
Leaderboard


Popular Content
Showing content with the highest reputation on 10/13/18 in all areas
-
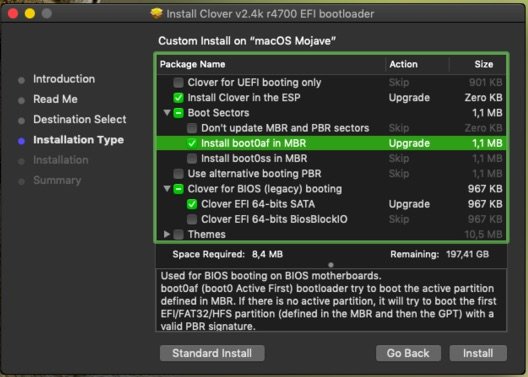
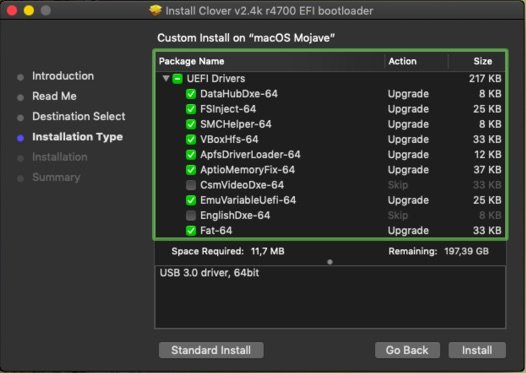
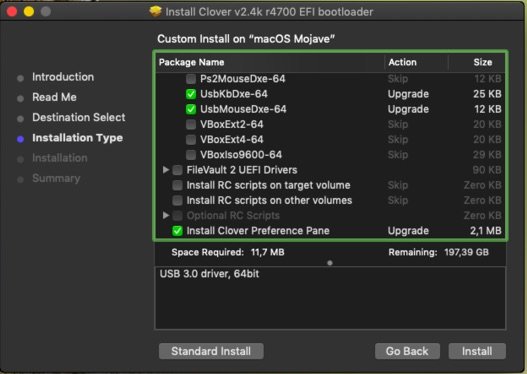
STEP 1: Download macOS Mojave The full operating system is a free download for anyone who has a Mac. 1. Purchase a 16GB or larger USB drive 2. Open Mac App Store 3. Log in with your Apple ID 4. Download macOS Mojave The Application Install macOS Mojave will appear in /Applications. STEP 2: Create a Bootable USB Drive with terminal. 1. Insert the USB drive 2. Open /Applications/Utilities/Disk Utility 3. Left corner click / View / Show all devices 4. Highlight the USB drive in left column 5. Click Erase button 6. For Name: type USB (You can rename it later) 7. For Format: choose Mac OS Extended (Journaled) GUID 8. Click Erase then Done 9. Copy paste the falowing command in terminal; sudo /Applications/Install\ macOS\ Mojave.app/Contents/Resources/createinstallmedia --volume /Volumes/UNTITLED --nointeraction && say Mojave Drive Created ( change UNTITLED with your erased usb name) STEP 3 Install Clover Bootloader on USB 1.Download Clover bootloader from internet, and install with settings from screenshots down below. 2.Replace your Clover folder from EFI with mine; INSTALL USB ASUS N73SV CLOVER MOJAVE STEP 4: Recommended BIOS Settings in general If you're installing on a recommended CustoMac desktop with AMI UEFI BIOS, the options are simple. For other systems make sure to set your BIOS to Optimized Defaults, and your hard drive to AHCI mode. For this Notebook Asus N73SV just Load Optimized Defaults 1. To access BIOS/UEFI Setup, press and hold Delete on a USB Keyboard while the system is booting up 2. Load Optimized Defaults 3. If your CPU supports VT-d, disable it 4. If your system has CFG-Lock, disable it 5. If your system has Secure Boot Mode, disable it 6. Set OS Type to Other OS 7. If your system has IO Serial Port, disable it 8. Set XHCI Handoff to Enabled 9. If you have a 6 series or x58 system with AWARD BIOS, disable USB 3.0 10. Save and exit. STEP 5: Install macOS Mojave All you need to do is boot from the USB drive and install! Insert the USB in a USB 2.0 port. 1. Turn on the computer 2. Press the hotkey to choose boot device (F12 for Gigabyte motherboards, F8 for ASUS motherboards, F11 for ASrock motherboards) 3. Choose your USB 4. At Clover boot screen, choose Boot OS X Install from Install macOS Mojave 5. When you arrive at the Installer, choose language. 6. For a new installation of macOS, you MUST erase and format the destination drive according to the following steps before continuing. • a. In the top menu bar choose Utilities, and open Disk Utility • b. Left corner click / View / Show all devices • c. Highlight your target drive for the Mojave installation in left column. • d. Click Erase button • e. For Name: type macOS Mojave (You can rename it later) • f. For Format: choose Mac OS Extended (Journaled) or APFS • g. Click Erase • h. Close Disk Utility 7. When the installer asks you where to install, choose macOS Mojave 8. Upon completion, the system will automatically restart. 9. Press the hotkey to choose boot device (F12 for Gigabyte motherboards, F8 for ASUS motherboards, F11 for ASrock motherboards) 10. Choose Install macOS Mojave USB 11. At the Boot Screen, choose macOS Mojave 12. Complete macOS installation. The system will automatically reboot. STEP 6: Post Installation The installation is complete, but the drive isn't bootable yet. Boot from the USB again, this time choosing macOS Mojave. 1. Press the hotkey to choose boot device (F12 for Gigabyte motherboards, F8 for ASUS motherboards, F11 for ASrock motherboards) 2. Choose USB 3. At the Boot Screen, choose your new macOS Mojave installation. 4. Complete macOS Mojave setup 5. Download Clover bootloader from internet, and install with settings from screenshots down below. 6. Replace your Clover folder from EFI with mine and reboot; CLOVER POSTINSTALL ASUS N73SV MOJAVE 7. At the Boot Screen, choose your new macOS Mojave HDD. 8. Fix Intel HD3000 graphics, download Intel HD3000 Fix Mojave zip from down below, and install the kext in S/L/E ( kext its clean, extracted from macOS Sierra image) 9. Fix Wifi Atheros AR9285, download AirPortAtheros40.kext zip from down below, and install the kext in S/L/E. ( kext its clean, extracted from macOS High Sierra image) 10. Reboot You are done.. installation is complete, you have a full functional MacBook Pro - Asus N73SV ! Not working Nvidia GeForce GT 540M! AirPortAtheros40.kext.zip CLOVER POSTINSTALL ASUS N73SV MOJAVE.zip INSTALL USB ASUS N73SV CLOVER MOJAVE.zip Intel HD3000 Fix Mojave.zip
 1 point
 -
Use the bootpack from here instead1 point
-
Can anyone help me with post installation of my ASUS K556UR Laptop. I already installed macOS Sierra 10.12.6. Everything working fine with different kexts found from so many places. My Issues are (1). PS2 Keyboard working fine with RehabMan's Voodoo PS2 Controller.kext. But Trackpad not working. I can use USB Mouse. (2). My Ethernet is working, Tried to install kexts for Atheros 9565 Wifi. Wifi is On, but cannot find any networks. (2). Installed ASUSNBFnKeys.kext and got most of the function keys working (Fn+f1 - Sleep, Fn+f10 - Mute, Fn+f11 - Decrease Volume, Fn+f12 - Increase Volume, Fn+Down Arrow - Play etc). But some other not working (Fn+f2 - Wifi / BT, Fn+f5 - Lower Brightness, Fn+f6 - Increase Brightness, Fn+f9 - Touchpad). I strongly believe because of this my Touchpad and Wifi not working. I have read DSDT need to be patched to get al the Fn keys to work. I need help for getting it done. Currently I am not using any DSDTs. My Laptop Configuration is as below. Intel Core i7 7500 Kaby Lake 24 GB of RAM (8GB Built in + 16GB) ASUS K556UR 2 TB Seagate FireCuda SSHD Intel HD 620 / Nvidia G930MX
1 point

This leaderboard is set to London/GMT+01:00