


Zackptg5
-
Posts
69 -
Joined
-
Last visited
-
Days Won
1
Content Type
Profiles
Articles, News and Tips
Forums
Posts posted by Zackptg5
-
-
Finally got around to installing El Capitan on it. Got everything up and running like before. Just took some updated kexts, clover patches, and the usb fix (the FakePCIID_XHCIMux and USB rename dsdt patch). Updated the guide with the new stuff.
On another note, I attempted the upgrade process with clover and it surprisingly worked...somewhat. There was some glitchiness with stuff like sound and graphics stuttering so I just washed my hands of it and did the old fashioned clean install which worked like a charm.
-
I've never used the EDP myself but there are some modifications such as the dummyhda that isn't present in the edp bootpack. I'd follow the manual steps
-
That's the same problem I ran into with clover which is why I ended up using chameleon. Then my laptop died before I got the chance to figure it out. But there is a device properties box in clover I think under boot or GUI or something like that along with a checkbox under it.
-
Woops, good catch.
-
what do you do with the 670m.hex file after you download it???
In chameleons boot.plist file in E/E, create a new string called device-properties.
Then open the hex file with textedit, then copy the contents of it to the device-properties in the boot.plist
-
I haven't tried it yet but there's no reason why it shouldn't. Everything should be the same except the added clover steps to disable the new security features present in el capitan
-
It depends. From what you're describing, your windows 8 install is not UEFI but legacy. Chameleon is the same. Clover on the other hand can boot UEFI or legacy depending on how you install it.
So to answer your question, both.
Chameleon is the tried and true boot loader and what I would recommend using if you're new to the whole osx86 scene.If you're more of an experienced osx86 user and/or consider yourself to be tech savvy, than I would recommend clover. Clover has far more options and is far more complex than chameleon as a result, but if you learn it, you can get a more vanilla build than with chameleon.
My laptop (Gigabyte P35G v2) is completely upgrade proof with clover. I can run OS X updates from the app store (such as 10.10.3 to 10.10.4) just like on a real mac without having to reinstall and kexts or patches because any such mods are run through clover at boot. Getting it to that point took a lot of work, but if paid off.
Clover has a lot of documentation to read up on (and some of it is out of date which makes it a little more complicated) but is what I use for all of my builds now. I used chameleon back in my earlier days
-
 1
1
-
-
No problem

Updated guide for 10.10.4 (easiest update ever by the way, I literally just ran the update from the app store and did nothing else: most vanilla hackintosh update I've ever taken)
Edit: Updated to 10.10.5, same process as 10.10.4
-
You can extract them from Windows but the Linux method gets fewer errors in the long run. Learned that lesson the hard way. So yes, linux only
-
Check out my guide here for an AppleHDA audio solution, backlight control, and TRIM support: https://osxlatitude.com/index.php?/topic/8102-gigabyte-p35w-v2/
My battery patch may work for your laptop too. You just want to use Rehabman's ACPIBattery, rolling back AppleACPIPlatform and such is not good or power management and such.
Also, for your dsdt and ssdts, you need to extract them from linux like I did in my guide or you'll get all sorts of weird errors.
-
Special Thanks:
Rehabman for helping me troubleshoot the various issues I had and helping me work them out
EmlyDinesh for adding a custom fix to his ApplePS2SmartTouchpad kext for the brightness keys to work properly
All developers who engineered the various tools/kexts/patches/etc to get this working
Specifications:
- Processor : Intel Core i7-4710HQ Processor (6M Cache, up to 3.50 GHz)
- Graphics Processor (GPU) : Intel HD Graphics 4600 and Nvidia 860m 4gb
- Chipset : Intel HM87 Express Chipset
- Hard disk : Crucial MX200 256gb mSata SSD
- RAM : 16GB DDR3L 1600 MHz SDRAM
- Wifi : Intel Dual Band Wireless-AC 7260 (Swapped out for: Azurewave AW-CE123H (BCM4352))
- Bluetooth : Intel Dual Band Wireless-AC 7260 Bluetooth 4.0 (Swapped out for: Azurewave AW-CE123H (BCM20702))
- LAN : Realtek RTL8166G/8111G PCI Express Gigabit Ethernet
- Audio : Realtek ALC282 High Definition Audio
- USB 3.0 : Intel 8 Series Chipset Family xHCI Host Controller
- Touchpad : Elan v4 Touchpad
- Webcam : USB2.0 UVC HD WebCam
- Card reader : Realtek RTS5227 PCIE Card Reader
- Monitor : 15.6 LCD 1920x1080
- Optical Drive : DVD±RW (±R DL) / DVD-RAM
Interface :
- 1 x Microphone-in jack
- 1 x Headphone-out jack
- 1 x VGA port/Mini D-sub 15-pin for external monitor
- 2 x USB 3.0 port(s)
- 2 x USB 2.0 port(s)
- 1 x RJ45 LAN Jack for LAN insert
- 1 x HDMI
- 1 x SPIDIF speaker out (same physical jack as Headphone-out)
- 1 x mini Display Port
Working:
- Graphics with Acceleration
- Audio
- Bluetooth
- HDMI
- mini Display Port
- LAN
- USB3.0
- Webcam
- Optical Drive
- Battery
- Card reader
- Synaptics Touchpad
- Sleep, Processor P&C-States with Native power management
- Fn Hotkeys
Not working:
- Intel Dual Band Wireless-AC 7260 (need to replace with supported card, I replaced with BCM4352)
- HDMI Audio is choppy and unusable
- Realtek Card Reader
For Installation:
EDP STEPS:
Follow the Steps in the link below, starting with Pre installation, Installation and Post Installation:
http://www.osxlatitude.com/edp/documentation/
(OR)
MANUAL STEPS:
In bios, disable secure boot, delete secure boot keysFormat hard drive as GPT/GUID
Clover Install Steps:
Make Clover usb drive using this command (replace "Cap" with name of USB drive):
sudo /Applications/Install\ OS\ X\ El\ Capitan.app/Contents/Resources/createinstallmedia --volume /Volumes/Cap --applicationpath /Applications/Install\ OS\ X\ El\ Capitan.app --no interaction
Then use following options for installing clover to usb drive:
- Install for UEFI Booting only
- install clover in the esp
- Drivers64Uefi->OsxAptioFixDrv-64
- Install RC scripts on target volume
After making clover usb drive, open usb drive with Clover Configurator app and change the following:
- In ACPI: Uncheck "FixAirport"
- In Boot: Check "kext-dev-mode=1" and "nv_disable=1"
- In Install Drivers: delete VBoxHFS, install HFSPlus UEFI
Then add ApplePS2SmartTouchpad, FakeSMC, NullCPUPowerManagement, and RealtekRTL8111 to 10.11 kexts in usb drive EFI partition
Then boot from it and install normally
Post Installation:
Bootloader: Clover
Clover Install Options:- Install for UEFI booting only
- install clover in the esp
- Drivers64UEFI->OsxAptioFixDrv-64
- Install all RC scripts on target volume
- Optional RC Scripts
Clover Config/smbios:
- See attached config.plist, too much to list config.plist.zip
Kexts (All kexts installed to S/L/E)
- latest fakesmc, plugins (except LPCSensors), and hardware monitor
- In fakesmc info.plist -> change "smc-name" to "smc-huronriver"
- and change the values in keys: "REV", "RVBF", and "RVUF" to:
- "<02060F00 0059>" for mbp 11,2 smbios
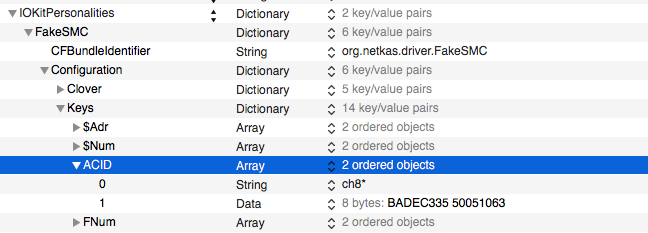
-
Add key "ACID" as shown in attached picture
- ApplePS2SmartTouchpad.kext for mouse, trackpad, and keyboard
- In Content->Plugins->ApplePS2Keyboard Info.plist, set fn mode to "3" and Layout to "GIGABYTE"
- RealtekRTL8111
- Rehab man's ACPIBacklight.kext
- Rehabman's ACPIBatteryManager.kext
- Bluetooth Firmware Uploader
- Custom aDummyHDA aDummyHDA.kext.zip
- CodecCommander
- FakePCIID
- FakePCIID_HD4600_HD4400
- FakePCIID_Intel_HDMI_Audio
- FakePCIID_XHCIMux
Sound
Install DummyHDA1) Go to Audio Midi Setup in Utilities and create a new multi-output device
2) Check both speakers
3) Make sure both speakers under the multi-output device have the same sample rate (I'm using 48000hz)4) Install SoundSiphon, in its preferences, make the multi-output device the pass through device
5) Make SoundSiphon default output device - now you have volume control over multi-output device
Note: Whenever headphones are plugged in, you will need to manually select it as the output device
DSDT/SSDT Patches
Note: All SSDTs and DSDT go into EFI/EFI/CLOVER/ACPI/PatchedNote2: Make sure you install the patches in the order listed
Extract DSDT/SSDT (taken from Rehabman's guide)
Copy dsdt and all ssdts from linux (located in /sys/firmware/acpi/tables) - ignore the tables in the "dynamic" folder
In osx, download aisle here: https://bitbucket.org/RehabMan/acpica/downloads
In OS X Terminal:
cd "to directory where you placed all SSDT/DSDT"
iasl -da -dl *.aml
**From this point on, we're only working with the .dsl files
Repositories to add to MaciASL:
- Rehabman Laptop: http://raw.github.com/RehabMan/Laptop-DSDT-Patch/master
- Toleda Realtek ALC: https://raw.github.com/toleda/audio_ALCInjection/master
- Toleda Airport: https://raw.github.com/toleda/wireless_half-mini/master
- PJALM Graphics: http://maciasl.sourceforge.net/pjalm/graphics/
- PJALM Gigabyte: http://maciasl.sourceforge.net/pjalm/gigabyte/
- PJALM General: http://maciasl.sourceforge.net/pjalm/general/
SSDT:
Generate ssdt with PikeRAlpha's Script - name it SSDT.aml
Patch all linux ssdts with:
into_all all code_regex _T_([0-6]) replaceall_matched begin T_%1 end;
Patch ssdt3 with:
- Rehabman Laptop: Remove _PSS Placeholders
Patch ssdt6 with:
- Rehabman Laptop: Brightness Fix (Haswell), Haswell HD4600 Yosemite, Rename B0D3 to HDAU, Rename GFX0 to IGPU
Patch ssdt7 with:
- Rehabman Laptop: Rename GFX0 to IGPU, Cleanup/Fix Errors (SSDT), Disable from _INI (SSDT) *Uncomment the External line from the INI patch*
- Delete the line: \_SB.PCI0.LPCB.H_EC.TDRF (One) from Method SGOF
Patch ssdt8 with:- Rehabman Laptop: Rename GFX0 to IGPU
DSDT (Note: The order for the patches below is important):1) Rehabman Laptop: Fix PARSEOP_ZERO Error2) Rehabman Laptop: Remove _DSM Methods3) Custom Battery Patch Gigabyte P35w v2 Battery Patch.txt4) Custom Screen Brightness Patch Screen Brightness Keys Patch.txt5) Rehabman Laptop: Add IMEI6) Toleda Realtek ALC: Enable Audio ID: 37) Toleda Airport: BRCM94352 - Note: In the patch, change RP05 to whatever your device is under (check in ioreg)8) PJALM Graphics: Intel Haswell MEI9) Rehabman Laptop: Rename B0D3 to HDAU10) Rehabman Laptop: Rename GFX0 to IGPU11) Rehabman Laptop: IRQ fix12) Rehabman Laptop: Usb_prw_0x0d_xhc13) PJALM Gigabyte: Generic Series 814) Rehabman Laptop: OS Check (Windows 8)15) Rehabman Laptop: RTC Fix16) Custom Disable from _Reg (DSDT) Patch Disable from _REG (DSDT) Mod.txt17) PJALM General: USB - Device Renames for OSX 11.1118) Search for method XWAK and add Return(0) underneath itImportant Notes:- There is an issue with the sound card in that at first boot and after sleep, sound will not play out of the front speakers or subwoofer. This is remedied by adjusting the volume with the fn keys. The same issue is present in ubuntu but no fix has been presented as of yet. The more people who add themselves to effected will increase the odds of a fix. See bug report here: https://bugs.launchpad.net/ubuntu/+source/alsa-driver/+bug/1366241
- Due to nvidia optimus not being supported in OS X, the nvidia card had to be disabled. This could be done in the bios but that would be a hassle when switching to windows so instead it was disabled in the dsdt and corresponding ssdts (see Rehabman's guide for details). This is why the nv_disable=1 flag is needed with the clover installer but not with the actual install once everything is done.
- This specific intel hd graphics is not supported in OS X and so a combination of clover fake id, Rehabman's fakepciid kexts, and some AppleIntelFramebufferAzul patches had to be used to remedy this
- 5ghz wifi and bluetooth handoff have been enabled with various clover kext patches
- Sound was enabled with AppleHDA clover patches and the use of DummyHDA
- For TRIM support, go into terminal and type: sudo trim force enable
-
Works with the Gigabyte P35w v2 with keyboard on PS2X with _Q28 as brightness down and _Q30 as brightness up
-
1F tapping and clicking not work. 2F and other work good.
OS X10.10.3, Clover 3202, Touchpad driver 4.3.
SYNAPTICS touchpad ,firmware unknown.
If you have synaptics trackpad, usr voodoops2 instead: https://bitbucket.org/RehabMan/os-x-voodoo-ps2-controller/downloads
-
Hi Emly, I have the Gigabyte p35w v2 laptop with elan touched. Touchpad works great and keyboard too except one issue: both the down and up screen brightness key acts the same by lowering the screen brightness. In other words, the up key does the down action too. After much troubleshooting here: http://goo.gl/MfR2U1
Rehabman deciphered that the issue was that both ps2 F14 and Acpi signals were being sent by the keyboard and in order to get it to work properly, we had to make a dsdt patch for the two keys:
into method label _Q28 replace_content
begin
// Brightness Down\n
Notify(\_SB.PCI0.LPCB.PS2K, 0x0205)\n
Notify(\_SB.PCI0.LPCB.PS2K, 0x0285)\n
end;

into method label _Q30 replace_content
begin
// Brightness Up\n
Notify(\_SB.PCI0.LPCB.PS2K, 0x0206)\n
Notify(\_SB.PCI0.LPCB.PS2K, 0x0286)\n

end;
and disable the ps2 action as it was interfering with the Acpi action.
The ps2 action that needed to be ignored was 65 and this was able to be done by adding it into the custom keymap of voodoops2keyboard
65=80 (80 is nothing)
but I couldn't find that functionality here and this is the only kext that gives me working trackpad.
This was all done on OS X 10.10.3 but I don't think the OS X version really matters with this case. If you could implement this into the keyboard driver or implement a way that I could use voodoo keyboard with your touchpad driver that would be great. Thanks!
-
I tried every combination of 'NONE' - Fn Keys 1,2,3 and 'ASUS' - Fn Keys 1,2,3 and couldnt get it to work. The issue is that my keyboard has a 'fn' button and for the characters that I need on the right hand side of the keyboard I need to press this 'fn' button, if not it acts like a numpad almost.
Suggestions please?
EDIT: figured it out - I had to switch the Numlock On to false. each time you make a change to the kext, does it need to be reinstalled via a kext utility? just making the change in the kext in s/l/e did not work, I had to reinstall it.
Yup. Any change to the internals of the kext requires it to be reinstalled/kext cache repaired
-
so I was able to boot via single user and see that when i was typing my password the letters on the right side of my laptop keyboard needed the FN key to be pressed if not numbers were getting displayed. i was able to go in and delete the 'appleps2elantouchpad.kext' rebuild the kernel and reboot just fine.
now the question is if there is a driver for the touchpad on this asus laptop without affecting the keyboard.
thanks
Did you read the documentation here: https://osxlatitude.com/index.php?/topic/5969-details-about-the-enhanced-keyboard-for-smart-touchpad-driver/
Try changing the fn mode to 3 and using ASUS vendor. Due to the complex nature of this kext and vast number of systems it supports, odds are it won't work without some adjustments for your system
-
Everything is working fantastically except one thing: the fn key to increase screen brightness lowers it instead. The decrease screen brightness key works correctly though. It's not an issue with this kext but likely with my dsdt/ssdt as the same thing happened when I just used clover dsdt injections and rehab man's voodoops2 kext. How can I fix this? Thanks
-
I'm not sure if this is an EAPD issue or not, but I have the realtek ALC 282 audio codec. I got everything patched and working with DummyHDA and Clover and I have EAPDFix installed though I'm not sure yet if it's needed.
The issue is that when I boot up my laptop (and after I resume from sleep), the speakers don't work until after I play music or sound for 7 minutes or so (doesn't matter what device I'm playing it through whether it's bluetooth or headphones). However, the headphones do.
My laptop has two separate speaker nodes: front speakers and subwoofer. Only the front speakers are EAPD, nothing else is (not even the headphones which share the output node with it).
The weird thing is that both the subwoofer and the front speakers have this problem.
Edit: Seems to be unrelated to EAPD as it occurs in linux too: https://bugs.launchpad.net/ubuntu/+source/alsa-driver/+bug/1366241
-
So I have a via1802 codec that even though it refused to completely work with AppleHDA, I got it working fully with VoodooHDA. When I put my laptop to sleep for a short time, upon wake, sound works fine. But when I put it to sleep for a long time, the sound doesn't work upon wake.
I've tried this kext but it says in the console:
com.apple.kextd[20]: /System/Library/Extensions/EAPDFix.kext - no dependency found for com.apple.driver.AppleHDAController.
I'm assuming that this depends on AppleHDA and it's plugins being present? Is there a way to use this without AppleHDA? I removed AppleHDA for the obvious reasons of avoiding a kernel panic since I use VoodooHDA.
-
After solving a black screen issue (GraphicsEnabler doesn't appear to work properly in yosemite), I got yosemite installed. Updated the guide.
For this laptop: mountain lion and yosemite work great, mavericks sucks. I'm sure many other users will draw the same conclusions for their computers
-
Perfect! That fixes it
-
dsdt patches updated with keyboard backlight sleep fix
-
Hey Emly, everything with this driver works great except an issue I hadn't noticed before was pointed out to me. After wake up from sleep, the keyboard backlight shuts off and doesn't turn on again (fn keys do nothing). The console says nothing concerning the kext except except says this when I adjust the screen brightness with the fn keys (which works fine with efi string):
9/24/14 3:18:31.000 PM kernel[0]: AsusNBFnKeys: GPU device not found
-
Like herve said no-one has been able to get the 660m working on osx. Its a bios issue

Asus G75VW help topic
in The Archive
Posted
If you follow the guide, multi touch does work. Asus g75vw has Intel graphics disabled by the manufacturer so that's moot point. I've never tested spdif out but in theory they should