Search the Community
Showing results for tags 'dell'.
-
I have the Optiplex 760 USFF and have it set up with myHack and Mavericks 10.9.3. The only two issues are this: No sound have installed Vodoo HDA. Screen flickers when using Safari and Quicktime. Any help would be great. Optiplex 760 USFF Intel Core 2 (Intel Q43 Express) 4GB Memmory 1TB HD Audio device: Intel Corporation 82801JD/DO (ICH10 Family) HD Audio Controller VGA compatible controller: Intel Corporation 4 Series Chipset Integrated Graphics Controller Display controller: Intel Corporation 4 Series Chipset Integrated Graphics Controller
-
I'm trying to get Mavericks running on my Dell Latitude E6510. I see that there's not even an option for it in your compatibility database here... but there is for e6520. I assume these two can't be too much different, right? Anyway... I have tried all bootflags and serveral different bootloaders. Sometimes I will get the Mac initial setup sounds but a black screen or just the spinning apple logo. When I run verbose all I can see that may be wrong is the applebatterymanagement keeps saying "failed' over and over and over... any suggestions?
-
Hi all! Tell me pls, how to enable wifi on my dell inspiron n5050 with os x 10.9.*?
-
I was currently given a Dell E6440 that is no longer needed. I wasn't sure if there was a guide for this system yet. It runs an i5-4300m, Qualcom Wireless chipset, and intel GFX chip. I was looking to get a Hackintosh setup on it but since there doesn't seem to be much in the way of setting one up. I can install whatever OS may be needed in order to get information that the community may need to get this hardware working. Thanks!
-
The system: Dell Precision Workstation 390. Intel Xeon x3230 CPU. 4GB OCZ RAM, ASUS Radeon 7850 PCIe. I've prepared MyHack 3.3 on a 16GB Flash Drive. Boot up from USB. Checked BIOS Settings. Get past language selection, barely. I then get a message stating: The OS X Installation couldn't be completed. And I have a log of the install. I've checked my BIOS per the MyHack 3.3 instructions. Only pertinent option was the SATA/RAID controller set to AHCI. I've looked for several keywords none of which brought me relevant information. Maybe someone, somewhere has a machine like this they've setup for MacOS before? Thanks, Paul
-
 Two problems: Wireless Cannot Find Networks I installed an Atheros AR5BHB112 as recommended on the supported/unsupported card thread. It is detected but cannot find wireless networks. I tried to manually enter my wireless network information, but it could not find it/connect in either clear or WEP modes. My SSID is not hidden. lspci -nn returns: 03:00.0 Network controller [0280]: Atheros Communications Inc. AR9300 Wireless LAN adaptor [168c:0030] (rev 01) I've tried running MyFix quick and full and have rebooted several times with no success. The old Dell card had two antenna hookups for ch 1 and 2; I attached those to ch 1 and 2 on the Atheros card. There was a third cable that was unused; I attached that to ch 0 on the Atheros card. Is this where I went wrong? Keyboard Layout Is Not Saved I use a Japanese keyboard layout. When I reboot, the computer reverts to a US layout and I have to go to Keyboard Settings to redetect it. Is there a way to permanently set it to a Japanese layout?
 -
OS X 10.7.3 is working well on Dell Inspiron 6400. Everything works except sleep. I could not test sleep as my power button is broken and I use the MediaDirect button to start my laptop. I have not used any DSDT or injection. I have not had a single KP so far. Please note that upgrading to 10.7.5 and above will break the OS, it will boot to a blank screen. if you patch the AppleIntegratedFrameBuffer.kext, it will panic as the patched version is not supported beyond 10.7.4. To get it to work on 10.7.4, you need to patch AppleACPIPlatform.kext with the one from Snow leopard 10.6.8 and also patch the AppleIntegratedFrameBuffer.kext. Since I was happy with the performance of 10.7.3, I decided to stay on this version. All the native OS X softwares like Aperture, iWork etc and third party softwares like Adobe products, office for Mac etc. run without any issue. My Inspiron 6400 configuration is as follows: Intel Core2Duo 7200 with 64bit support; Intel ICH7 family chipset optimized by Dell Onboard Intel 945GMA video driver with 64MB shared memory; (1680x1050 full resolution, QE/GL everything works including mirror) : patched with AppleIntegratedFrameBuffer.kext (version 1.4.20.28) 4GB 667Mhz DDR2 RAM, RICOH R5C822 memory card reader (in-built), (works well with patched VooDooSDHC.kext) 2-port UBS 3.0 ASMedia 1042 Express Card in ExpressCard slot; (works with native AppleUSBHub.kext and patched CallDigitUSBxHCI.kext), CallDigitFastO.kext is optional but recommended) 500GB SATA HDD; Onboard Broadcom 440family ethernet; (works with AppleBCM400.kext) Broadcom BCM4322 mini-wifi card, (works Out of the Box, no need for any additional kexts) Sigma Tel Stac9200 onboard Audio Device : (Works with VooDooHDA (version used 2.7.2) Trumobile 350 bluetooth card : (Works OOB) Slot loading CDwriter/DVD ROM I will attach a list of kexts that I have used and also the Extra folder which includes my edited chameleon.plist and smbios.plist. For the patched kexts, you may need to patch with your Dev-id and Ven-id of your hardware. Prerequisite: You need to find a working OS X Snow Leopard machine to create a bootable USB stick of OS X Lion patched with AppleIntegratedFrameBuffer.kext from here. Any windows software like MacDrive to access OS X partiton from windows to edit the Extension folder after fist install. You will need to edit the info.plist of some of the kexts to insert the Ven-id and Dev-id of your hardware for full compatibility. I can post a full tutorial on request. I am multiboot (chameleon, stolen and rebranded)ing with Lion/Linux/Windows 8/Windows 7 and Windows XP from a single drive. Regards OS Lion on Inspiron 6400.zip
-
Hello, i am installing os x mavericks on my dell latitude e6400. I followed a guide, and it used myhack. Before, i could not get to the installer, but the guide told me to copy dsdt.aml, and some other kexts to my usb which got me to the install screen without any boot flags. I successfully installed, and the last part of the guide said this: "Once you installed maverick, the same files you added to the USB installation , go ahead and add them to your system HDD. Assuming you already know you need a working mac to accomplish this. You might need to connect the harddrive where you installed Mavericks to a working Mac using a USB adapter or else. Be creative. Follow the same steps. " I did not know how to do this, so i ignored it. I tried to boot, i got stuck in the same place i was before copying the files to the usb. Can anyone help me follow this last part because to create myhack, i used a virtual machine, and i dont knnow if a virtual machine would work in this case. Although, i know that this is the step that didn't get my comp to boot. I appreciate your help because i have been trying this for half a year with no luck.
-
Hi Everybody! Wanted to ask anyone has experience in installing or any sort of possible options to get OSX on this notebook? I, myself tried to get 10.8.2 to install, the USB drive is booting fine, install boots up. (I just don't have any built in space on my HDD and wanted to try it on a USB/External device and could not, it didn't recognize it as possible install device. All comments are welcome!
-
Hi there, I got a Dell Precision M 70: CPU: Pentium M Dothan 2.13GHz FSB 533MHz Motherboard: chipset Intel 915 PM with 2 gig Ram Graphics: NVIDIA Quadro FX Go1400 with 512MB Audio: Sigmatel 9751 Broadcom NetXtreme 57XX Gigabit Lan (does not work on Mac OS X, IP address is 0.0.0.0) Broadcom BCM1450 DWI wireless adapter, instead of the original Intel Wireless 2200BG adapter, since no Internet access was possible with it. The only restriction by the Broadcom 1450 is that it only works with a Wep encryption. I´m running an Mac OS X 10.5.2 on it, which I got (about 5 years ago) from a friend via USB drive and CarbonCopyCloner, because Kalyway 10.5.2 Install hung up after 1 min caused by the BCM5751E Ethernet: " 1659 setPowerLevels - returning early have a 5721onoff = fPciDeviceceld =" while a DVD iFail 10.5.5 installs Leopard, but then kernel panics while booting. We blessed the system in the terminal by means of a bootefi folder from the network in which all the relevant files / folders - usr - standalone - i386 - boot with the files boot0 , boot_V8 , boot1h , boot1u , bootefi , cdboot , chain0 and folders guid and mbr were included by the following instructions: - Easy installation --- For Single-Booting systems --- Copy the folder "bootefi" and all included files/folders to the root directory of either a USB Thumb drive, or a USB hard drive, click on the Utilities menu and select "Terminal". Then enter the following commands: sudo -s (then enter your root password) cd /Volumes/usbvolname/bootefi where usbvolname is the volume name of the USB Thumb drive, USB hard drive, or second internal drive where the "bootefi" folder was copied to. ./bootefi.sh installvolumename where installvolumename is the volume name of the drive that OS X was installed to. The installvolumename should be surrounded by double quotes. Example: ./bootefi.sh "MacHD" or ./bootefi.sh "Macintosh HD" I have the M 70 dug out again after a long time of abstinence, but now the hdd is causing problems ... pending sectors etc , so I have the current system 10.5.2 cloned via CCC to a new hard disk. Unfortunately, the above method doesn´t work any more, it hang up by a blinking cursor L However, since iTunes is on version 9, Firefox on version 2 and Safari on 3.1, so they are no longer state of the art. I can´t receive for example e-mails , etc updates are not availible cause I would need to have 10.6.8 installed to do so. Therefore I would rather prefer to change to something more up to date like Snow Leopard 10.6.8, or if it is possible even Lion or Mountain Lion. Has anyone ever attempt that on an ol ' M 70? What do I have to care for ? Does anyone have any instructions for me? Thank you for answering please excuse my bad English Cheers

-
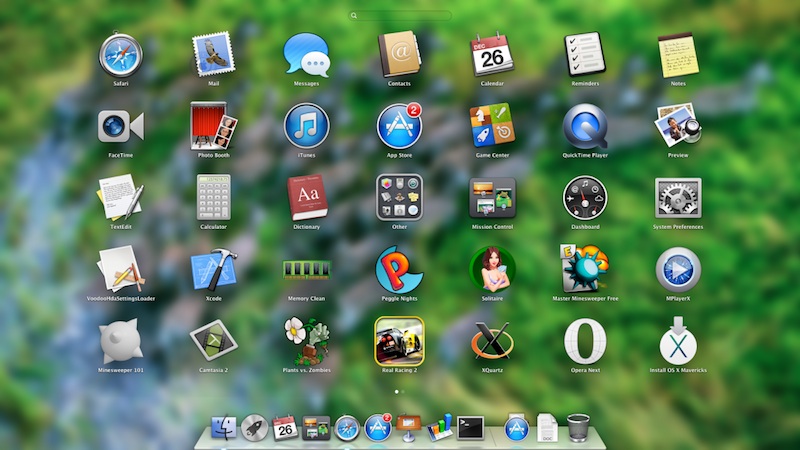
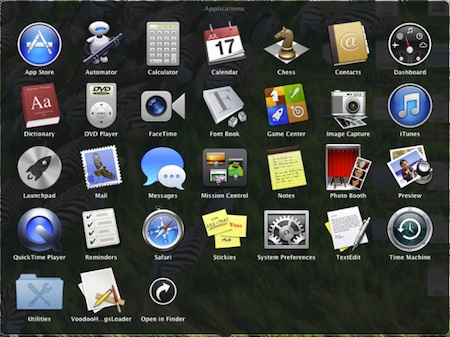
 After a reinstallation of Mac ML 10.8.4, launchpad has all applications that I installed before & after the reinstallation, but Applications folder has only applications that I installed after reinstallation. Is there any fix? I have provided screenshots below. Screen Shots: Launchpad View (I only provided one page) Applications folder view. There is less than the Launchpad folder
-
Okay so I want to install Snow Leopard on my e6500. I have the genuine snow leopard cd imaged to a thumb drive. I'm not sure what to do from here. The only thing I've hackintoshed in the past was a dell mini 9, which was a breeze. Thanks for your input!
-
I have been using the myHack software to try to load mavericks on my Dell Latitude 530s. I have checked the bios settings and found out there is no ACHI mode, so i could not set that. The installer loads up fine and seems to be ready to install but only shows my flash drive after being connected. What should i do to fix the problem.
-
i7-3740QM Processor Nvidia Quadro K1000M + HD4000 Video Thanks, Mark
-
Looks like today I'm lucky.. I'm using osX 10.9 on my M6400 Intel Qx9300 - nVidia quadro FX 3700m - IDT audio First of all I used MyHack solution 3.3 + the mbr patch for mavericks (still unsupported in myhack whilewrithing) I also put in extra my DSDT from a previous 10.6.8 osx install booted with graphicenablers=no and good old npci=0×2000 (truth is i modified org.chaemeleon.boot.plist with chameleon wizard and also set graphics mode to 1920x1200x32) I had to remove all NVDA kext from extesions folder to make it bot as was hanging on a black screen suddenly. however I installed and the pc booted completely.. now I'm tryin' to fix other stuff working: Checking now but almost everything to just use it keyboard and touchpad WiFi (but I have a Atheros board that worked out-of-the-box) audio (just used old Applehda and hdaenabler for IDT audio from SL) not working Audio (I'll try with patched Applehda and hdaenabler for IDT audio) full Graphic Acceleration (I dont know why.. the system detect it correctly both using DSDT or graphic enabler and everithing looks like is there but there are glitches in chess and topbar is not translucent) I'll make this first post better when I'll have more results
-
Hello everyone, I have a Dell Inspiron 15 (N5050) with i3 processor. It has IDT 92HD87B1 sound card which probably can be used with VoodooHDA. I would like to run Mac OS X Mavericks 10.9. I am also fine with Mac OS X Mountain Lion 10.8.4 or 10.8.5. It has an Intel HD Graphics 3000 graphics card. I need the WIndows preinstalled on this machine. Will it work with MBR partition? Thanks vgupta
-
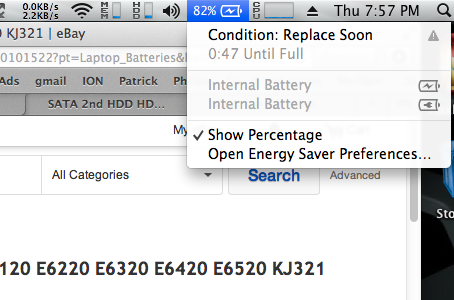
I was stumbling around eBay and found this little addition to my E6520. It's a genuine Dell External Battery. It is compatible with a lot of Dell units. It is kinda cool in that it elevates my E6520 up off of surfaces so it should help with cooling it better. It only snap/plugs into the expansion slot and the two holes adjacent to the slot. It has a small handle on it that you can pull to release the battery from its mating position. I believe the two holes in the upper left corner of the picture are first, charge indicator and then a charging port so you could possibly charge the external battery by its self. They range anywhere from 60 to 140 dollars depending on new or refurbished condition. I also noticed that my battery indicator in the status bar seems to be working now. I can even see the current percentage of charge. Im happier.
-
Updated 03 october 2013 - Fixed correct links to files - Latest PDF version 2.4 with date 03 october 2013 Updated 02 october 2013 - Celebrating 1 year Mountain Lion tutorial 780 - Added update 10.8.5 steps in the document - Videofix must be done manually - Latest PDF version 2.4 with date 02 october 2013 Updated 16 June 2013 - New Install780.zip with Old VoodooHDA.kext because of audio issues after reboot Updated 08 June 2013 - Added update 10.8.4 steps in the document - Added new zip file Videofix1084.zip for update 10.8.4 - New Install780.zip with new VoodooHDA.kext - Latest PDF version 2.3 with date 08 June 2013 Updated 03 June 2013 - Text changes in Chapters 6.11, 13.2 and 15.7 - Added extra text in chapter 15 about skipping parts, depends on wich ML version you are using - Latest PDF version 2.2 with date 03 June 2013 Updated 19 April 2013 - Added update 10.8.3 steps in the document - Added new zip file Videofix1083.zip for update 10.8.3 - Latest PDF version 2.1 with date 19 April 2013 Updated 27 Februari 2013 - Added version number of PDF Document and date stamp of modification - Latest PDF version 2.0 with date 27 Februari 2013 Updated 18 december 2012 - Some text changes in Chapter 13 about kext utility.app. - Thks goes to Pingu for the changes. Updated 22 october 2012 - fixed correct links to Chapters 11. - Some text changes in Chapter 7,10,11 and 15. - Thks goes to julianarevalo for the changes. Updated 08 october 2012 - fixed correct links to Chapters. - Add Numbers to Chapters. - Some text changes. - New uploaded PDF File. Run OSX Mountain Lion on a Dell Optiplex 780 This tutorial will describe the steps to install Mountain Lion on a Dell Optiplex 780 (this will also works on a 760). The installation goes to the latest update 10.8.5, and when there is a new update i will change the tutorial as soon as possible. If you find any mistakes or have something to improve then please send me a PM and i will update the tutorial. You can also see my configuration on the OSX86 Wiki Project Page. I have also included the PDF file of the guide and the zip files to install Mountain Lion. A special thanks goes to Brian from Tech Erra for using parts of their tutorial. I am from The Netherlands so sorry for my bad English. 1. Credits/Sources Everything OSx86-related is a collaborative effort amongst people who enjoy doing these things, as well as those of us who enjoy tweaking and experimenting with things. Below are a list of sources used to compile this guide: Tech Erra OSX86 Wiki InsanelyMac OSX86.net Forum member Pingu from Germany for helping me out with the text changes. And all other forum members who have posted in my topic and helping out the community. 2. Requirements Here are the requirements: A Dell Optiplex 780 – This is necessary to install mountain lion for this tutorial A copy of Mac OS X – This can be in the form of an existing hackintosh, a virtual machine within Windows or Linux, or even a regular Mac. If you don’t have any of these things, then find someone who can help you out for a while. I prefer using a hackintosh with OSX Lion. Using an already working copy of Mac OS X either in a VM or a native hackintosh install is HIGHLY recommended. A 8GB USB flash drive (or larger) – We’ll be copying the files to the drive appropriately, so make sure that you have a flash drive with enough storage space (8GB or larger). A copy of Mountain Lion 10.8 GM – If you don’t have a Mac Developer Account, then you’ll find torrents of 10.8 around the web. 30-60 minutes of time – Depending on how tech-savvy you are, this may be quick, or it may take a while. An SSD or HDD to install 10.8 to – For me, I used a 160GB partition to install 10.8 to. An PCI Express Video Card – For use with QE and CI Highly recommended. I use a Ati Radeon HD5450 512MB but 1GB or 2GB also works. Boot780.zip – This ZIP file contains everything that you need to get your flash drive properly prepared. Install780.zip – This ZIP file contains everything that you need to get your Dell Optiplex Hardware to work with Mountain Lion OSX. Videofix1083.zip – This ZIP file contains kext files for the videofix in 10.8.3( see chapter 15). Videofix1084.zip – This ZIP file contains kext files for the videofix in 10.8.4( see chapter 16). Note: The files for number 8 Boot780.zip contains the following:FakeSMC.kext NullCPUPowerManagement.kext EliottForceLegacyRTC.kext OSInstall (Not used for my configuration because I use the entire hard disk) OSInstall.mpkg (Not used for my configuration because I use the entire hard disk) Chameleon_2.1svn_r1820_trunk_10.8.pkg ShowHiddenFiles.app Org.Chameleon.Boot.plist The first 3.kext files will fix most kernel panics and bios reset that you might experience while booting. The 2 OSInstall files will allow you to install 10.8 onto an MBR-partitioned drive. Lastly, the Chameleon package is the bootloader that we’ll be using, and has been specifically compiled for use with 10.8. Note: The files for number 9 Install780.zip contains the following: AMDRadeonAccelerator.kext AppelIntelE1000e.kext ATI5000Injector.kext EFIStudio-1.1.app EliottForceLegacyRTC.kext FakeSMC.kext Kext Utility.app NullCPUPowerManagement.kext VoodooHDA.kext Note: The files for number 10 and 11 Videofix1083.zip and Videofix1084.zip contains the following:AMDRadeonAccelerator.kext ATI5000Controller.kext 3. My Specs My installation was successfully done on an Dell Optiplex 780 Desktop computer with the following specs. NOTE: A PCI video card is recommended to use the full potential of OS of Mountain Lion because the on board video card doesn't support QE/CI. Intel Core 2 Duo E7500 @ 2.93GHz 4GB DDR3 1333Mhz RAM Western Digital 160GB HDD ATI RADEON HD5450 512MB Intel WG82567LM onboard network Bluetooth USB Cambridge silicon radio (works OOB) ADI 1984A HDA audio onboard HP W2207h Monitor 1680×1050 display Apple Magic Trackpad 4. Preparing your SSD or HDD for install on a MBR-partitioned drive If you intent to install OSX86 Mountain Lion On the same Hard disk as your windows follow the steps below. For a clean install on a new formatted hard disk go to Chapter 5. If you’re in Windows 7, you can easily make a new partition on an SSD or HDD via the Disk Managementprogram. Start>Run (or Windows key on your keyboard plus R). diskmgmt.msc (press enter after typing that) Find your drive, right-click on it, and go to Shrink Volume. Wait for it to calculate the amount of space you can make your partition, and enter in your amount (for an exact GB amount, multiple your desired amount of GB times 1024, so a 20GB partition would be 20480MB). Let it make your partition. It will show up as unallocated space. Format the new unallocated space as NTFS and give it a label (mine was ML). Done! 5. Formatting your USB drive Start OSX Lion or Snow Leopard to prepare your USB Flash drive Make sure to backup the files that are already on your USB flash drive via Disk Utility in Mac OS X: Extract both zip files (Boot780 and Install780) to your Mac OS x desktop Put USB drive in your Mac Open up Disk Utility. Click on your USB drive in the left sidebar. Click on the Erase tab in the middle. Choose “Mac OS X Extended (Journaled)†as the format, and give your drive a label (like “ML USBâ€). Click on the Erase… button. Done! Leave Disk Utility open, as you’ll need it later. 6. Preparing your USB drive with 10.8 This part is the most time consuming. Using a USB 3.0 flash drive will help things out quite a bit. Mount the DMG for Mountain Lion (will be called Mac OS X Install ESD on your desktop). Show hidden files by running the app ShowHiddenFiles in the folder Boot780 on your desktop. Click on Show Special Files (leave the app ShowHiddenFiles open we need this later). In the folder MAC OS X Install ESD right click on Basesystem.dmg and choose “ open with DiskImageMounter(default) Switch back to Disk Utility. Click on your flash drive in the left sidebar. Click on the Restore button in the middle area. For the source, drag “Mac OS X Base System†from your desktop into the empty Source box. For the destination, drag your USB drive from your desktop into the empty Destination box. Click on “Restore†and type your password. This process will take anywhere from 5 to 10 minutes depending on the speed of your flash drive. When it’s finished, you’ll end up with 2 “Mac OS X Base System†drives on your desktop. Figure out which one is your USB copy (you can right-click > Get Info and use the capacity as an indicator), and rename it to MLINSTALLUSB, after that open it up. Once you’ve opened up MLINSTALLUSB (the one that’s your flash drive), go to /System/Installation. You’ll see a symlink for Packages. Remove it. Create a folder called Packages. Open up a window of the original Mac OS X Install ESD drive and copy everything within Packages to the empty Packages folder on your USB drive. Done! 10.8 is now installed onto your USB drive. Now, we need to modify some of the files on it so that it will properly bootup on a PC. 7. Adding the fixed 10.8 files to the USB drive Now, we need to modify some of the files on your USB drive so that it will properly bootup on your PC. Open the folder “Boot780†on your Mac OS X desktop. Copy 2 .kext files (FakeSMC.kext, NullCPUPowerManagement.kext) to /System/Library/Extensions on your flash drive. NOTE: The 2 OSInstall files will allow you to install 10.8 onto an MBR-partitioned drive, if you install it on the entire hard disk skip step 3 and 4 an go further with step 5. Copy the OSInstall file to /System/Library/PrivateFrameworks/Install.framework/Frameworks/OSInstall.framework/Versions/A/, overwriting the file that’s already there. Copy the OSInstall.mpkg file to /System/Installation/Packages/, overwriting the file that’s already there. Run the Chameleon installation package. Make sure to install this package to your flash drive, and customize the installation so that you have an SMBIOS that best relates to the CPU that’s on your computer (leave the default options checked; just check your SMBIOS imac9.1 for the Dell Optiplex 780). Copy now 3 kext files (FakeSMC.kext, NullCPUPowerManagement.kext, EliottForceLegacyRTC.kext) from folder Boot780 to /extra/extensions on your flash drive we need this for Chapter 11, Booting 10.8! . Copy mach_kernel from the root of the Mac OS X Install ESD volume and paste it into the root of your flash drive. Lastly, copy extracted folders (Boot780 and Install780) which you have extracted earlier from the zip files to the root of your flash drive. You’ll need this in Chapter 11. Eject all mounted drives (this is not necessary) Go to ShowHiddenFiles and click hide special files after that close program. Eject your USB Drive Done ! 8. Bios Settings Dell Optiplex 780 Before we boot from the Dell Optiplex we need to optimize the bios for Mountain Lion. Start your Dell Optiplex and press F2 to get into the Bios. Go to Boot Sequence and choose on the right for USB Device and click the up arrow so that the USB Device is on top, click on apply to make the setting. Go then to Drives - Sata Operation and choose on the right for Raid Autodetect/AHCI click again on apply and choose exit, now the Bios is ready for installing Mountain Lion. 9. Installing 10.8 from your USB drive Time for the fun stuff! We’ll now boot from your USB drive and install 10.8 onto the partition or Hard Drive. Boot from your USB drive. Once in Chameleon, highlight your flash drive and add -v to the end, then push enter. You’ll see a lot of text fly by be patience startup may take a while. Once you get into the installer (assuming your computer didn’t freeze, restart itself, or get a kernel panic), choose your partition or Hard Disk to install 10.8 to. NOTE : when you install it on a partition skip step 5 - 10 see Chapter 4. (If you install Mountain Lion on the entire Hard disk follow the steps below ) In the installer open up Disk Utility. Click on your Hard Drive in the left sidebar. Click on the Erase tab in the middle. Choose “Mac OS X Extended (Journaled)†as the format, and give your drive a label (like “ML OSXâ€). Click on the Erase… button. Done close Disk Utility and go further with the installation process. The installation process will take about 5 to 15 minutes, depending on the speed of both your USB drive and your SSD or HDD. When finished, boot back into your already working copy of Mac OS X. 10. Booting 10.8! Now that everything is finally prepared, you can go ahead and boot into Mountain Lion. Boot from your USB drive again your computer won't still be able to boot from the hard drive. Once in Chameleon, highlight your partition that has 10.8 installed. Add -v to it and push enter. You’ll see a lot of text fly by again be patience startup will take a while. You’ll eventually get to the setup screens for 10.8. Go through that process to setup 10.8. Choose by "How Do You Connect" for "My Computer Does Not Connect to the Internet" we will fix this later in Chapter 13, go further with the installation process. The installation process will take about 25 minutes, depending on the speed of both your USB drive and your SSD or HDD. Done! Proceed to Chapter 11 to install the bootloader to your partition so that you don’t have to rely on using your USB drive to bootup. 11. Installing the bootloader to 10.8Once in 10.8 go to finder – preferences –General and choose in show these items on the desktop for - Hard Disk - External Disk - CD Go also to System Preferences – Security& Privacy click on the lock on the left corner and type your password Choose by “Allow applications downloaded from: for “Anywhere – Allow from anywhere Close system preferences. Copy the folders "Boot780" and "Install780" from your USB Device to your Mac OS X desktop after that open up the Chameleon installation package in folder Boot780, and install Chameleon to your 10.8 partition (while choosing your SMBIOS imac9.1, just like before, This is similar to step 5 in Chapter 7.) . Done! 12. Copy org.chameleon.boot.plist to /extra Starting up Mac OS X for the first time on your Hackintosh can be a very tricky process, which often requires you to set special boot options through the use of boot flags. For those of you who don't know, boot flags are "arguments" (pieces of data that you enter) to change the way that your bootloader runs. The bootloader is the program that boots Mac OS X. Boot flags can set the boot options for Chameleon, and any other boot CD or bootloader for Hackintoshes. Read past the break to learn how to use boot flags. There are two ways to apply a boot flag: either by typing it into the bootloader before starting up Mac OS X, or by typing it into org.Chameleon.boot.plist, the settings file used by the bootloader. See also Chapter Common boot options for Chameleon. I have included a org.Chameleon.Boot.Plist for the Dell Optiplex 780 Open the folder “Boot780.†and copy org.chameleon.Boot.Plist Past org.chameleon.Boot.Plist to /extra on your Hard Disk 13. Install the Kext files for de Dell Optiplex 780 hardwareNow, we need to install some Kext files on your Hard Disk drive so that the hardware will work properly on your PC. Open the folder “Install780†and select the following Kext files - AMDRadeonAccelerator.kext - AppelIntelE1000e.kext - ATI5000Injector.kext - EliottForceLegacyRTC.kext - FakeSMC.kext - NullCPUPowerManagement.kext - VoodooHDA.kext Drag the Kext files (which are mentioned above) over "Kext utility.app" (contained in folder “Install780â€) and release the mouse Type your root password and the Kext files will be installed on your Hard disk. Reboot. Once in 10.8 go to System Preferences – Network There will be a message saying “Network device is detected†Choose apply if you want to use DHCP or give a IP Address if you use static IP. Click apply to make the setting active. 14. Update to 10.8.2Don't update thru Software Update download the combo update here Download from the apple site. Run the 10.8.2 combo update walk thru the steps. After installation there will be a message saying to restart your system DON’T RESTART. We will fix the video after the update, go to folder Install780 on your desktop. Drag the Kext files AMDRadeonAccelerator.kext and ATI5000Injector.kext to Kext Utility and type your password the files will be installed, after install reboot. Now reboot with -v. After Reboot go to about this Mac and check if the version is 10.8.2 The update is finished. 15. Update to 10.8.3 If your "Mac OS X Install ESD" contains already the newest ML Version you don't have to update the system and you can skip step 15.1 to 15.5. To check your current version go to "About this Mac". Don't update thru Software Update download the combo update here Download from the apple site. Unpack the Videofix1083.zip to your desktop. Run the 10.8.3 combo update walk thru the steps. After installation there will be a message saying to restart your system DON’T RESTART. Run the Chameleon installation package. Make sure to install this package to your Hard drive, and customize the installation so that you have an SMBIOS that best relates to the CPU that’s on your computer (leave the default options checked; just check your SMBIOS imac9.1 for the Dell Optiplex 780). We will also fix the video, go to folder Videofix1083 on your desktop. Drag the Kext files AMDRadeonAccelerator.kext and ATI5000Controller.kext from the Videofix1083 directory to Kext Utility (in folder Install780) and type your password the files will be installed, after install reboot. Now reboot with -v. After Reboot go to about this Mac and check if the version is 10.8.3 The update is finished. 16. Update to 10.8.4 If your "Mac OS X Install ESD" contains already the newest ML Version you don't have to update the system and you can skip step 15.1 to 15.5. To check your current version go to "About this Mac". Don't update thru Software Update download the combo update here Download from the apple site. Unpack the Videofix1084.zip to your desktop. Run the 10.8.4 combo update walk thru the steps. After installation there will be a message saying to restart your system DON’T RESTART. Run the Chameleon installation package. Make sure to install this package to your Hard drive, and customize the installation so that you have an SMBIOS that best relates to the CPU that’s on your computer (leave the default options checked; just check your SMBIOS imac9.1 for the Dell Optiplex 780). We will also fix the video, go to folder Videofix1084 on your desktop. Drag the Kext files AMDRadeonAccelerator.kext and ATI5000Controller.kext from the Videofix1084 directory to Kext Utility (in folder Install780) and type your password the files will be installed, after install reboot. Now reboot with -v. After Reboot go to about this Mac and check if the version is 10.8.4 The update is finished. 16. Update to 10.8.5 If your "Mac OS X Install ESD" contains already the newest ML Version you don't have to update the system and you can skip this step. To check your current version go to "About this Mac". Don't update thru Software Update download the combo update here Download from the apple site. Run the 10.8.5 combo update walk thru the steps. After installation there will be a message saying to restart your system DON’T RESTART. Run the Chameleon installation package. Make sure to install this package to your Hard drive, and customize the installation so that you have an SMBIOS that best relates to the CPU that’s on your computer (leave the default options checked; just check your SMBIOS imac9.1 for the Dell Optiplex 780). We will also fix the video, we will do it manually. Copy the Kext files AMDRadeonAccelerator.kext and ATI5000Controller.kext from system/library/extension to your desktop. Go to ATI5000Controller.kext and rightclick and choose Show Package Contents and open info.plist with textedit. Find <key>IOPCIMatch</key> and add your string for HD5450 ( HD5450 1GB the string is 0x68F91002 and for 512MB the string is 0x68E11002) <string>0x68F91002 0x68981002 0x68991002 0x68E01002 0x68E11002 0x68D81002 0x68C01002 0x68C11002 0x68D91002 0x68B81002 0x68B01002 0x68B11002 0x68A01002 0x68A11002 </string> Save and Exit Go to AMDRadeonAccelerator.kext and rightclick and choose Show Package Contents and open info.plist with textedit. 11. Find <key>AMDCedarGraphicsAccelerator</key> and then look for the first <key>IOPCIMatch</key> and add your string for HD5450 ( HD5450 1GB the string is 0x68F91002 and for 512MB the string is 0x68E11002) add <string>0x68F91002 0x68E01002</string> Save and Exit Install both kext files with Kext Utility Now reboot with -v. After Reboot go to about this Mac and check if the version is 10.8.4 The update is finished. 17. App store and iCloud doesn't work If AppStore and iCloud doesn't work follow the steps below. Open up EFI Studio in folder “Install780.†, select Ethernet, select Add Device. On the new window you will see a lot of numbers (Hex String) in the second row. Then clicked write to com.apple.boot.plist. Then go to /Library/Preferences/SystemConfiguration/apple.com.boot.plist and select the new key and string it added. Now you can add the Hex Strings to your org.chameleon.boot.plist(com.apple.boot.plist) see Chapter 12 which should be in root/extra folder. When you add it manually make sure it is in <key>device-properties</key> <string>Your Hex String here</string> arguments after that. Remove all network devices from System Preferences/Network. Delete in library>preferences>system configuration> NetworkInterfaces.plist file. Finally, Reboot. After reboot, go to System Preferences/Network add devices. Click (Ethernet) FIRST!! Then add the other adapters you use to connect to the internet or Bluetooth. Voila. App Store and iCloud now works. 18. If sound doesn’t work The HDMI from the Ati Radeon 5450 doesn’t work properly so we need to change this to Headphone, follow the step below to make sound work. Open System Preferences – Sound – Output – And choose for Headphones.19. Finished! You’ve successfully installed Mountain Lion OSX onto your Dell Optiplex 780. Boot780.zip Install780.zip run os x mountain lion 10.8.pdf Videofix1083.zip Videofix1084.zip
-
So I'm working on upgrading my snow leopard partition to lion on my Dell Latitude D830. Last night I made a generic myHack installation onto a 16GB sandisk cruzer, and I booted my computer into the installer. However, after about 5 minutes in the installer, the computer completely froze, and I had to hold the power button to shut it off. Then I formatted and recreated the myHack installer, this time using a bootpack for the high-res intel graphics card. It started booting with a kernel panic, which I resolved by using arch=X86_64. After it passed that point, it froze with the message: Cannot alloc class Intel 965 My computer specs are: -> Intel Core 2 Duo Processor -> Standard Mobo -> Intel Mobile 965 Graphics
-
When I go to install using OSinstall.mpkg it says "The Installer could not install the software because there was no software found to install." Help me please. Dell D830 Nvidia Graphics 4 gigs ram
-
Hi all, I have a Dell Inspiron E6220 (infact two-I'm only trying to install on one though), which are both: Intel Core i5 2520 2.5GHZ CPU 4GB Ram Seagate Momentus Thin 7200RPM 250GB HDD Intel HD Graphics I have two USBs: a unifail 10.8, and a myHack 10.8, both with the OSX ML from the Mac App Store (on a Mac). When I try to boot up the install, it goes to the Apple screen, the spinning wheel, and then freezes on the spinning wheel and doesn't do anything. This is the same for both USBs (and both laptops). I read somewhere that someone was only able to boot with -f, I tried this on the myHack USB and it still didn't work, but when I tried the unifail, it did work. I was able to get everything ready for installation, and start the installation, until about halfway through the installation the screen just turns full white, with a small grey box. I am pretty sure that the computer completes the installation, and then it reboots back to the unifail USB (I'm not sure about this). Picture of screen: http://puu.sh/4otRE.jpg The computer reboots, and then comes back to the unifail screen on the USB. So now I try to get into the Macintosh HD, and no luck. I try with -f on both USBs and still no luck (it freezes on spinning wheel again). How can I fix this? Some errors near the end I can see: (in -v boot Verbose mode) Bootcachecontrol: Unable to open /var/db/Bootcache.playlist: 2 No such file or directory Bootcachecontrol: Unable to open /var/db/Bootcaches/PreheatedUser/Merged.playlist: 2 No such file or directory Bootcachecontrol: Unable to open /var/db/Bootcaches/PreheatedUser/Login.playlist: 2 No such file or directory Gets stuck on: AppleIntelE1000e: Ethernet address 24:b6:restofaddress Thanks
-
I'm trying for hours to get mac os lion orking on my dell D620, but every time i start my lion bootstick which i exactly did how it is said in the guide, the boot progress stops at different points while the boot up. I got the nVidia modell with the Intel® Core™2 Duo Processor T7500 ... please help me... SL worked very well, but now its kind of old so i wanted to try something new thanks
-
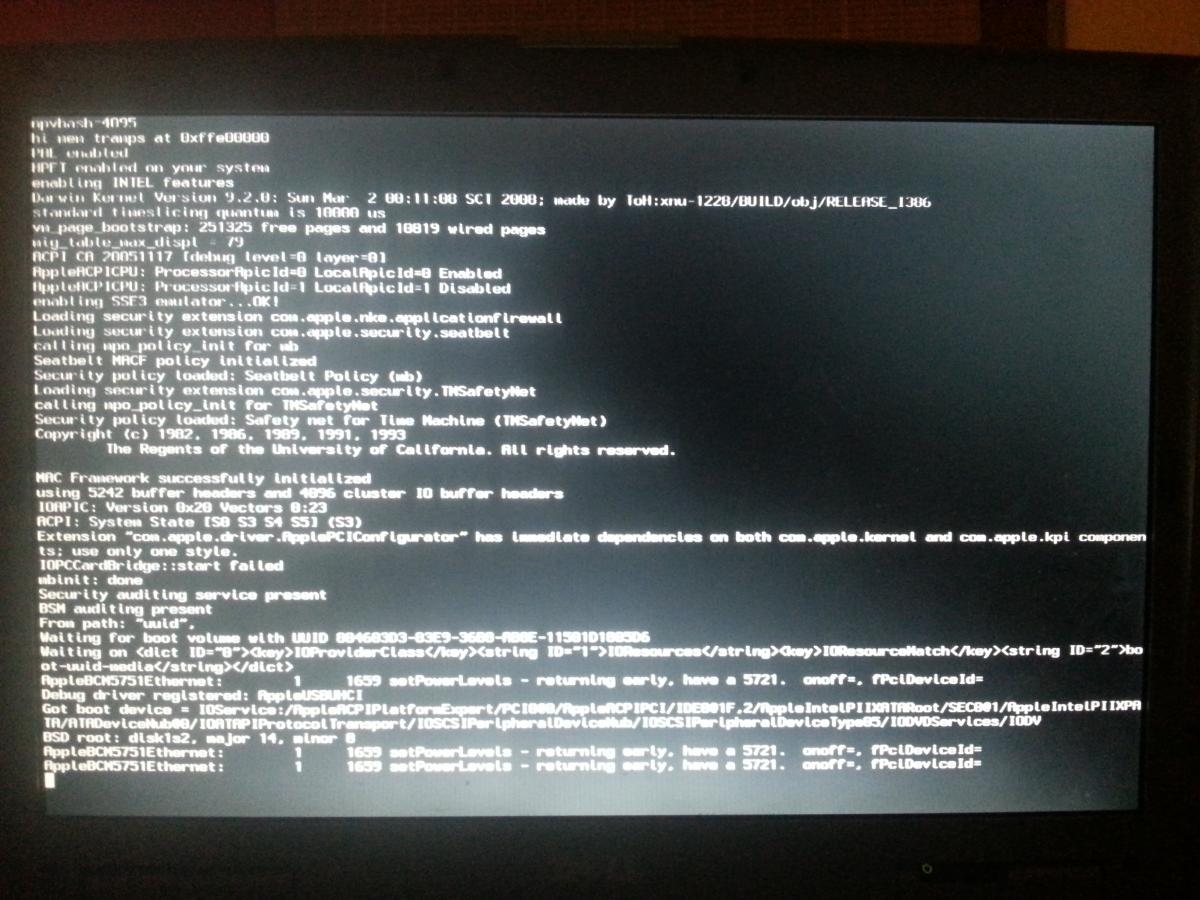
I did everything in the pre-installation, plugged in the USB drive, and booted it up, saw the chameleon bootloader, verbose mode, and then this. I have no idea what to do. I had built and installed lots Hackintoshes in the past, none had a problem.
-
Hello everyone at OS X Latitude, I have added a PCI graphics card to my Dell Vostro 200 Desktop. I got a Nvidea geforce gt 610 pci express card from PNY. My Windows 7 Professional boots fine, but my Mac mountain lion stopped working. It is stuck at [ PCI configuration begin ]. If I plug it into the original on-board VGA port, it works fine. What is the problem behind this? I am using a 1024MB DDR3 card. I know Hervé wrote in his Vostro 200 guide to use a 2GB card, but it was too expensive to I just got a 1GB card. Is there problem because of the Windows. I am using GUID partition layout. First, I installed Mac, then I installed Windows. Somehow, after installing Windows, the computer boots up to Windows by default. The only way to get to Mac is to plug in my myHack USB installer and boot using that. Again, USB booting worked using on-board video card. Is there a problem because I am booting via USB installer to my Mac partition, or because of some graphic card problem. I also remember that right after my Mac Mountain Lion installation(which was before I got my graphics card) that it said Installation Failed. I just ignored it, because it appeared that it was working fine eventhough it said Installation failed.Could that be the case? Thanks vgupta
-
Hello, I installed myHack+Dell Vostro 200 Bootpack+EDP for Mountain Lion, but now Launchpad takes forever to open! The launchpad was pretty quick like an original Mac in Lion, but it takes 5-7 minutes to open Launchpad which is very annoying. I have not yet gotten a graphics card(because it will take a few days to order it), but launchpad takes forever. Will the Nvidea gt 610 graphic card Pci 2.0 fix the problem? If you need any screenshots, or photos of my desktop, please ask. I will be getting my card in a few days, so it might solve the problem. Thanks vgupta