Search the Community
Showing results for tags 'D430'.
Found 3 results
-
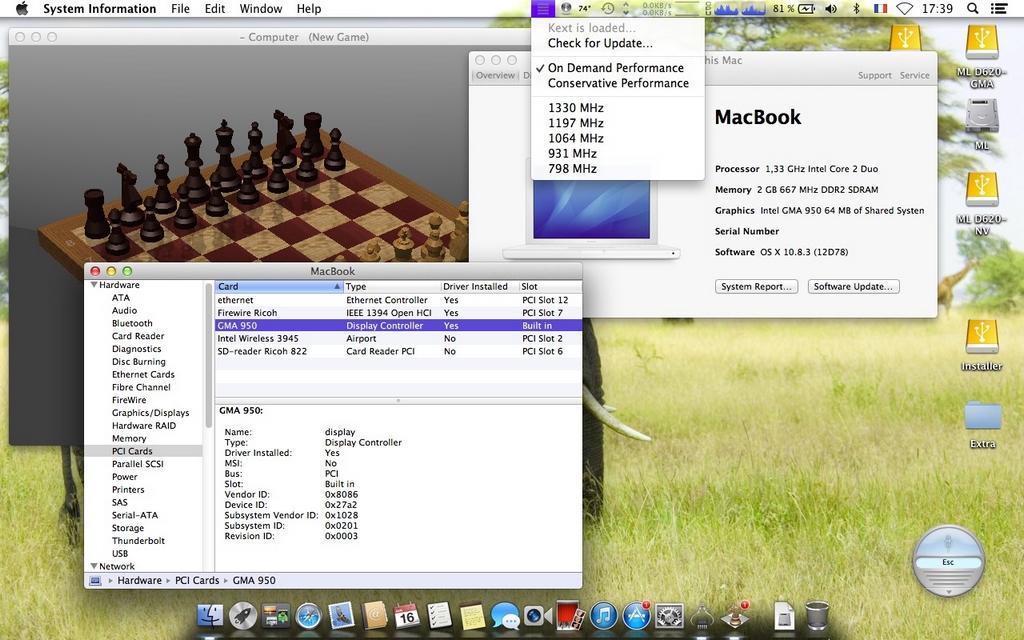
Last update: 03 Jan 2024 This guide applies to the Core2Duo D430 models. This guide was initially made with a MyHack-based installation of ML 10.8.0 + subsequent updates to ML 10.8.3/10.8.4/10.8.5. The bootpack was made out of the D630 nVidia ML bootpack where the DSDT table was replaced by the table from D430 Dual Core Lion bootpack, appropriate kexts removed and/or added and Chameleon plists replaced. EDIT - 20Aug 2014: ------------------------- Bootpack edited following report of missing Broadcom LAN kext. Pack is now fully loaded with all necessary kexts, modules and plists and no post-install EDP is really required for hardware fine tuning. Includes tuned Kozlek's FakeSMC + SMBIOS for native CPU SpeedStep. Extra D430 ML.zip This guide assumes you're using a blank HDD, partitioned and formated GUID. No tests done on MBR partitioned HDD, so don't ask about it, try it for yourself and report back if appropriate. Read the MacRumors guide thoroughly and follow it to the letter as far as creating the installer is concerned. Remember that it is not our hack and we do not support it. http://forums.macrumors.com/showthread.php?t=1325709 You need a legit copy of ML, i.e. the Install Mountain Lion.app application, otherwise forget it. The tool requires you to copy it to your Applications folder. It won't work if all you have is the InstallESD.dmg image. In June 2021, Apple finally made Mountain Lion freely available. A link to download the application package is available here. Phase 1: initial ML installation in mainstream 64bit kernel mode with unsupported graphics make the usual myHack USB installer for ML 10.8, using the attached LoRes or HiRes bootpack. myHack v3.3.1 is recommended. It's available here. boot the myHack USB installer and install ML 10.8, pointing to the /Extra folder of the installer media when prompted for the bootpack (do not choose generic). reboot into ML through your USB installer and complete 1st boot setup. you're now in ML 10.8 with default graphics at 1024x768 and without graphics acceleration. If you have not already done so, remove your myHack USB installer and put it aside. install recommended version of Chameleon (r2468) or Enoch (r2839) bootloader on your disk. They're available here. install latest update or combo update for ML 10.8.5 and all security updates for 10.8.5 (your wireless may not be supported at that stage, so use Ethernet port or install appropriate Wifi kext). reboot into latest version of ML 10.8.5, still with default graphics and without acceleration. Phase 2: MLPostFactor download MLPostFactor from here (original links posted in 2013 at MacRumors are dead since 2015). create a new small partition on your HDD (8 to 16GB) or insert and erase your myHack USB installer (or any other available external media). following MLPF instructions to the letter, run MLPostFactor and create an ML installer on the freshly created spare HDD partition or freshly erased USB key. Select the appropriate ML version that meets your installation and run the app, knowing that version 10.8.4 is to be selected for ML 10.8.5. upon completion, create a folder called Extra at the root of that installer media and copy DSDT table + SMBIOS & Chameleon boot plist files there. if you have a Bluetooth module, turn off your wireless services with the side switch (or laptop will look for a BT keyboard at next step and you'd need to hook up a USB keyboard). reboot off your initial ML disk/partition, interrupt the boot process at the Chameleon delay bar and select this newly created ML installer partition/disk with options & flag DSDT=/Extra/DSDT.aml arch=i386 -f. once installer is loaded, do not actually proceed with any installation (it would not be bootable). Go to Utilities in the menu bar and select MLPostFactor. when MLPostFactor app kicks in, click Continue until you're offered to select a destination volume. in the list available under the HDD icon, select your previously-made ML 10.8 installation, check the relevant 10.8.x case (select 10.8.4 for ML 10.8.5) and click Install MLPostFactor. upon completion, click Quit MLPostFactor, quit installation program and reboot ML 10.8 with flag and boot option -f arch=i386. If you switched off wireless services, turn the switch back on before the reboot. You will now have full QE/CI ! open up the Chameleon boot plist file in /Extra folder with TextEditor and add boot arg arch=i386 to ensure your system boots in 32bit kernel mode. If you have Chameleon Wizard app, use that to open up the boot plist and tick the 32-bit (i386) option, then save the file. open up Terminal and type sudo kextcache -system-prelinked-kernel -a i386 to rebuild the 32bit-mode cache; this will remove the need to boot with -f flag. For ML 10.8.5, edit file /System/Library/CoreServices/SystemVersion.plist to replace version number from 10.8.4 to 10.8.5. That's it, enjoy ML on your previously unsupported D620 GMA950. Remember that this hack is quite aggressive in the way it reverts to DP1 files and older graphics drivers (GMA950 kexts, OpenGL libraries), so you may find that things do not work. Again, don't ask for support here, go to the authors at MacRumors.

-
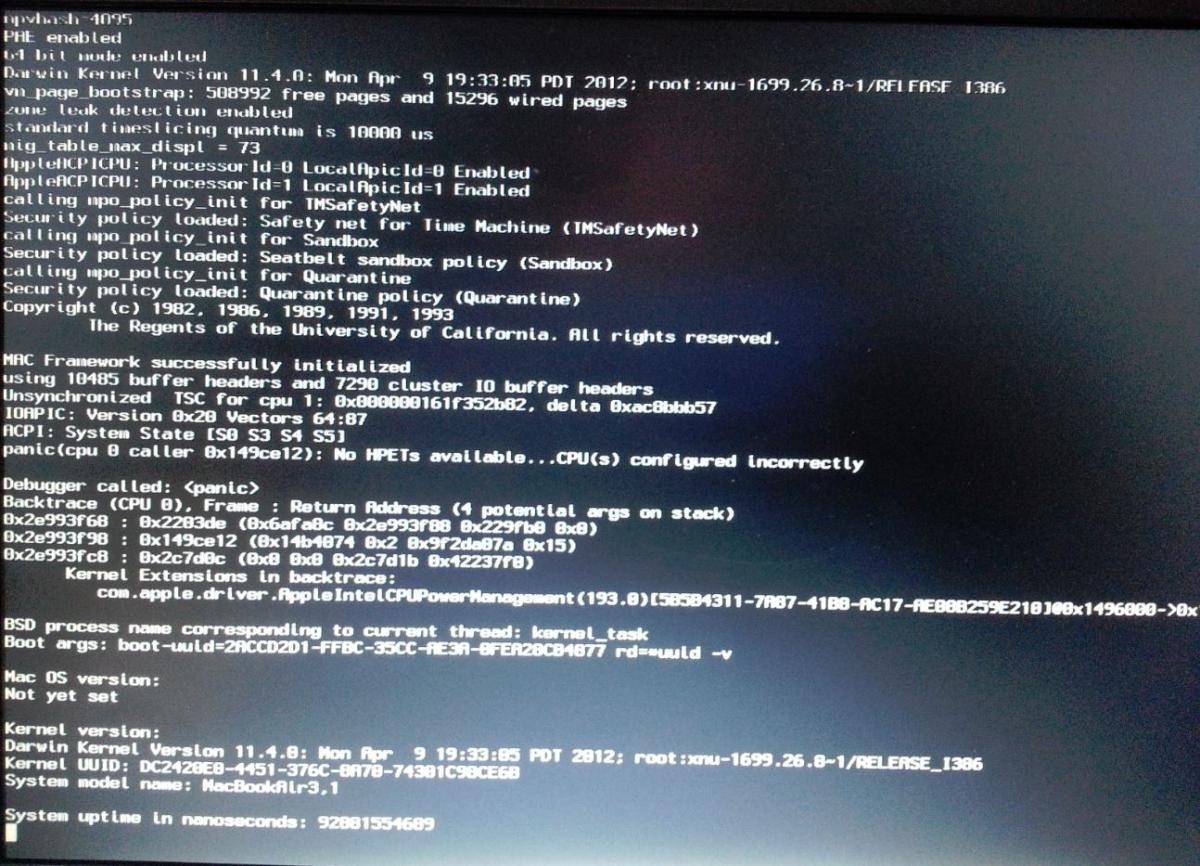
Hello OSXlatitude community- Newbie here. Got a cheap D430 from a craiglist - Found your site and decided to try it out as my first Mac (physical). After 2 weeks of frustration, not getting anywhere so hope someone else there can help! Issue- Cannot get to initial setup screen Steps I followed 1. Configured my bios per https://osxlatitude.com/index.php?/topic/2036-bios-settings-d430/ 2. downloaded myhack 3.3.1 3. downloaded bootback for 10.7 (confirmed my bios shows cpu is intel core duo) http://www.osxlatitude.com/packs/Dell/Dell_Latitude_D4x0-lion.zip 4. Created boot usb using the above along with OSX 10.7.5 image (also tried 10.7.4, 10.7.2 and 10.7) 5. Replaced /extra folder with the contents from bootpack 6. Installed OSX using usb stick, selected to install extra from "my own" and selected the extra folder on USB stick 7. rebooted, but got kernel panic screen 8. tried replacing extra folder with one I found in this thread and re-ran myhack / reapplied extra https://osxlatitude.com/index.php?/topic/2843-d430-kernel-panic-because-kexts-fail-to-load/?hl=%2Bd430+%2Bkernel+%2Bpanic 9. reboot, getting this screen. (just stays there forever) 10. It does boot to setup screen if I use safe option (-x), but then network/mouse/kb is not found. Any help would be appreciated.
-
For old EDP, I've been always using ApplePS2Controller.kext, that makes both touchpad and pointing stick working. For some reason, with new EDP, my D430 (SL) 's pointing stick no longer working, and I noticed the kext is the same. Why thhe same kext behaves differently? Is there anyway to make both built-in touchpad and pointing stick working? Thanks a lot