


makayama
-
Posts
9 -
Joined
-
Last visited
-
Days Won
1
Content Type
Profiles
Articles, News and Tips
Forums
Posts posted by makayama
-
-
Audio driver kext :

Audio Working ..status ok
please install the driver in the attachment using Kext Utility than after finish restart your laptop
-
Notes: Before Install Your Nvidia Driver :after installing Yosemite using bootloader in legacy and clover in UEFIAfter startup Yosemite from clovercheck your gpu you see the value is 3 mbthan you can install the correct nvidia driver for your osx version by check these link:notice that we have disable nvidia before that so after you install nvidia driver and before making restart justenter clover config from efi partationand search arguments line that have command for disable nvidia replace that with command for enable nvidia
-v nvda_drv=1
Finally congratulation
You success to have Nvidia Driver full work with your mac osx Yosemite
Important notes:
( some time user face blackscreen through booting using clover just restart and try again if that happen with you )
- nvidia have feature ECC i am not testing it yet but i prefer that it would be work fine. -
ok i get that lspci -nn
sh-3.2# lspci -nn
00:00.0 Host bridge [0600]: Intel Corporation Device [8086:0c04] (rev 06)00:01.0 PCI bridge [0604]: Intel Corporation Device [8086:0c01] (rev 06)00:14.0 USB Controller [0c03]: Intel Corporation Device [8086:8c31] (rev 05)00:16.0 Communication controller [0780]: Intel Corporation Device [8086:8c3a] (rev 04)00:1a.0 USB Controller [0c03]: Intel Corporation Device [8086:8c2d] (rev 05)00:1b.0 Audio device [0403]: Intel Corporation Device [8086:8c20] (rev 05)00:1c.0 PCI bridge [0604]: Intel Corporation Device [8086:8c10] (rev d5)00:1c.2 PCI bridge [0604]: Intel Corporation Device [8086:8c14] (rev d5)00:1c.3 PCI bridge [0604]: Intel Corporation Device [8086:8c16] (rev d5)00:1d.0 USB Controller [0c03]: Intel Corporation Device [8086:8c26] (rev 05)00:1f.0 ISA bridge [0601]: Intel Corporation Device [8086:8c4b] (rev 05)00:1f.2 SATA controller [0106]: Intel Corporation Device [8086:8c03] (rev 05)00:1f.3 SMBus [0c05]: Intel Corporation Device [8086:8c22] (rev 05)01:00.0 VGA compatible controller [0300]: nVidia Corporation Device [10de:13d8] (rev a1)01:00.1 Audio device [0403]: nVidia Corporation Device [10de:0fbb] (rev a1)3b:00.0 Network controller [0280]: Intel Corporation Device [8086:08b1] (rev 6b)3c:00.0 Ethernet controller [0200]: Realtek Semiconductor Co., Ltd. RTL8111/8168B PCI Express Gigabit Ethernet controller [10ec:8168] (rev 10) -
you mean i can use this command Extract of lspci -nn in the terminal than i copy all result in text editor and uploded for you
ok don't worry after i getting to my home i will uploaded what you request about
-
Important notes : the Following attachment CLOVER-folder.zip prepared to making clover boot success with clover bootloder UEFI laptop
So you can save time to for who face any problem and error message in the future through boot with clover UEFI
after you boot success than you can modify it as you want
example you can hide your volume partition also change sm bios if you want to something else through
using clover configuration as i am using smbios for macbook pro 11.2 so keep in touch with me if something wrong you ...
-
First steps :Install Clover UEFIBootloader
Requirement:
make sure you prepare usb flash memory 8 gb format as Fat32
install Clover
http://sourceforge.net/projects/cloverefiboot (chameleon, stolen and rebranded)/
simple guide to install clover bootloder:
After obtaining the Clover installer, first task is to install to the USB "CLOVER EFI" partition.
For Clover UEFI, run the Clover Installer package:
- select the target of the install to "CLOVER EFI" using "Change Install Location"
- select "Customize" (the default is a legacy install -- we need to change it)
- check "Install for UEFI booting only", "Install Clover in the ESP" will automatically select
- check "Bluemac" from Themes (the config.plist files I provide use this theme)
- check "OsxAptioFixDrv-64" from Drivers64UEFI
Then start the app you can skip update dialog update
Than you can start and check partition make sure you choose the correct partition next choose disk mount EFI
after EFI Partition appear in your finder enter it
you see clover folder don't access to clover folder just remove it
copy folder included with zip in the attachment in the same path
before restart make sure you enter clover in the efi partation and clover config
search line argu
make sure disable nvidia : nvda_drv=0 nv_disable=1
Now you can Restart laptop
you most now get boot Started successfully with clover UEFI
If have any problem just ask ...
waiting for replies... -
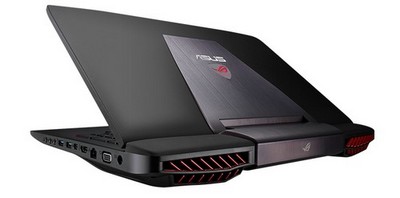
First : the laptop model ASUS ROG G751JT-CH71
The Following information for lspci-type extract of hardware information + USB device and other details in the attachment00:00.0 Host bridge: Intel Corporation Xeon E3-1200 v3/4th Gen Core Processor DRAM Controller (rev 06)00:01.0 PCI bridge: Intel Corporation Xeon E3-1200 v3/4th Gen Core Processor PCI Express x16 Controller (rev 06) 00:14.0 USB controller: Intel Corporation 8 Series/C220 Series Chipset Family USB xHCI (rev 05) 00:16.0 Communication controller: Intel Corporation 8 Series/C220 Series Chipset Family MEI Controller #1 (rev 04) 00:1a.0 USB controller: Intel Corporation 8 Series/C220 Series Chipset Family USB EHCI #2 (rev 05) 00:1b.0 Audio device: Intel Corporation 8 Series/C220 Series Chipset High Definition Audio Controller (rev 05) 00:1c.0 PCI bridge: Intel Corporation 8 Series/C220 Series Chipset Family PCI Express Root Port #1 (rev d5) 00:1c.2 PCI bridge: Intel Corporation 8 Series/C220 Series Chipset Family PCI Express Root Port #3 (rev d5) 00:1c.3 PCI bridge: Intel Corporation 8 Series/C220 Series Chipset Family PCI Express Root Port #4 (rev d5) 00:1d.0 USB controller: Intel Corporation 8 Series/C220 Series Chipset Family USB EHCI #1 (rev 05) 00:1f.0 ISA bridge: Intel Corporation HM87 Express LPC Controller (rev 05) 00:1f.2 SATA controller: Intel Corporation 8 Series/C220 Series Chipset Family 6-port SATA Controller 1 [AHCI mode] (rev 05) 00:1f.3 SMBus: Intel Corporation 8 Series/C220 Series Chipset Family SMBus Controller (rev 05) 01:00.0 VGA compatible controller: NVIDIA Corporation Device 13d8 (rev a1) 01:00.1 Audio device: NVIDIA Corporation Device 0fbb (rev a1) 3b:00.0 Network controller: Intel Corporation Wireless 7260 (rev 6b) 3c:00.0 Ethernet controller: Realtek Semiconductor Co., Ltd. RTL8111/8168/8411 PCI Express Gigabit Ethernet Controller (rev 10)
-
G751JT- Monster of Hackintosh Laptop
Success running Yosemite 10.10.2 on G751JT laptop bootloader ​with NVidia 970m through clover
Display: 17.3" 16:9 IPS FHD (1920x1080) anti-glare
Processor: 4th-Gen Haswell Intel Core i7-4710HQ quad core processor clocked at 2.5 GHz with Turbo Boost up to 3.5 GHz
Chipset: Intel® HM87 Express Chipset
Graphics: NVIDIA® GeForce® GTX970M with 3GB GDDR5 (Maxwell)Dedicated Video Card
WLAN: Integrated Intel® AC 7260 802.11 A/AC/B/G/N + Bluetooth™ 4.0
LAN: 10/100/1000 /Gigabits Base T Mbps Ethernet
Memory: DDR3L MHz SDRAM, 16 GB ( up to 32GB)
Storage: 1TB HDD 7200 RPM With 256 G SSD
Optical Drive: Super Multi DVD drive
Camera: HD Web Camera
Speakers: Stereo Speakers with Subwoofer
Microphone: 1 x Built-in Microphone
Card Reader: 2-in-1 Card Reader SD / MMC
Input / Output:
4 x USB 3.0 ports
1 x Thunderbolt Port
1 x VGA port/Mini D-sub 15-pin for external monitor
1 x RJ45 LAN Jack for LAN insert
1 x HDMI
1 x Microphone-in jack
1 x Headphone-out jack
Working:
NVIDIA® GeForce® GTX970M (need NVidia driver )
Realtek ALC269 Audio (need kext)
Battery Management (need kext + dsdt patch )
after all i getting it but need dsdt patch to make it work better .
Sleep/Wake/Reboot working (native work )
Fn Hotkeys (Function Key )
Super Multi DVD drive (Native)
HD Web Camera (native work)
Usb 3 (need kext )
Touchpad: Elan Touchpad (need kext)
Microphone
backlight​ (needs app or kext + dsdt )
Not working :
Intel® AC 7260 802.11 A/AC/B/G/N + Bluetooth™ 4.0
Alternative :
replace your internal Wifi in laptop with aetheros adapter
or the easy way using external usb wifi adapter .
-
 2
2
-


G751JT- Monster of Hackintosh Laptop
in The Archive
Posted
i plan to make some change for my topics to make it simple and clear to understand ,i getting many request from users told me that to upload all kext , i can't do that because all users have different version if some user have trouble in some drivers that not working they can sending message in OS X latitude for the problem to answer them quickly .
Thank you for all user and members who support us .
Makayama