


gajaciosif
-
Posts
16 -
Joined
-
Last visited
-
Days Won
2
Content Type
Profiles
Articles, News and Tips
Forums
Posts posted by gajaciosif
-
-
Hi! my usb 3 and not working and the camera it's upside down. also having some issues with sleep,it doesn't sleep correctly,it's wake up immediately from sleep.
Don't expect nvidia 540m to work,it well not gonna work,cause optimus isen,t suported by apple.
I don't use nullcpupowermanagement kext, i have just ssdt files for power management, but you can download that kext from any hackintosh source.
If you manage with usb 3 or sleep, or webcam to make it work, please let me now how you managed to work.
-
-
let me know if it worked for you, and if you need additional information
-
Instalation and post installation! just with minor changes on config plist for bootable usb
-
Hi snucksnuck ! You can try with my clover files from here; https://osxlatitude.com/index.php?/topic/9626-macos-sierra-on-asus-n73sv-clover-botloader-legacy/
I have a question for you..
Can your laptop support EFI boot? in my bios it,s show up EFI in settings, but it dosen,t boot Bootable EFI stick
I'm forced to use the laptop just with legacy. The same ting with windows 10 just legacy boot
I think I,m missing someting !
-

macOS Sierra seems to run quite well on these notebook, with Clover botloader, and also with Cameleon. All seems to work well except USB 3, and Nvidia 540M. I opened this topic, in the hopes that those, with same laptop (hardware) as mine or like to give their opinion about this build here, about a potential fuctionalitate and rectifications.
I forgot to mention that webcam its upside-down!
-
Hi
I,m very busy this days , but i think with some kext it gona work fully!
try to contact me on Skype i geve you some kext
my ID gajac.iosif
-
I suggest to not use dual boot with windows, on the same drive becaouse it may mess up!
use dual boot just if both operating systems are on different HDD Drive!
-
Hi
Yes, sound buttons on the left side are working perfect, and Brightnes butons ctrl+f5,f6,f7Just delete your extra first don,t overite!
-
i succesed with instaling OS X Mavericks on my notebook N73SV, cause This developper hep me
..EMlyDinEsH
i want you guis to understand somtyng
first of all dont use bootpack from osxlatitude
just use generic extra
1 make bootable usb with my hack
2 copy this file ...DSDT.aml.... to extra folder wen usb it,s done.........important..! use just ..DSDT.aml...from.......http://en.file-upload.net/download-8740295/Extra.rar.html3 boot from usb with -v
4 after intallation boot again from usb,but this time select The HDD with OS X Instaled
5 after succesful login in OS X copy this files.... http://en.file-upload.net/download-8740295/Extra.rar.html.......and overite all.... to extra folder on mavericks HDD drive
6 reboot and all must work
7 for usb 3 and Bluethoth use this kext instal with kext utylyty.............http://en.file-upload.net/download-8740296/usb-3---Bluethoth.rar.html
8 for brightnes use this....http://en.file-upload.net/download-8740299/BrightnessFix.rar.html
9 after all kext instalation run my hack to repair permisions and you done!
use this files only if you have the same model.....
this is my machine -------
Motherboard:
CPU Type Mobile QuadCore Intel Core i7-2630QM, 2800 MHz (28 x 100)
Motherboard Name Asus N73SV Series Notebook
Motherboard Chipset Intel Cougar Point HM65, Intel Sandy Bridge
System Memory 12198 MB (DDR3-1333 DDR3 SDRAM)
DIMM1: Samsung M471B5273CH0-CH9 4 GB DDR3-1333 DDR3 SDRAM (9-9-9-24 @ 666 MHz) (8-8-8-22 @ 609 MHz) (7-7-7-20 @ 533 MHz) (6-6-6-17 @ 457 MHz) (5-5-5-14 @ 380 MHz)
DIMM2: Samsung M471B5273CH0-CH9 4 GB DDR3-1333 DDR3 SDRAM (9-9-9-24 @ 666 MHz) (8-8-8-22 @ 609 MHz) (7-7-7-20 @ 533 MHz) (6-6-6-17 @ 457 MHz) (5-5-5-14 @ 380 MHz)
DIMM3: Samsung M471B5273CH0-CH9 4 GB DDR3-1333 DDR3 SDRAM (9-9-9-24 @ 666 MHz) (8-8-8-22 @ 609 MHz) (7-7-7-20 @ 533 MHz) (6-6-6-17 @ 457 MHz) (5-5-5-14 @ 380 MHz)
BIOS Type AMI (08/18/2011)
Display:
Video Adapter Intel® HD Graphics 3000 (2108 MB)
Video Adapter Intel® HD Graphics 3000 (2108 MB)
Video Adapter NVIDIA GeForce GT 540M (1 GB)
3D Accelerator Intel HD Graphics 3000
3D Accelerator nVIDIA GeForce GT 540M
Monitor Samsung LTN173KT01000 [17.3" LCD]
Multimedia:
Audio Adapter Intel Cougar Point HDMI @ Intel Cougar Point PCH - High Definition Audio Controller [b-3]
Audio Adapter Realtek ALC269 @ Intel Cougar Point PCH - High Definition Audio Controller [b-3]
network Adapter Microsoft Wi-Fi Direct Virtual Adapter
Network Adapter Qualcomm Atheros AR8151 PCI-E Gigabit Ethernet Controller (NDIS 6.30)
Network Adapter Qualcomm Atheros AR9002WB-1NG Wireless Network Adapter-
 1
1
-
-
No, it dozen,t got serviced.
i have,t this issue once on windows to, but wen i updated mi driver then all workt ok.
-
Hi
anybody now how to fix upside down webcam?!
Pleaze help!
Any help would be greatful!
Thx!
-
Hi
NielsjeNLPlesze send me a mesage if you succeded with Asus N73SV to make it work full !
sory for mi engles!
-
Hi
I have this notebook ASUS N73SV. I installed OS X Mavericks and the wifi card and lan work natively or automatically.
This is my hardware:
LAN - Qualcomm Atheros AR8151 PCI-E Gigabit Ethernet Controller (NDIS 6.30)
Wifi - Qualcomm Atheros AR9002WB-1NG Wireless Network Adapter
-
Hi
can sombody help me with a tutorial ,step by step how to pack and instal OS X Mavericks on Asus N73SV
I dont now How to pack on usb this Maverick Bootpack to make it work
soryy for bad englesh!
Asus N73SV: Mojave with Clover Bootloader Legacy ESP
in Asus
Posted
STEP 1: Download macOS Mojave
The full operating system is a free download for anyone who has a Mac.
1. Purchase a 16GB or larger USB drive
2. Open Mac App Store
3. Log in with your Apple ID
4. Download macOS Mojave
The Application Install macOS Mojave will appear in /Applications.
STEP 2: Create a Bootable USB Drive with terminal.
1. Insert the USB drive
2. Open /Applications/Utilities/Disk Utility
3. Left corner click / View / Show all devices
4. Highlight the USB drive in left column
5. Click Erase button
6. For Name: type USB (You can rename it later)
7. For Format: choose Mac OS Extended (Journaled) GUID
8. Click Erase then Done
9. Copy paste the falowing command in terminal; sudo /Applications/Install\ macOS\ Mojave.app/Contents/Resources/createinstallmedia --volume /Volumes/UNTITLED --nointeraction && say Mojave Drive Created
( change UNTITLED with your erased usb name)
STEP 3 Install Clover Bootloader on USB
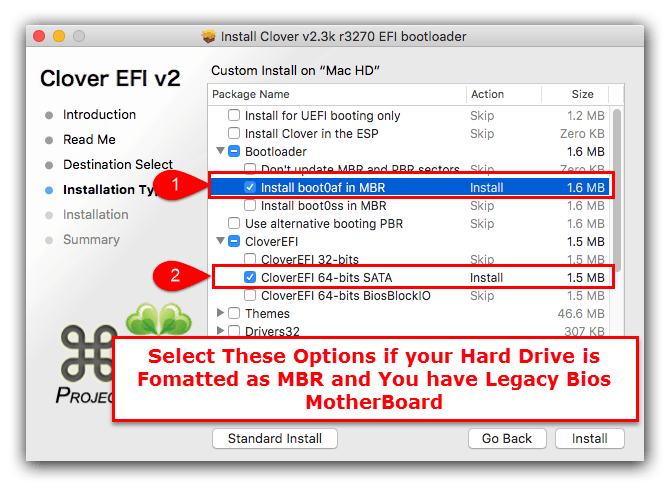
1.Download Clover bootloader from internet, and install with settings from screenshots down below.
2.Replace your Clover folder from EFI with mine; INSTALL USB ASUS N73SV CLOVER MOJAVE
STEP 4: Recommended BIOS Settings in general
If you're installing on a recommended CustoMac desktop with AMI UEFI BIOS, the options are simple. For other systems make sure to set your BIOS to Optimized Defaults, and your hard drive to AHCI mode.
For this Notebook Asus N73SV just Load Optimized Defaults
1. To access BIOS/UEFI Setup, press and hold Delete on a USB Keyboard while the system is booting up
2. Load Optimized Defaults
3. If your CPU supports VT-d, disable it
4. If your system has CFG-Lock, disable it
5. If your system has Secure Boot Mode, disable it
6. Set OS Type to Other OS
7. If your system has IO Serial Port, disable it
8. Set XHCI Handoff to Enabled
9. If you have a 6 series or x58 system with AWARD BIOS, disable USB 3.0
10. Save and exit.
STEP 5: Install macOS Mojave
All you need to do is boot from the USB drive and install! Insert the USB in a USB 2.0 port.
1. Turn on the computer
2. Press the hotkey to choose boot device (F12 for Gigabyte motherboards, F8 for ASUS motherboards, F11 for ASrock motherboards)
3. Choose your USB
4. At Clover boot screen, choose Boot OS X Install from Install macOS Mojave
5. When you arrive at the Installer, choose language.
6. For a new installation of macOS, you MUST erase and format the destination drive according to the following steps before continuing.
• a. In the top menu bar choose Utilities, and open Disk Utility
• b. Left corner click / View / Show all devices
• c. Highlight your target drive for the Mojave installation in left column.
• d. Click Erase button
• e. For Name: type macOS Mojave (You can rename it later)
• f. For Format: choose Mac OS Extended (Journaled) or APFS
• g. Click Erase
• h. Close Disk Utility
7. When the installer asks you where to install, choose macOS Mojave
8. Upon completion, the system will automatically restart.
9. Press the hotkey to choose boot device (F12 for Gigabyte motherboards, F8 for ASUS motherboards, F11 for ASrock motherboards)
10. Choose Install macOS Mojave USB
11. At the Boot Screen, choose macOS Mojave
12. Complete macOS installation. The system will automatically reboot.
STEP 6: Post Installation
The installation is complete, but the drive isn't bootable yet. Boot from the USB again, this time choosing macOS Mojave.
1. Press the hotkey to choose boot device (F12 for Gigabyte motherboards, F8 for ASUS motherboards, F11 for ASrock motherboards)
2. Choose USB
3. At the Boot Screen, choose your new macOS Mojave installation.
4. Complete macOS Mojave setup
5. Download Clover bootloader from internet, and install with settings from screenshots down below.
6. Replace your Clover folder from EFI with mine and reboot; CLOVER POSTINSTALL ASUS N73SV MOJAVE
7. At the Boot Screen, choose your new macOS Mojave HDD.
8. Fix Intel HD3000 graphics, download Intel HD3000 Fix Mojave zip from down below, and install the kext in S/L/E ( kext its clean, extracted from macOS Sierra image)
9. Fix Wifi Atheros AR9285, download AirPortAtheros40.kext zip from down below, and install the kext in S/L/E. ( kext its clean, extracted from macOS High Sierra image)
10. Reboot
You are done.. installation is complete, you have a full functional MacBook Pro - Asus N73SV !
Not working Nvidia GeForce GT 540M!
AirPortAtheros40.kext.zip
CLOVER POSTINSTALL ASUS N73SV MOJAVE.zip
INSTALL USB ASUS N73SV CLOVER MOJAVE.zip
Intel HD3000 Fix Mojave.zip