


pokenguyen
-
Posts
304 -
Joined
-
Last visited
-
Days Won
22
Content Type
Profiles
Articles, News and Tips
Forums
Posts posted by pokenguyen
-
-
Use those files (dsdt.aml, ssdt-1.aml, ssdt-2.aml), along with ssdt.aml generated by ssdtprgen. Then run the script in terminal to patch your AppleRTC.kext:
perl -pi -e 's|\x75\x30\x89\xd8|\xeb\x30\x89\xd8|' "/System/Library/Extensions/AppleRTC.kext/Contents/MacOS/AppleRTC"
-
Enable Optimus in BIOS, then post your original dsdt ssdt, you can use RW-Everything or AIDA64 to extract them. I will write a patch for you.
-
Your laptop CPU (i5-4300U) is not supported by SSDTPrgen, that's why my tool failed, I will contact Piker later.
You can use this file I generated for 4300U: https://dl.dropboxusercontent.com/u/8160092/ssdt.aml
Can you boot without usb now?
-
Ok:
- You have to do step 13, select Tools > SSDT Generator, it will create /Extra/ssdt.aml for your cpu.
- You have to do do step 8 (press F4), if not, the origin folder will be empty.
I suggested you restart from usb and repeat from step 8. Please follow EXACTLY, or you will have problems like this again.
Please take note every steps for sure. I can't help you if you even don't know what you are doing.
-
Tell me which steps you did, and didn't.
-
If you don't mind doing extra steps, try this guide:
https://osxlatitude.com/index.php?/topic/6372-guide-dell-latitude-5x30-clover-install-guide/
-
Your Clover usb can't boot because you don't have right config.plist, or you are lacking kexts in kexts/10.9 folder. The config.plist is really important for Clover, you are nearly unable to boot without correct one.
-
0GB or 2GB is only cosmetic problem. (There is no way that you can boot with a Graphics card 0MB). Just make sure QE/CI has been working fully. I think you should create a new 10.9.2 installer with Clover. If your config.plist can boot to installer, you can boot to OS X too.
-
Just a note, you have to use patched mach_kernel which matches your OS x version if you use Chameleon.
-
What is your usable graphics card? HD 4600 with nVidia Optimus? or nVidia only?
EDIT: It's nVidia only, no HD4600. Do you have full QE/CI with Chameleon?
FYI: nVidia 765M on Dell Alienware can be used with Clover by setting Inject nVidia=true and Inject EDID=true.
-
Try each of these solutions:
1/ different usb 3.0 ports
2/ At clover screen, press spacebar, boot without cache/booot in safe mode.
3/ replacing GenericUSBXHCI in 10.9 folder with the latest kext: http://www.insanelymac.com/forum/topic/286860-genericusbxhci-usb-30-driver-for-os-x-with-source/
4/ remove GenericUSBXHCI
5/ Change Fast Boot to Throughout.
-
Try using this folder, I included config.plist for you https://dl.dropboxusercontent.com/u/8160092/EFI.zip
-
Still waiting for root when you boot to USB does mean that it can't load your USB 3.0 drivers. Check if you have /EFI/Clover/kexts/10.9/GenericUSBXHCI.kext. It's better to redownload and create CLOVER partition (you can keep the install os x partition)
If you still can't load it, something wrong with your USB config in BIOS.
-
Haswell does not use AICPM, and you should use original mach_kernel with Clover, Clover will patch it correctly.
Here are unnecessary things for Clover:
patched mach_kernel (use vanilla kernel instead)
NullCPUPowerManagement (useless on Haswell)
-
Use hackintosh vietnam tool to create a config.plist suit your laptop, then try again.
-
Dell Latitude E7x40 Mavericks/Yosemite Clover UEFI
Here is guide for Clover install on E7440 I assumed based on my experience, note that dsdt patch is based on HD4400 only model. If you have nvidia, zip the origin after pressing F4, post it here I will write a patch for them:
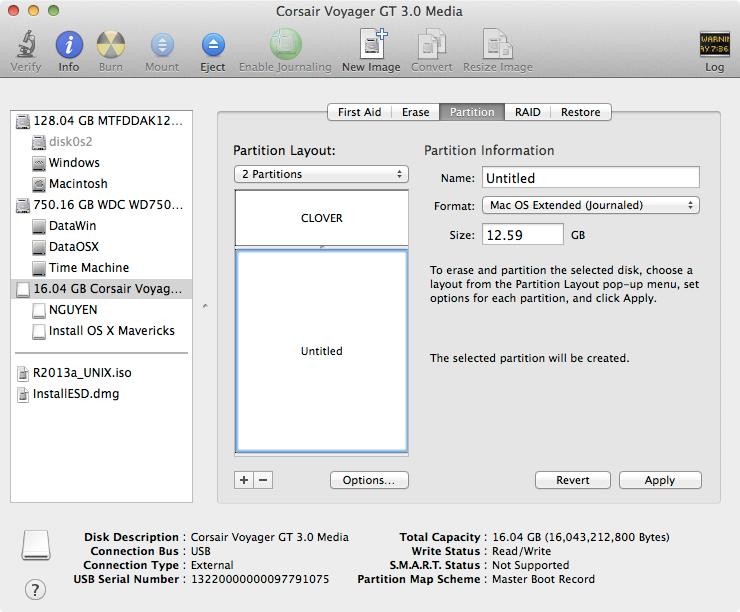
1. Prepare a USB with 8GB or more, format by Disk Utility:- Partition Layout: 2 Partitions
- 1st Partition: Name CLOVER, Format: MS-DOS (FAT), Size: >300MB
- 2nd Partition: Name Untitled, Format: Mac OS Extended (Journaled), Size: >7GB
- Options: Master Boot Record
2. Download Clover.zip, extract then copy EFI folder to CLOVER partition.
- Download Config.zip, extract then select right config.plist and copy to /EFI/Clover/:
3a. For OS X Mavericks
- Download Mavericks Install app from AppStore.
- Launch terminal and run the following script:sudo /Applications/Install\ OS\ X\ Mavericks.app/Contents/Resources/createinstallmedia --volume /Volumes/Untitled --applicationpath /Applications/Install\ OS\ X\ Mavericks.app --nointeraction
- Your Mavericks Installer partition will be renamed "Install OS X Mavericks"
3b. For OS X Yosemite
- Download Yosemite Install app
- Right click to Yosemite Install app > Show Package Contents > Contents > Shared Support, open InstallESD.dmg.
- Open OS X Install ESD partition, open BaseSystem.dmg (hidden file)
- Use Disk Utility to clone OS X Base System to MacUSB partition.
- Go to System/Installation of USB and delete the alias “Packagesâ€, then go to “OS X Install ESD†partition, copy the “Packages†to the folder System/Installation of your USB
- Copy BaseSystem.dmg and BaseSystem.chunklist (hidden files) from OS X Install ESD to OS X Base System (on your USB)
4. Restart with USB plugged in, select these options in BIOS:- Function keyboard: Function mode
- Disk: AHCI
- UEFI Boot: Enabled
- Secure Boot: Disabled
- Legacy Rom: Disabled
- Add boot option: Add EFI\Boot\Bootx64.efi in USB, then move the boot entry to top.Save settings and restart.
5. Clover bootloader screen shows up, press F4 (this will dump your dsdt, ssdt), and shutdown.
6. Use another Mac, download HVT here, run the tool and install Tools > MacIASL, run MacIASL, go to Preferences and set to ACPI 5.0, then open /EFI/Clover/ACPI/origin/dsdt.aml in CLOVER USB drive. Click Compile, you will see 2 errors. Select the first error, you will see lots of Zero, delete them all. Click compile, you will see 1 error left.
Click Patch button, download the patch here and apply:
https://www.dropbox.com/s/du6ee0eislnzan2/Dell%20E7x40%20patches.txt
Click Compile to check for errors, if no error (ignore warnings), you can save the file with File Format: ACPI Machine Language Library, name DSDT.aml to /EFI/Clover/ACPI/patched/ (of CLOVER USB).
7. Boot to USB, Clover bootloader screen will show up (if not, add Clover in USB in BIOS again), select "Boot OS X Install from xxxxxxxxx" (your OS X Installer partition).
8. Press spacebar if a nagging screen about Mouse/keyboard appears. Install screen will appear, use Disk Utility to format your drive as GPT, create a Mac OS X Extended (Journaled) partition and install Mavericks to your formatted partition. The installer will extract necessary files to "Install OS X Mavericks" (not your target partition). This takes a lot of time at the end, though you only see "a minute remaining". This will end PHASE 1. If you are installing Yosemite, jump to step 11
9. Restart and Clover bootloader screen (from USB) shows up, select "Boot OS X Install from Install OS X Mavericks" (your Mavericks Installer partition, not your install target partition).
10. Install screen will appear and continue installation. This time, installer will install files to your target partition and create Recovery HD partition. This will end PHASE 2.
11. Restart, Clover bootloader screen shows up, then select "Boot OS X from YourPartition".
12. If everything goes well, you can boot straight to OS X desktop.
13. Copy config.plist from USB to /EFI/Clover/ of EFI partition, then use Clover Configurator to IMPORT config.plist (in EFI partition) and edit those values:- ACPI > GeneratePStates/CStates: uncheck
- SMBIOS: create your new SMBIOS (Macbook Air 6,2) with random Serial NumberThen EXPORT config.plist to /EFI/Clover/ of EFI partition
14. Download HVT here, run the tool and select those:
- CloverUEFI
- Kexts > Intel Ethernet or Broadcom Ethernet.
- Kexts > Graphics > HD4400/4600 DP/HDMI Freeze (Only on Mavericks 10.9.1 -> 10.9.3)
- Tools > Kext Wizard.
- Tools > SSDTGenerator.
- Tools > MacIASL.
- Tools > Clover Configurator.
- Fixes > Hibernate Mode > Disable Hibernate
Use kext wizard to install this https://www.dropbox.com/s/reah7jmuyh1jlpu/AppleHDAALC%20ALC%20292.zip
15. Download https://www.dropbox.com/s/mut20ige5ylgj6o/Kexts%20Dell%20E5x30.zip, unzip and copy .kext files to /EFI/Clover/kexts/10.9 and 10.10 of EFI partition
16. Copy /EFI/Clover/ACPI/patched/dsdt.aml from USB to HDD EFI partition.
17. Copy /Extra/SSDT.aml in your Mac partition to /EFI/Clover/ACPI/patched/ (of HDD EFI partition)
18. Recheck if config.plist, dsdt.aml, ssdt.aml are placed correctly in EFI partition of internal drive.
19. Restart, go to BIOS, add Boot entry of /EFI/Clover/Cloverx64.efi in your EFI partition, move it to the top, save and restart, you should see Clover screen and option to boot to OS X. Enjoy!
Clear Network Settings
If you use any USB Wifi device, or use Mobile Phones to connect to Internet before completing the guide, you won't be able to access to AppStore or iCloud. You must reset your network settings:
- Go to /Library/Preferences/SystemConfiguration/ and delete these files:- CaptiveNetworkSupport
- com.apple.airport.preferences.plist
- com.apple.network.eapolclient.configuration.plist
- NetworkInterfaces.plist
- Go to System Preferences > Network, delete all connection. Then restart
- Go to System Preferences > Network, add your connection again.
Update from Mavericks to Yosemite
If you followed the old guide (without Yosemite mentioned), do extra steps:
- Download latest HVT, run and select Clover UEFI, Clover Configurator > finish.
- Go to /EFI/Clover/kexts/, create 10.10 folder and copy kexts here https://www.dropbox.com/s/mut20ige5ylgj6o/Kexts%20Dell%20E5x30.zip to 10.10 folder.
- Use Clover Configurator to IMPORT /EFI/Clover/config.plist, go to Boot section and select kext-dev-mode=1. Then EXPORT config.plist to /EFI/Clover/.
Run the OS X Yosemite installer and follow the guide.
Done!
Windows 8 UEFI Dual Boot
- Use Disk Utility to prepare a Mac OS X Extended partition (don’t ever use Fat32, Disk Utility will mess up your drive)
- Create a FAT32 usb drive, extract Windows 8 64-bit iso there
- Boot to usb drive, format the new partition to NTFS, install Windows there.
- Go to BIOS, move the Clover boot entry to top.
Done!-
 4
4
-
You need to install Chameleon after inst to get bootloader on hdd. You may need to fix the boot0 error too.
-
Could someone try my Clover guide on a clean install and report?
https://osxlatitude.com/index.php?/topic/6372-guide-dell-latitude-5x30-clover-install-guide/
-
E6540
in The Archive
Does this laptop have both Intel HD4600 and AMD in Windows? If you have both and no option to switch off AMD Switchable Graphics, only HD4600 is usuable on OS X.
-
Yes, I see it.
I am trying to turn my chameleon boot into clover boot following your guide.
I just edit my config/dsdt patch/ kext in that guide.
-
You can find the dsdt patch at my guide, I don't patch Nvidia ssdt (ssdt-7).
-
Try those files: DSDT.aml and SSDT-1.aml (it's actually your SSDT-7.aml).
I basically apply the patch of Dell E5x30, then rename ssdt-7.aml to ssdt-1.aml. (I applied the 1366x768 patch, if you're using 1600x900, apply the patch here):
https://osxlatitude.com/index.php?/topic/6372-guide-dell-latitude-5x30-clover-install-guide/ (Step 14)
You also have to create SSDT.aml by SSDTPrgen to get working cpu, and for chameleon to load ssdt-1.aml.
Also, disable hibernate mode by run this on terminal:
sudo pmset -a hibernatemode 0
-
Sorry, but they are not vanilla (unmodified, unpatched) files. If you want to extract dsdt, ssdt from Windows, use RW-Everything or AIDA64.
Your CPU Power Management is not configured correctly, ACPI_SMC_PlatformPlugin is not meant to loaded on IvyBridge system, maybe wrong smbios, old ACPIPlatform, etc.
-
Please post all vanilla dsdt/ssdt, not this modified/merge dsdt.

Dell E6420 with Nvidia Nvs 4200M on Mavericks
in The Archive
Posted
My mistake, a call is missing from previoud dstd.aml. Try again, make sure you only have these .aml in /Extra folder: new dsdt.aml, your cpu's ssdt.aml, ssdt-1.aml, ssdt-2.aml. No other .aml is in /Extra
I'm trying to call _OFF function in ssdt-1.aml from _INI to turn off your nVidia at boot.
dsdt.aml.zip