petras47
-
Posts
16 -
Joined
-
Last visited
Content Type
Profiles
Articles, News and Tips
Forums
Everything posted by petras47
-
Hi EMlyDinEsH, any progress?
-
Thanks EMlyDinEsH, I made reports with Aida64 Lenovo Z70-80.zip
-
more details about last attempt, boot OS X installer without cache ended: verbose boot: log:

-
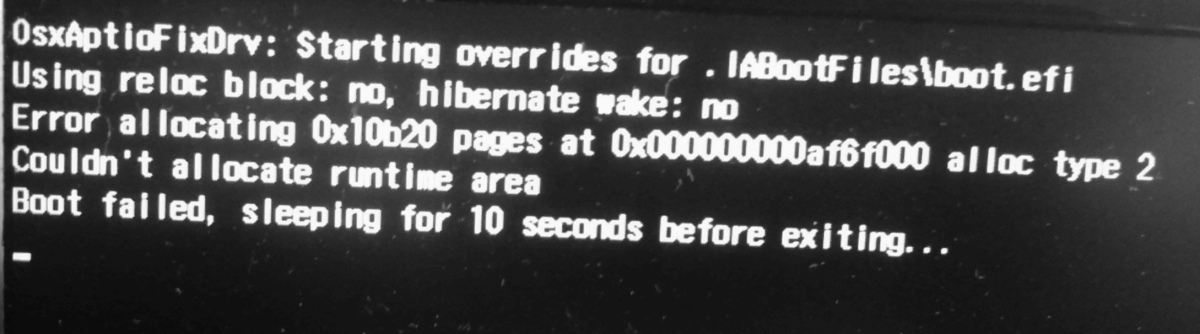
First of all Thank You Jake Lo for your work with Jake's config.plist Clover didnt load, then I returned to official EFI folder ( is to say in USB installer I deleted EFI folder made by Bronxteck, placed official EFI folder and then replaced config.plist with Jake's version. After that Clover loaded, but further all the same: normal OS X boot ended with restart, without cache OS X boot ended with same text: OsxAptioFixDrv: Starting ...
-
Bronxteck Yes, before yesterday I downloaded OS X El Capitan 10.11.4 installer from within VMware's OSX with Mac App Store. Then I successfully made USB installer according (http://www.osxlatitude.com/edp/documentation/pre-installation/), on end of procedure Terminal outputed "Complete", there wasnt any error message. All last attempts to boot OSX installer I have done with that USB installer.
-
I booted my laptop Lenovo Z70-80 without HDD, as Bronxteck recommended, visually I got same result, Clover loaded, normal OSX boot ended with white apple on black screen, and OSX boot without cache: Log: What to do next?
-
I forgot to mention why I asked about virtual OS, I asked in forum on this topic: https://osxlatitude.com/index.php?/topic/9042-how-successfully-to-create-osx-usb-installer-in-virtual-machines-osx/
-
Dear Bronxteck, my knowledge of English far away from perfection, I am not sure what do you mean saying: I guess you encourage to make OS X USB installer in virtual machine's OSX? That I already done according http://www.osxlatitude.com/edp/documentation/pre-installation/, so I should use that USB drive? Yes?
-
in laptop there are one HDD split in two volumes, first bootable with win10, and second for data, and one SSD in place of DVD, in that SSD I am going to install OSX, I will remove HDD with win10 when booting from USB installer I will remove RAM stick from second bank-channel I created USB installer in host OS win10, VMware Workstation Player 12.1.1, and OS X El Capitan 10.11.4 in VMware. Is there any advice how successfully to create OSX USB installer from with in VMware's OSX? Thank You
-
Can anyone to say what to do to reach OS X installer?
-
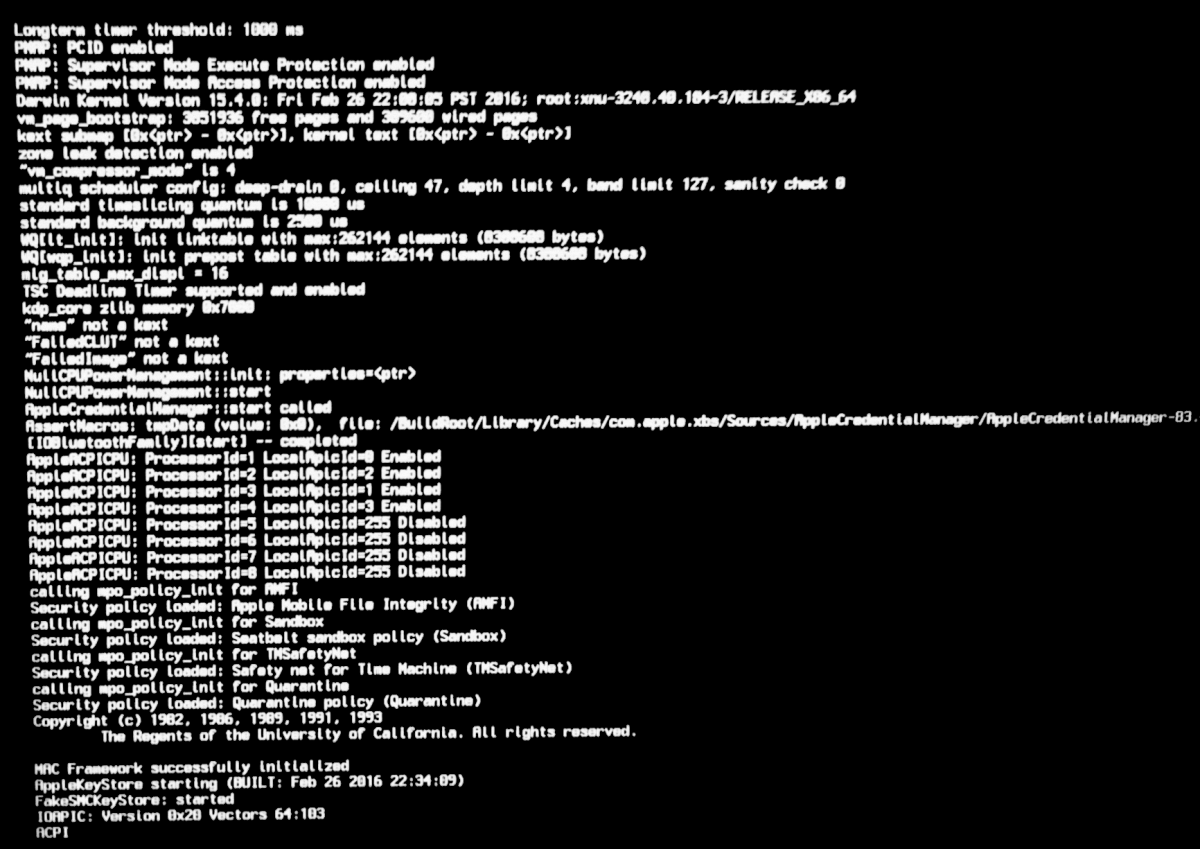
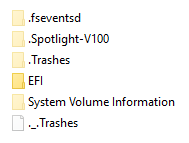
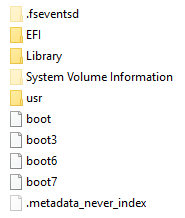
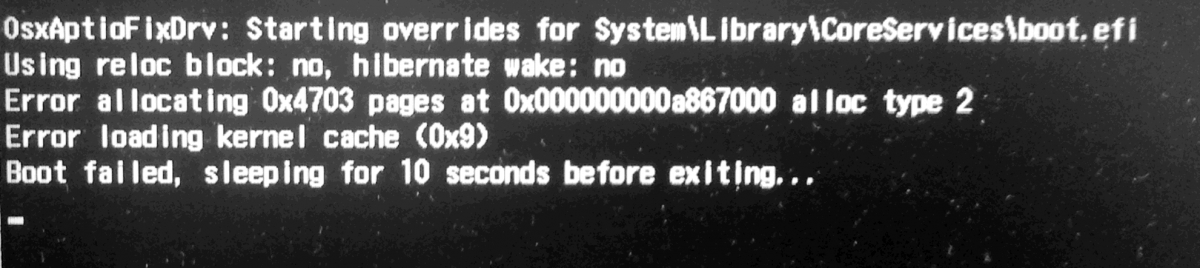
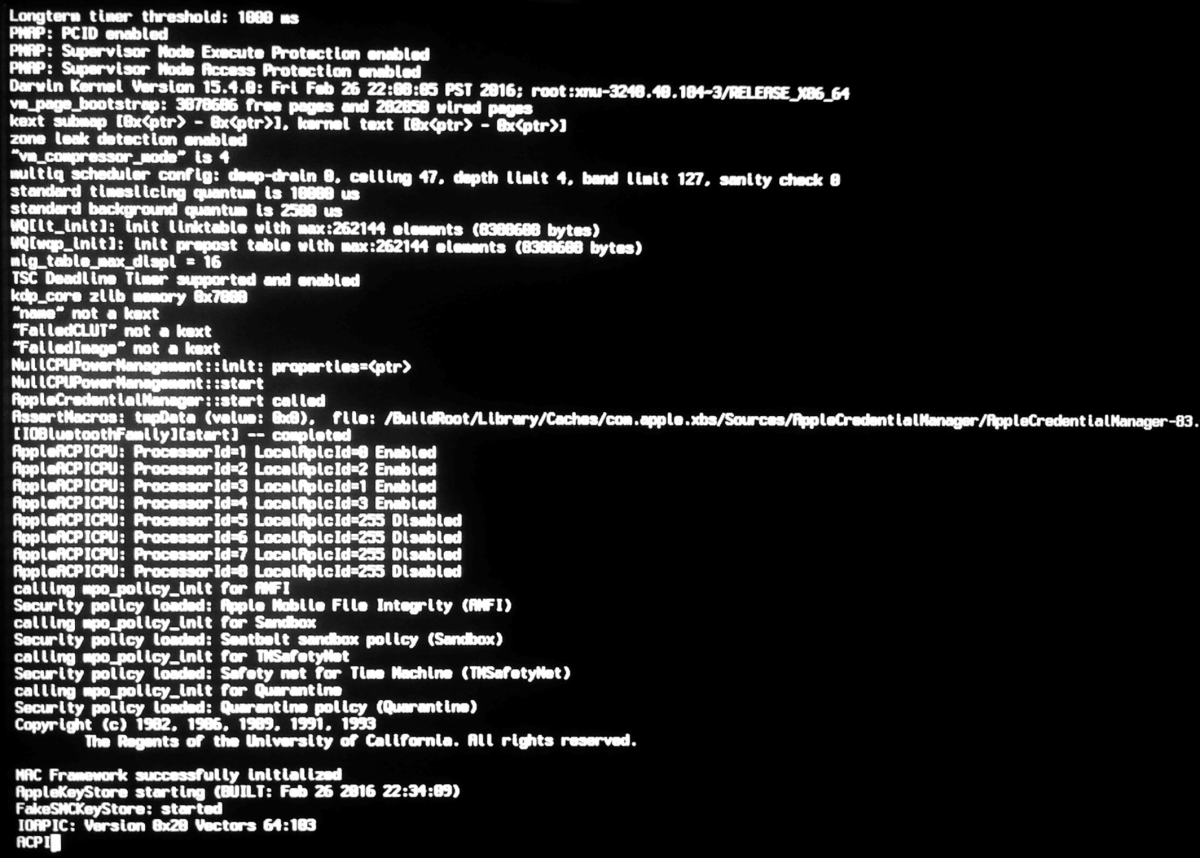
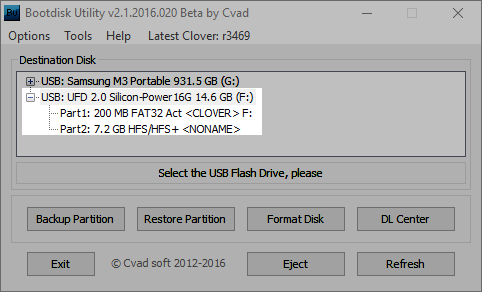
Hello, I successfully made OS X El Capitan 10.11.4 USB installer in VMware OS X (host OS win10), copying files to USB drive was quite long, but after about half an hour that was completed, then I put boot pack EFI folder in EFI partition. Then booted from prepared USB installer, Clover loaded successfully, then I chose normal OS X boot, with enter key, after 20 seconds on black screen appeared white apple and process stops on that, I waited about 5 minutes, there wasnt activity in USB drive (it has flash lights on read-write), then I pressed Esc and was returned to Clover UI. Then I booted OS X without cache and get such screen: Pressing Ecs returned to Clover UI. Logging was enabled, log file: Curious that with OSX made USB installer's EFI partition's root folder looks: But with Bootdisk Utility in Windows made USB installer's Clover partition's root folder looks: Probably it is OK, I dont know.
-
Bronxteck I intend to make OS X USB installer in VMware OS X, what bootpack should I use, from (http://www.osxlatitude.com/edp/compatibility/) designed for Lenovo Z70-80 (http://argo.osxlatitude.com/packs/Lenovo/Broadwell/Lenovo_Z70_80_Intel_HD5500-clover_support.zip), or what you sent to me (edited EFI folder)? Thank You
-
Thanks Bronxteck, I tried to load with your edited EFI, but that wasnt successful, then I thought to check OS X 10.11.4 instalation image (5.hfs) integrity, most of the time for big and important programs I check downloaded file integrity before using it, and in this case I thought that I already done that, but I was wrong, given MD5 Hash mismatch. Really sorry, I need redownload that file. I successfully loaded OS X 10.11.4 in VMware, maybe would be more straight way to make USB installer according official documentation in OS X. I will write how to succeed. Thank You
-
EFI.zip
-
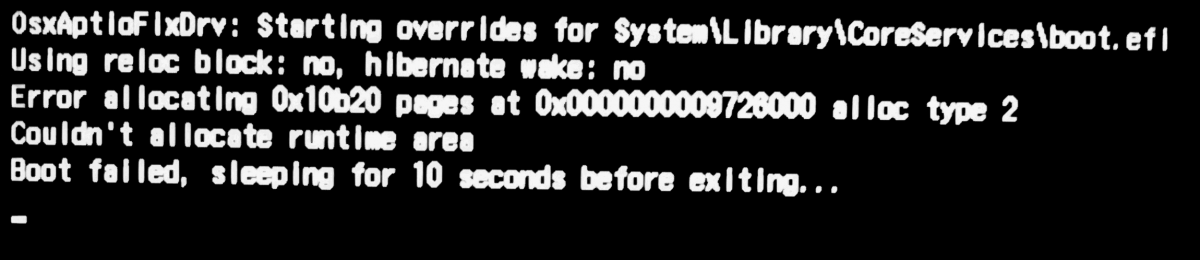
Thanks for your commitment and quick response, the last few days I did not have enough time to answer, Sorry I wasnt clear how booting from USB installer happen. I successfully loaded Clover, all in Clover worked, but trying to boot OS X installer from Clover wasnt successful, I ended with black screen with white apple's apple in the middle: just show that screen and nothing happen, pressing Esc returned to Clover UI. Sometimes black screen with apple stay just some short time and happens automatic computer restart. With changed BIOS date before February/14/2016 I got same or similar result, still ending with black screen and white apple. Booting without cache with current date in BIOS gave this screen: with date before February/14/2016: For Bronxteck's note "also your log shows issues with your boot theme" I dont know what to say, for me Clover worked flawlessly, probably there is some inconsistency as result of file manipulations what I did. For this "another thing i see is your clover has been regressed to Clover revision: 3320 in your picture it shows you installed 3504" - in first post I wrote that first of all I made USB installer with Bootdisk Utility (https://applelife.ru/threads/mac-osx-i-clover-iz-windows-izgotovlenie-zagruzochnoj-flehshki.37189/), in this procedure I used latest Clover version available from Bootdisk Utility itself, that was 3471. I made attempt to equate Clover versions, from this https://sourceforge.net/projects/cloverefiboot (chameleon, stolen and rebranded)/files/Bootable_ISO/page downloaded CloverISO-3320.tar.lzma, in this archive I found two files: Clover-v2.3k-3320-IA32.iso and Clover-v2.3k-3320-X64.iso, I chose Clover-v2.3k-3320-X64.iso, looks like 64-bit, so I took two folders in root of this ISO: /Library and /usr, and with them replaced same folders in USB installer, now all three folders of bootable partition are the same Colver version, /EFI from OSXLatitude‘s bootpack, /Library and /usr from official Clover page. When I booted from USB installer with those changes, I successfully loaded Clover, then in Clover I pick to load normaly OS X installer, I get such screen: then booted without cache and got different screen: This screen "locks up" computer, I mean pressing ESC didnt returned to Clover, and even pressing laptop's power button had no effect, I restarted laptop pressing and hold laptop's power button for about 5 seconds.
-
Hello, first of all thanks OSXLatitude team for excellent work. I am novice in this field, help would be appreciated. Recently I bought laptop Lenovo Z70-80, this model has ready OSXLatitude‘s Hackintosh instalation http://www.osxlatitude.com/edp/compatibility/, so I decided to try. I dont have access to Mac, according to http://www.osxlatitude.com/edp/documentation/ I should use Vmware Hackintosh, but with Bootdisk Utility (https://applelife.ru/threads/mac-osx-i-clover-iz-windows-izgotovlenie-zagruzochnoj-flehshki.37189/) is realy much easier (now I am using Windows 10), essentially Bootdisk Utility makes the same, creates Hackintosh USB installer with Clover. My question, is it possible to create working USB installer by two (or need more) steps: 1) Make USB installer with Bootdisk Utility, 2) then add suitable OSXLatitude‘s bootpack to this USB installer. I tried to do this, but unsuccessfully, OS X installer didnt load. Further more details. ------------------------------------------------- My laptop LENOVO Lenovo Z70-80 ------------------------------------------------- CPU: Intel Core i7-5500U Chipset: Intel Broadwell-U PCH-LP (Premium) RAM (I bought separately): 16384 MBytes @ 798 MHz, 11.0-11-11-28 - 8192 MB PC12800 DDR3 SDRAM - Crucial Technology CT102464BF160B.C16 - 8192 MB PC12800 DDR3 SDRAM - Crucial Technology CT102464BF160B.C16 Graphics: Intel HD Graphics 5500, Intel Broadwell-U GT2 - Integrated Graphics Controller NVIDIA GeForce 840M, 1996 MB HDD: Samsung SSD 850 EVO 120GB, 117.2 GB, Serial ATA 6Gb/s @ 6Gb/s (I bought separately) ST1000LM014-SSHD-8GB, 976.8 GB, Serial ATA 6Gb/s @ 6Gb/s Sound: Intel Broadwell PCH-LP - High Definition Audio Controller Network: RealTek Semiconductor RTL8168/8111 PCI-E Gigabit Ethernet NIC Intel Dual Band Wireless-AC 3160 HMC WiFi Adapter --------------------------------- Important BIOS settings --------------------------------- Information: BIOS version: ABCN96WW (newest at moment) Configuration: Wireless: Enabled SATA Controller Mode: AHCI Graphic Device Setting: UMA Only Intel Virtual Technology: Disabled Security: Secure Boot: Disabled Boot: Boot Mode: UEFI Fast Boot: Disabled USB Boot: Enabled --------------------------------------------------------------------- How I made USB installer (on USB 2.0 flash drive) --------------------------------------------------------------------- In Bootdisk Utility: 1) Configure to download latest Clover available for Bootdisk Utility. 2) Made „Format Disk“ , this created two partition and made first UEFI bootable with Clover. 3) Made „Restore Partition“ to second partition with OS X 10.11.4 (15E65) image, suitable for Bootdisk Utility, which I got from https://applelife.ru/threads/mac-osx-i-clover-iz-windows-izgotovlenie-zagruzochnoj-flehshki.37189/page-57#post-557498. Add OSXLatitude‘s bootpack: 1) Prepared OSXLatitude‘s bootpack for LENOVO Lenovo Z70-80, which I got from http://www.osxlatitude.com/edp/compatibility/(http://argo.osxlatitude.com/packs/Lenovo/Broadwell/Lenovo_Z70_80_Intel_HD5500-clover_support.zip). This bootpack‘s root folder: /EFI /Kexts Readme_clover_support.txt For me instructions in Readme_clover_support.txt isnt clear, I just understand that I should move all kexts in /Kexts to /EFI/CLOVER/kexts/10.11, and I did that. 2) Replaced USB installer‘s first partition (bootable with Clover) /EFI folder, with prepared bootpack‘s /EFI. config.plist customize: To get log, in EFI\CLOVER\config.plist set Boot > Debug > true ---------------- Clover‘s log ---------------- After trying to boot OS X installer from prepared USB installer, I get log file \EFI\CLOVER\misc\debug.log: I would be grateful for the advice. Zydrunas