blackosx
-
Posts
33 -
Joined
-
Last visited
Content Type
Profiles
Articles, News and Tips
Forums
Everything posted by blackosx
-
Asus Rampage II Gene - Revision 1 - BIOS version 1701
blackosx replied to SubStandard's topic in The Archive
Thanks for posting your ioreg dumps, however I can't open them! And it's not you as I can't open my own ones that I've made with the v3 of IORegistryExplorer that I posted for you.. It's either a damaged version of it's just really buggy! So I was going to ask you to do it again, but maybe there's no need right now.... because.....looking at the differences in your Linux ACPI dumps compared to mine: - Your dumps are missing SSDT_PmRef_P001Cst.dsl which are the native C-States. Did you find out more about why your C-State options are missing from your BIOS? So for now, the way I see it is this.... As you've already had success using the auto-generated P/C state boot options on Chameleon, then maybe stick to using this for now as you've already said this gives you the best temps (comparable to Windows). If you can find out more about the missing C-states from your BIOS, then we can maybe revisit this in the future.. Or, in the mean time - maybe somebody else might spot something obvious here which I've missed? If though, one day you decide to save your ioreg again then please use the older v2.0 (2.0b1) of IORegistryExplorer that I've attached here and not the one I posted previously. IORegistryExplorer2.zip -
Noobish review: myHack3.1 & Wake Up problem
blackosx replied to digital farmer's topic in The Archive
10.04 - i386 1 - The creation method might be in question there, but ultimately if the end result is correct then it's still a valid file. 2 - So for a like for like replacement board, just different BIOS, your plan of attack should be to extract the ACPI tables (from Linux) and compare them with the ACPI tables you would have originally dumped from your old board (be it either using Linux or a different method back then). You may be surprised to find there's not much difference - meaning you can apply the same patches to your new DSDT or, amend your existing DSDT with the differences (if any) that you find in your new tables. That's great. So just to be clear here, all you're doing it dumping the ACPI tables from your BIOS without there being any influence from any boot loader used to boot OS X on your hack, and also grabbing any other details that aschar's script gathers . Once you have them, you can then begin comparing, stripping and patching them for your system to make them compatible for OS X. -
Asus Rampage II Gene - Revision 1 - BIOS version 1701
blackosx replied to SubStandard's topic in The Archive
Looking at your ACPI dump from Linux, I see you have an RSDT table where as I have an XSDT table. Have you ACPI 2.0 support disabled in your BIOS? if so, you will want to enable it. See pic:
-
Noobish review: myHack3.1 & Wake Up problem
blackosx replied to digital farmer's topic in The Archive
Good for you Forgive me for not reading your thread thoroughly as I don't have lots of time right now. But it looks like you've spent some time patching a DSDT already and from what you say it worked. Well I guess your topic was titled "Is it the right way to create my own DSDT?" so Conti's reply was to that. He suggests using Linux to extract the ACPI tables from BIOS (which I also suggest you do - see PolishOX's thread here). Then you can always download an i386 v10.04 iso, burn the .iso to a CD-ROM and boot from it and follow the instructions in aschar's script (at the bottom of PolishOX's post). It's not actually that difficult. Otherwise there's DSDTSE as a secondary option.I loaded it up once and hated it. Maybe I didn't give it a chance and it really is a decent app but I have managed to work without it. But you have a DSDT that you made before don't you? If it works then can't you use that? Okay. But I wasn't suggesting you use it, just look at it for reference and comparison to yours. It may help - that's all -
Asus Rampage II Gene - Revision 1 - BIOS version 1701
blackosx replied to SubStandard's topic in The Archive
A common way these days is to use a dropbox account and post a link to the files. -
Noobish review: myHack3.1 & Wake Up problem
blackosx replied to digital farmer's topic in The Archive
Don't give up so easily Have you searched for anybody else using a DSDT for your board? Maybe like here? It might give you a starting point... -
Asus Rampage II Gene - Revision 1 - BIOS version 1701
blackosx replied to SubStandard's topic in The Archive
Okay. So this shows you have p-states with both options - and I get the exact same results with both options here (which makes sense as we are both using the same CPU, mono and boot loader in this case). So in theory you don't need to use the Chameleon boot options - but I see you still get the high temps when doing so. Did you manage to file->save the ioreg from IORegistryExplorer for each boot and not just a screengrab of the performancestatearrays ? This way I can check mine against yours. -
Noobish review: myHack3.1 & Wake Up problem
blackosx replied to digital farmer's topic in The Archive
I think the reason you don't get many answers is because ACPI is a huge subject and not many people have a wide, holistic, knowledge of it. Some names that spring to mind that I've seen demonstrate great skill in this area are THe KiNG and Masterchief for example, otherwise you will find a large number of users who know and understand certain parts of it and then many more, like me, who only know small parts which have been learned from reading and testing code posted by others. I have only scratched the surface throughout my endeavours to read the ACPIspec as it takes a lot of time and dedication to read and understand the code and then try to match it all against the chipset(s) of your own hardware. I would love to be able to say to you.. "Right then, this is what you need to do". But unfortunately, I can't. I fail at becoming an intellectual on ACPI because my brain always wants to do something else instead. The only real way to learn is to search and read from the myriad of topics that already exist in a number of forums, blogs and online resources, then roll up your sleeves and get stuck in with trial and error. Don't forget that our PC's BIOS knows nothing of OS X that we attempt to run on our hacks and for that a good starting place is to examine Apple's ACPI tables for reference to see how they do it. Pick yourself one issue which you have and concentrate on trying to fix that. Annotate the parts of the code as you learn about them, making changes slowly and checking the code still compiles as you go. And don't expect to get it right first time. With the right amount to time, patience, dedication and effort, it can be learned and the more time you spend on it, the more it will start to make sense. Sorry if this post doesn't give you an answer you were expecting but that's all I can give here. But I wish you every success in your quest -
Asus Rampage II Gene - Revision 1 - BIOS version 1701
blackosx replied to SubStandard's topic in The Archive
Run this to print Chameleon's boot log. bdmesg.zip As for a using a theme for Chameleon, see here. -
Noobish review: myHack3.1 & Wake Up problem
blackosx replied to digital farmer's topic in The Archive
Hi digital farmer. You can find a collection of Chameleon themes at the Theme Park section of the voodooprojects forum. Note: You'll need to be registered to see the downloads etc. -
Asus Rampage II Gene - Revision 1 - BIOS version 1701
blackosx replied to SubStandard's topic in The Archive
No, I don't think flashing your BIOS will prove anything and besides it always introduces an element of risk. No. I am very thankful for his kindness so I don't care about that. End of story. Could maybe a friend or someone else do it for you? Yes, I see you have a performance state array but with only two entries. Was this produced from your machine booted with or without using Chameleon's Generate PState/CState boot options? Also, I see the property numbers are all 0? (Looking here I see the same - it must be due to the v3.0 I sent you as v2.0 shows them indexed - maybe a bug?) EDIT: Okay - I've run a test here using the following Chameleon boot options: DropSSDT Yes GeneratePStates Yes GenerateCStates Yes Looking at Chameleon's boot log I see: Found ACPI CPU: P001 Found ACPI CPU: P002 Found ACPI CPU: P003 Found ACPI CPU: P004 Found ACPI CPU: P005 Found ACPI CPU: P006 Found ACPI CPU: P007 Found ACPI CPU: P008 SSDT with CPU C-States generated successfully P-States: min 0xc, max 0x14 SSDT with CPU P-States generated successfully RSDT: Added 2 SSDT table(s) Do you see similar? For further investigation, could you boot your machine without and with the above Chameleon boot options and then load up IORegistryExplorer and do a file->save and send me the file for comparison here? -
Asus Rampage II Gene - Revision 1 - BIOS version 1701
blackosx replied to SubStandard's topic in The Archive
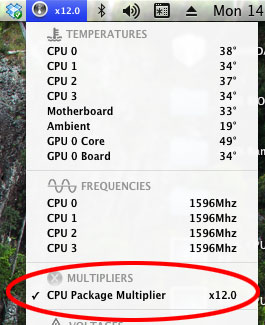
No it's not that. I've just flashed my BIOS with v1701 and I still have all the options I showed previously with v1405. Booted in to OS X just fine and speedstep is working fine. No problem. It wasn't a warning - you just didn't need it. Well done And I can see your CPU Package Multiplier is at it's lowest p-state (x12) which is good. No. I've never had one and to be honest I didn't know what it was until I googled it to find out. Maybe one reads the temps for the CPU core and the other is reading the temp from the CPU casing? I don't know. You did say previously that "In Windows 7, temperatures get around 60-65ºC" - so at least we know OS X is reporting similar temps. Though I still can explain your high CPU temps other than question the cooling / mounting of the heatsink - which I know you've said is okay. Personally, I would look at removing it and re-mounting it just to be sure. You still shouldn't need to do that. But the thing is I'm not sure what your missing....I'm going to have to think some more. Here you go: IORegistryExplorer.zip You're welcome -
Asus Rampage II Gene - Revision 1 - BIOS version 1701
blackosx replied to SubStandard's topic in The Archive
Thanks for posting your org.chameleon.Boot.plist though it doesn't help reveal anything with regard to your power management - I was thinking maybe you had the DropSSDT boot option there but you don't. No matter, but I'm surprised you have so few options available considering we have the same motherboard (albeit different BIOS version) and CPU. I wonder why? BTW, you can remove the EthernetBuiltIn boot option as that's enabled in your DSDT. See here: Device (ETH0) { Name (_ADR, Zero) Method (_DSM, 4, NotSerialized) { Store (Package (0x02) { "location", Buffer (0x02) { "1" } }, Local0) DTGP (Arg2, RefOf (Local0)) Return (Local0) } } No. I said that option is now in IntelCPUMonitor.kext's info.plist - one of FakeSMC's plugins. But there's no need to change it as our CPU defaults to Tjmax of 100. I was just showing where the option was in case somebody else reading this wanted to know. You can use FakeSMC's plugins to help show your temps and working speedstep. Grab yourself the FakeSMC_plugins_Apps_rev609.zip from projectosx. Add IntelCPUMonitor.kext and WinbondW836x.kext to your /Extra folder alongside your existing FakeSMC.kext and re-run myHack -> myfix -> quick to update your myhack.kext and caches etc. then reboot. Once booted back up, run the HWMonitor app and you will see a new item in the menubar. You will then be able to see your temps and current multiplier. Here's a pic from my system: The multiplier changes here from 12 to 21 depending on what I'm doing. Well I didn't pay for it. I just entered my AppleID which is free to create when you use iTunes or the app store.
-
Asus Rampage II Gene - Revision 1 - BIOS version 1701
blackosx replied to SubStandard's topic in The Archive
What boot options do you have in org.chameleon.Boot.plist? Maybe we need to double check your BIOS settings. This is what I see: Well done. The Tjmax setting is no longer in FakeSMC's info.plist but now in IntelCPUMonitor.kext's info.plist - one of FakeSMC's plugins. I think I'm right in saying it defaults to 100, but there is an existing entry to allow it to be changed. TjMax 0 However, a Tjmax of 100 is fine for the i7 920 2.67Ghz. Aida64 in Windows reports the following for my CPU: CPUID Manufacturer GenuineIntel CPUID CPU Name Intel(R) Core(TM) i7 CPU 920 @ 2.67GHz CPUID Revision 000106A5h IA Brand ID 00h (Unknown) Platform ID 2Fh / MC 02h (LGA1366) Microcode Update Revision 11 HTT / CMP Units 2 / 4 Tjmax Temperature 100 °C (212 °F) CPU Thermal Design Power 130 W CPU Thermal Design Current 110 A Max Turbo Boost Multipliers  1C: 22x, 2C: 21x, 3C: 21x, 4C: 21x Yep - The developer tools are free. You can download the latest version from Apple's app store. Load up Xcode, then from the Xcode menu, select Open Developer Tool -> More Developer Tools… where you will be able to download the Hardware IO Tools for Xcode. We're going off topic here. But quickly, I'd say there's no need for any antivirus - just use your common sense if anything asks for your authentication. And yes, turn the firewall on.
-
Asus Rampage II Gene - Revision 1 - BIOS version 1701
blackosx replied to SubStandard's topic in The Archive
Hi josh256 I've heard about this but I've never experienced it - i guess I'm lucky. The 10.7.4 kernel boots in to 64-bit mode fine here. No need to change anything. I do see the following SMC messages in my kernel log: SMC::smcInitHelper ERROR: MMIO regMap == NULL - fall back to old SMC mode SMC::smcReadKeyAction ERROR $Num kSMCKeyNotFound(0x84) fKeyHashTable=0x0 EDIT: I added key $Num to FakeSMC's info.plist so the error regarding that has now gone. All I can determine right now is that maybe AppleSMC is now looking for some extra stuff that FakeSMC doesn't provide. But having said that my iMac also has the following SMC errors in the kernel log: SMC::smcReadKeyAction ERROR: smcReadData8 failed for key DPLM (kSMCKeyNotReadable) SMC::smcReadKeyAction ERROR DPLM kSMCKeyNotReadable(0x85) fKeyHashTable=0x0xffffff8011f39000 SMC::smcReadKeyAction ERROR F0Sf kSMCBadArgumentError(0x89) fKeyHashTable=0x0xffffff8011f39000 SMC::smcReadKeyAction ERROR F1Sf kSMCBadArgumentError(0x89) fKeyHashTable=0x0xffffff8011f39000 SMC::smcReadKeyAction ERROR F2Sf kSMCBadArgumentError(0x89) fKeyHashTable=0x0xffffff8011f39000 SMC::smcInitHelper ERROR: MMIO regMap == NULL - fall back to old SMC mode SMC::smcWriteKeyAction ERROR CLWK kSMCBadArgumentError(0x89) fKeyHashTable=0x0xffffff8012f59000 After some reading on Apple's support forum I did read that maybe the logging of these SMC key requests to the kernel log is now active where as before they weren't? But I don't know. I hear Sandy Bridge CPU's have issues with speedstep but no problems with my 1st gen core i7. A quick geekbench shows a score of 9473 in 10.7.3 and 9434 in 10.7.4. -
Asus Rampage II Gene - Revision 1 - BIOS version 1701
blackosx replied to SubStandard's topic in The Archive
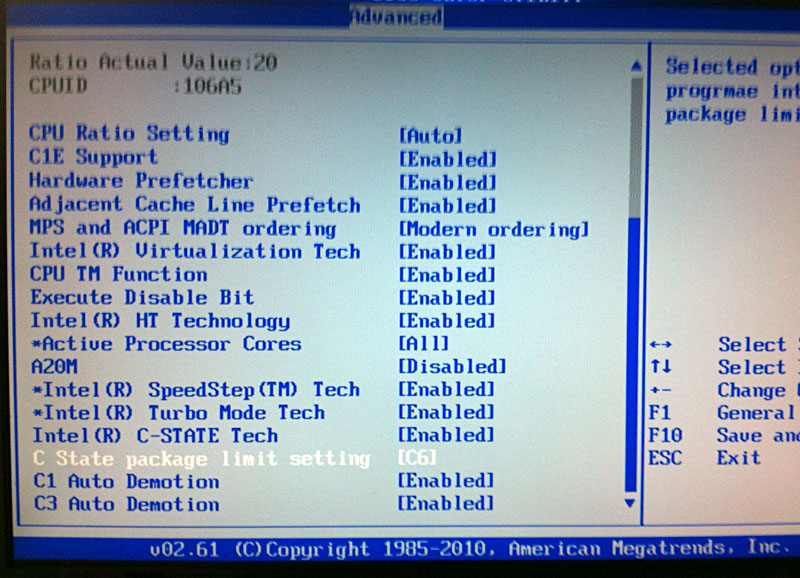
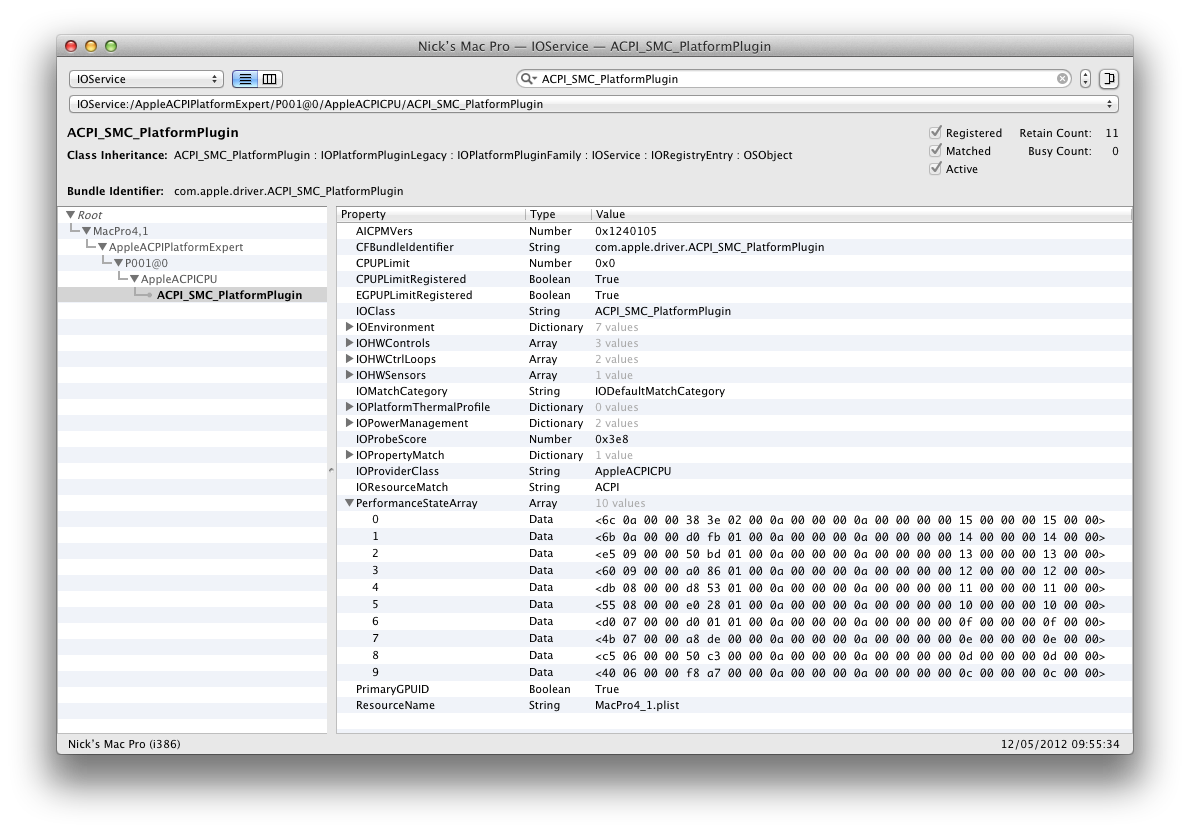
Good to hear your audio is working. I don't use a mic here so I've never thought of checking for it. I'm sure it can be added - I guess the codec verbs need to be changed? I'm not very good at that but maybe I can have a look sometime in the future. Otherwise maybe somebody else might be able to help? Well if you're positive the thermal paste has been applied (I know you said an engineer did it for you) then I can suggest only that you get a better aftermarket cooler and look at the airflow in and out of your case. Is the PC stuck in a corner somewhere, would moving it help? It only appears once Intel® C-STATE Tech is enabled. I see it here under: Advanced -> CPU Configuration If you want, I'll post a photo of my screen? Yes. Correct No - remove those. Your board's native tables are good to use. One way to check for your p-states is to load up IORegistryExplorer (from Apple's developer tools) and check the PerformanceStateArrary under AppleACPICPU -> ACPI_SMC_PlatformPlugin. Here's a screenshot from my end: Well done Well to be honest, not much. I won't have any spare time this weekend so I'm happy to leave you to play with your system and learn more about it. There's a wealth of information out there to read if you want to learn. For example - looking at your System-Profiler.spx file I can see: SMC Version (system): 1.30f3 when really, when trying to emulate a MacPro4,1 is should be more like: SMC Version (system): 1.39f5 I'll leave that one for you to play with - for a start read this post at Prasys's blog. Well done and keep up the good work
-
Asus Rampage II Gene - Revision 1 - BIOS version 1701
blackosx replied to SubStandard's topic in The Archive
Okay. Well I think you should try again sometime as it's only by doing these things that you learn. But for now, here's the AppleHDA.kext from 10.7.4 which I've applied the previous instructions to. http://dl.dropbox.com/u/222155/myHack_F ... A.kext.zip Well if you're happy with those then fine - I guess the ambient temperature is fairly high over there... Great. Yep, there are a few ways. The quickest way will be to type the following in to the Terminal: sudo kextstat | grep AppleLPC Try the DSDT I posted to see if it works for you - it should. But note, it's always recommended to make your own, or at least work through your own, editing it, whilst comparing against someone else's so you try to understand what's in it to learn. Also because there may be some small differences between them - but I guess in this case you know I've compared them both. SMbiosdate 01/22/10 SMbiosvendor Apple Computer, Inc. SMbiosversion MP41.88Z.0081.B08.1001221313 SMboardproduct Mac-F221BEC8 SMfamily Mac Pro SMmanufacter Apple Inc. SMmanufacturer Apple Computer, Inc. SMproductname MacPro4,1 SMserial CK0087654PC SMsystemversion 1.0 At a quick glance this looks good. Nice.. Now, if you know the Terminal commands then you can get some of this information yourself, but having it all done for you in a single app is very helpful. So now, without asking you lots of questions, I can see many things. For example, a list of your loaded kexts: - I see AppleLPC.kext is not loaded - but then I knew it wouldn't be as I have the same board. - I see NullCPUPowerManagement.kext is loaded. You will need to remove this if you want to make use of your boards native powermanagement! - But as i noted above earlier - please make sure you have a bootable USB flash drive handy which you know works before doing this just incase you can't boot your system anymore. I'll look more at the dumps later when I get some time. The DSDT patch you are referring is not really a fix, more a workaround as it tells OS X your southbridge is no longer ICH10 and now something older, I think ICH6? As a consequence you lose the hot-plug benefit of ICH10. I prefer to stick with ICH10 and use the orangeiconfix. Well done - you're learning Yes - I understand that everything Apple is very expensive in Brazil with crazy prices! But programming can always be learnt, even a small understanding can help. You're welcome. My name is Nick -
Asus Rampage II Gene - Revision 1 - BIOS version 1701
blackosx replied to SubStandard's topic in The Archive
Okay. But we have to find out why the instructions didn't work because you do not need to be using AD2000b.kext, HDAEnabler.kext and HDEFEnabler.kext. But this can be done later as it's more important you look at your temps... 84ºC idle is indeed worrying. Is your CPU cooler fitted correctly? What temps do you see in Windows? That would be my first check. If you know the temps in Windows are okay then you know that to aim for with OS X. I ran Prime95 in Windows7 for 20 minutes to check temps which resulted in an average temps of: idle 34°C / load 70°C. But those could be less if I had a better cooler myself - I think I remember dgsga saying his load temps were about 50°C with his Noctua cooler. You will want to check a couple of BIOS settings. Make sure Intel® C-STATE Tech is set to ENABLED. Set C State package limited setting to C6 Then for OS X you need to make sure AppleLPC.kext loads and for that we need to patch the deviceID in your DSDT. This is currently identified as Device (SBRG) in the DSDT you've extracted from your BIOS. For example, here's a snippet from mine (though note all instances of SBRG have been changed to LPCB) Device (LPCB) { Name (_ADR, 0x001F0000) Method (_DSM, 4, NotSerialized) { Store (Package (0x02) { "device-id", Buffer (0x04) { 0x18, 0x3A, 0x00, 0x00 } }, Local0) DTGP (Arg2, RefOf (Local0)) Return (Local0) } With the BIOS settings and AppleLPC loaded, power management in OS X will be native. You won't need to use either the Generate P-State / Generate C-State boot options in Chameleon. What SMBIOS settings are you using? Can you maybe run a set of scripts and post the result here? The set of scripts can be found in an app named DarwinDumper and the latest version can be found near the end of this thread at projectosx. But to conclude for now, check your temps in another OS such as Windows. Then we can check OS X. This is cosmetic. For a fix,use THe KiNG's OrangeIconFix.kext I've already posted it - see above - it's called DSDT_ASUS_Rampage_II_Gene.dsl.zip These things take a while to get right and that's the fun of building a hackintosh - I know it can be frustrating but if we all wanted to run OS X flawlessly without having to do anything then wouldn't we all go out and buy a real Mac? Reason for edit: To update the link to the DarwinDumper topic at projectosx. -
Asus Rampage II Gene - Revision 1 - BIOS version 1701
blackosx replied to SubStandard's topic in The Archive
Okay. Well here's a start. I don't know everything but I can tell you what I do know. NOTE - DO NOT CONTINUE UNTIL THIS HAS BEEN DONE.: Before you do anything, I recommend you check you have a backup method of booting your system just incase something goes wrong and your system fails to boot. If you've created a bootable USB flash drive using myhack then great, if not then create one. Either way, check it works and keep it safe incase you need it. Here's an overview for enabling audio on your mono for Lion 10.7.3 that you will need to change two things - your DSDT and AppleHDA.kext. It also works for 10.7.4. iasl tool You will need a way of compiling / decompiling your ACPI files. .aml files are the compiled files which the system uses. .dsl files are the decompiled files which you can edit in a text editor. This can be done with a tool named iasl and for ease, it's been wrapped in a friendly GUI app which allows you to drag a drop a file on it's icon. It will either compile a .dsl file or decompile a .aml file, depending on what you give it. Here's the latest version which I got from here iaslMe 20120420.zip Now you have the tool you can start to edit your DSDT.dsl and recompile afterwards for using. Edit DSDT 1 - start with your extracted DSDT_A1234_A1234000.dsl file. 2 - copy it somewhere and rename it DSDT.dsl 3 - open it up in a text editor. 4 - Search for Name (_HID, "pnp0c14") and change to Name (_HID, "PNP0C14") 5 - Search for Method (_WAK, 1, NotSerialized) Add the following before it. Method (DTGP, 2, NotSerialized) { If (LEqual (Arg0, Zero)) { Store (Buffer (One) { 0x03 }, Arg1) } } Search for Device (SBRG) and add the following code before it Device (HDEF) { Name (_ADR, 0x001B0000) Method (_DSM, 4, NotSerialized) { Store (Package (0x08) { "AFGLowPowerState", Buffer (0x04) { 0x01, 0x00, 0x00, 0x00 }, "layout-id", Buffer (0x04) { 0x0C, 0x00, 0x00, 0x00 }, "PinConfigurations", Buffer (Zero) {}, "platformFamily", Buffer (One) { 0x00 } }, Local0) DTGP (Arg2, RefOf (Local0)) Return (Local0) } } (For more info on patching AppleHDA check THe KiNG's thread at projectosx.) 6 - save the file 7 - drag and drop the new DSDT.dsl file on to iaslMe's icon. 8 - In the window that appears, the last line will read something like this: Compilation complete. 0 Errors, 101 Warnings, 35 Remarks, 84 Optimizations You will eventually want to fix all those warnings, but for now we have no errors so that's good. 9 - In the Finder, next to your DSDT.dsl file will be a folder named Sessions, and in there will be your compiled DSDT.aml file. This can now be added to your /Extra folder for the bootloader to use. Patch APPLEHDA Here I presume you have a folder named Extra at the root of your Lion volume. If you're using Conti's myHack then you should have. But if not then you will need to adjust the following commands to suit. The plan here will be to copy the AppleHDA.kext from /System/Library/Extensions to your /Extra/Extensions, patch it and have myfix add it to the myhack.kext for loading. You could also just patch the original AppleHDA.kext in /System/Library/Extensions if you prefer. 1 - make a copy of AppleHDA.kext to your /Extra/Extensions. sudo cp -R /System/Library/Extensions/AppleHDA.kext /Extra/Extensions 2 - Bin patch AppleHDA binary sudo perl -pi -e 's|\x8b\x19\xd4\x11|\x9b\x98\xd4\x11|g' /Extra/Extensions/AppleHDA.kext/Contents/MacOS/AppleHDA 3 - Remove two .xml files from the Resources folder sudo rm -f /Extra/Extensions/AppleHDA.kext/Contents/Resources/layout12.xml sudo rm -f /Extra/Extensions/AppleHDA.kext/Contents/Resources/Platforms.xml 4 - download these two patched .xml files, and put them on your Desktop. Platforms.xml layout12.xml sudo cp -R ~/Desktop/*.xml /Extra/Extensions/AppleHDA.kext/Contents/Resources 5 - run myHack -> myfix. (Choose quick if you like). This will copy all your /Extra/Extensions to /System/Library/Extensions/myhack.kext and bump all the version numbers so the kexts load. Repair ownership/permissions and rebuild your caches. 6 - reboot I think that should get your audio up and running. -
Asus Rampage II Gene - Revision 1 - BIOS version 1701
blackosx replied to SubStandard's topic in The Archive
Hi leomenassun / SubStandard Well done with extracting the ACPI tables from your BIOS I've done some comparisons and so far... BIOS v1405 original DSDT is identical to BIOS v1701 original DSDT. BIOS v1701 original DSDT is identical to both leomenassun's & SubStandard's DSDT's (had to check). So it's safe to say that we can patch your DSDT's based on the patched one I posted above. -
Asus Rampage II Gene - Revision 1 - BIOS version 1701
blackosx replied to SubStandard's topic in The Archive
Hi guys I suggest you check the topic for this board from dgsga at InsanelyMac http://www.insanelymac.com/forum/index. ... pic=201758 He kindly offered to sell that board to me and that's what I'm using now. I've made a couple of minor tweaks to the DSDT but otherwise this is all dgsga's work. Here's the latest version I have for it: DSDT_ASUS_Rampage_II_Gene.dsl.zip Please note: This is from BIOS version 1405 and not version 1701 as you have in your title here. Feel free to use it for comparison and a reference when editing your own DSDT. EDIT: After some PM's from leomenassun for help trying to understanding some of the basic principles, I thought it sensible to post here the original DSDT from my BIOS for comparison purposes. Use this to compare with your own original DSDT from your BIOS and see what changes have been made between the original and patched files. EDIT2: Having looked at the original BIOS I extracted and posted here, I realised it was from a patched BIOS ROM. Here's a truly original v1405 DSDT.aml, extracted from the ASUS BIOS ROM using Andy's amitool162. Original_Asus_Rampage_Gene_II_BIOS_v1405_DSDT.dsl.zip -
I've decided to bring myself in line and change my ways to follow what you suggest as it makes sense. I came round to the thinking of although I've managed perfectly well the way I was doing it, I'd be foolish to ignore an easier method of managing the system. myfix provides a complete solution for adding new/alternative/patched extensions whilst keeping the system operating correctly with regards to ownership, permissions & caches. All my OS X volumes now have /Extra and when required, I use myfix to populate myhack.kext and generate new caches. Maintaining my OS installation(s) this way can now be as simple as possible. Very true - I had never thought of that. Thanks for the explanation and giving me the reason to update my methods Reason for edit: My original post here was done quickly due to little time, I've made the post more comprehensive.
-
Hi Conti This morning I adapted my main system to run using myHack.kext, built by myFix which I pointed to my /Volumes/Boot/Extra folder when asked. This worked great and I think I'll now use this method for all my installs. However, I use a single HDD partition for my bootloader stuff and have my /Extra folder there and not on any of my OS X volumes. When running myFix I currently see the following in the log: WARNING: Extra not found on target... Installing your Extra from /Volumes/BOOT/Extra/ to /Extra... Would it be possible for myFix to do it's stuff using the directed /Extra folder without having it copy the /Extra folder to the target root? Thanks
-
Perfect!.. Good job. Thanks Conti.
-
Ah.. okay. Good to know it wasn't something stupid I was doing here. lol I'll keep my eye out for a build and test it as soon as possible for you.