firefly1
-
Posts
15 -
Joined
-
Last visited
-
Days Won
1
firefly1's Achievements
Private First Class (3/17)
1
Reputation
-
Securing your data by automatic home directory encryption
firefly1 replied to firefly1's topic in The Archive
I slightly modified the script listed under point 4, as a blank space character was causing some trouble: #!/bin/bash # replace 0x_____ with the Vendor ID of your USB stick device='system_profiler SPUSBDataType | grep 0x_____ | cut -d: -f2 | cut -c2-7` # only execute the command if the USB stick is present if test "$device" = "0x_____" then password=`system_profiler SPUSBDataType | grep -i 'serial' | cut -d: -f2 | tr -d ' '` /Applications/TrueCrypt.app/Contents/MacOS/TrueCrypt --mount --password="$password" /dev/rdiskXsY /User/secret password='clear' fi -
Security for your Hackintosh Especially for mobile computers like Dell's Latitude-series data encryption is desirable in case that your notebook gets lost or is stolen. Till Snow Leopard one could easily use OS X built-in encryption mechanism called FileVault (aka Legacy FileVault). This encypted the home directory of a user. During the logging process the user password served to decrypt the home diretory. With OS X Lion FileVault 2 was introduced. This was a redesign of the encryption mechanism. It has the advantage of a full disc encryption but is tightly conneted to Apple hardware. So personally I don't know of a way to make FileVault2 work to encrypt the system itself with a hackintosh. As I really wanted to at least secure my home diretory, I've been thinking about other opportunities. As far as I know there are ways to make Legacy FileVault work (Link 1 and Link 2). But I also wanted to be able to access the data over a Linux system as well. The only encryption software I know of that is useable under OS X and Linux is TrueCrypt (eventhough the development stopped) or VeraCrypt (as a successor). With this guide I want to describe a way to encrypt your home directory with TrueCrypt and have it automatically mounted during the boot process using a specal USB stick as your passphrase or key. So the data only get decrypted if this USB stick is plugged into your computer when booting. There are several steps needed to accomplish this: 1) Automated start We need to invoke a script during the boot process, which can be accomplished using launchd. Therefore one has to create a plist in: /Library/LaunchDaemons It can have any name (I called mine: my.start.script.plist) and has to be created as root. <?xml version="1.0" encoding="UTF-8"?> <!DOCTYPE plist PUBLIC "-//Apple Computer//DTD PLIST 1.0//EN" "http://www.apple.com/DTDs/PropertyList-1.0.dtd"> <plist version="1.0"> <dict> <key>Label</key> <string>start script</string> <key>ProgramArguments</key> <array> <string>/usr/local/script/start.sh</string> </array> <key>RunAtLoad</key> <true/> <key>UserName</key> <string>root</string> <key>GroupName</key> <string>staff</string> </dict> </plist> The sole purpose of this plist is to execute the shell script under /usr/local/script/start.sh. 2) Installation of Truecrypt The development of Truecrypt stopped in 2014 (a potential successor is Veracrypt, which now is also available for Linux, OS X and Windows). You should decide for yourself if you still want to use Truecrypt or not. If you want to use Truecrypt you should get the version 7.1a not 7.2! Installation itself is straight forward. 3) Create an encrypted partition Now you've to creat an encypted partitions, where to store the data of your user. Of course you need some free disk space for this. Creation of the partition is normally done using disk utility. After this you can use TrueCrypt to set up an encrypted filesystem within this partition. As a password you should use the serial number of a USB stick. This can be figured out by the command: system_profiler SPUSBDataType. 4) Creating a script Now you've to create a script that invokes TrueCrypt during the boot process and to mount your encrypted partition. It's the script that you execut in the first step. Here is how mine is looking like: #!/bin/bash # replace 0x_____ with the Vendor ID of your USB stick device='system_profiler SPUSBDataType | grep 0x_____ | cut -d: -f2 | cut -c2-7` # only execute the command if the USB stick is present if test "$device" = "0x_____" then # get the serial number of you USB stick # and use it as a password password=`system_profiler SPUSBDataType | grep -i 'serial' | cut -d: -f2` # decrypt and mount the parition # you need to give the correct partition name for X and Y # my user will be called secret /Applications/TrueCrypt.app/Contents/MacOS/TrueCrypt --mount --password=`echo $password` /dev/rdiskXsY /User/secret # delet the password password='clear' fi The script must be made executable, with root rights and I only want root to be able to execute it: chmod 4700 script.sh 5) Create a new user Now you've to create a new user who uses the directory /User/secret as his home diretory. This has to be done using the command line: dscl . -create /Users/secret dscl . -create /Users/secret UserShell /bin/bash dscl . -create /Users/secret RealName "John Doe" dscl . -create /Users/secret UniqueID 2000 dscl . -create /Users/secret PrimaryGroupID 20 -> this is staff dscl . -create /Users/secret NFSHomeDirectory /Users/secret dscl . -passwd /Users/secret dscl . -append /Groups/admin GroupMembership secret dscl . -read /Users/secret 6) Take care about the home folders rights Perhaps you need to change the rights of the folder /Users/secret as it gets mounted by root and not the user secret: chmod 775 /Users/secret And you have to make sure that the folder belongs to the same group as your new user. In the above case it's the group staff (groupid 20). That's it! Now you have to plug in a very specific USB stick before booting you hackintosh. This will automatically decrypt and mount the home diretory of your newly created user. By adding an additonal user you will still be able to log in with the original user. In case you forget to plug in the USB stick you can also use this user to mount the encrypted paritions, you only need to know the serial number of you USB stick. So you should write this down somewhere incase that your USB stick gets lost. Otherwise you will not only lose the stick itself but also your passphrase. By extending the script you might also be able to use a keyfile that is stored on any USB stick to decrypt the partition. Just in case that you like the idea. Hope this is helpful to some hackintosh users that like an extra bit of security.
-
This is something I could understand but it did not cause any trouble before the installation of the other ALPS driver. So why was it working over USB before? But I've trouble with the USB 3.0 port and sleep anyways. I'm trying to get this solved in the E6230 thread. But anyways, the trackpad is working fine now with eSATA or internal SATA
-
Thanks for your answer. Actually I already experienced problems with the first driver. But I kept on testing things and I believe I found the reason for my trouble. I always performed initial tests of any change using a USB 2.0 test drive. And here I experienced that strange bahavior. But when I connect the same drive via eSATA things seem to work fine. At least after 10 tests and switching between USB 2.0 and eSATA I only experienced the trouble when using USB 2.0. The spinning ball always could be reproduced after the computer went to sleep, but not when connected to eSATA. Right now I hope that this is the solution to my problem, and I feel quite positive about this.
-
I just tested your driver (RehabMan-Voodoo-ALPS-2014-0205) on my E6230 and it did solved all my issues! Thank you very much and also everybody involved in this driver - great job! THANKS! Edit: After a reboot I noticed that it's not as trouble free as I thougt. My screen was very dark a the login screen and during login it turned black. After some seconds a dark picture came back. The brightness of the screen could be turned back to normal via the keyboard. Then the "taskbard" froze and the mouse showed a spinning ball. At a second reboot things worked better again. At a third it was acting wired again. Same strange behavior with RehabMan-Voodoo-ALPS-2014-0207-update-2. After login the notebook even tried to go to sleep and woke up immediately again. Now there is an infinitely spinning ball. Edit 2: I just reinstalled to Mavericks to my external USB 2.0 test drive and the trackpad driver is working much better at the moment. Perphaps something was broken after trying too many different trackpad drivers. I'll keep you updated about any further problems. BTW what am I suppoesed to do with the org.rehabman.voodoo.driver.Daemon.plist? Edit 3: After the screen went to sleep, when I didn't use the computer. I logged in back again an clicke the apple logo, to turn the computer off. Now there is only the infinitly spinning ball again. I can still move the pointer but noting is reaction. So there is still a problem.
-
Thanks for your replies! I just installed the RehabmanMerge-kext again. At first the pointer was not reaction but then I moved the Finger Z button all to the left side the pointer started to move normally. But clicking by tapping the trackpad is not working any more. Enabling clicking in the System settings under Trackpad is not doing anything for me right now. Then I removed the RehabmanMerge driver and installed the ALPS-TouchPad-Driver-v7 . After a reboot the neither mouse nor keyboard was working only the attached USB mouse was doing its job. Going back to the RehabmanMerge driver brought the keyboard and trackpad back but still no clicking. Then the system started to hang, for instance the user was loged out automatically . Will play with this later a bit more, but right now I don't have the time nor the mood for doing this . Will keep you updated about any progress.
-
Hi Nolen, thank you very much for your reply! Don't get me wrong this was by no means ment as a complaint. I posted this more for your information. So if there is some day a driver that's working for me too, I'd be very happy but besides this I'm already very glad that I've a very nicely working hackintosh with my Dell E6230. This is a great community and I wouldn't have been able to do this myself - Thanks a lot to anybody involved in OS X Latitude!
-
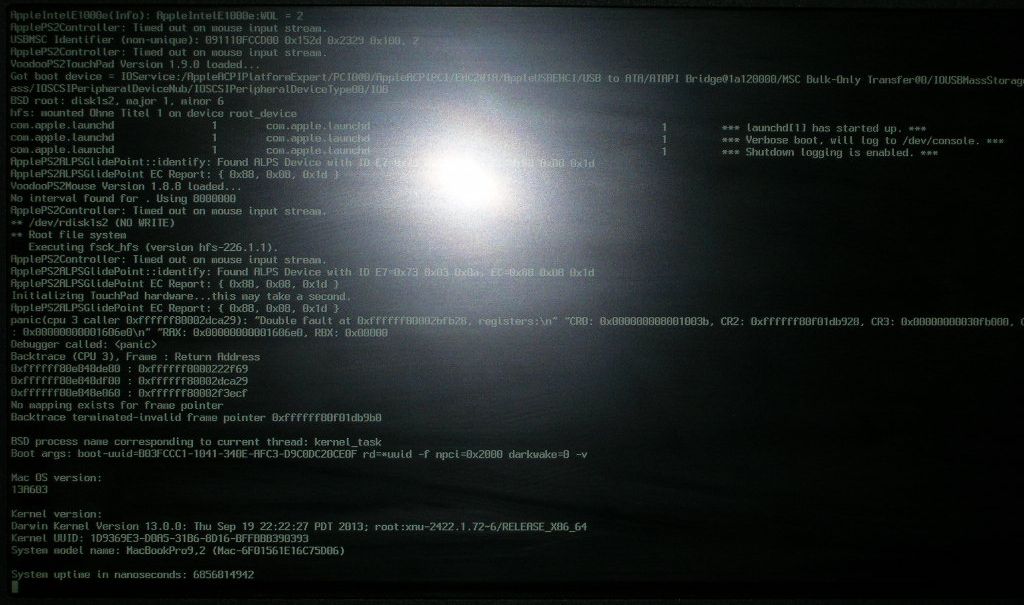
I get a kernel panic as well. Installed the driver from post #241 (it's this package: Npjohnsonyeahoon Merge.zip). To me it looks similar to the error Stolidedog posted in #267. I'm using a Latitude E6230 Core i5, with 2x4 GB ram. Edit: I tested the kext from post #222 (ALPS Mutitouch.zip) and used the normal version (not the debug version). With this kext my notebook booted and the mouse was "kind of working". Actually two finger scrolling is working but normal movement of the mouse pointer often hangs. So the mouse moves for a moment then it stops, then it moves again and it stops again. Very annoying behavior. Actually I don't need all multitouch guestures, if only two finger scrolling and right click by two fingers was working I'd be happy. If anybody knows about a kext to acomplish this I'd be happy about a reply Thanks to anybody working on this anyways! Edit 2: I just installed the kext from the first post. The mouse works a bit better now but besides this the system behaves strange, with the screen truning dark then I've to login again or it tries to go to sleep. Very strange. Last Edit for today: The last thing I tested was the driver RehabmanMerge for the first post. The screen was not turning black but the reaction of the trackpad was not really good. Sotimes the pointer just didn't move and single click is not alwas recognized. For now I'll probably stick with the normal kext without two finger scrolling, at least the pointer reacts the way it should.

-
Thanks for your reply! I'll try your Npjohnsonyeahoon Merge.zip.
-
Hi, I just installed Mavericks to a Dell Latitude E6230. It's working nicely besides the touchpad. So I wanted to install the drivers from this thread but actually I'm not sure if I understood everything correctly. So I've to use the: ALPS-TouchPad-Driver-v7.zip not the other archive, right? Before installing the kext from there I've to delete every PS2 kext from: /E/E, /S/L/E and /S/L/E/myHack.kext/Contents/PlugIns. Then I've to install the VoodooPS2Controller.kext. Can I copy that to /E/E and run myFix to include it in the myHack.kext? The VoodooPS2Deamon only has to be copied to /usr/bin? And what to do with the VoodooPS2synapticsPane.prefPane? Do I have to copy it to /Users/name/Library/PreferencePanes? This is what I think what to do after some reading but before I break anything I wanted to ask. And what are those other folders good for, like: - synapticsconfigload.dSYM - VoodooPS2Controller.kext.dSYM Are they just automatically created when compiling the other files? Thanks for any help!
-
Hello everybody, I tried to install OS X on this notebook and wanted to let you know about the outcome. I've to mention that EMlyDinEsH provided me some great help, as I don't have a clue about DSDT patching. Thanks a lot! First of all I want to say that I didn't get a working system, but it might be possible for somebody who is more skilled than I'm. As I wanted to be able to return the system in case that OS X is not working, I installed to an external USB 2.0 hard disk. Using the flags -v -x it was possible to install and boot OS X 10.8.3. Without the -x flag the AMD/ATI graphics card did cause trouble. The system was booting but didn't show a login screen. I attached the Extra-folder I used. There are several DSDT-files included. They should work using the flags -v -x. Also there are two SMBios.plist files, one for MacBook Pro one for MacBook Air. Mostly I used the one for the Pro. I've some more DSDT files, where the ATI graphics card is disabled but using those DSDT files the system didn't boot. It did shut down suddenly during the boot process. I'll attach those files too, just in case that somebody wants to have a closer look. Once again, those DSDT files didn't work for me! And of course you've to modify the BIOS settings. In "Adcanced" you have to "Fast BIOS Mode" must be set to off, "AHCI Mode Control" must be manual and "Set AHCI Mode" is turned on. In the "Boot" optiosn you have to disable Secure Boot. After that a new entry appears "OS Mode Selection". Here you've to select "CSM OS". This anables the BIOS legacy mode. After that Windows 8 is not booting any longer. For Linux those settings where fine too. As a final note I want to mention that in two cases amount several tries the system booted perfectly and with working graphics using the boot option: -v GraphcisEnalber=No PCIRootUID=0 I guess that booting with those options did only work once within 40 tries. It was a matter of chance. Finally I decided to return the system. It's a very nice notebook and has the best screen I ever experienced. So it's a pitty that it wasn't working for me. But I was lucky to get my hands on a Dell Latitude E6230 which is already supported by EDP. Hope you're more lucky than I was in getting this notebook working! Cheers Extra-Samsung-730U3E-X03.zip DSDT_TEST#AMD_DISABLED.zip DSDT_TEST_18Dez13#AMD_DISABLED.zip
-
@iMick Dinesh already helped me a lot in getting this working. HDMI is working fine, only with my TV screen there are some problems, but this is not related to OS X, as I ve the very same problem under Linux and Win 7. @Compik I didn t do anything special for sleep to work. It just went to sleep when I closed the lid.
-
FYI lid sleep is working, eventhough it takes a moment to go to sleep (using a hdd) and you have to push the power button twice to wake it up again. But that's not a big deal to me.
-
After getting some great help by the people from OS X Latitude I wanted to give a little report on the installation of OS X on a Samsung 530U3C-A01 Ultrabook. First of all: The screen is not working and probably never will be working correctly! Only HDMI is an option. This is due to the specific model of the screen, which is Samsung SEC 0200. If you have a different screen you're notebook might be working very well. So you should check you respective screen model. I wanted to clearify this so that you're not disappointed during the reading of this thread. And the supplied Extra folder is made for my exact model, which has a Core i5-3317U. EMlyDinEsH provided me with some extraordinary help, and I'm amazed by the efforts he put into helping me! So much for the preface and now to the installtion and what could be done with the 530U3C: The first thing I did was installing a new BIOS using the tools provided by Samsung on their support site. Under firmware they provide a tool that's called "Update Software". This is actually a Windows program that is used to install the latest BIOS. So you need Windows for doing this. After this you should adjust the BIOS settings. So open the BIOS via F2 and go to Boot and set "UEFI Boot Support" to "Disabled". This is important as there is a bug in UEFI that can break your system nonrecoverable. I have the following settings in Adcanced section: CPU Power Saving Mode: Enabled Hyperthreading: Enabled EDB: Enabled Fast BIOS Mode: Disabled AHCI Mode Control: Manual Set AHCI Mode: Enabled Battery Life Cycle Extension: Enabled USB Charge In Sleep: Enabled USB 3 Wake-up: Disabled Turbo Control: Enabled Intel ® AT Technology Suspend On: Disabled So now you've to prepare a bootable USB stick using myHack. You can find a discription of the process on the myHack website. The important part is "Step1 - Ceate OS X 10.6. 10.7 or 10.8 Installer". I used 10.8 Mountain Lion. After preparing the USB stick you have to run myHack once again and select the option "Install Extra". Using this option you can install the Extra-folder attached to this thread. By now you should have a USB stick that can be used to install OS X. Now things are quite straight forward. Simply plug in the USB stick and boot you notebook using this stick (I adjusted the BIOS settings accordingly). Your machine should boot but when coming to the graphical installtion process the screen is very dark (like it's covered with a grey veil). Sadly this can not be changed. Now the installtion process will ask you for a bluetooth mouse and keyboard. But you can simply plug in an USB mouse and keyboard. You only have to plug it in shortly but you can use the touchpad and build in keyboard of the notebook. After this the installtion can be done as on a real Mac. In the end of the instation process myHack will ask you to remove some packages but you can keep them, they don't have to be removed. Afterwards you can restart the PC but you still have to use the USB stick to boot. You will be promted a selection whether to boot formt the USB stick or from HDD (OS X). Boot from HDD and you're done. That's what can be done so far. Of course you would have to install a boot loader. But I stopped at this point. The good thing is that you can fully use the HDMI output. So you could use this machine with an external monitor nicely. I only tested VGA briefly, didn't work. But sleep is working, which is nice. EMlyDinEsH has put a lot of efforts into patching DSDT files and kexts to get the screen working. But sadly Samsung isn't following general standards so getting anything more than this dark faded looking screen was not possible. So if you really want an Ultrabook that's working nicely with OS X you should look for something else. I'd advice you to have a look at Samsung Serie 9 900X3 (there is a nice thread about one of those models here on OSXLatitude) or ASUS Zenbook UX32VD. They are included in the EDP package, but you might have to make sure that you choose the correct version, as the DSDT file has to be patched for the right CPU type as far as I know. Ok that's it. Thanks for reading. Ps. as a side note, I'll be using Linux on this machine. Ubuntu LTS 12.4.2 was working nicely in a first test, but you should update the BIOS as well and disable UEFI mode - very important! Extra.zip
-
Hi, I've just been sending you the requested files for a Samsung Series 5 Utrabook: 530U3C-A01. Hope to hear form you! Thanks a lot!