TheOpSys
-
Posts
48 -
Joined
-
Last visited
-
Days Won
4
Content Type
Profiles
Articles, News and Tips
Forums
Everything posted by TheOpSys
-
[Short GUIDE] Install High Sierra on Lenovo X201 [i5 520M]
TheOpSys replied to TheOpSys's topic in The Archive
I don't precisely remember what my initial Clover bootloader install options were, since I have it installed on my SSD from 2016, with Sierra and a few weeks ago just upgraded to High Sierra. But last night (after you pointed that you can't reach Clover) , I've tested myself on a 2GB USB stick, as I showed you (standard install meaning that in Clover installer, I only changed the destination to my USB), restarted my laptop and booted from it into the installer with no problem. The post install files I provided are the ones I use on my system right now. My SSD is GPT and APFS (Apple File System), since that's what High Sierra runs on. -
[Short GUIDE] Install High Sierra on Lenovo X201 [i5 520M]
TheOpSys replied to TheOpSys's topic in The Archive
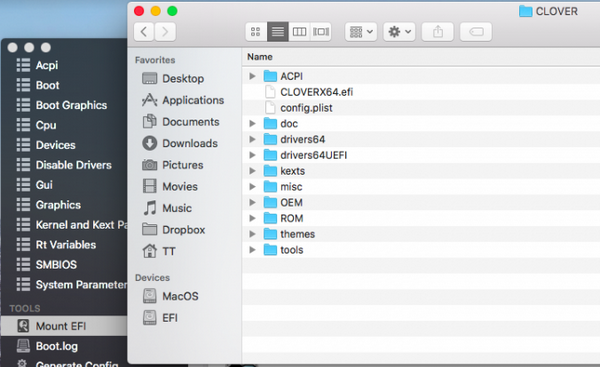
This is my Clover partition, on my SDD (I don't have dual boot, I only use High Sierra, with APFS):
-
[Short GUIDE] Install High Sierra on Lenovo X201 [i5 520M]
TheOpSys replied to TheOpSys's topic in The Archive
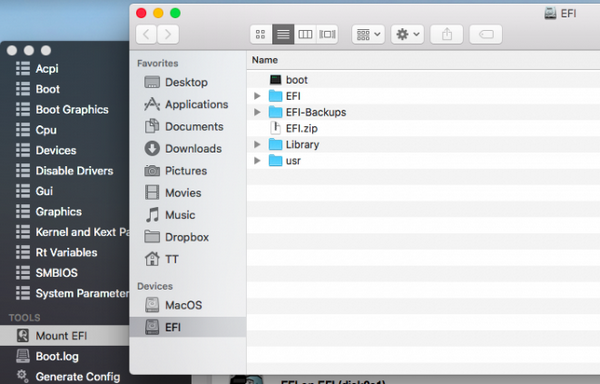
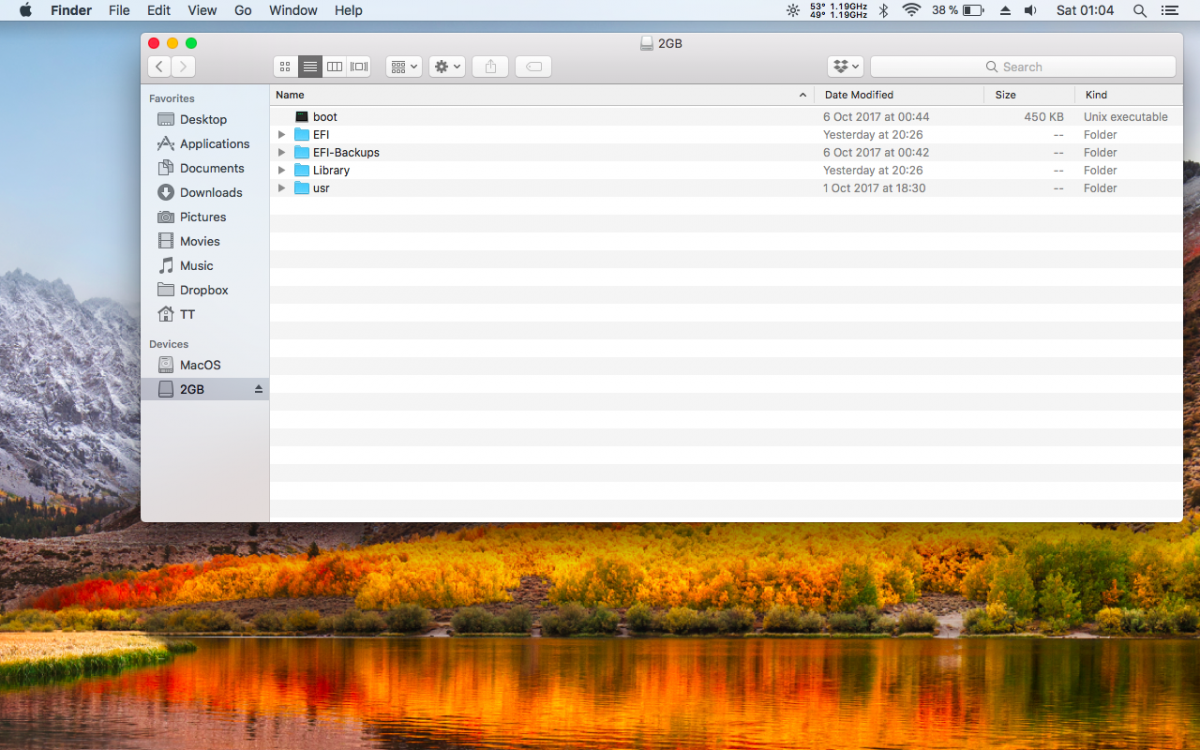
Well, I hope this time I will expose it more clear: I recommend you to use a separate USB stick for clover bootloader, format it in MS-DOS FAT via Disk Utility, get Clover from here, make a standard install on the USB stick, go to freshly installed EFI Clover bootloader USB Stick, delete everything you find on it, download EFI-to reach installer.zip, extract it's content ( you should have one file - boot and four folders - EFI, EFI-Backups, Library and usr), copy them in place of previously deleted Clover files and boot from that USB stick. The terminal command for creating bootable MacOS USB installer seem's to be ok.
-
[Short GUIDE] Install High Sierra on Lenovo X201 [i5 520M]
TheOpSys replied to TheOpSys's topic in The Archive
Standard Clover install, no custom changes, neither on the USB stick Clover used for the installation process or the one you will install on your HDD after the MacOS installation process has ended. In both cases you will delete the contents of EFI Clover bootloader partitions and replace them with the ones I provided. I tried that already, but the .zip files are too big. -
No, it's not, I've just modified one step: To reach the installer and install High Sierra, use this EFI folder like so: format your USB Stick in FAT32, download the latest CLOVER bootloader, install it on the USB by making no custom changes, delete it's content and replace it with 'EFI-to reach installer' content), after that select it under the boot device on startup. Also I've made a separate thread on this subject.
-
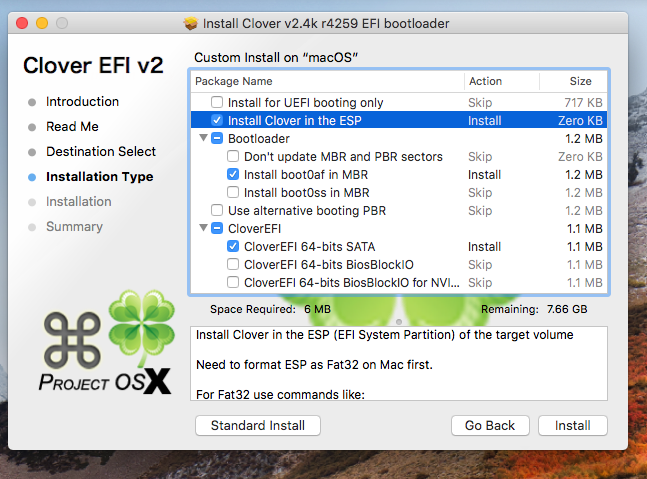
I'll try to make this as simple and short as I can: ...................................................................... Note that you will need two USB Sticks, one for CLOVER and the other one for High Sierra, also keep in mind that you will need a working MacOS system for downloading the HS installer and make the bootable USB. First of all, make sure that you have checked the following options under BIOS: SATA controller set to AHCI, Display set to Thinkpad LCD, under CPU - Hyper-Threading is Enabled, Virtualization and VT-d feature are both disabled. You can get the High Sierra installer from the AppStore, make it bootable on your USB Stick via terminal, not with the help of any other third party tool. ...................................................................... To reach the installer and install High Sierra, use folder EFI-to reach installer.zip like so: format your USB Stick in FAT32 (a 2GB one is recommended), download the latest CLOVER bootloader, install it on the USB with the options showed in the picture bellow, delete it's content and replace it with 'EFI-to reach installer' content), after that select it under the boot device on startup. After you boot into MacOS, load this AppleIntelHDGraphicsFB.kext.zip with your favorite kext installer, install CLOVER Bootloader on your HDD with the options showed in the picture bellow, install CLOVER Configurator, mount the EFI partition, delete it's content and replace it with the content of EFI-Post Install.zip file. No need to delete any graphic kexts, just follow the steps above. ...................................................................... I have patched my DSDT and SSDT's (you have 'em on EFI-Post Install .zip, under ACPI\patched and you also have the unpatched CLOVER extracted versions under ACPI\origin). Speedstep is working but is not reaching turbo speed (2.9Ghz), only max 2.66Ghz, brightness buttons are working, sleep/wake from sleep is not working. Don't know though if those are usable to you, considering that we may have some different hardware components, like RAM's, HDD/SSD, WiFi adapter and/or BIOS settings. You may have to extract and patch yours to be fully functional. If they are creating you problems, which probably will, just delete 'em from ACPI/patched. ...................................................................... Although I have only tested this on my i5 520M, 1280x800 res. X201, it might also work on other sub-models. ...................................................................... Why [short Guide]? Because you may/will have to install some other kexts so the hack will work at it's full potential and considering that you already have some knowledge on how this works, I let that on you. ...................................................................... Credits: thanks to @bd4utonite2 - by reading the first 5 pages of the thread, you will see he's active contribution to this guide. ...................................................................... Enjoy your hack!
-
Check out the post #7 from this thread, I've exposed there a simple guide on how to install High Sierra on X201.
-
Yes, you're right about dual boot, also keep in mind that you have different hardware config than mine, I would suggest you to delete the DSDT.aml and all SSDT's from CLOVER\ACPI\patched under EFI Post Install folder.
-
As @Jake Lo already said, you need a working MacOS/OS X to make the bootable USB, altough you can do this under Windows with some tools. Also, don't know if this will work on your i7 X201, since we have different configs. But give it a try, nothing to loose here, right?!
-
Actually, there is a bluetooth activate/deactivate option in BIOS, but is under a not so intuitive menu.... Anyways, that's not the problem causing this issue, if you didn't deactivate it under BIOS prior to that... The problem is caused by the MacOS! To have your bluetooth back on, just make a live USB with any Linux (I've used Kali) distribution and boot into it (just that, no need to do anything else in Linux). After that, you will have your bluetooth back, under both Windows and MacOS. It's a 'strange' FIX, I discovered it by mistake a few years ago, but will do the trick. BTW: Is your Sleep/Wake from Sleep working? You only mentioned the 'hibernation' issue under 'not working' line, or that's what you meant by 'hibernation'(which are not the same thing)?
-
If everything goes well (which it should, since I already tested the process), I will post it as a guide.
-
Although you (@gpetrowich) probably don't need all these - step by step - informations (since you already have 10.9.5 installed), I made it this way, thinking that it might help others that intend to install High Sierra on their Lenovo X201, so here you go: Guide moved here.
-
Yes, 10.13 High Sierra here, on X201 i5 520M, can give you my EFI if still need it.
-
Install OSX on Lenovo Thinkpad X201s (and maybe x201)
TheOpSys replied to Leon's topic in The Archive
Nice, I'm going to try this out sometime next week -
Install OSX on Lenovo Thinkpad X201s (and maybe x201)
TheOpSys replied to Leon's topic in The Archive
Sory, but there is no Qualcomm device under the USB tab in System Information. My Bluetooth is from Broadcom, if this is what you're looking for: Product ID: 0x217f - Vendor ID: 0x0a5c (Broadcom Corp.) -
Install OSX on Lenovo Thinkpad X201s (and maybe x201)
TheOpSys replied to Leon's topic in The Archive
Glad it worked for you too. I didn't tried until now to deactivate the Bluetooth, but yes, you are right, you can't do it by the top panel icon. A solution would be the physical button from the left side of X201, but that one will also deactivate your WiFi... About the WWAN, don't know what to say, I don't use it, so I even deactivate it from BIOS. -
Install OSX on Lenovo Thinkpad X201s (and maybe x201)
TheOpSys replied to Leon's topic in The Archive
I have the one with 1280x800 res. and i5 proc., but I am talking about 10.9, not Yosemite... -
Install OSX on Lenovo Thinkpad X201s (and maybe x201)
TheOpSys replied to Leon's topic in The Archive
Hello, After changed my WiFi module, and btw - I think the Bluetooth is somehow linked with the WiFi, but not sure, the only way which activated the Bluetooth, was to boot into a live USB Stick with a Linux distribution (I have found this randomly and worked twice - I've installed OS X twice on my X201), in my case Kali, but I think it doesn't matter which one is it. And I have to mention that I have dual-boot on my HDD, OS X and W7, but the Bluetooth wasn't present in W7 either, until the Linux trick. If you did't managed this issue by now, give this method a try, you'll just have to boot into Linux Desktop and that's it. -
I was in a big mess after I changed the voodoops2controller.kext from the extra folder with the one that came with the initial package (the working one)... [i mention that when I have asked you if your x201's have a working red dot mouse, I my extra folder already contained the vodoops2...kext, and after Jake Lo advice, I added via Kext Utility, the voovoops2...kext from my initial package, and then I couldn't bootup anymore] To be more specific, I couldn't bootup os x anymore, even with -f bootflag. The boot in verbose mode was always stopping after voodoops2...kext failed to load message and the only solution was to install paragon in windows and replace the whole extra folder, with a backup working one(the one that came with the initial package, from the backup folder). So for the moment I give up, and keep os x without sleep, but with everything else working, including the red dot mouse.
-
Ok, I'm back with good news: - suddenly, after I have used a Live USB of Kali Linux, the BT has start working in both OS X and Windows (I have dual boot) - I have followed the advices from this topic and removed the FakeSMC kext with the one I have used before I applied EDP Method and now I can boot up without '-f' or 'UseKernelCache=No' boot flags and as result I have a much more quickly boot of OS X PS: Does the red dot mouse working on your devices?
-
The EDP Method finally worked, but only with 'UseKernelCache=No' or '-f' boot flags, don't really know why and the result is a slower boot time, working wake from sleep, but with no USB after and the sleep sign from the base of LCD permanently activated. Another interesting thing, is that after I applied EDP Method, the red dot mouse doesn't work anymore...
-
Yes, but the EDP Method is for x201s, not for x201 - my CPU is i5 520M, with 1280x800 screen resolution. I have solved the WiFi problem with an AR5B95 module, bought for 8$, which is working fine, BT not working, but I don't need it anyway, so the only problem remaining is the wake from sleep. For the installation I have followed the steps from post #3 -> on this topic.
-
Thank you very much guys, With your help, this was almost like installing windows! Recently I broke my old 13" - 2006 MacBook and I decided not to buy a new Apple device, so I found out this nice x201 with 4GB RAM, i5 520M, 320GB at only 180$, in a SUPER condition, but without battery. After a little compatibility research, found this topic, bought the laptop and I am very satisfied with it. For the moment I have no WiFi, I do have the Atheros module from my old MacBook, but I can't flash BIOS, having no battery, I'll do that after I find a good priced one. Thanks again, keep up the good work and btw - this is my first Hackintosh! Later Notes: #1 I'm on 10.9 and my USB ports are working after coming from sleep, but the BT doesn't work at all - with the kext from the first post. #2 Sometimes (or EVERYTIME...?!) it doesn't wake from sleep, actually it wakes but with no backlight on the LCD or enters into a kind of loop state in witch the LCD is off and the green light indicators from the base of the LCD are blinking. #3 DSDT crash the OS X after apply with MultiB... any advices?