


black.dragon74
-
Posts
190 -
Joined
-
Last visited
-
Days Won
17
Content Type
Profiles
Articles, News and Tips
Forums
Posts posted by black.dragon74
-
-
Call Apple support again and tell them you are getting an “iMessage Validation code”. Ask them to complete the registration for you. Also, just so you know, there is no other way to get rid of that code except calling Apple.
Your conversation should be like, “Hey there! I’m facing a lil issue while trying to log in to iMessage on my macBook. It js giving me a validation code. Can you please complete the registration for me?”
Most of the time they’ll say, “Okay sir, what’s the code”
Once they approve your code. iMessage will start to work.
Note: Please don’t change anything related to SMBIOS once you have iMessage working. Also, it may take more than 1 tries with different SMBIOS as iMessage is the most finicky software while trying to run on a hack.
All the best!
Regards
-
And, if it doesn't work even after adding a Fake ALS device you might wanna reset hardware NVRAM from clover EFI shell.
How to do it:
- At clover boot screen select UEFI Shell option
In that, type:
# For cd to EFI voulme
FS0:

# For cd to EFI dir
cd EFI

# For dumping vars
dmpstore -all -s somefile.txt

# Now, when it is dumping the vars you need to take a note of your drive's GUID (use a phone to record)

# Once you know the GUID, use
dmpstore -d -guid YOUR-GUID-GOES-HERE
Regards
-
I always have a error "An error occurred during activation. Try again."
You probably have you Apple ID blacklisted. What you can try is, create a new Apple ID and try using iMessage/FaceTime on your hack with it. If it works, cool. Else, you might consider debugging it.
In case you want to recover you original Apple ID, call apple support (don't mention about your hack though, tell them about "iPhone" part).
Regards
-
any update anytime soon my trackpad is acting up will be nice to be able to speed it up a bit even on Mac painter is still slow and maybe a bit more scrolling also touch gestures are not working right only 3 finger drag and drop works if I hold on ..
If the trackpad is working for you, all the functions will work except you will have to use value 33 for right click instead of 21 (only on macOS 10.12+)
You need to configure it properly.
Have a good read of: https://osxlatitude.com/index.php?/topic/5966-details-about-the-smart-touchpad-driver-features/
Regards
-
 1
1
-
-
hi black.dragon74
I saw in your signature that you have the same asus notebook Asus X540 I have installed high sierra but I have not been able to work the touchpad in any way, no signs of life can you help me telling me how can I activate it? or if you do not mind, you may also go through the clover folder
Thank you
A problem reporting dump would have been nice.
The trackpad on X540 (ELAN 1000) is on I2C bus whereas ApplePS2SmartTouchpad is meant for devices on PS2 bus.
Open a separate thread with proper problem reporting files and PM me the link of that thread.
P.S: OSX-Debug dump is required, as pointed by Jake for we will have to patch DSDT for I2C bus. (Hint: Don't forget to press F4 at CLOVER boot screen to dump ACPI tables. Generate debug report after dumping origin tables)
Regards
-
Changes I have done,
- Changed CKEDITOR theme to be more in sync with current theme (the current one looks better)
- Changed font to "Roboto Regular"
- Added webkit font smoothing (Text will be easier to read on screens of all resolutions)
- Added font weight (Cosmetic enhancements)
Update:
Fixed an issue where "Location: Value" used to be shown as "LocationValue", like
Before:

After:
Note: I am using a CSS override in order to accomplish this as I do not have access to the theme files(FTP) and hey! it can be done using css.
Search for "Nick" in custom.css to see what edits I have done.
Goodnight! It's 4AM here. LOL. Gonna get some sleep.
I will keep updating this post as I keep making changes.
-
Maybe it is only required for kext's plugins?
-
Upon wake, the webcam doesn't work
EAPDFix.kext+CodecCommander.kext doesn't solve the headphone issue (no sound on headphone)
For webcam: USB configuration issue. Fix your USB related problems.
EAPDFix: Use either one. Not both.
-
Try booting installer in safe mode (Using -x flag)
EDIT: Also, try to boot using a USB2 device in a USB2 port.
EDIT2: Upon looking up a bit I found out this happens due to corrupted Volume. Maybe try using a different USB?
-
Hello friends,
Many of you have noticed that after upgrade to high sierra whenever you machine sleeps, be it a display sleep or a system sleep, the screen turns out fully white with garbled lines, or it might turn black with just the cursor moving. If you try and press few keys you will find out that the machine works but the display doesn't.
If you want to know a little background info, read on, else skip to fix.
On my ASUS R541UJ this bugged me a lot. I tried hell lot of things like, re patching DSDT, trying with all 15 ig-platform-id (for Kabylake), still, the issue persisted.
I also have an ASUS A555LA (which I am trying to make a perfect MacBook Air). So, in my process of making my A555LA a perfect MacBook I added a ALS (ambient light sensor device) and then, changed vendor-id along with product-id of the laptop's display to that of Apple's display i.e. PID: 0x9cf2 VID: 0x610 for MacBook Air's display..
Whatever I do on my A555LA, I replicate the same on my 2 other ASUS laptops. So, I did the same on my R541UJ (the one affected by this annoying bug)
And to my surprise, that issue was fixed! Then, I disabled the ALS device in my custom SSDT (I generally make a dynamic configurable SSDT that works for all my machines, See here) and that issue didn't come back.
So, I finally came to the conclusion that it was due to incorrect vendor-id and product-id of my display in IODisplayEDID or EDID.
Enough talking, let's see how you can fix this in a few simple steps.
How to fix:
In order to fix this, as you might already know from above, we need to change our display's product and vendor id to that of Apple's display.
There are 3 ways for this, Injecting custom EDID using clover, Using a display override, Using a custom override kext (DispalyMergeNub). I love CLOVER so will be covering that part of the fix in this guide. Also, injecting EDID with clover is preferred as it will also work when booting recovery partition. (Not the same with Display Overrides and DisplayMergeNub)
Update your CLOVER to latest version (nothing to do with this fix but is a good idea to have you boot loader up to date)
Download Darwin Dumper from here
Download FixEDID app from here
Download my script attached to this post.
Open Darwin dumper and uncheck everything except EDID. Then, select run from the left pane. It will dump your EDID and then it will open a folder where it dumped the files.
In the folder you will find an EDID folder. Upon opening it you will see 3 files namely, EDID.bin, EDID.hex, EDID.txt (All three files are your EDID dump except in different formats).
We need the one in BIN format for FixEDID.app
Copy EDID.bin from DarwinDump*/EDID to your Desktop (Dump* is the darwinDumper output folder)
Open FixEDID.app and select open EDID binary file. Choose the EDID.bin file you copied to desktop.
If you look below "Open EDID binary file" button, you will see a drop down menu saying "Apple iMac Display 16:10"
Select it and choose "Apple MacBook Air Display 16:9" (Note: You may try experimenting with different models, I personally use "Apple MacBook Air Display 16:9" on my A555LA and "Apple MacBook Pro Display 16:10" on my R541UJ)
Make sure display class is set to "AppleBacklightDisplay" for we are overriding our internal LVDS display. (AppleDisplay is used for external displays like that on HDMI or DP)
Click on Make button (Note: You won't see any sort of confirmation but the app has done it's work)
Close FixEDID and come back to your desktop. You will see a host of new files there. (3 files to be precise)
For this guide, you just need DisplayVendorID-xxx folder. Open it any then you will find a file named "DisplayProductID-xxxx"
Copy this file to the Desktop.
Now we need to extract EDID that is in base64 format and then convert it to HEX format as required by CLOVER.
Worry not, I got you covered. Now is the time to run my script.
Assuming my downloaded script is in Downloads folder, open terminal and type:
# Change working directory
cd ~/Downloads

# Make script executable
chmod a+x get_edid.sh

# Run and get EDID to inject
./get_edid.sh ~/Desktop/DisplayProductID*
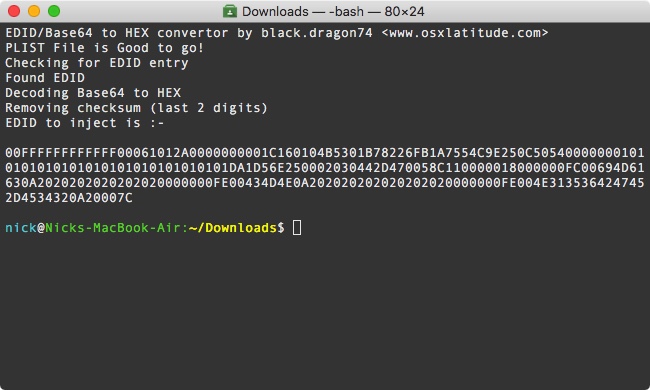
`
This script wil give you EDID you need to inject using CLOVER, like:
Copy that EDID and paste it in your config.plist under Graphics > EDID > Custom (You can use clover configurator as that will save you from manual PLIST editing which is not recommended for novice users)
Also, set Boolean Inject to True (YES) under config.plist > Graphics > EDID.
See below screenshots for reference:
Any Plist Editor(Xcode):
Clover Configurator:
Reboot and Voilà! You won't face that dreaded issue ever again until you remove custom EDID. LOL.You can verify if the EDID is being injected by opening terminal and typing:
ioreg -l | grep "IODisplayEDID"
`
The output should match the output of get_edid.sh
Problem Reporting:
See How to generate proper problem reporting files
Note: This issue mostly seems to effect machines running High Sierra on Kabylake hardware (maybe Skylake too?). I have personally tested this on Sierra (with and without skylake spoofing) turns out that Sierra is not affected by this.Note: Upon booting up with custom EDID in place you will see that your colors are not such bright and crisp. YMMV. (Coz our's isn't a Apple branded display
). To fix that, open system preferences > Display. Select "Color" tab and choose "Apple RGB Display"Hope this helped someone!
Regards
-
8
-
 1
1
-
-
Unfortunately I can't provide the plist file. I couldn't find any information on that. Can you point me to that, please?
As you are using CLOVER to inject ApplePS2SmartTouchpad (it is not recommended as the kext was never meant to be injected by CLOVER.) You might consider installing it to /S/L/E or /L/E on 10.11+
The Info.plist of any kext resides in KextName.kext/Contents/Info.plist (You need to right click on the kext and select show package contents to see "Contents" folder of a kext)
Regards
-
I have the launcher menu and right click working on High Sierra, I'm not sure why you are experiencing that.
Maybe I forgot to mention that this "Not Working" issue affects certain touch-pads only. FocalTech, in my case. And please remember, on a hack, your mileage may vary as everyone has different system configurations.
Regards
-
I tried this files, on 10.3 it doesn't show up at all.
Did you install the provided injector kext on my GitHub? Also, remember to boot with flag "-ath9565"
-
My laptop is an acer f5-573g and I don't think I have any kexts that could interfere with this one.
Attach SmartTouchpad's Info.plist
Attach proper problem reporting files. See How to generate proper problem reporting files
Regards -
@fan0, Apple has changed a lot of stuffs including PS2 code in macOS High Sierra. Hence, the right click value doesn't work, it instead opens up force close menu.
Dinesh is working on it and will come up with an update soon. Also, just FYI, all other values work as they are written in ApplePS2SmartTouchpad documentation.
Regards
-
1
-
-
Glad that you resolved it!
Also, for everyone else, I finally have a 100% working and stable workaround for bluetooth. Check the main post for details.
Regards
-
Last update: 16 July 2018
Current Ver: 4.2.7Suggestions/Discussions: HERE
Hello guys,
I have seen many instances where people start a thread with the problem they are facing on their hack.
They try to describe the issue in their own way that most of the times, is not able to properly describe what's going wrong with their system.
The developers and other advanced members on OSXL can point out the problem exactly when they have a set of files, called problem reporting files.
These are basically a set of files that contain various logs and some other components.
Many a times a normal user can not generate those files properly and it leads to a lot of wastage of good time, frustrated by this, I wrote a script to generate proper problem reporting files. You can have a look at the source code here
The purpose of this guide is to tell the normal user on how to generate those files properly for debugging.
I wrote a script that automatically installs that debug report generator script and then gives you a .zip output.
If you are seeking help about a problem and you must attach problem reporting files as it saves a lot of time.
How to generate debug report:-
It is very simple, you just have to download the attached script and run it. The script in attachment will install the tool for you and will then prompt if you want to generate the files.
If you want to generate files next time, you just have to invoke: "gen_debug" from terminal (without quotes)
How to download and run attached script :-- Unzip the downloaded zip file
- Open terminal
- Assuming your script is in Downloads folder, type the following code :-
chmod a+x ~/Downloads/install_tools.sh
~/Downloads/install_tools.sh
Args for gen_debug:
You can use custom set of args for controlling gen_debug output, this list will be updated as new features become available- gen_debug -u || To update your copy (available from ver2.1+)
- gen_debug -sysprofile || To include your system profile in the dump (available from ver2.2+)
- gen_debug -sysprofile txt || To include system profile in the dump but in TXT format
Note: Whenever you change anything, you should attach new output of gen_debug.
Note 2: It is recommended to update your copy of gen_debug every alternate month (for fixes and new features). To do so, If you are running version 2.1 or above, you can simply type "gen_debug -u" (without quotes) in terminal. If you are running version 2.0 or less, you can use the attached installer script to update your copy.Note 3: To all the users that are facing IOREG dump failures:
You need to enable the accessibility permissions for the “Terminal”.
This privacy feature was introduced in macOS Mojave.
Open Sys Prefs > Security & Privacy > Accessibility. Look for “Terminal” and allow access.
Changelogs:Update 4.2.7 - 14 Jul 2018
- Fix a rare issue where script went crazy when user had a space in his/her home folder name.
Update 4.2.6
- Improvements to ACPI file verification and colored STDERR.
Updates 4.2 to 4.2.5
- Check for ACPI origin files existence and age
- Added a hacky method for IORegistryExplorer verification (will download regexplorer for once)
- Listen for CTRL+C interrupts
- Hardcode the launch-path for IORegExplorer (prevents launch of other version than the one intended.)
- Include PwrMgmtSet(PMSET) in dump
- Handle scenarios where ACPI files age is in some h/m/s
- Check for preboot log & many other enhancements.
Updates 4.0 to 4.2:
- Experimental support for Chameleon (and similar) boot-loaders.
- Check for ACPI origin files age. Should not be older than 1 day.
Updates 3.2 to 4.0:
- Fix potential user's file deletion loophole
- Make IOREG dump dynamic (time values are adjusted automatically for slower machines)
- Include generic IOREG dump if normal IOREG dump fails more than 3 times.
- Handle scenarios where CLOVER might not be installed.
- Include kernel panic logs if exits.
- Fixed issues with whitespaces in EFI pathname.
- If root elevations fails, exit.
- Include list of all loaded kexts in dump.
Update 3.1 - 1 Jan 2018:
- Mask MLB in RtVariables section of config.plist
- Fixed STDERR for pledit
Update 3.0 - 29 Dec 2017:
- Fix conflicts with GNU date on some developer environments (Fix kernel log generation)
Update 2.9 - 21 Dec 2017:
- Fix kextcache output redunancy on 10.13.1+
Update 2.8 - 13 Dec 2017:
- Add NVRAM dump functionality.
- Fix broken update functionality when using "-u" arg.
Update 2.7 - 12 Dec 2017:
- If a new update for the script it available, it will update automatically. (Helps to stay you up-to-date)
- New IOReg dump mechanism for slow machines.
- Include script version in the dump report.
Update 2.6 - 11 Dec 2017:
- IOREG dump will never ever fail again.
Update 2.5 - 3 Dec 2017:
- Check for IORegistryExplorer version 2.1
Update 2.4 - 2 Dec 2017:
- Script now also dumps your boot log
Update 2.3 - 2 Dec 2017:
- Fixed an issue where the time stamp of files was overwritten to current system time, reported by RehabMan.
Update 2.2 - 27Nov 2017:
- Added option to generate system information dump using -sysprofile arg
Update 2.1 - 27Nov 2017:
- Fixed an issue where IOREG was not saved on some machines
- You can now update your copy of OSX-Debug by using "-u" arg, like gen_debug -u
Regards
-
6
-
i try to all method but does't work for me (AR9462 , AR3012 (VID: 0cf3 , PID 311e)
This workaround is seen to have issues on macOS High Sierra 10.13.1. Also, I can't help you debug without proper problem reporting files.
See Here
Brief follow up to where I had left off with Bronxteck's injector.
I was able to pair an Apple Keyboard and Magic Mouse 2 successfully. However, the unit dropped to Sleep Mode after I had to step away for a bit. When I woke it, the devices were unable to reconnect. I shutdown/restarted, and this continued to be the case. I manually removed the entries for the keyboard and mouse, rebooted, and attempted to pair them again from scratch but could not. At one point, when scanning for BT devices, the unit saw the mouse again but was unable to pair it.
Sound to me as USB issue, I would suggest you to move USB devices on EHCI controller to XHCI controller.
Attach proper problem reporting files. See Here
-
None yet. You may try the workaround if it works for you.
P.S: Dinesh is working on it.
-
Most probably an USB configuration issue. Attach output of gen_debug from here
-
AFAIK, external icons patch is used when your internal drive is shown as external. So, it is obsolete in your case, try removing that.
Also, we can't help you without proper debugging files. So please provide them.
See here: https://osxlatitude.com/index.php?/topic/10154-tool-problem-reporting-file-generator/?p=74193
Regards
-
@viktor001 The gray/black-ish screen after sleep is a common problem affecting Laptops running High Sierra. I tried everything that I could possibly do for my ASUS R541UJ in order to fix this issue but it persisted.
Hope Apple will fix this with future updates. Do you still have High Sierra installed? If yes, you could try upgrading to 10.13.1 and see if this issue is fixed.
Regards
-
@tonio92 Did you try BTFirmwareUploader.kext?
Also, please tell me your device's product and vendor id.
Regards
-
When using the sudo trimforce enable command you will get a few errors when you try to rebuild caches, Using patch overcomes that error.
Performance wise, you can use any one of them two, no difference.
Regards


iMessage not working at all
in The Archive
Posted
P.S: It requires a patch to work. Make sure you are using that patch.
Regards