
Leaderboard

Popular Content
Showing content with the highest reputation on 03/23/19 in all areas
-
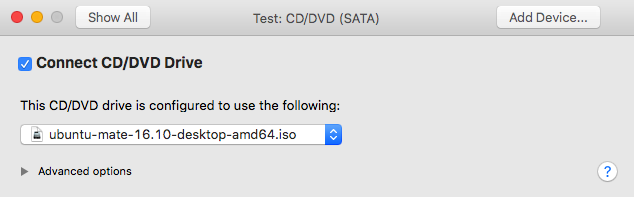
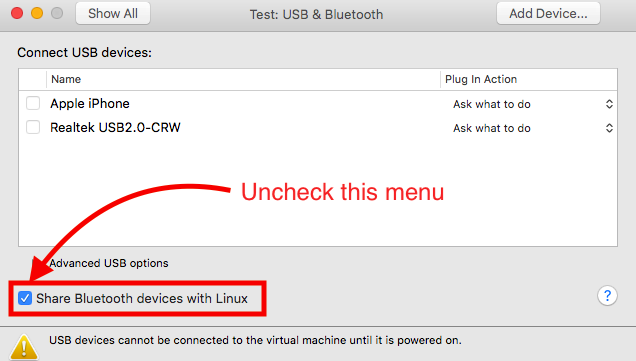
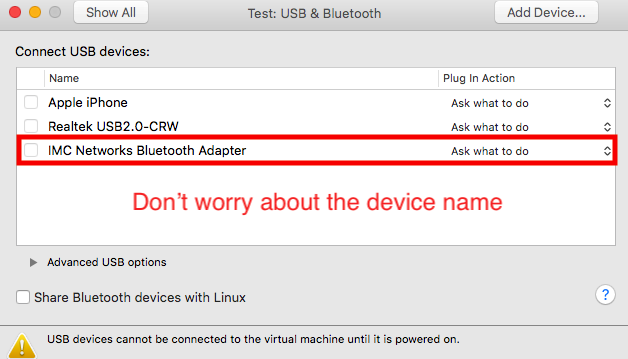
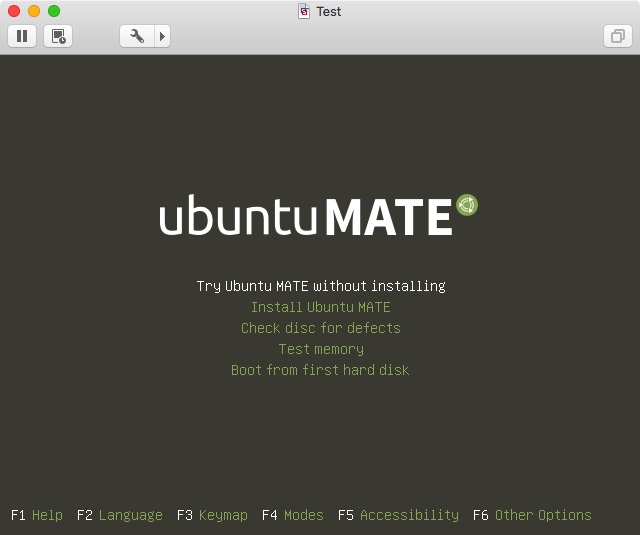
Hello awesome people, I have taken a lot from this community, this is the time to give something back. As we all know that BTFirmwareUploader.kext stopped working for some reasons after spending countless hours on this issue I finally came to a workaround. Not that this workaround is temporary, our awesome developer of the kext will find a fix for this for sure. UPDATE (2017-11-22) (Recommended) :- Hey guys, as you all might have noticed, all the workarounds mentioned below are not working properly since the macOS 10.13.1 incremental update. So, this got me investigating this issue further and I'm happy to say that I have finally come out with a proper fix. This process is a bit complicated but read on, once you set things up, working Bluetooth is just 3-4 clicks away. While I was busy investigating this issue, I came to the conclusion that Apple has changed a lot of stuffs in IOUSBHostDevice in macOS High Sierra. The developer of the BTFirmwareUploader is working on it (results are delayed due to his personal life problems). Let's first understand how Bluetooth firmware uploader works in *NIX based systems. A few bluetooth devices have the firmware required for bluetooth embedded in them and hence they are not problematic, but a lot of devices rely on firmware uploader to function properly. You can have a look at ath3k.c file in Linux kernel tree to get the idea of how the firmware is uploaded to the device. Cutting the nerd stuff out, here is the process in short, the system powers up the bluetooth device, the firmware uploader detects that the device is powered on and then it sends(uploads) the firmware in buffers. If you look in Apple Menu > About this Mac > System Information > Bluetooth you can see our device is recognized properly (look at vendor and product ids) but is not pairing to any other peripheral because of the missing firmware. So, in order to fix bluetooth,we have to upload the firmware to the bluetooth device, there is more than one way to do it. The simplest would be using a FirmwareUploader kernel extension (which doesn't seem to be working in our case) The second option is, Booting into Linux/Windows and then cold warm booting (cold warm booting means booting macOS without powering down the machine, like on linux, power menu > restart) to macOS. What this does is, when we boot Linux/Windows the appropriate firmware is uploaded to the device and due to the way BT devices work, they don't lose the firmware until the device is not powered off. So, this would get the BT device working in macOS as the only thing missing was proper Firmware and now we have it loaded in our bluetooth device by booting other OS. This would work fine on macOS 10.13, but sadly, in macOS 10.13.1 when we boot the operating system (hot boot/cold boot) it resets the Bluetooth device. Hence, we lose our uploaded firmware. The method we are going to use is based on the above method except we won't be losing our firmware until we restart or put our machine to sleep. This is how it works, we boot linux (you may try with windows) in a virtual machine and share our bluetooth device (exclusively to guest OS, i.e. Disconnecting the device from macOS and connecting it only to Virtual Machine). What this will do is, as soon as we connect our device to Linux VM the Linux kernel will upload the required firmware in our BT device. Then, we will disconnect the device from VM and connect it to macOS (Hot plugging works fine, thanks to USB). Technically, we uploaded the firmware, switched the connection from VM to Host OS(macOS) without powering off the device. So, we still have the firmware, this is what we wanted, right? Okay, enough talking, let's do it. Prerequisites :- Linux bootable ISO (You can download one here) A VM software (I used VMware Fusion, you may try with VirtualBox). On a second note, VirtualBox should not be the preferred VM Software on a hack as it tends to cause issues with proper functioning of USB controller in macOS) Patience and little bit of your gray matter. Remove any existing Firmware Uploader and then reboot by rebuilding caches. How to do it :- I am going to explain the entire process by assuming that you are using VMware Fusion. First up, open VMware Fusion and press Cmd + N or File > New to create a new virtual machine. Select Custom Virtual machine. In the next screen select Linux > Ubuntu 64-Bit Click on Next and then Finish the setup by saving the virtual machine to your desired location. You will see that upon finishing the process VMware will boot the virtual machine, but we don't want to boot it just yet (have to change a few configuration settings). So, select Virtual Machine > Shut Down from the Menu Bar (Confirm the prompt that you want to shut down) Now let's get to changing settings. Click the settings gear icon in your virtual machine window, it looks like, Upon clicking it you will get a new window. Select the CD/DVD (SATA) pref in it. Now, check the box saying "Connect CD/DVD Drive" Now, if you look below you will see an option like, Click on the popup menu and select "Choose a disc or disc image" and then select your Linux bootable ISO file. So, upon changing the above settings that section should look like, Now click on "Show All" at the top to go back to the main pref pane. Now we need to change settings of Bluetooth devices. Select "USB & Bluetooth" pref in the main window. Upon clicking it you will see a screen like this, Now that you have unchecked the "Share BT Devices with Linux" you will see a new device popup in the above list, like, Now, click on "Show All" on the top again to go back to the main pref pane. Now we just need to change boot order to boot our live ISO image. Click on "Startup Disk" and then in the next pref pane, select CD/DVD and click Restart, like, Upon clicking restart, you will see that the VM boots up and you get GRUB menu like, Select "Try without installing". Yes, we don't even have to install the OS for real. We are pretty much done here, just a few last steps. Once the virtual machine boots up you have to click on Settings Gear at the top of your VM window once again. Now select "USB & Bluetooth" option. In that, check the box in front of your BT Module's name You will see that BT icon in the macOS's Menu Bar turns to device not available and a new BT icon appears in your Linux VM's Menu Bar. Once you do that, wait for 4-5 seconds, Then uncheck the box in front of your BT controller. You will see that device disappears from Linux Menu Bar and reappears in macOS menu bar. That's it, mission accomplished. We still have firmware in the device. As a result, Bluetooth will work perfectly. You can now close the VM. VMware will save the machine state for you. You can use bluetooth as long as you don't put your machine to sleep or restart. If you lose bluetooth functionality after sleep/restart worry not, like I said, once you set things up, the fix is a few clicks away. How to resume BT after sleep/restart :- Open VMware and resume your Linux VM Click on Settings gear in VM window Select "USB & Bluetooth" Connect device and then disconnect after 4-5 seconds (i.e. Tick the box in front of your BT module's name and untick it) Close the VM (Save VM state as it will result in much quicker fix) Voila! You have BT working! Note: If you lose your Bluetooth Device after sleep (i.e. No Bluetooth section in macOS SYSTEM PREFERENCES or under SYSTEM INFORMATION > BLUETOOTH) it is due to wrong USB configuration. Report with proper problem reporting files. See How to generate proper problem reporting files Make sure you don't have any Firmware Uploader kext installed as that might interfere with this workaround. This workaround wil only work if your BT device is showing up in SYSTEM INFORMATION > BLUETOOTH This workaround will also work for devices not supported by BTFirmwareUploader.kext Hope that helps! UPDATE (2017-10-29) (Deprecated) :- While some debugging sessions with the developer of the kext I found out a better method to have BTFirmwareUploader up and running smoothly as long as you don't cold boot macOS (shut down and then power on) Note: It too will only work if the kext worked for you before upgrading to High Sierra. Steps to follow:- Install the kext to /S/L/E and reboot. (DO NOT SHUTDOWN, RESTART) Upon booting back up, open terminal and type the following:- sudo rm -rf /S*/L*/E*/BTFirmware* Now reboot (DO NOT SHUTDOWN AND BOOT BACK UP), Click Apple Menu and Restart.That's it, now as long as you don't cold boot (power off and boot macOS) bluetooth will work for you. Once you cold boot, repeat these steps again. I'm sure the developer will soon come out with a FIX for this. OLD METHODS (NOT RECOMMENDED, TRY IF THE ABOVE DOESN'T WORK FOR YOU) :- Note: This method will only work for those who can turn toggle bluetooth using the Fn keys on their laptop. There is also a way for those who can't toggle bluetooth from the keyboard. That will be covered later in this guide. My Hardware:- QCA AR9565 Wi-Fi (0x168c, 0x0036) QC Atheros 4.0 Bluetooth (0x13d3, 0x3423) The BluetoothFirmwareUploader.kext attached to this post has been modified to work ONLY with this hardware. If you had working bluetooth before macOS HighSierra you need that BluetoothFirmwareUploader.kext, If you don't have the above mentioned hardware please DO NOT download the attached KEXT. METHOD 1 (FOR THOSE WHO CAN TOGGLE BLUETOOTH) Download the attached script. Open terminal and type:- open $(echo $HOME) Copy your previously working BluetoothFirmwareUploader.kext in the newly opened Finder window. Place the downloaded script on desktop and then go back to terminal and type, cd ~/Desktop chmod a+x ./fix_blue* Run the script as root user. Go to the terminal and type sudo ~/Desktop/fix_blue* Follow the onscreen instructions and you will be done. METHOD 2 (For those who can't toggle bluetooth) Note: You need to have working sleep. This is mandatory. Copy you previously working BluetoothFirmwareUploader.kext on the DESKTOP. Open terminal and type the following:- cd ~/Desktop sudo chmod -R 755 BluetoothFirmwareUploader.kext sudo chown -R root:wheel BluetoothFirmwareUploader.kext sudo kextload BluetoothFirmwareUploader.kext Once done, put you laptop to sleep. Once it's sleeping, wake it up. Open terminal and type:- sudo kextunload -p ~/Desktop/BluetoothFirmwareUploader.kext Once done, put your laptop to sleep again. Once sleeping wake it up. That'd be all. After waking up you can go to System Prefs > Bluetooth and connect to your devices. General Notes:- You can use bluetooth even after you reboot. Once you shut down and then open macOS again, you need to follow the above METHOD 1 or METHOD 2 again. Developers, @Hervé, @Bronxteck, @EMlyDinEsH please look into a permanent fix for this issue. I'm all ready for testing and stuffs. If someone comes with some problems regarding to the above mentioned steps please post your queries here. I'll try my best to help you out. BTFirmwareUploader.kext.zip fix_bluetooth_13d3_3423.sh.zip
 1 point


This leaderboard is set to London/GMT+01:00