BillDH2k
-
Posts
30 -
Joined
-
Last visited
-
Days Won
8
BillDH2k's Achievements
-
Here is what I found for 5410/5510 Latitude (results from 1.20 and 1.31 BIOS are the same): CFG Lock - Offset = 0x3E, VaStoreID = 0x11 ("CpuSetup") DVMT Pre-Allocated - Offset = 0xF5, VaStoreID = 0x16 ("SaSetup") DVMT Total Gfx Mem - Offset = 0xF6, VaStoreID = 0x16 ("SaSetup") I used modGRUBShell.efi, here are the commands: setup_var_cv CpuSetup 0x3E 0x1 0x0 (Disable CFG Lock) setup_var_cv SaSetup 0xF5 0x1 0x2 (DVMT Pre-Allocated = 64MB) setup_var_cv SaSetup 0xF6 0x1 0x3 (DVMT Total Gfx Mem = Max, if needed)
-
[Solved] Latitude 5490: need assistance finalizing Sonoma setup
BillDH2k replied to badziew's topic in 5000 Series
Here is my working EFI OC097 for Latitude 5490 (i5-8350U, Intel Wifi), for Sonoma. Due to file uploading size limitation, AirportItlwm.kext (V1.23 Alpha for Sonoma) is not included. Both HDMI port and Display Port via USB-C port are working. You may give it a try. This EFI was based on this GitHub repository: juanpy0223/Dell-Latitude-5490-8th-gen. My bios is still 1.26 and did not update to the latest (V1.32) since the latest BIOS may prevent the CFG LOCK changing. Also once updated, it can not go back to earlier BIOS. I experienced this with my Latitude 5400. If you are able to disable CFG LOCK with 1.32 BIOS and set DVMT to 64MB (instruction is in the link above), then you can make the following changes to the Config.plist: - Root->Kernel->AppleCpuPmCfgLock = FALSE (for native CPU power management) - Remove the following two properties from your iGPU's DeviceProperties (PciRoot(0x0)/Pci(0x2,0x0) for my case): framebuffer-fbmem framebuffer-stolenmem Goodluck! DELL-5490-OC097.zip -
Latitude 5400: TouchPad issue - two units, one working, one not
BillDH2k replied to BillDH2k's topic in 5000 Series
@Baio77 It turned out to be a simple fix. The culpit was that GPIO device in the unit #2 was not enabled by the generic "SSDT-GPI0.aml" patch used in my EFI. I had to use a different method, by setting GPEN =1, to enable it (as explained in the OpenCore guide, for my particular case). Also, I updated to the latest woodooI2C.kext. Now the touchpad worked! Here is the updated SSDT-GPIO.aml, only works on unit #2 (it's BIOS ACPI code will enable GPIO if GPEN =1): /* SSDT-GPIO.aml */ DefinitionBlock ("", "SSDT", 2, "DRTNIA", "GPI0", 0x00000000) { External (GPEN, FieldUnitObj) If (_OSI ("Darwin")) { \GPEN = One } } For comparison, here is the generic patch, which works on unit #1, not unit #2 (#1's BIOS is different. Not 100% sure caused by the version difference, or hardware difference): DefinitionBlock ("", "SSDT", 2, "hack", "GPI0", 0x00000000) { External (_SB_.PCI0.GPI0, DeviceObj) Scope (_SB.PCI0.GPI0) { Method (_STA, 0, NotSerialized) // _STA: Status { Return (0x0F) } } } @Baio77: The AlpsHID kext also worked, but GPIO must be enabled first. -
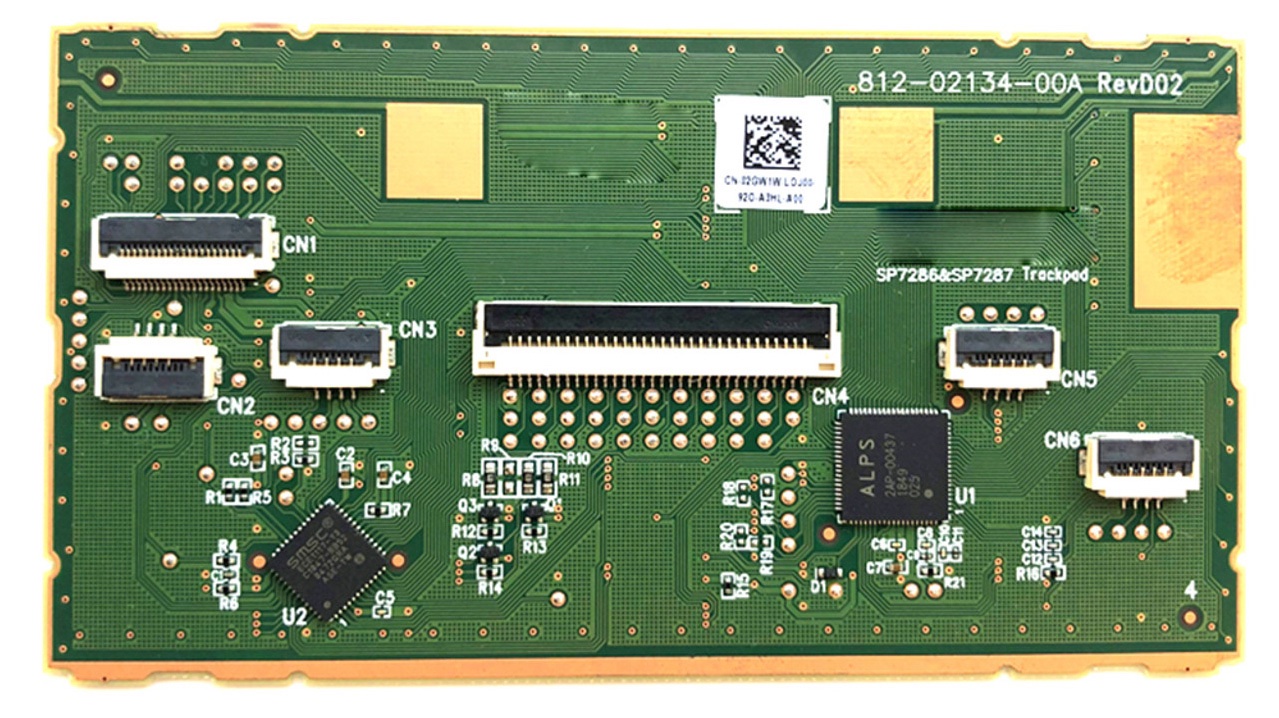
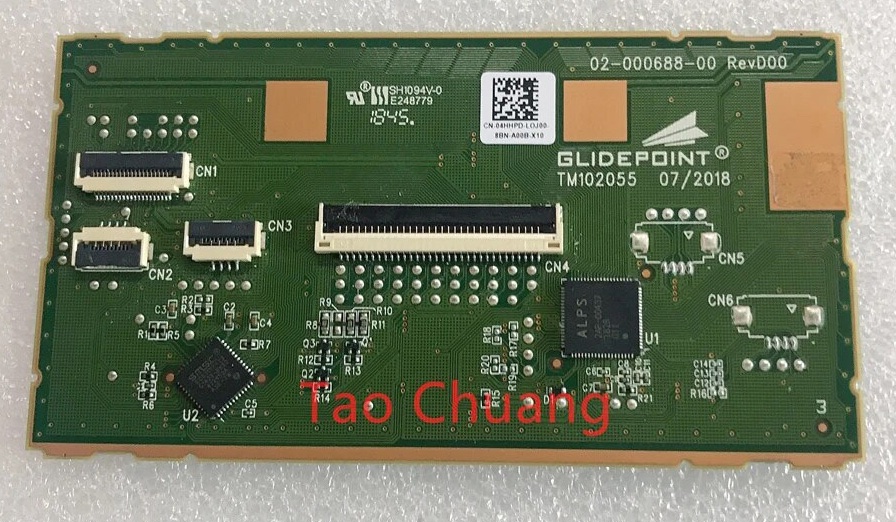
I have a nearly perfect working 5400 (unit #1, i5-8365U, my signature system) running Monterey. Try to setup an 2nd 5400 (Unit #2, i5-8250U), using the same EFI, the TouchPad is not working, while everything else appeared to be working fine. There are some some differences the two systems: they used different touch pad boards (see attached two pictures. Matching stock pictures). #1 has P/N 02GW1W, #2 has 04HHPD. In addition, #1 has Thunderbolt option, while #2 does not. I've attached the config.plist, and IO register reports below. This could be simple driver change, but I don't know which one to use. There is another difference: #1 has BIOS 1.22.1 (able to disable CFG Lock), while #2 has 1.23 (unable to disable CFG Lock, not down-gradable to older BIOS). Anyone has an answer? Thanks! config.plist.zip 5400-#1-IOReg-WorkingTouchPad.zip 5400-#2-IOReg-NonWorkingTouchPad.zip

-
Latitude 5300: trackpad and brightness keys issues
BillDH2k replied to Santiago93's topic in 5000 Series
@Santiago93 The solution to solve your audio/headphone issue (also work on 5300) can be found here: [Solved] Dell Latitude 7300: Bluetooth (DW1830) and audio jack problems. -
Latitude 5490 : OC 0.9.0 Ventura - Battery issues
BillDH2k replied to msagres's topic in 5000 Series
I am certain that you have a battery near the end its life. If you don't believe it, try to run Windows 10 to verify it. -
I had Western Digital SN730 512GB in there when I encountered this issue. When I took the screen shot, I had the original SSD back (Samsung PM991, non macOS compatible, I believe, with Windows installed). The real issue, as I updated my post above, was apparently related to the latest BIOS. UPDATE (3/17): It turned out that I have to disable this BIOS setting - "Enable Legacy Option ROMs" (under General->Advanced Boot Options). Now, this EFI worked fine even with latest BIOS.
-
Tried to use this EFI on a 7480 with 7300U (latest BIOS 1.30), Monterey 12.6 install. Stuck at this screen (screen shot), with the last line message: "AppleKeyStore:863:0: oy vey using 16384 buffer headers and 10240 cluster IO buffer headers" Did NVRAM reset. Enabled NVMeFix (Note: the screen shot was taken when booting from Monterey USB install, while I still had the Windows SSD drive in). But made no difference. Any idea what went wrong/missing? Thanks!
-
May be your bluetooth is interfering? This wi-fi card does not have dedicated Bluetooth antenna. Try turn off bluetooth to see if it makes a difference.
-
@Baio77 I've tried your TB3 patch on my 5400 which happens to have the Thunderbolt option, and it worked perfectly. During the testing, I've found that my TB3 device (Dell TB16 docker) has a flaky connection, likely due to the wear of the connector pins, which made intermittent contact and causing similar problem I've encountered with the 7400. If a good connection is made, the 5400 worked perfectly on the TB3 port, either cold or hot plug. So I believe the 7400 would be working fine if I had a good cable.
-
1. Download the appropriate version from the Releases and extract the zip file. Let’s assume that you downloaded “ALCPlugFix-Swift-RELEASE-1.5.zip” to download folder, and extracted the zip file in the same place (by double-clicking). You would have a new folder “ALCPlugFix-Swift-RELEASE-1.5” created. Right-Mouse-Click on the new folder icon -> Services -> New Terminal at Folder. A new terminal window would be opened at the current folder path: /Users/YOURNAME/Downloads/ALCPlugFix-Swift-RELEASE-1.5 (You can type “pwd” to verify it) 2. Copy the edited sample.plist file (in this case: ALC295-DELL7400.plist) to somewhere safe. I placed it in “Monterey HD\users\shared”, where Monterey HD is the name for my macOS drive. You may have a different name. 3. At the terminal (opened in step 1), type: ./install.sh Follow the instruction. When it asked for .plist file, drag “ALC295-DELL7400.plist” icon to the terminal, from the location you stored in step 2 above (in my case, it is from “Monterey HD\users\shared\”). You may encounter message like "ALCPlugFix is from unknown source” (1st time install) , just ignore it. After install is completed, go to folder: /usr/local/bin (this is where ALCPlugFix is installed). Right-Mouse-Click on ALCPlugFix icon -> Open, then Open again to allow it to run. This would give it the permission to run. Add "alcverbs=1 alcid=77" to the boot args. Reboot.
-
Check my post here, regarding using ALCPlugFix-Swift.
-
You don't need legacy boot option. Just add modGRUBShell.efi (in the download link) as an EUFI tool to OC\Tools\ folder, then add it to config.plist: misc->Tools. At the OC picker screen, hit-space bar to show all Auxiliary tools (if they didn't show up), select modGRUBShell.efi to launch it. Enter the commands (my post above) to modify the settings. Recommend #1, and #2 (64MB should be OK, as Herve pointed). #3 may be optional. Once done, reboot. WARNING: Make sure you enter the exact commands above!!! If you modified the wrong cells, it could brick the BIOS! Update: With DVMT Pre-Allocate set to 64MB, you can remove the following keys from the Device Properties for iGPU (no patching of the VRAM is necessary): framebuffer-stolenmem framebuffer-fbmem
-
May be 4K display would require that "DVMT Pre-Allocated" set to 64MB? This could be done with 5400/5490. It requires an extracted version of the DELL BIOS to identify the location of the variable that controls "DVMT Pre-Allocated" setting. Update (Mar 5): I've identified the location of the following parameters for 7400 BIOS (V1.24, same in V1.23). You can modify them using modGRUBShell.efi. Here are the commands: 1. Disable "CFG LOCK": VarOffset = 0x6ED, VarStore: 0x1 (Name: Setup) Command for modGRUBShell.efi: setup_var_cv Setup 0x6ED 0x1 0x0 2. Set "DVMT Pre-Allocate" to 64MB: VaOffset = 0xA10, VarStore: 0x1 (Name: Setup) Command for modGRUBShell.efi: setup_var_cv Setup 0xA10 0x1 0x2 3. Set "DVMT Total Gfx Mem = Max": VarOffset = 0xA11 VarStore: 0x1 (Name: Setup) Command for modGRUBShell.efi: setup_var_cv Setup 0xA11 0x1 0x3 @Jazzoo Please give it a try.
-
@Jazzoo I've tested the HDMI port of the TB16 docker to a 4K Samsung TV. It only connected at 1080p @120Hz.