


EMlyDinEsH
-
Posts
1102 -
Joined
-
Last visited
-
Days Won
196
Content Type
Profiles
Articles, News and Tips
Forums
Posts posted by EMlyDinEsH
-
-
I can confirm the same behavior in beta 1.8 on V4. It works for 20 seconds or so, then stops working for several seconds. Then this pattern repeats. Is there an earlier v4 beta posted somewhere that worked more or less correctly? Thanks to Dinesh!
Fixed and uploaded again, so check it.
-
If you ever update this, please note that according to ACPI spec, the HID including PNP device names should be in capitals. E.g. "PNP0c14" = "PNP0C14"
So maybe make it case-insensitive?
Yes, but with the extracted and untouched dsdt we will find this untill we compile it for errors. That's why I meant this. I'll correct this with explanation.
-
Ok, I'll look into this and upload a new one as soon as possible. May be some two finger features I was working could have ended up on this release to make this unstable. Sorry, for uploading an unstable one. I'll upload a good one soon perhaps with some two finger stuff.
-
 2
2
-
-
Hello
I managed to install Mac osx 10.8 on my friend asus zenbook ux21 with patched kext and DSDT using myhack. however I tried to update it to 10.8.2 after updating it to 10.8.1 and get kernel panic while trying to boot 10.8.2 and I included a picture. Please Help

Its an error from the OemSMBios kext, so remove it and update to new FakeSMC plugins then try.
-
Im having the same problem with the UX31A fn keys only the volume keys work. I updloaded my DSDT already in the DSDT section. Should I send it to this address instead?
WIthout my driver what keys working and with mine what are working?
-
This kext does not completely seem to work for the UX31A. I have checked the DSDT and it seems like the _UID=ATK and _HID=PNP0c14 however only the volume keys seem to work. The fn key functions are mapped exactly like what you have above. I have attached the DSDT. I'd donate man! Good work
Send me files to this mail:[email protected] and also tell me what are the keys you have.
-
Hello,
There is an issue with some Realtek Codecs, which is no audio from the output devices after sleep because of an External Amplifier(EAPD) existing in it which powers up/down the codec but EAPD is not enabled by the AppleHDA after sleep. This issue has been fixed by me in patching IOAudioFamily kext. It is based on the information from the netbook installer in code.google.com which was meant for the Old Mac and source code of Apple.
Find the Patched IOAudioFamily in the attachments for the different nodes with EAPD.
Version: 1.8.9fc11 is for Mountain Lion 10.8.3 or laterIf anyone want the Lion version then PM me and I'll add those. And I will keep on uploading the patched kexts when there is an updated IOAudioFamily from Apple updates, so keep checking this thread if you want to have updated one.
Note:
There seems to be an issue for some notebooks with Jack sensing after sleep if there is no audio stream active before sleep within 30sec. Solution are:1. WIth an Application "ControlPlane" which can run functions based on some rules. I have added an StartUp Rule for the Running Application Evidence with sources as Dock to start the Itunes with some Music. So, we will have some audio stream automatically when we start the system and the Jack sensing will work after sleep. Even you could add other rules for controlling brightness and many other in this application.
2. This is for people with Elan touchpad only, you can enable a fix for this from EAPD Preferences in Elan touchpad kext plist.
3. After Sleep, try to toggle/change the Volume Control within 30 seconds.
For me its working well, so I wanted to share with you all.
Hope this helps some.UPDATE:
There is a standalone kext fix for this issue which addresses everything at here: https://osxlatitude.com/index.php?/topic/3084-eapd-fix-in-a-standalone-kext-no-need-ioaudiofamily-patching/
IOAudioFamily-189.4.9-FIXED_SRC.zip
Patches_IOAudioFamily_10.8.zip
IOAudioFamily_1.8.9c11#Node1b_HP.zip
IOAudioFamily_1.8.9c11#Node1b_SPK_Node#15_HP.zip
IOAudioFamily_1.8.9c11#Node1b_SPK_Node#21_HP.zip
IOAudioFamily_1.8.9c11#Node1b_SPK.zip
IOAudioFamily_1.8.9c11#Node12_SPK.zip
IOAudioFamily_1.8.9c11#Node14_SPK_Node#1b_HP.zip
IOAudioFamily_1.8.9c11#Node14_SPK_Node#15_HP.zip
IOAudioFamily_1.8.9c11#Node14_SPK_Node#21_HP.zip
IOAudioFamily_1.8.9c11#Node14_SPK.zip
IOAudioFamily_1.8.9c11#Node15_HP.zip
-
3
-
-
Hi,
This is a short guide for enabling the ports VGA and HDMI(audio) in the Notebooks equipped with Intel HD3000 GPU, but I'm gonna provide details as clearly as possible to apply and understand this patch.
Needed:
- AppleIntelSNBGraphicsFB.kext from SLE
- Hex fiend application to patch the kext: http://ridiculousfish.com/hexfiend/
- Patched DSDT with platform id (or) SMBios of MacBookPro8,1
DSDT patch of platform id is:
"AAPL,snb-platform-id", Buffer (0x04) { 0x00, 0x00, 0x01, 0x00 }Add this to the _DSM method of GFX0/IGPU or other named device found at address 0x00020000.
Here is the entire DSDT patch for HD3000:
         Method (_DSM, 4, Serialized)
             {
                 Store (Package (0x0E)
                        {
                            "AAPL00,backlight-control",
                            Buffer (0x04)
                            {
                                 0x01, 0x00, 0x00, 0x00
                            },
                            "AAPL00,DualLink",
                            Buffer (0x04)
                            {
                                 0x00, 0x00, 0x00, 0x00
                            },
                            "graphic-options",
                            Buffer (0x04)
                            {
                                 0x04, 0x00, 0x00, 0x00
                            },
                            "device-id",
                            Buffer (0x04)
                            {
                                 0x16, 0x01, 0x00, 0x00
                            },
                            "hda-gfx",
                            Buffer (0x0A)
                            {
                                "onboard-1"
                            },
                            "AAPL,snb-platform-id",
                            Buffer (0x04)
                            {
                                 0x00, 0x00, 0x01, 0x00
                            }
                        }, Local0)
                    DTGP (Arg0, Arg1, Arg2, Arg3, RefOf (Local0))
                    Return (Local0)
                }
DETAILS ABOUT THE CONNECTORS:
Lets have a look at the connectors information table before we try to patch and enable ports.This is the Original Connectors information provided by apple in the above kext for MacBookPro8,1.
0102 0400 1007 0000 1007 0000 // No of Connectors
0503 0000 0200 0000 3000 0000 // Laptop Display Port
0205 0000 0004 0000 0700 0000 //
0304 0000 0004 0000 0900 0000 // All 3 of them are Display Ports
0406 0000 0004 0000 0900 0000 //
Let me explain the above values line by line...
Line #1:
01 02 04 00 10 07 00 00 10 07 00 00
In the above line, we have information regarding the number of Connectors(Ports) and that number is 4, edit this number according to your number of ports/Connectors exist in your notebook and its optional, but doing so you can have only the ports active and rest removed.
Line #2:
0503 0000 0200 0000 3000 0000
This is Laptop built in screen display value where it gets detected, so we don't need to change anything here.
Line #3 to #5:
0205 0000 0004 0000 0700 0000 //
0304 0000 0004 0000 0900 0000 // All 3 of them are Display Ports DVI
0406 0000 0004 0000 0900 0000 //
The above 3 lines are Display ports (DVI) which can work for both DVI & HDMI, but for HDMI the audio won't work because it needs a patch like below:
0205/0304/0406 00 00 00 08 00 00 06 00 00 00
Basically, the above line applies to all 3 possible HDMI connectors that are 0205, 0304 and 0406.
VGA port:
Apple Mac computers do not have a VGA port, so we won't find the connector info in Apple connectors table. But the Hackintosh community has figured out the VGA code that works [found by RevoGirl (R.I.P) and bcc9 from other non-Intel GPU connectors table].
06 02 00 00 00 01 00 00 XX 00 00 00 //VGA, xx is port number
The VGA port number can be identified through Intel Registry dump (in Linux for instance).
The following lines provide a sample edited connectors table with VGA and HDMI ports (HDMI configured with 0304 connector):
01 02 03 00 10 07 00 00 10 07 00 00 // 3 Connectors (built-in LVDS + HDMI + VGA)
05 03 00 00 02 00 00 00 30 00 00 00 // LVDS
03 04 00 00 00 08 00 00 06 00 00 00 // HDMI
06 02 00 00 00 01 00 00 09 00 00 00 // VGA (port number set to 09)
00 00 00 00 00 00 00 00 00 00 00 00 // NONE
The above set of lines will basically enable built-in LCD + HDMI + VGA on the laptop. Note the number of connectors set to 3 in the 1st line and the last/4th connector line nulled (all set to 0)
NOTE: For HDMI, you have to try each value 0205/0304/0406 to find out which connector your notebook actually uses.
STEPS FOR PATCHING THE CONNECTORS:
- Get the File "AppleIntelSNBGraphicsFB" from AppleIntelSNBGraphicsFB.kext/Contents/MacOS folder and place it in some place for patching
- Open the above file from the Hex fiend application
- Press Command + F for Find/Replace utility
Enter the following values in "find" field
0102 0400 1007 0000 1007 0000
0503 0000 0200 0000 3000 0000
0205 0000 0004 0000 0700 0000
0304 0000 0004 0000 0900 0000
0406 0000 0004 0000 0900 0000
and enter the following values in "replace" field
01 02 03 00 10 07 00 00 10 07 00 00
05 03 00 00 02 00 00 00 30 00 00 00
03 04 00 00 00 08 00 00 06 00 00 00
06 02 00 00 00 01 00 00 09 00 00 00
00 00 00 00 00 00 00 00 00 00 00 00
As stated in above note, sometimes your HDMI might be on a connector other than "03 04" which I've used here. In that case, try either of the following values instead of "03 04 00 00 00 08 00 00 06 00 00 00" to get HDMI working.
02 05 00 00 00 08 00 00 06 00 00
(OR)
04 06 00 00 00 08 00 00 06 00 00
and Click on Replace all button
- Now save the file and copy back the file to the Folder AppleIntelSNBGraphicsFB.kext/Contents/MacOS
- Install the patched Kext and reboot & check
For HDMI Audio:
We need DSDT edit and Patched AppleHDA for HDMI audio.For this, follow my guide for patching AppleHDA from here: https://osxlatitude.com/index.php?/topic/1946-complete-applehda-patching-guide/
I hope this guide helps for the people trying to get VGA and HDMI with audio.
NOTE:
*External display (VGA mostly) won't get detected automatically if we plug after Mac is booted, so we have to perform manual display detection through the Display Preferences panel and click on Detect Display button.*From Mountain Lion or later, we don't see Detect Display button in the Display Preferences panel. Hold the ALT or Win key (=Option) at Display Preferences panel to get the Detect Displays button.
Credits go to RevoGirl(R.I.P), bcc9, toldeda and others who contributed.
-
Hello everyone,
This is an ACPI driver to control the Fn Keys and ALS sensor found in Asus Notebooks, developed by me based on the ideas from linux asus wmi, hokoffy (insanelymac user) WMI controller source and my own research on ACPI and OS X API. Also I've introduced many new features with customizations along the way and improved several things. Some of the Fn keys require DSDT patches in order to work.
The Fn keys which my driver controls are:
Fn +F3 Does OS X function (Misson control/Dashboard)/Keyboard Backlight Down (If supports) F4 Does OS X function (Launchpad/Desktop)/ Keyboard Backlight Up (If supports) F5 Brightness Down F6 Brightness Up F7 Screen Backlight On/Off (Soft mode) F8 Video Mirror F9 Touchpad (only if you use my Smart Touchpad driver) F10 Mute F11 Volume Down F12 Volume Up C - Rewind V - Fast A - Toggles ALS Sensor on/off (If supports) Asus Instant Key - Does OS X function (Launchpad) (If supports) Space - Play/Pause Left Arrow - Previous Down Arrow - Play/Pause Right Arrow - Next Up Arrow - Toggles Media Functions Fast/Rewind and Prev/Next between C,V & Left, Right Arrows and Toggles OSX Functions for F3, F4 Toggles Finer and Normal Brightness, Volume controlSupported Functions by F3, F4 and Asus Instant keys are:
Edit the plist entries "F3KeyAction" and "F4KeyAction" with the below values to assign different functions
0 - Default Functions
1 - Launchpad
2 - Misson control
3 - Dashboard
4 - Desktop
5 - Application window
6 - Eject
For Notebooks with compact Keyboard (without Numpad):
Fn +C - Previous V - Next Space - Play/Pause
CONFIG DEFAULT PREFERENCES:
Edit the file "info.plist" file located inside my kext "AsusNBFnKeys.kext/Contents/"
Look for the secton "IOKitPersonalities->AsusNBFnKeys->Preferences" to change Fn key controls- HasMediaFnKeys - Notebook has multi media fn keys Play/Pause, Next, Previous?
- SoftDisplayBacklightOff - Enable backlight on/off in soft mode? Useful it native backlight control is not working.
- DimBacklightOnAC/DC - Enable brightness pop up on AC/DC to notify? Useful for AC/DC status.
- MediaKeysDoFastRewind - Enable Media keys should do fast/rewind instead next/previous?
- FingerBrighntessControl - Enable finer brightness control which provides more steps?
- FinerVolumeControl - Enable finer volume control which provides more steps?
- DimBrightnessByLevels - 0 - 15, Default value is 3.
- KBackLightlvlAtBoot - 0-3 / 0-15
- F3KeyFunction - 0 - 6
- F4KeyFunction - 0 - 6
- InstantKeyFunction - 0 - 6
- IdleKBacklightAutoOff - Enable idle auto keyboard backlight off?
- IdleKBacklightAutoOffTimeout - Default 10000 ms, idle timeout value.
Look for the secton "IOKitPersonalities->AsusNBFnKeys->Preferences->ConfigForALS" to change ALS sensor controls
- EnableALSLogs - Enable logging to see values it reports?
- DisableOnAC - Disable ALS on AC?
- DisableOnFnControl - Disable Auto backlight when Fn key used to manually control?
- EnableAtBoot - Enable ALS sensor at boot?
- SamplesToProcess - Number of samples used to control backlight in background.
- TimerInterval - Interval used for checking the ALS in background.
- LevelxBrightness - Brightness level for the level 'x'. There are 5 levels for x = 1 - 5.
- LevelxRangeStart - ALS range start value for the level 'x'.
- LevelxRangeEnd - ALS range end value for the level 'x'.
Note:
For some dsdt files, you need to replace "\_SB.ATKD.IANE (0xXX)" with "Notify (ATKD, 0xXX)".
Use the attached patches in DSDT Editor app to patch your DSDT only if there is something not working.
Must Needed patches:
Brightness Fn keys patch:
Modify the method _Q0E and _Q0F in DSDT for the ATKP conditional clause code:Method (_Q0E, 0, NotSerialized) { If (ATKP) { \_SB.ATKD.IANE (0x20) } } Method (_Q0F, 0, NotSerialized) { If (ATKP) { \_SB.ATKD.IANE (0x10) } }Keyboard backlight patch:
Use the dsdt patch and config to plist from this link manually or attached patch file: https://osxlatitude.com/index.php?/topic/5966-details-about-the-elan-touchpad-features/&do=findComment&comment=32299
ALS sensor patch:
Use the dsdt patch attached.
Supports: Mac OSX 10.7 or greater
How to install:
1) Remove my kext from System (Optional).
2) Install my kext using your favorite kext installers.
For support just PM me (post in this thread too) in forums or send a mail to [email protected]
Change Log
Update v2.6 Released
- Major code optimizations
- Some improvements, bug fixes and optimizations
Update v2.5.5
- Improved ALS
- Some improvements, bug fixes and optimizations
Update v2.5
- Reworked ALS sensor driver integration
- Updated DSDT patches
- Several improvements, bug fixes and optimizations
Update v2.4
- Fixed "GPU not found" bug in some systems
- Fixed a bug in keyboard backlight read for some systems
- Added auto detection of Nvidia GPU (Removed DisplayUsesNvidiaGPU option in plist)
- Added Finer controls for brightness and Volume to get more steps of brightness/volume levels (Can be enabled/disables in plist) like Shift + Option does.
- Minor bug fixes and optimizations
Update v2.3.5
- Reworked on some sections for improvements
- Added new _HID value "PnP0C14" found in new Notebooks DSDT to load my kext
- Removed debug logs which was on before
- Some bug fixes and optimizations
Update v2.3
- Added support for old Asus models.
- Added support to auto detect the Keyboard backlight and ALS sensor support from DSDT.
- Added support for Asus Instant key found in some models.
- Added Eject function for F3, F4 and Instant key customization.
- Some bug fixes
- Optimized code
Update v2.2
- Fixed ALS sensor screen backlight changes not working issue
- Fixed Media Next and Previous key press to work everywhere
- Added NVRAM support for keyboard backlight levels (need to use new DSDT patch)
- Added 16 Levels support for keyboard backlight (need to use new DSDT patch)
- Added idle auto off support for keyboard backlight (need to use new DSDT patch)
- Added automatic detection of my asus backlight driver use(removed plist option)
- Updated code to work with new version of my AsusBacklight driver
- Minor bug fixes
- Optimized code
Update v2.0
- Enabled F3 and F4 keys to OSX functions which was not used in Full sized keyboard
- Integrated two kexts used in previous versions into a Single kext
- Assigned Fast, Rewind and Play functions to C, V and Space keys which was not used before in Full sized keyboard
- Assigned Up Arrow to toggle the actions of media keys and F3,F4
- Optimizations to the code for some improvements
- Bug fixes
Update v1.7.2
- Fixed some bugs introduced in v1.7 which made kext not working
- Added screen backlight on/off for Fn + F7 for those whose backlight is not working (it is done in soft mode, but you can use attached patch for hard wired backlight control in zenbooks, credits: qwerty12)
- Improved support for ALS sensor of Zenbooks which is reported to be working well
Update v1.6
- Added support for the Fn key Fn+ F9 to enable/disable touchpad with my Elan touchpad driver
- Added support for Asus Backlight driver to match Apple brightness bezel values to Asus brightness levels
- Added support for old Asus notebooks with different _UID for ATKD device in dsdt (still in progress so need testers with _UID ASUSxxxx in dsdt)
- Added experimental support for ALS sensor in new Zenbooks (still in testing phase so it won't work for now)
Update v1.4.1(Remove AsusNBWMI kext before installing this)
- Renamed the kext name from AsusNBWMI to more sensible name "AsusNBFnKeys" and did some code changes for future improvements
Update: v1.4
- Integrated both compact keyboard version and normal version in single kext
- Added plist options to choose keyboard backlight at boot and map media buttons to c,v and space keys
- Optimized code
Hoping this helps for many.
CREDITS: Hotkoffy (InsanelyMac) for his WMI source and to Linux OS
PS: I've worked very hard in this and need your support , so I request you to consider a small donation if possible which helps me and allows to spend some time on this for future updates.
Paypal:
Thanks for the support.-
23
-
Hello,
This post is going to be a part of my AppleHDA Patching guide. However, this post alone can be used to Patch AppleHDA binary. I'm using the codec ALC269 as an example for explaining the process. The credit goes to RevoGirl (R.I.P), TimeWalker and others who contributed for discovering the binary patch details.
Basically, what we try to do with binary patch is matching our codec ID with codec ID of Apple. By this way our codec gets enabled and work like an Apple codec. There are three Apple codecs from AppleHDA known to work very well for binary patching.They are:
- ADI 1984 [0x11d41984]
Hex Value for patching = "84 19 D4 11"
- ADI 1984B Analog [0x11d4198b]
Hex Value for patching = "8B 19 D4 11"
- ALC 885 [0x10ec0885]
Hex Value for patching = "85 08 EC 10"
Now, what we are gonna do is just replace the Vendor and Device id of our codec for any one of the above three Apple codec ID's and zero out/patch some lines which does the comparison and prevents the codec getting enabled. This method works very well for many codecs so far, but it might not for some codecs.
Note:
There is a script created by bcc9 from InsanelyMac for this bin patching. So, if want to do this in a script way then follow this post: Binary Patch Script.I'm going to use Apple codec ADI 1984 for the ALC 269 which works very well.
Things needed:- Untouched AppleHDA from OSX 10.7 or greater
- Hex Fiend Application (For Patching binary)
- Codec dump from Linux (Read AppleHDA Complete guide for steps to get dump )
- Plist Editor (or) Xcode
Steps to patch AppleHDA binary: [ALC269 codec is used as an example]
1. Go to the folder "AppleHDA.kext/Contents/MacOS" inside AppleHDA kext
2. Copy the binary file "AppleHDA" inside the folder MacOS to Desktop
3. Open the binary file "AppleHDA" from the application "Hex fiend"
4. Press the shortcut keys "Command+F" in Hex fiend app to open Find and Replace boxes
For AppleHDA 10.8 or later:Enter "84 19 D4 11" in Find Box (Apple codec) and "69 02 EC 10" in replace box (use your ‘Vendor Id’ value from codec dump) Press "Replace All" button to replace
Note 1: For ADI 1984/1984B patch, if your codec device id value is less "884" then you need this additional patch.
If your codec device id is less than "884" then you need to clear a check in AppleHDA, otherwise it will try to skip this and will load ALC885 codec instead. Because in our example of ALC269 whose device id "0269 (0x10ec0269)" is less than "884", so we need to apply this patch which clear the comparison to use the ADI 1984 codec.
Enter "84 08 EC 10" in Find box and
      "00 00 00 00" in replace box
Press "Replace All" button to replace
Note 2: For ADI 1984B, you need this additional patch.
If you use Apple codec ADI 1984B to patch, then you have to clear ADI 1984 check for loading the codec ADI 1984B.
Enter "84 19 D4 11" in Find box and
      "00 00 00 00" in replace box
Press "Replace All" button to replace
For AppleHDA in 10.7:
In 10.7, we need the below additional patch along with the patches used in 10.8 or greater.
Enter "83 19 D4 11" in Find Box and
      "00 00 00 00" in replace box
Press "Replace All" button to replace
5. After above replaces, save the file from File menu and copy the patched AppleHDA binary from desktop to back too "AppleHDA.kext/Contents/MacOS".
Binary patch is finished, next we need to patch the AppleHDA kext with the details of layout, codec id and calculated codec verbs from the AppleHDA guide.
Patching AppleHDA Kext:
1. Open the file Info.plist from the folder "AppleHDA.kext/Contents/Plugins/AppleHDAHardwareConfigDriver.kext/" using Xcode/Plist editor
2. Go to the section "IOKitPersonalities->HDA Hardware Config Resource->HDAConfigDefault->Item 0" in info.plist
3. Edit the item "CodecID" to the decimal value of Vendor Id found from codec dump, which is “283902569†(0x10EC0269) for ALC269 as shown in the below picture of the codec dump.
4. Edit the item “ConfigData" to the calculated codec verb data by following the AppleHDA complete guide<01271cf0 01271d00 01271e00 01271f40 01471c10 01471d01 01471e13 01471f90 01771cf0 01771d00 01771e00 01771f40 01871c20 01871d10 01871e81 01871f04 01971c30 01971d01 01971ea0 01971f90 01a71cf0 01a71d00 01a71e00 01a71f40 01b71cf0 01b71d00 01b71e00 01b71f40 01d71cf0 01d71d00 01d71e00 01d71f40 01e71cf0 01e71d00 01e71e00 01e71f40 02171c40 02171d10 02171e21 02171f04 01470c02>
5. Edit the item “LayoutID" to “28†for Realtek ALC2xx (or) “12†for ALC8xx/IDT/Conexant and save the file.
6. Patch your DSDT with the layout value.
7. Everything is done, now you can install the patched AppleHDA kext and reboot.
DSDT Patch:
Add (or) edit the _DSM method to HDEF device in DSDT using below code (or) use the attached patch files in DSDT editor.
Note: Replace the value "1c" to "0c" if you are using layout12.
          Method (_DSM, 4, NotSerialized)
                {
                    Store (Package (0x06)
                        {
                            "hda-gfx",
                            Buffer (0x0A)
                            {
                                "onboard-1"
                            },
                            "layout-id",
                            Buffer (0x04)
                            {
                                 0x1C, 0x00, 0x00, 0x00
                            },
                            "PinConfigurations",
                            Buffer (Zero) {}
                        }, Local0)
                    DTGP (Arg0, Arg1, Arg2, Arg3, RefOf (Local0))
                    Return (Local0)
                }
Hope this helps for many. Please let me know if you have any doubts and I will try to answer and help if possible. I've attached patched AppleHDA files of ALC269 for reference.
AppleHDA.kext_Patched_10.7.2.zip
AppleHDA.kext_Patched_10.7.3.zip
Platforms and Layout Files 10.8.zip
-
8
-
Hi everyone,
I've started this thread in order to know the bugs in my driver, so please post your issues here and I'll try to fix them asp. You may sometimes not receive answer from here, so try to PM me if you want support. Please donate if you can which will help me to get more time on these projects. ThanksSTEPS TO SUBMIT BUG:
1) Explain your problem clearly like how to reproduce it again.
2) Mention your OSX, boot loader and my driver version used to test.
3) Send me your system log file from /var/log after boot and ioreg file saved using IORegistryExplorer v2.1 or lower.
4) Also provide info about any custom plist edits if you did.
CHANGE LOG:
Version v4.2 :
- Integrated Focaltech touchpad driver and renamed kext to SmartTouchpad (Remove old kext manually before install)
- Improved support for some new ELAN touchpads found in new notebooks
- Improvements for all the features which is stable and works better
- Updated few plist options to manage better
- Fixed many problems related to touchpad not working sometimes for some systems
- Fixed many bugs and optimized code to work faster
Version v4.0.5
- Fixed scrolling issues related to continuous
- Fixed Edge swipe issues which was not working properly
- Added plist options to control scroll speed levels more precisely
- Removed EAPD fix which i think is not useful anymore in this as got issues in sync, so use EAPDFix kext.
- Fixed many minor bugs
- Optimized code
Version v4
- Updated code for all the features from the scratch
- Updated buttons from soft control to real buttons, so buttons will work just fine everywhere
- Updated plist for preferences with many new options to control the features
- Updated code for EAPD fix based on my EAPDFix 2.0
- Added Palm detection
- Added some new additions to some features (For details check the features explanation thread)
- Improved multi finger gestures
- Added compatibility for Yosemite
- Fixed many major and minor bugs
- Optimized code
Version v3.8.5
- Fixed an issue which made still touchpad not working/acting weird on some boots/after sleep for some users
- Fixed two finger pointer move with thumb on virtual button area and index moving pointer in v4 hardware (can be enabled/disabled in plist)
- Fixed and updated keyboard layouts which solves problems faced by some users
- Reworked multi touch data processing which improves overall performance/accuracy of multi touch
- Added support for finer brightness and volume levels to feature smaller increments in Fn keys mode (can be enabled/disabled in plist)
- Added support for brightness and volume keys to work on key hold to increase/decrease
- Added option to choose the edge scroll working area in plist
- Added option to choose the virtual buttons working area for v4 hardware in plist
- Added option to choose the edge swipe length from edge/middle of the pad in plist
- Added option to choose scroll level at boot for those users who need scroll speed above 6(as a temp fix) because OSX prefpane not saving the values above 6 which is a bug
- Turned off NumLock at boot by default as its causing some problems for some users (Enable this from keyboard plist if you want)
- Organized the touchpad plist preferences to manage the features properly and easily
- Updated EAPDFix
- Fixed many bugs
- Optimized code
Version v3.8
- Fixed some issues which made touchpad not working/acting weird on some boots/after sleep
- Fixed an issue with physical buttons found in v4 hardware
- Reworked scrolling feature from the scratch which is now so much better and smooth and can be customized using scroll acceleration modes by editing plist.
- Added support for the active multiplexing controllers used by the new touchapds for sharing the PS2 protocol.
- Added pointer acceleration mode to improve the acceleration.
- Regular function keys can be accessed in Fn keys mode 1 using the "Shift + Caps + Fx"
- ​Added new scroll type "Auto scroll"
- Moved keyboard NumLock toggle from touchpad plist to keyboard plist
- Modified some plist entries and merged
- Optimized some features
- Updated EAPDFix code, which now can enable the EAPD on demand along with after sleep mute/unmute fix using keyboard shortcut Shift + Caps + Enter needed for the new AppleHDA v2.6 or later.
- Fixed many bugs
- Optimized code
Version v3.7
- Added 5 Fingers touch support for v4 hardware with three gestures
- Added Asus Keyboard backlight Idle auto off support (need to use my updated AsusNBFnkeys kext)
- Fixed dragging related issues in v4 hardware
- Fixed 3f left/right gestures for Spanish/Italian/French keyboards (need to use Keyboard Type ID values)
- Improvements to every feature
- Fixed many bugs
- Optimized code
Version v3.5
- Added option for customizing Extended functions F13-F24 with custom shortcuts
- Added option to choose custom shortcuts to gestures actions list
- Added physical buttons support present in some v4 hardware
- Fixed some keyboard, touchpad and controller related probe issues
- Fixed horizontal scrolling bug and added option to disable inertia
- Fixed slow edge scrolling and inertia effect
- Removed SlowSynch scroll option and integrated as default to improve scroll
- Added option for choosing pressure for tap and hold drag
- Updated EAPD Fix (Read my EAPDFix post for details on update)
- Added support for Asus Keyboard backlight
- Added option to make shift + caps shortcut as Fn key
- Added custom german layout option for keyboard to fix the key mapping
- Added support for new firmware from v4 and fixed some bugs related to v4
- Added option to map Delete as command + backspace shortcut for deleting files
- Fixed many bugs encountered so far
- Optimized code a lot (means less code doing same work even better)
Version v3.3
- Added v2 hardware support
- Added support for some of the old v3 hardware (found in Gigabyte notebooks, need to enable v3HWLegacyMode in plist)
- Added support for the most of the Fn key scan codes in notebooks from Acer, MSI, Dell, Samsung and few others
- Reworked on keyboard keys dispatch to improve (check keyboard thread for details)
- Added Fast and Rewind support for Media keys Next and Previous if you hold it
- Moved ApplePS2Controller and ApplePS2Keboard kexts to plugins folder of ApplePS2ElanTouchpad
- Merged AppleACPIPS2Nub to ApplePS2Controller
- Improved scrolling and added new feature SlowSynch scroll
- Fixed button dragging issue and added new option for choosing single button/emulated three buttons in v4 from plist
- Improved staiblity for all the features
- Many bugs fixed
- Optimized code
Version v3.0.2
- Fixed a bug in right click button in v4 hardware
- Fixed a bug in App switch swipe gesture which was making right click not working
- Changed Fn key mode to 1 and disabled experimental elastic effect
Version v3.0
- Reworked on almost every feature from the scratch to make it better
- Added support for new firmwares from v4 hardware
- Added EAPD fix support for realtek codecs
- Added more functions for gestures option list
- Added new effects to scroll
- Improvements to everything
- Fixed so many bugs
Version 2.8.3
- Disabled some of the features which are not used to for the most, so if you want enable them from plist after reading details about that feature
- Changed Notification centre function from Soft mode to Keyboard shortcut of Apple in Keyboard Preferences
- Improved Swiping and dragging
- Changed Plist options for enabling/disabling swipes from 4 options to 2(3FingersSwipes and 4FingerSwipes)
- Fixed some bugs
- Changed FingerLift dragging timeout from 0.5s to 0.1s
Version 2.8
- Fixed issues related to Keyboard and touchpad Kexts, which are not loading properly due to kernel cache issues
- Added new Feature "Taps Feature Toggle" for enabling/disabling some features using Double/Triple Taps (Read Taps Feature toggle section for more details)
- Changed 'Three Finger Press gesture' for v3 hardware to Show Desktop
- Improved Three and Four Fingers Swipe gestures detection
- Fixed Fn keys mode key mapping issues in Keyboard kext
- Added option(need to set the value to "disable" for Fn key) to disable Fn key Mapping in Fn keys mode
- some bug fixes
Version 2.7.5
- Removed CommandKeyPos plist entry, now the driver detects it automatically
- Added new Fnkeys mode without using fn key and mapped keys to Apple Fn keys layout
- Reworked Keyboard from the scratch for Normal and Extended Key Sequences, check the keyboard section for updated details
- Fixed NumLock key for enabling/disabling num keys properly
- Fixed ISO layout issues in the previous version
- Fixed double tap to drag for v4 and some dragging issues
- Added timeout for finger lift drag release and the timeout can be edited in plist entry "FingLiftDragTimeOut", default value is 1/2 second (500ms)
- Added acceleration preference option in plist, for details read Pointer Acceleration tables section
- Added support for Asus Fn key driver to enable/disable touchpad with the fn key Fn+F9
- Improved Corner tapping detection
- Fixed Single tap issue which was not releasing in safari and finder back buttons
- Added Control + Pause/Break key to eject Optical drive
- Assigned Scroll Lock key for enabling/disabling Inertial scroll
- Optimized some features
- Fixed many bugs
Version 2.6
- Added new feature Fnkeys mode to access standard fn functions using right Context key as fn key
- Added few more functions to swipe gesture
- Added few enhancements to keyboard (check those in keyboard section)
- Added new features Continuous and Inertial Scrolling effects
- Reworked Edge swipe and Corner tapping features to better
- Reworked Scrolling for both two finger and edge which is very smooth now
- Fixed Double tap to drag on Windows
- Fixed an issue for driver to work in Lion
- Improved code for all the features with optimizations
- Smoothed Mouse pointer with some acceleration tables and curves from Mac touchpads( so accelerations apps I said are not needed mostly)
- Added a workaround for ALC269 jack sense after sleep(only for those users who have this issue)
- Many Bug fixes
Version 2.1.3
- Fixed a bug with Right Click
- Improved code for Three/Four Finger Swipe to v4 hardware
- Improved with Touchpad detection after sleep
Version 2.1 Final
This update brings every feature of the touchpad for v3 and v4 with improvements to the already released features.- Added the features Swipe, Zoom, Rotation, Tapping and many other, so check my details above
- Improved all the features of v4 hardware
- Integrated the code of v3 with v4 in a single Kext
- Added the feature Edge Swipe to v3 hardware
- Improved the code of v3 hardware across all the features
-
10
-
Files sent to address above! My system is a D830 with NVS140M NVidia card.
I've also attached system report to this thread....adn open this other thread:
THX!!!
I'll look into that and let you know what I can do for you as soon as possible.
-
I chose to leave out the pre-modified DSDT. If you need/want them, let me know. It only comes as DSDT.aml.
Files sent. Thanks for looking, EMlyDinEsH!
Edit:
Forgot IORegistryExplorer file! Sending another email containing that file only!
I'm really sorry as I should have mentioned in the thread itself about the SSDT patching. SSDT patching to enable the Native Power management is only for the newer processors like intel Core i3, i5 and i7. So, I can only do dsdt patching which are relevant to your model but you said already got it working. There is nothing here which I can help you with. But, I can try for the power management and sleep as much as possible. So, Plz send me the files from Windows becoz files from the Linux was not perfect for me.
-
DSDT has already been modified on most, if not all, Latitude D series laptops. Has the SSDT?
For example, if I send you the IORegistry taken from 10.7.5 for my D520 and the DSDT from EDP for my model, will that be sufficient? Having native Speedstep and sleep have always been a quest of mine lol.
It would be better if you send me the files I asked along with your edited files.
-
Hello EMlyDinEsH,
I sent you my files yesterday to the [email protected] email.
I have an Asus K55VM and my email is: "[email protected]"
Thanks and best regards!!
I got files and let you know tomorrow.
-
Please I want DSDT and SSDT for Asus zenbook ux21
I've patched and sent you the files. Plz check and post a guide with all the files when you are done setting up Mac Successfully on it.
-
- Popular Post
- Popular Post
Last update: 17 Sep 2017
UPDATE: 17 - 09 - 2017
Just wanted to clear few things about my commitments to community, and development on my projects which has been going slow due to my personal life as I have been hit really hard since an year, and I am trying to sort out personal things still. So decided to take timeout on my commitments to my projects and put my attention on personal life first. Don't expect any regular updates on this project and others projects of mine till end of this year 2017. It does not mean I will not be working, and it is just that I won't post any update or respond to you all unless I have something worth to share.
I know many of you are disappointed with me and some of my choices/decisions for the last one year, but believe me I had no other option and good reason for that. So your patience will be rewarded properly once I have started releasing updates as I have big plans and willing to commit myself to long term development, and I apologize for not keeping up with promises so far.
In case I fail to keep up like I promised above, then I will give up and release all of my work to others to continue.
Hope you understand and support me with beta tests when I need them
Thanks
Hi everyone,
This is a multitouch driver for ELAN, FocalTech and Synaptics touchpad for Mac OS X based on the documentations available and some ideas from VoodooPS2, ApplePS2 and Linux open source code. I have successfully accomplished everything so far and added many new features to take advantage the touchpad completely to make it close to Apple touchpad in every way. Also my driver is implemented with my own universal logic for all the features, so it can be adapted to all touchpads easily and I'm still improving these to achieve even better results.
My driver supports every hardware version of ELAN touchpads except version 1 (which is too old and can't find in existing notebooks will support that if i get some testers), mostly all available FocalTech touchpads and Synaptics touchpads (still experimental) with firmware version v7.5+.
NOTE: For Synaptics, it was developed based on my touchpad hardware i have, so support is limited to touchpad with firmware version 7.5+ only, but will try to improve support other hardwares also if users interested in my features and help me with beta testing.
FOR BUG REPORTING:
If you have problems with my driver the follow steps to report the bug from this link: Touchpad issues. Use this thread only to ask about features, feedback and for any other comments.Please read the below threads which explain the features after installing the driver, so you can understand and learn how to use every feature. If anyone still have doubts/issues then PM me to get help from myself (or) post them in other thread about issues so others can help you. I will respond to you mostly during weekends only for some time.
FEATURES DETAILS: (UPDATED FOR v4.6)
Touchpad features: Click here to learn
Keyboard features: Click here to learnSupports OS X version 10.6 or later (10.6 support is only from v4.4)
For Prefpane, try to install the version from this link, and add the prefpane to start up items:
http://www.hackintosh.zone/file/997-correct-preference-pane-trackpad-macos-sierra/
UPDATE: 06-06-17
Hi everyone,
It has been long time since I have given you all an update on my development. The reason for this was I had a pretty rough personal life and busy time in my job last few months, so I was really under big stress and had busy days which did not allow me to do any progress on my projects.
Good news is that I was able to sort some of my issues, and find some time to continue my projects again. I have already done some analysis on my project, and figured that I had to do some major code rewrite (most of the code was depending around work arounds which are not optimized well for the time being back then) in order to better support future hardwares and also improve features with ease.
My plan is
- Setup a way to support and track bugs from users
- Setup a way to gather feedback from users
- Re-build the project from the scratch with good design for cross-platform support in mind, to support multiple touchpad vendors and interfaces (thinking about I2C) as universal driver
- Refactor the project code with as much clean code (so when I make it open others can understand) as possible of mine from the scratch
- Finish basic features (Keyboard and Mouse emulation)
- Integrate basic vendor specific features
- Develop and Integrate basic prefpane of mine
- Release first beta to test
- Integrate and implement my old driver features one by one for better stability
- Update prefpane for new features and release another beta
- Update and improve support for newer hardware based on linux and other sources
- Finish integrating all the features of old driver by reviewing each one with community feedback
- Add new features and improve it's stability and performance
I have big list of TODO's, but I promise this time that I will try to finish each of them as soon as possible with a beta release happening very soon before the end of this month in best case. Understand your patience is really needed here, as I do not want to rush and have limited time of mine. Also, I am gonna give weekly update on my progress if possible when I have finished my milestones.
I will try to respond to your PM during weekends, and if you want to be beta tester then send me your skype ids with GMT time via PM.
One more thing, current version of my driver is deprecated and so will not be continuing this. But, I will try to give you some support if there is a need before I finish my new version of driver for any issues which are not big enough for time being.
Thanks for your support and co-operation.
PS: Sorry for those who want my project to be open sourced now, as I cannot do that until I finish above TODO's. Hope you understand, and support me as I really worked hard on this project. I have worries to get this open right now, and understand that with more people development can progress faster but opening this right now might create issues and end myself supporting to the development in the long run due to fragmentation.
I would request you to go through plist editing for controlling the features (as I have a lot of them and its important users to know about those details, because it will allow the driver to be tweaked as you want and my default values are not going to be best for every touchpad or user) for now (will make my own prefpane very soon within 3 months, and its a promise). Going to update my thread which details the features every week one after another for keeping it updated with latest version.
Version v4.7 beta 5 (10 - 12 - 2016) (work in progress, available to try from attachments).
- Added back feature multi finger drag due to users request (can be dragged using 1-3f, Note: This drag wont be as smooth as 1f because the data is not as good as 1f in 2-3f which is why I stopped working on this long time ago, but currently it works nicely and usable in my touchpad. So its usage varies to each touchpad). You have to hold fingers for 2-3 sec at fixed position and move to trigger drag.
- Improved support for Sierra
- Support for new style prefpane (most of the features wont control my feature, but I will fix them by next weekend to match them) [Drag, scroll, double click speed can be controlled inside Accessibility Settings->Mouse & Trackpad]
- [Experimental] USB mouse can now stop trackpad if you enable Accessibility setting of Ignore Trackpad [Works only in 10.10 or lower (?). Will find a way for new OS X versions asp]
- Improved scroll inertia with more control options in Plist to choose
- Fixed Sierra Caps Lock bug using a workaround
- Fixed a bug with some new ELAN touchpads which have issues with virtual buttons acting weird if pointing was enabled at button area, so added option to diable/enable this in plist
- Fixed sierra OS X functions like Launchpad, Dashboard, Mission control etc., which are not working by redirecting to new keyboard shortcuts. (Needs to be configured at Keyboard shortcuts)
- Updated support for Asus keyboard backlight with two levels
- Several minor bug fixes and improvements
- And more to come as am still looking at improving others things that are buggy and also using feedback from users
Version v4.6.5 Released
- Major code optimizations
- Updated support for 10.12 (Still some Fn keys wont work, will try to fix close to release)
- Added plist options to control Apple Trackpad prefpane values for 10.12
- Several bug fixes and improvements
Version v4.6
- Fixed CapsLock key change plist option
- Fixed a firmware bug in ELAN v3 hardware
- Updated driver to accept new revisions of ELAN Touchpad to be recognized as Version 4
- Added plist option to disable the touchpad when LID id closed (Enable back auto when its opened)) which will stop strange behavior from touchpad when using HDMI in some systems.
- Pointer acceleration enhancements (new plist options to control)
- Partial support for the extra buttons and track point from Synaptics trackpad
- Improved support for synaptics
- Updated documentation for features
- Several minor bug fixes and optimizations
Version v4.5
- Added new plist option to control touchpad edges dead zone
- Added plist option to change 2f and 3f tap default actions
- Added option to tweak pointing acceleration
- Added 4f pinch gesture and plist option (ELAN and Focaltech)
- Updated plist options to better organize
- Improved 2f dragging in clickpads
- Improved edge swipes
- Fixed synaptic touchpad sleep issue seen in some systems
- Fixed some keyboard bugs
- Several improvements, minor bug fixes and optimizations
Version v4.4.5 :
- Improved support for Synaptics touchpads (Clickpad working fine now)
- Updated support for new ELAN touchpads
- Improved edge swipes
- Fixed a bug with Karabiner app to allow mapping
- Several bug fixes and optimizations
Version v4.4 : Released (For Asus keyboard backlight auto off, use updated DSDT patch and v2.5 Fn keys kext)
- Improved support for Synaptics touchpad (Clickpad still have some issues so i need beta testers)
- Improved support for some new ELAN and Focaltech touchpads
- Improved pointer acceleration
- Reworked scrolling
- Improved Swipes, Zoom and Rotations
- Added more plist options to tweak the gestures and option to control delay after sleep
- Added GIGABYTE Fn key mode layout
- Added support for 10.6 (32bit build)
- Fixed several bugs in both keyboard and Touchpad
- Optimizations
Version v4.3 :
- Added support for Synaptics touchpads (Firmware v7.5+) found in new laptops but still its experimental for others as it has not been tested on many laptops. (Tested only on Lenovo Z50-70 and G400)
- Added support for unsupported touchpads to work in enhanced mouse mode without multi touch
- Improved support for Focaltech and ELAN touchpad (especially ELAN v2)
- Improved pointing and scroll with new smoothing features and other improvements which can be controlled in plist
- Improvements and optimizations for all features
- Added plist option for keyboard to make Num Lock into clear instead of soft controlled num lock mode
- Added Fn keys mode layout for Lenovo
- Added support for ACPI brightness controls from EC calls (You have to use DSDT patch)
- Fixed many bugs
For the complete change log of all the updates follow this thread:
https://osxlatitude.com/index.php?/topic/1966-elan-touchpad-driver-issues/
FEATURES OF ELAN v4 HARDWARE, FOCALTECH and SYNAPTICS: (Supports up to five fingers touch)
- Mouse mode with Virtual Buttons Left, Right and Middle
- Tapping - Up to 5 fingers
- Clicking - Up to 5 fingers
- Dragging : Tap to release and Finger Lift
⃠Left Button Drag, Double Tap Drag, Single Tap Drag and Click Drag - Corner Tapping
- Scrolling - Single finger Edge and Two Fingers swipe
- Continuous, Linear, Sling and Inertial scroll effects
- Finger Press - Up to 5 fingers
- Swiping - Edge, Three and Four Fingers
- Zoom - Two fingers pinch zoom, OSX Zoom with Keyboard
- 4 (Elan, Focaltech) & 5 fingers Pinch gesture
- Rotations - Arc and Swipe Rotations
- Accidental Input/Palm check when typing
- Fn Keys Mode
- Features Toggle
- Full customization
FEATURES OF ELAN v2 and v3 HARDWARE: (Supports up to three fingers touch)
- Mouse mode with Buttons Left, Right and Virtual Middle
- Tapping - Up to 3 fingers
- Dragging - Tap to release and Finger Lift
⃠Left Button Drag, Double Tap Drag and Single Tap Drag - Corner Tapping
- Scrolling - Edge Scroll and Two Fingers
- Continuous, Linear, Sling, Circular and Inertial scroll effects
- Finger Press - Up to 3 fingers
- Swiping - Edge and Three Fingers
- Zoom - Two fingers pinch zoom, OSX Zoom with Keyboard
- Rotations - Arc, Circular and Swipe Rotations
- Accidental Input/Palm check when typing
- Fn Keys Mode
- Features Toggle
- Full customization
HOW TO INSTALL:- Remove any existing "ApplePS2Controller, VoodooPS2Controller, AppleACPIPS2Nub, ApplePS2Keyboard and old Elan Touchpad" kexts if you have already installed from the HDD '/System/Library/Extensions ', '/Extra/Extensions', and '/System/Extensions/Library/myHack.kext/Contents/Plugins/' (if you used myHack USB installer for OSX).
- If you use USB installer to boot (used to install OSX), then you have to remove the above kexts from USB '/Extra/Extensions'.
- Install the Kexts (Recommended to use Kext utility for installing) inside the attached zip file using any kext installing methods (In clover, some systems may have problems with kext injection, so try to install them to System/Library/Extensions in that case). 

​ NOTE: From v3.3, there is only one kext as my driver in the attached zip file.
For Support PM me or POST here . I may respond slowly sometimes due to busy life.
NOTE: Please don't mirror my files at other places, let the people know about this thread for the latest version and support.NOTE:
I've worked very hard on this driver (especially ELAN v2, 4 and Focaltech without hardware) and will try to continue support in future. I do the development everyday with some time dedicated to this and many other projects. But i need your support so i can get more time to spend on these projects for improvements. Also we maintain this website without ads for all of you and it costs a bit for us to host.
IF POSSIBLE PLEASE MAKE A DONATION BY CLICKING BELOW PAYPAL DONATE BUTTON FOR ME
Paypal:
FOR WEBSITE DONATE HERE: http://www.osxlatitude.com/donate/
THANKS FOR YOUR SUPPORT
I would like to thank following people for beta testing the driver and providing valuable feedback:
Leon, Ramalxlama, Shin zon, Sherlocks, Dragon, Ðнтошка, Thomas benhamou,68x, Eli and many others.
SOURCE:
Project source code: https://github.com/E...Touchpad-Driver
I am still doing some major work with beta testers to improve the features and stability, so I cannot update my git until its done, because it may allow others to modify and distribute their own version which can miss my changes and also worried about something else too which I do not want to mention here. I want to support this project for very long time and did spend hundreds of hours so far with testers (without hardware) and implemented many of the features myself from the scratch. So, I deserve and have rights to not to update my project source until I feel confident. The base of the Apple PS2 open sources I have used for my project are pretty much same which you find in the source from my above git link and rest of the changes from that are based on documentation and my own ideas.
CREDITS:
ELAN - Arjan Opmeer for ELAN linux documentation/source
FocalTech - mgottschlag (github) for linux source
Synaptics - Synaptics official documentation and linux source
I would like to thank the VoodooPS2 team (Slice, King, rehabman and many others who contributed to the VoodooPS2) for ideas, Apple for their PS2 open sources which i've used as base for my driver and linux sources for the touchpad initialization and packet info.
SmartTouchPad_v4.4_Final_64bit.zip
SmartTouchPad_v4.4_Final_32_64bit.zip
SmartTouchpad_v4.4.5_32_64bit.zip
SmartTouchpad_v4.4.5_64bit.zip
-
141
-
 3
3
-
***Codec Verbs Info***
071CXYX = Default Association Values: 1, 2, 3, 4, 5, 6, 7, 8, 9, a, b, c, d and f Y = Sequence Values: Always set this to '0' because Apple dont use analog multi outputs in their codec.
071DXY
X = Color: Color of the jack
Values:
Unknown 0
Black 1
Grey 2
Blue 3
Green 4
Red 5
Orange 6
Yellow 7
Purple 8
Pink 9
Reserved A-D
White E
Other F

Y = Misc - Jack detect sensing capability
Values:
1 for Internal Devices(Speaker etc.,) and
0 for External Devices(Headphones etc.,)
071EXY
X = Default device - Intended use of the Jack
Values:
Speakers 1
HP Out 2
CD 3
SPDIF Out 4
Digital Other Out 5
Modem Line Side 6
Modem Handset Side 7
Line In 8
AUX 9
Mic In A
Telephony B
SPDIF In C
Digital Other In D
Reserved E
Other F

Y = Connection type - indicates the type of physical connection
Values:
Unknown 0
1/8 stereo/mono 1
1/4 stereo/mono 2
ATAPI internal 3
RCA 4
Optical 5
Other Digital 6
Other Analog 7
Multichannel Analog (DIN) 8
XLR/Professional 9
RJ-11 (Modem) A
Combination B
Other F
071FXY
X = Port Connectivity - indicates the external connectivity of the Pin Complex. Software can use this value to know what Pin Complexes are connected to jacks, internal devices, or not connected at all. 00b - The Port Complex is connected to a jack (1/8, ATAPI, etc.). 01b - No physical connection for Port. 10b - A fixed function device (integrated speaker, integrated mic, etc.) is attached. 11b - Both a jack and an internal device are attached. Y = Location Location indicates the physical location of the jack or device to which the pin complex is connected. This allows software to indicate, for instance, that the device is the “Front Panel Headphone Jack†as opposed to rear panel connections. Details: Convert the 2 digit hex number to binary. Pad the front with zeros to make it 8 dgits. Example: Code: 0x02 = binary 10 = 00000010 8 digit binary Reading the bits from left to right: Port Connectivity bits 7:6 ----------------------------------------------------------- 00 - Port is connected to a Jack 01 - No External Port -or- No physical connection for Port** 10 - Fixed Function/Built In Device (integrated speaker, mic, etc) 11 - Jack and Internal device are attached Location Part 1 - bits 5:4 ----------------------------------------------------------- 00 - External on primary chassis 01 - Internal 10 - Separate chassis 11 - Other Location Part 2 - bits 3:0 ----------------------------------------------------------- The meaning depends on Location Part 1 00 0000****N/A 00 0001** Rear 00 0010** Front 00 0011** Left 00 0100** Right 00 0101** Top 00 0110** Bottom 00 0111** Special (Rear panel) 00 1000** Special (Drive bay) 01 0000** N/A 01 0111** Special (Riser) 01 1000** HDMI 01 1001** ATAPI 10 0000****N/A 10 0001** Rear 10 0010** Front 10 0011** Left 10 0100** Right 10 0101** Top 10 0110** Bottom 11 0000** N/A 11 0110** ? 11 0111** Inside Mobile Lid (example: mic) 11 1000** Outside Mobile Lid ************Bits Hex******76 54 3210 ------------------- 71cf01 = 00 00 0001 - Port has a jack - It is External - Rear Location 71cf02 = 00 00 0010 - Port has a jack - It is External - Front Panel Location 71cf59 = 01 01 1001 - No External Port - ATAPI 71cf18 = 00 01 1000 - Port has a jack - External - HDMI 71cf90 = 10 01 0000 - Built In Device - Internal - N/A ******** |**|**|||| ******** |**|**|--------- Location part 2 ******** |**|------------ Location part 1** ******** |--------------- Port Connectivity
-
3
-
-
CHAPTER -2 PATCHING XML FILES:
***Platforms and Layoutxx file Patch Explanation***
COMPRESSING AND UNCOMPRESSING ZLIB FILES OF PLATFORM AND LAYOUT XML:
From 10.8 or later, the xml files are compressed to zlib format. We have to uncompress them to edit the files. After editing, again we have to compress it back to zlib.For Compressing and uncompressing, use the attached perl script and below commands in terminal:
for uncompressing
perl zlib.pl inflate layout28.xml.zlib > layout28.xml

for compressing
perl zlib.pl deflate layout28.xml > layout28.xml.zlib
Layoutxx.xml file Patching
You can either use the attached xml files (or) can choose any one of the layout xml file from the apple Resources directory inside AppleHDA kext that matches Inputs and outputs of your codec and try this only if you want to experiment.I'm using the Layout28.xml of Apple and edited to the values of ALC269. One of the reason to choose layout28 is because its used in MacBookPro8,1 and works very well. The other layout id's which also works for some codecs are '1' and '12' in hackintosh.
Note: We removed the tags External Mic, SPDIF from the Apple layout28 xml file since they are not needed for our example ALC269.
In the Layout xml file, we have to edit the following information.
1. LayoutID<key>LayoutID</key> <integer>28</integer>
2. CodecID [ALC 269 Vendor id decimal value =283902569 ]
<key>CodecID</key>
<array>
  <integer>283902569</integer>
</array>
3. Edit the Inputs key like below for External Mic(LineIn) and Internal Mic in Notebooks<key>Inputs</key> <array> <string>Mic</string> <string>LineIn</string> </array>
4. Edit the "IntSpeaker" key like below and remove all the signal processing elements.
Note: set MuteGPIO to 0 (or) remove this if its not working [ not supported by some codecs]For Realtek:
<key>IntSpeaker</key>
<dict>
    <key>MaximumBootBeepValue</key>
    <integer>48</integer>
    <key>MuteGPIO</key>
    <integer>0</integer>
</dict>
For others:
 <key>IntSpeaker</key>
<dict>
    <key>MaximumBootBeepValue</key>
    <integer>110</integer>
</dict>
5. Edit the "LineIn" key like below.
For Realtek:<key>LineIn</key> <dict> <key>MuteGPIO</key> <integer>1342242840</integer> </dict>
For Others:
<key>Mic</key>
<dict/>
6. Edit the "Mic" key like below.
For Realtek:<key>Mic</key> <dict> <key>MuteGPIO</key> <integer>1342242841</integer> </dict>
For Others:
<key>LineIn</key>
<dict/>
7. Edit the Outputs key like below for Speakers and Headphone in Notebooks<key>Inputs</key> <array> <string>Headphone</string> <string>IntSpeaker</string> </array>
8. Edit the PathMapID tag at the end of the file with the PathMapID value used in Platforms xml file.
<key>PathMapID</key>
<integer>269</integer>
Note: SignalProcessing elements for Mic and Speaker are not supported by some codecs, so i've removed it. But can provide some good audio if used but not sure, so try to experiment with this later after getting audio working. I've attached xml files with the SignalProcessing working fine in ALC269 for speaker and Mic in Realtek and IDT for your reference, you can get more from Apple xml files.
Platforms.xml Patching:
This file contains the Mapping of Controls to its nodes giving a path. These path maps are contained in the key tag "PathMaps ".Note:You can use the Platforms xml file i've attached which has all the PathMaps of Apple codec are removed and has only one PathMap of ALC269 in order to make it easy for editing instead of Apple file.
We need to add our pathMaps to this root key which is a mapping of our Pin Complex's(O/P & I/P) to its Output/Input controls.
Follow the pattern i've explained below and edit the values of your codec nodes PathMaps calculated in the first post for each input and output. After editing then add the PathMap pattern of yours inside the file Platforms.xml at the end after the key tag of PathMapID like below.<key>PathMapID</key> <integer>[some apple id]</integer> </dict> <<< Your pathMaps >>
The pattern for the PathMap is
<dict>
     <key>PathMap</key>
            <array>
                <array>
                    <array>
                      Data of Input1 (LineIn)
                    </array>
                    <array>
                      Data of Input2 (Mic)
                    </array>
                </array>
                <array>
                    <array>
                      Data of Output1 (Speaker)
                    </array>
                    <array>
                      Data of Output2 (Headphone)
                    </array>
                </array>
            </array>
            <key>PathMapID</key>
            <integer>[PathMapID used in layout#]</integer>
     </dict>
Input Data pattern:<array> <dict> <key>Amp</key> <dict> <key>Channels</key> <array> <dict> <key>Bind</key> <integer>1</integer> <key>Channel</key> <integer>1</integer> </dict> <dict> <key>Bind</key> <integer>2</integer> <key>Channel</key> <integer>2</integer> </dict> </array> <key>MuteInputAmp</key> <true/> <key>PublishMute</key> <true/> <key>PublishVolume</key> <true/> <key>VolumeInputAmp</key> <true/> </dict> <key>NodeID</key> <integer>[Input Node#]</integer> </dict> <dict> <key>NodeID</key> <integer>[Audio Mixer/Selector Node#]</integer> </dict> <dict> <key>Boost</key> <integer>[Boost value# 1-3]</integer> <key>NodeID</key> <integer>[Pin complex Node#]</integer> </dict> </array>
Input Data pattern without Audio Mixer/Selector:
Note: Some codecs doesn't need (or) use Audio Mixer/Selector node, so in order to get them working we should remove it from the pattern. Mostly this has been seen from IDT and Conexant codecs so far by me.
<array>
    <dict>
        <key>Amp</key>
        <dict>
            <key>Channels</key>
            <array>
                <dict>
                    <key>Bind</key>
                    <integer>1</integer>
                    <key>Channel</key>
                    <integer>1</integer>
                </dict>
                <dict>
                    <key>Bind</key>
                    <integer>2</integer>
                    <key>Channel</key>
                    <integer>2</integer>
                </dict>
            </array>
            <key>MuteInputAmp</key>
            <true/>
            <key>PublishMute</key>
            <true/>
            <key>PublishVolume</key>
            <true/>
            <key>VolumeInputAmp</key>
            <true/>
        </dict>
        <key>NodeID</key>
        <integer>[Input Node#]</integer>
    </dict>
    <dict>
        <key>Boost</key>
        <integer>[Boost value# 1-3]</integer>
        <key>NodeID</key>
        <integer>[Pin complex Node#]</integer>
    </dict>
</array>
Output data pattern:
<array>
    <dict>
        <key>Amp</key>
        <dict>
            <key>MuteInputAmp</key>
            <false/>
            <key>PublishMute</key>
            <true/>
            <key>PublishVolume</key>
            <true/>
            <key>VolumeInputAmp</key>
            <false/>
        </dict>
        <key>NodeID</key>
        <integer>[Pin complex Node#]</integer>
    </dict>
    <dict>
        <key>Amp</key>
        <dict>
            <key>MuteInputAmp</key>
            <true/>
            <key>PublishMute</key>
            <true/>
            <key>PublishVolume</key>
            <true/>
            <key>VolumeInputAmp</key>
            <false/>
        </dict>
        <key>NodeID</key>
        <integer>[Audio Mixer Node#]</integer>
    </dict>
    <dict>
        <key>Amp</key>
        <dict>
            <key>Channels</key>
            <array>
                <dict>
                    <key>Bind</key>
                    <integer>1</integer>
                    <key>Channel</key>
                    <integer>1</integer>
                </dict>
                <dict>
                    <key>Bind</key>
                    <integer>2</integer>
                    <key>Channel</key>
                    <integer>2</integer>
                </dict>
            </array>
            <key>MuteInputAmp</key>
            <true/>
            <key>PublishMute</key>
            <true/>
            <key>PublishVolume</key>
            <true/>
            <key>VolumeInputAmp</key>
            <false/>
        </dict>
        <key>NodeID</key>
        <integer>[Output Node#]</integer>
    </dict>
</array>
Output Data pattern without Audio Mixer:
Note: Some codecs doesn't need (or) use Audio Mixer, so in order to get them working we should remove it from the pattern. Mostly this has been seen from IDT and Conexant codecs so far by me.
<array>
    <dict>
        <key>Amp</key>
        <dict>
            <key>MuteInputAmp</key>
            <false/>
            <key>PublishMute</key>
            <true/>
            <key>PublishVolume</key>
            <true/>
            <key>VolumeInputAmp</key>
            <false/>
        </dict>
        <key>NodeID</key>
        <integer>[Pin complex Node#]</integer>
    </dict>
    <dict>
        <key>Amp</key>
        <dict>
            <key>Channels</key>
            <array>
                <dict>
                    <key>Bind</key>
                    <integer>1</integer>
                    <key>Channel</key>
                    <integer>1</integer>
                </dict>
                <dict>
                    <key>Bind</key>
                    <integer>2</integer>
                    <key>Channel</key>
                    <integer>2</integer>
                </dict>
            </array>
            <key>MuteInputAmp</key>
            <true/>
            <key>PublishMute</key>
            <true/>
            <key>PublishVolume</key>
            <true/>
            <key>VolumeInputAmp</key>
            <false/>
        </dict>
        <key>NodeID</key>
        <integer>[Output Node#]</integer>
    </dict>
</array>
-
3
-
-
Hi friends,
This is a complete AppleHDA patching guide for the Audio codec in the Notebooks (but theory works for Desktop too). I'm writing this guide based on my knowledge and experience gained myself doing so many patches and details from the web. Hoping this could help many people looking to patch their AppleHDA by themselves. I did my best to make this as simple as possible and will try to improve as the time passes.Also I don't take credit for all this information entirely except for appreciation on writing this guide. The credit will go for all these people: king, Master Chief, RevoGirl, toleda, bcc9, TimeWalker and many others who contributed to AppleHDA patching.
I'm using the Audio codec ALC269 and HD3000 HDMI audio which i've in my notebook for explaining the process. And I'm gonna break this guide into four chapters since its gonna be a very lengthy guide because of trying to provide insight on everything. Hope everyone can find this easy and helpful. Lets get started!
The Four Chapters are:
1. Calculating Codec verb commands and PathMaps
2. Patching XML(Platforms and layout) files.
3. AppleHDA Binary Patch
4. HDMI Audio Patch(coming soon)
CHAPTER -1 CALCULATING CODEC VERB COMMANDS AND PATHMAPS:
*****Calculation of codec verb commands and PathMaps explanation*****
***Part 1***
**Section 1**
Getting the codec dumpFirst, we need get the dump of your audio codec from linux. So, get into any of the Linux distributions of either Live USB/CD (or) Full install.
And enter the following command in terminal to get the dump in text format at Desktop.
cat /proc/asound/card0/codec#0 > ~/Desktop/codec_dump.txt
(or)
cat /proc/asound/card0/codec#1 > ~/Desktop/codec_dump.txt
(or)
cat /proc/asound/card0/codec#2 > ~/Desktop/codec_dump.txt
**Section 2**
Analyzing the codec dump and extracting relevant information
We need the following details from the codec dump:1. Codec 2. Address 3. Vendor Id (Convert this hex value into decimal value) 4. Pin Complex Nodes with Control Name 5. Audio Mixer/Selector Nodes 6. Audio Output Nodes 7. Audio Input Nodes
Above details for the example ALC269 from the codec dump are below:
1. CODEC : Realtek ALC269VB

2. ADDRESS : 0

3. VENDOR ID : Hex: 0x10ec0269 [Decimal: 283902569]
4. PIN COMPLEX NODES WITH CONTROL NAMES :
Node 0x14 [Pin Complex] wcaps 0x40018d: Stereo Amp-Out
Control: name="Speaker Playback Switch", index=0, device=0
ControlAmp: chs=3, dir=Out, idx=0, ofs=0
Amp-Out caps: ofs=0x00, nsteps=0x00, stepsize=0x00, mute=1
Amp-Out vals: [0x00 0x00]
Pincap 0x00010014: OUT EAPD Detect
EAPD 0x2: EAPD
Pin Default 0x99130110: [Fixed] Speaker at Int ATAPI
Conn = ATAPI, Color = Unknown
DefAssociation = 0x1, Sequence = 0x0
Misc = NO_PRESENCE
Pin-ctls: 0x40: OUT
Unsolicited: tag=00, enabled=0
Connection: 2
0x0c* 0x0d

Node 0x18 [Pin Complex] wcaps 0x40018f: Stereo Amp-In Amp-Out
Control: name="Mic Boost Volume", index=0, device=0
ControlAmp: chs=3, dir=In, idx=0, ofs=0
Amp-In caps: ofs=0x00, nsteps=0x03, stepsize=0x2f, mute=0
Amp-In vals: [0x00 0x00]
Amp-Out caps: ofs=0x00, nsteps=0x00, stepsize=0x00, mute=1
Amp-Out vals: [0x80 0x80]
Pincap 0x00001734: IN OUT Detect
Vref caps: HIZ 50 GRD 80
Pin Default 0x04a11820: [Jack] Mic at Ext Right
Conn = 1/8, Color = Black
DefAssociation = 0x2, Sequence = 0x0
Pin-ctls: 0x24: IN VREF_80
Unsolicited: tag=08, enabled=1
Connection: 1
0x0d

Node 0x19 [Pin Complex] wcaps 0x40008b: Stereo Amp-In
Control: name="Internal Mic Boost Volume", index=0, device=0
ControlAmp: chs=3, dir=In, idx=0, ofs=0
Amp-In caps: ofs=0x00, nsteps=0x03, stepsize=0x2f, mute=0
Amp-In vals: [0x03 0x03]
Pincap 0x00001724: IN Detect
Vref caps: HIZ 50 GRD 80
Pin Default 0x99a3092f: [Fixed] Mic at Int ATAPI
Conn = ATAPI, Color = Unknown
DefAssociation = 0x2, Sequence = 0xf
Misc = NO_PRESENCE
Pin-ctls: 0x24: IN VREF_80
Unsolicited: tag=00, enabled=0

Node 0x21 [Pin Complex] wcaps 0x40018d: Stereo Amp-Out
Control: name="Headphone Playback Switch", index=0, device=0
ControlAmp: chs=3, dir=Out, idx=0, ofs=0
Amp-Out caps: ofs=0x00, nsteps=0x00, stepsize=0x00, mute=1
Amp-Out vals: [0x00 0x00]
Pincap 0x0000001c: OUT HP Detect
Pin Default 0x0421101f: [Jack] HP Out at Ext Right
Conn = 1/8, Color = Black
DefAssociation = 0x1, Sequence = 0xf
Pin-ctls: 0xc0: OUT HP
Unsolicited: tag=04, enabled=1
Connection: 2
0x0c 0x0d*
5. AUDIO MIXER/SELECTOR NODES :
Node 0x0b [Audio Mixer] wcaps 0x20010b: Stereo Amp-In
Amp-In caps: ofs=0x17, nsteps=0x1f, stepsize=0x05, mute=1
Amp-In vals: [0x97 0x97] [0x97 0x97] [0x97 0x97] [0x97 0x97] [0x97 0x97]
Connection: 5
0x18 0x19 0x1a 0x1b 0x1d

Node 0x0c [Audio Mixer] wcaps 0x20010b: Stereo Amp-In
Amp-In caps: ofs=0x00, nsteps=0x00, stepsize=0x00, mute=1
Amp-In vals: [0x00 0x00] [0x00 0x00]
Connection: 2
0x02 0x0b

Node 0x0d [Audio Mixer] wcaps 0x20010b: Stereo Amp-In
Amp-In caps: ofs=0x00, nsteps=0x00, stepsize=0x00, mute=1
Amp-In vals: [0x00 0x00] [0x00 0x00]
Connection: 2
0x03 0x0b

Node 0x0f [Audio Mixer] wcaps 0x20010a: Mono Amp-In
Amp-In caps: ofs=0x00, nsteps=0x00, stepsize=0x00, mute=1
Amp-In vals: [0x00] [0x00]
Connection: 2
0x02 0x0b

Node 0x22 [Audio Selector] wcaps 0x30010b: Stereo Amp-In
Amp-In caps: N/A
Amp-In vals: [0x00 0x00] [0x00 0x00] [0x00 0x00] [0x00 0x00] [0x00 0x00] [0x00 0x00] [0x00 0x00]
Connection: 7
0x18* 0x19 0x1a 0x1b 0x1d 0x0b 0x12

Node 0x23 [Audio Mixer] wcaps 0x20010b: Stereo Amp-In
Amp-In caps: ofs=0x00, nsteps=0x00, stepsize=0x00, mute=1
Amp-In vals: [0x80 0x80] [0x00 0x00] [0x80 0x80] [0x80 0x80] [0x80 0x80] [0x80 0x80]
Connection: 6
0x18 0x19 0x1a 0x1b 0x1d 0x0b
6. AUDIO OUTPUT NODES :
Node 0x02 [Audio Output] wcaps 0x1d: Stereo Amp-Out
Control: name="Speaker Playback Volume", index=0, device=0
ControlAmp: chs=3, dir=Out, idx=0, ofs=0
Device: name="ALC269VB Analog", type="Audio", device=0
Amp-Out caps: ofs=0x57, nsteps=0x57, stepsize=0x02, mute=0
Amp-Out vals: [0x41 0x41]
Converter: stream=5, channel=0
PCM:
rates [0x560]: 44100 48000 96000 192000
bits [0xe]: 16 20 24
formats [0x1]: PCM
Node 0x03 [Audio Output] wcaps 0x1d: Stereo Amp-Out
Control: name="Headphone Playback Volume", index=0, device=0
ControlAmp: chs=3, dir=Out, idx=0, ofs=0
Amp-Out caps: ofs=0x57, nsteps=0x57, stepsize=0x02, mute=0
Amp-Out vals: [0x41 0x41]
Converter: stream=5, channel=0
PCM:
rates [0x560]: 44100 48000 96000 192000
bits [0xe]: 16 20 24
formats [0x1]: PCM
7. AUDIO INPUT NODES :
Node 0x08 [Audio Input] wcaps 0x10011b: Stereo Amp-In
Control: name="Capture Switch", index=0, device=0
Control: name="Capture Volume", index=0, device=0
Device: name="ALC269VB Analog", type="Audio", device=0
Amp-In caps: ofs=0x0b, nsteps=0x1f, stepsize=0x05, mute=1
Amp-In vals: [0x1e 0x1e]
Converter: stream=1, channel=0
SDI-Select: 0
PCM:
rates [0x560]: 44100 48000 96000 192000
bits [0xe]: 16 20 24
formats [0x1]: PCM
Connection: 1
0x23

Node 0x09 [Audio Input] wcaps 0x10011b: Stereo Amp-In
Control: name="Capture Switch", index=1, device=0
Control: name="Capture Volume", index=1, device=0
Amp-In caps: ofs=0x0b, nsteps=0x1f, stepsize=0x05, mute=1
Amp-In vals: [0x00 0x00]
Converter: stream=0, channel=0
SDI-Select: 0
PCM:
rates [0x560]: 44100 48000 96000 192000
bits [0xe]: 16 20 24
formats [0x1]: PCM
Connection: 1
0x22
***Part 2***
**Section 1**
Extracting the values 'Pin Default', 'EAPD' and 'Node ID' from the Pin Complex Nodes:
We have analyzed and got the relevant details from the codec dump in part 1. Now, we try to get the values of Pin Default, EAPD and Node ID from the Pin Complex nodes with Control Name extracted above.
For the example ALC269:-
Pin Complex Nodes with Control NameNode 14 : Pin Default 0x99130110, EAPD: 0x02 Node 18 : Pin Default 0x04a11820 Node 19 : Pin Default 0x99a3092f Node 21 : Pin Default 0x0421101f
**Section 2**
Extracting the verb data:
We will get the verb data from the Pin Default values of Nodes.
Pin default values must be read from right to left. And we will take two digits from it and write it down from left to right like below explained for ALC269.Node 14: Pin Default value: 0x99130110 Extracted verb data: "10 01 13 99" Node 18: Pin Default value: 0x04a11820 Extracted verb data: "20 18 a1 04" Node 19: Pin Default value: 0x99a3092f Extracted verb data: "2f 09 a3 99" Node 21: Pin Default value: 0x0421101f Extracted verb data: "1f 10 21 04"
Now, we need to correct the above verb data according to verbs info explained in the second post.
at Node 14: 10 01 13 99 [ Correction 99->90(Note 1)]
at Node 18: 20 18 a1 04 [ Correction 18->10(Note 2)]
at Node 19: 2f 09 a3 99 [ Correction 2f->20(Note 3) 09->01(Note 2) 99->90(Note 1)]
at Node 21: 1f 10 21 04 [ Correction 1f->10(Note 3)]
at Node 14 EAPD : 02 (Note 5)

Corrected Verb Data:
Code:
at Node 14: 10 01 13 90
at Node 18: 20 10 a1 04
at Node 19: 20 01 a3 90
at Node 21: 10 10 21 04
at Node 14 EAPD : 02
Verb data after default association corrections: Note 4
at Node 14: 10 01 13 90
at Node 18: 20 10 a1 04
at Node 19: 30 01 a3 90
at Node 21: 40 10 21 04
at Node 14 EAPD : 02
Final Verb data after Mic corrections: Note 6 and Note 7
Node 14: 10 01 13 90
Node 18: 20 10 81 04
Node 19: 30 01 a0 90
Node 21: 40 10 21 04
Node 14 EAPD : 02
Note 1: Location correction (9x)
Apple uses the location value as Built in Device - N/A instead of ATAPi in their codecs, which is always '0 ' for the location bit for the Integrated devices(Speakr, Int Mic). This is optional and audio will work if we use default codec value also. Just changing this to be more like Apple codec so we can avoid any future issues.
Ex:- at Node 14: 10 01 13 90 (Speaker) [ Changed from 9 to 0]
at Node 19: 30 01 a0 90 (Int Mic) [ Changed from 9 to 0]Note 2: Jack color and sense capability correction (xx)
For internal devices like speakers etc., we use the jack color value as '0'(unknown) and need to Jack sense value of '1'.
For external devices like Headphones etc., we use the jack color value as '1'(black) and need to Jack sense value of '0'.
In this jack color may be optional, but Jack sense must use the values i've explained.
Note 3: Sequence correction (Ax)
We have to set this value to '0' for every device because Apple don't use analog multi out.
We have corrected above 2f and 1f values to 20 and 10 by replacing f with 0 in our example, so this Sequence number(Second digit) value must be always 0 for every node and A is the associate bit value of the node which is unique for each node.
Note 4: Default association correction (x0)
The Default association bit in the codec verbs must not match with other devices, so the association bit must be unique for all the devices.
Here, We have same association bit for both Speakers and Headphone as "1" and for both Mic's as "2", so we have to correct this default association bit. Most importantly the association bit must be in sequence and serially like assigning 1,2...x to the Nodes in sequence.
For example:- '1' to node 14, '2' to node 18 in sequence, '3' to Node 19 in sequence and '4' to Node 21 in sequence to previous node 19.
The association bit value can either 1 2 3….. d.e.f.Note 5: EAPD existence
We have to look carefully at the output nodes like Speaker and Headphone, since in some codecs there is an External Amplifier(EAPD) to power up/down the Speaker to save power. We need to use EAPD command to wake up the node to get the sound otherwise we won't get sound even though its recognized.Note 6: Internal Mic correction
If you did not get the "Ambient noise reduction" working for the Internal mic then you have to correct the "Connection type" bit field to Unknown Code Value(i.e, 0). In our example, we have the value 'a3' for the mic and corrected to 'a0'.Note 7: External Mic correction
Here, we have to correct the external mic verb data to LineIn, otherwise the external mic won't work with AppleHDA.So, the verb data needs to be corrected at the position where it tells what kind of device it is.
Existing verb data for External Mic is "ax", where 'a' tells its Mic In. Now, we change this to Line in with 'ax' is replaced by '81' .For more information about the codec verbs info:Click Here.
***Part 3***
Calculating the Codec verb commands :Formulae for calculating the Codec verbs is: Codec Address + NodeID + Verb Commands + Verb data
We have the Codec Address value from the Section 2 of Part 1.
We have the NodeID's values from the above Section 1 of Part 2.
Verb Commands are standard and they are 71c, 71d, 71e, 71f and 70c for EAPD
We have the verb data from the Section 2 of Part 2.
Calculation of codec Verb commands for the example ALC269:For the Pin Complex Node 14: 0 + 14 + 71c + 10 = 01471c10 0 + 14 + 71d + 01 = 01471d01 0 + 14 + 71e + 13 = 01471e13 0 + 14 + 71f + 90 = 01471f90
For the Pin Complex Node 18:
0 + 18 + 71c + 20 = 01871c20
0 + 18 + 71d + 10 = 01871d10
0 + 18 + 71e + 81 = 01871e81
0 + 18 + 71f + 04 = 01871f04
For the Pin Complex Node 19:
0 + 19 + 71c + 30 = 01971c30
0 + 19 + 71d + 01 = 01971d01
0 + 19 + 71e + a0 = 01971ea0
0 + 19 + 71f + 90 = 01971f90
For the Pin Complex Node 21:
0 + 21 + 71c + 40 = 02171c40
0 + 21 + 71d + 10 = 02171d10
0 + 21 + 71e + 21 = 02171e21
0 + 21 + 71f + 04 = 02171f04
In our ALC269 example, there is an EAPD at Node 14 of Speaker. So, we need to calculate the verb command for this EAPD and use in our patch to get sound from speaker.
For EAPD at Node 14:
0 + 14 +70c + 02 = 01470c02
Now, we assemble the calculated codec verb commands so we can use for AppleHDA patch.
<01471c10 01471d01 01471e13 01471f99 01470c02
01871c20 01871d10 01871ea1 01871f04
01971c30 01971d01 01971ea3 01971f99
02171c40 02171d10 02171e21 02171f04>
DISABLING THE NODES (PIN COMPLEX) THAT ARE NOT USED:
We should disable the nodes that the codec is not using, so we can avoid any issues from them. Use the following the verb data for disabling those nodes and calculate verb commands.
Verb data for disabled node:
F0 00 00 40
Final codec verb commands with disabled nodes are:
<01271cf0 01271d00 01271e00 01271f40
01471c10 01471d01 01471e13 01471f90 01470c02
01771cf0 01771d00 01771e00 01771f40
01871c20 01871d18 01871e81 01871f04
01971c30 01971d10 01971ea0 01971f90
01a71cf0 01a71d00 01a71e00 01a71f40
01b71cf0 01b71d00 01b71e00 01b71f40
01d71cf0 01d71d00 01d71e00 01d71f40
01e71cf0 01e71d00 01e71e00 01e71f40
02171c40 02171d10 02171e21 02171f04>
***Part 4***
Calculating the PathMaps:For calculating the PathMaps, we have to carefully follow the connections mentioned in every node from the analyzed relevant nodes information in the Section 2 of Part 1.
For output Devices, the PathMap follows this pattern
We have to find a Pin Complex node, an Audio Mixer node (optional for some codecs) and finally an Audio output node.
Pin Complex -> Audio Mixer -> Audio Output
(or)
Pin Complex ->  Audio Output
For Input Devices, the PathMap follow this pattern
We have to find a Pin Complex node, an Audio Mixer/Selector node (optional for some codecs) and finally an Audio input node.
Pin Complex -> Audio Selector/Mixer -> Audio Input
(or)
Pin Complex -> Audio Input
Output device PathMap calculation:
Lets first calculate the PathMaps for the output devices speaker and Headphone in our example ALC269.According to the output device PathMap pattern, first we need to find Pin Complex node. In our ALC269 example, the output device 'Speaker' is located at the Pin Complex Node 0x14 with the Control Name "Speaker Playback Switch". Write down this Pin Complex node value in hex and decimal value.
0x14 , Decimal - 20
Now, take a look at the Connection in the Node 0x14.
We have two connections to nodes 0x0c and 0x0d, but the connection 0x0c has an asterisk symbol(*) indicating that this node 0x14 has a real connection to the node 0x0c which is an Audio Mixer needed according to our PathMaps pattern, so write down this node value in sequence0x14->0x0c, Decimal - 20->12
Again, take a look at the node 0x0c we reached from the node 0x14. Here, we have two more nodes 0x02 and 0x0b without asterisk symbol(*) indicating the path where it goes. So, we have to figure out ourself and choose one from the two nodes. To solve this, just take a look at the two Nodes 0x02 and 0x0b.
For the output device PathMap, we already have two nodes out of three required except Audio Output Node. In our case 0x02 node is the Audio Output, so write this value in the sequence
0x14->0x0c->0x02, Decimal - 20->12->2
Now, we have calculated PathMap for the output device speaker.
Similarly, take a look at the Pin Complex Node 0x21 which is also an another output device "HeadPhone Playback switch". If we calculate the PathMap just like speaker and we will get
0x21->0x0d->0x03, Decimal - 33->13->3
Now, we have calculated PathMap for the output device Headphone.
NOTE:
If both Pin Complex nodes have connection to same Audio output node then try to use the other output node we analyzed from codec dump and test. sometimes using same output node for both also works.
Input device PathMaps calculation:
Calculating the pathMaps for input devices is little different from the output devices because connections are not mentioned and doesn't follow similar to output nodes. So, in this case we have go through the PathMap pattern from "Audio input" to "Pin Complex node" instead from "Pin Complex node" to "Audio Input" like we did for Output devices.
Like this,- First go to the Audio input node and look at the connections to the nodes Audio Mixer/Selector from here.
- Follow the connection which will lead us to Audio Mixer/Selector
- At Audio Mixer/Selector, Look at the Connections for the "*" symbol on Pin complex node
- If it contains the symbol "*" then that is the Pin Complex node it is connected to, so got the PathMap of Pin Comple Node->Audio Mixer/Selector->Audio Input we needed.
- If it does not contain then compare the results of the other Audio Input node ->Audio Mixers/Selector for the symbol "*". Even that Audio Mixer/Selector node also don't has symbol "*" then try to experiment with the available options of Pin complex node to Audio Selector/Mixer nodes (or) look at the Pin Complex node connections to Audio Selector/Mixer nodes.
Lets calculate the PathMaps for the example of ALC 269.
I've followed the Audio input (Node#9) Connection to Audio Selector(Node#22) then to Audio Input (Node#18) because of the symbol "*" on that node indicating default path.
0x09->0x22->0x18 => 0x18->0x22->0x09
Again, followed Audio input (Node#8) Connections to Audio Mixer(Node#23). But, i did not find the symbol "*" here to show the path. However, i've followed to Pin complex (Node#19) because its the only Input device we left with and even the connections of the Node#22 contains a Connection to Node#19 as well.
0x08->0x023->0x19 => 0x19->0x23->0x08
PathMaps for the Output and Input Devices of ALC269:
Pin Complex->Audio Mixer->Audio Output (Hex values)
Speaker : 20-> 12-> 2 (0x14->0x0c->0x02)
HeadPhone : 33-> 13-> 3 (0x21->0x0d->0x03)

Pin Complex->Audio Selector/Mixer->Audio Input(Hex values)
Internal Mic : 25-> 35-> 8 (0x19->0x23->0x08)
External Mic : 24-> 34-> 9 (0x18->0x22->0x09)
*****END OF CHAPTER-1*****
After following all the above steps, we get the verb commands and PathMaps for the codec.
Follow the below links for the next chapter:*****CHAPTER-2*****
LINK: XML Files patching*****CHAPTER-3*****
LINK: AppleHDA Binary Patching
*****CHAPTER-4*****
LINK: HDMI audio Patch
Hoping this could help some people in patching their AppleHDA.Other Links that provide AppleHDA Patching details which I used as reference for this guide:
Reference link 1
Reference link 2-
4
-
Hi
I'm struggling to even get my K53E to boot in to mountain lion after Sucessful install !
Please help
Plz provide your notebook specification so i can help you.
-
Hello everyone,
As we know that for Hackintosh, most of the systems needs a patched DSDT in order to get everything working and stable in OSX, and SSDT files are needed for the native cpu power management and Speedsteps to work in Intel processors.
We know that most of you can't patch DSDT/SSDT yourself (or) don't have skills/time to search the web for posts/info related to DSDT/SSDT. So, this thread is meant for the users to request DSDT/SSDT patch. This thread explains how to get the system dump needed for DSDT/SSDT patching from either Windows (or) Linux to request patch and using those patched files.
We'll try to do our best in patching the DSDT and SSDT that are relevant to the system we get by doing our research, but remember for some systems the patched files may not solve everything because it might need something else too along with DSDT/SSDT patching.Notice:
NO LONGER WE ARE PROVIDING THIS SERVICE. SORRY FOR THE INCONVENIENCE, AND WE WILL SURELY BRING BACK IT IN FUTURE. THANKS FOR THE SUPPORT.
STEPS TO GET THE DUMPS FROM WINDOWS:NOTE: Newer versions of AIDA64 does not have ACPI tool so use the v3.20 or lower, if that does not work then use RWEverything app instead.
How to dump DSDT and SSDT files from Windows using AIDA64:
1. Download and install the App AIDA64 v2 (new versions don't has the ACPI tool feature) from the link: http://www.aida64.com/archives
2. Open the Application and right click on the down left corner of the application as shown in the picture below to open the Menu
3. Select the option "ACPI Tool" from the Menu
4. Click on the button "Save Table" and choose "DSDT" from the list to save
5. Similarly, again click on the button "Save Table" and choose "SSDT" to save all the SSDT files one by one (there will upto 4 or more of these SSDT files)Screenshot from AIDA64 app showing DSDT/SSDT dump files location:
How to dump System Devices info from Windows using AIDA64:
1. Open the AIDA64 Application and right click on the down left corner of the app to open menu
2. From the menu, choose "System debug" then Select "PCI Dump" which will open a window with the dump details3. Click on "Save to File" Button for saving the dump
4. Again, From the menu choose the option "System debug" then Select the option "Devices Dump" and save this dump as well
5. Finally, Save a Report as shown in the picture#2 belowScreenshot from AIDA64 app showing devices info dump files location:
ALTERNATE METHOD:
How to dump DSDT and SSDT files from Windows using RWEverything:
1. Download and install the App RWEverything from the link: http://rweverything.com/download/
2. Open the Application and click on the button "APCI".
3. Save DSDT and all the SSDT files you found there.
STEPS TO GET THE DUMPS FROM LINUX:
How to extract DSDT and SSDT files from Linux using acpi commands:
1. First you need to install the following two programs to get the dump.
acpidump:Enter the below command in terminal to install:
sudo apt-get install acpidump
(or)
Download and install it from here:
http://packages.ubuntu.com/lucid/acpidumpiasl:
Enter the below command in terminal to install:
sudo apt-get install iasl
2. Open Terminal and enter the following commands one by one to get the DSDT and SSDT dump files
sudo acpidump > acpidump.out
sudo acpixtract -a acpidump.out
sudo iasl -d DSDT.dat
How to dump System Devices info from Linux using lspci command:
1. Open Terminal and enter the following command to get the devices info dumplspci -nn
2. Save the output of the above command in a text file
SEND US THE DUMP FILES BY FOLLOWING BELOW THE RULES TO THE MAIL: [email protected]
- Extracted files using the above steps either from Windows (or) Linux OS
- Specify your CPU model name in the mail (Ex:- Intel Core i3 2330M)
- IOReg File saved using the attached IORegistryExplorer(v2.1) app [Only if you have OSX already installed]
- Mention Free (or) Sponsored patching in the mail
- Post your Notebook/Desktop Model and CPU model name in this thread
- Try to remind us about the patch request if you did not receive the patched files because we might forget due to the huge number of free requests we get and due to our free limited time.
HOW TO USE PATCHED DSDT/SSDT FILES: (with Chameleon boot loader)
1. Copy the patched DSDT and SSDT files to Extra folder
2. Add/Edit these flags in org.chameleon.Boot.plist file<key>DSDT</key> <string>/Extra/DSDT.aml</string> <key>DropSSDT</key> <string>Yes</string>
3. Remove the flags "GraphicsEnabler, GeneratePStates and GenerateCStates" from org.chameleon.Boot.plist file if you have since we patch these in dsdt/ssdt
4. Remove NullCPUPowerManagement.kext and Install patched AppleIntelCPUPowerManagement.kext
5. Use the MacBookPro8,x SMBios for Sandy/IvyBridge, MacBookAir5,x for Ivy Bridge and MacBookAir6,x for Haswell to get good number of CPU PStates, otherwise you will get only few states and mostly it will be only two CPU states of Min and Max. Also try to experiment with other SMBios files that have hardware close to yours and see if you can get more PStates.HOW TO USE PATCHED DSDT/SSDT FILES: (with Clover boot loader)
1. Copy the patched DSDT and SSDT files to EFI->CLOVER->ACPI->patched folder.
2. Enable the flag "DropOEM" from APCI section of clover config.plist and disable Generate flag.3. Enable the flag "AsusAICPUPM" for Ivy/Sandy bridge systems, "KernelPm" for Haswell systems from "KernelAndKextPatches" section of clover config.plist.
HOPE WE CAN BE HELPFUL FOR SOME
-
2


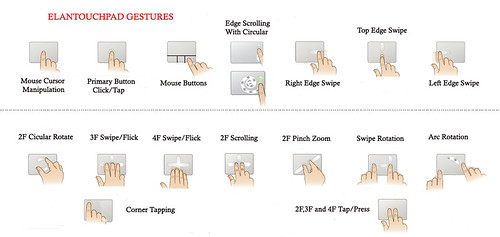
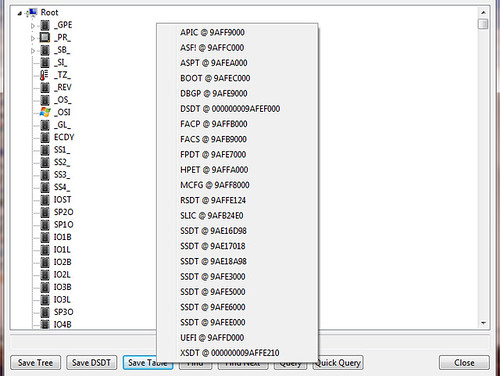

ELAN and FocalTech (Smart Touchpad) driver Issues
in Smart Touchpad
Posted
What's the issue plz? Explain it once again.