arsradu
Members-
Posts
51 -
Joined
-
Last visited
Content Type
Profiles
Articles, News and Tips
Forums
Everything posted by arsradu
-
how to update to catalina from Mojave Dell Latitude 7480
arsradu replied to Nancy10's topic in The Archive
Where are you updating from? In theory, if everything is correctly configured, and if you're not upgrading from Yosemite to Catalina or some really old version of MacOS, then yeah...it should work pretty smoothly. What I would recommend is just making sure the following things are up to date: 1. Clover (here's the official place to download it from) 2. drivers and kexts (you can use Clover Configurator to update those) Also, before anything, copy your existing EFI folder to the EFI partition of a USB drive for safe keeping. This way, if anything happens with the Clover update, you still have a backup. When you're done updating Clover and kexts, before starting the upgrade to Catalina, try to see if you can still boot your current installation with updated files. If everything ok, download the update directly from your current version of MacOS, or make a bootable USB drive with Catalina on it and try to install it. In case the updated EFI folder is still ok, you can add that to your USB, as well. -
For Yosemite, I think you also need boot-args: "kext-dev-mode=1".
-
@ghaffari Indeed, you have a valid point... I don't know why they wouldn't show up in this case... What I found intriguing is the fact that AirDrop seems to work... At least from the iPhone to the Hack. Which would suggest that BT itself is working fine. Why it's not showing devices...that I don't know. Kinda weird, indeed...
-
I see... Ok, I thought this is about sending files from one device to the other. For pairing AirPods (I don't have AirPods by the way, so...it might or might not work), you can take a look at this tutorial here. If the AirPods are in pairing mode (same for other devices) and you can't see them in BT control panel, it would be interesting to know why. I'm sorry, if that doesn't help you, I don't know how to fix it. I just thought I would share my opinion on what I think could be the cause.
-
For as far as I know, sending a file via AirDrop doesn't have anything to do with the bluetooth control panel from System Preferences. BT needs to be ON though. To share a file from MacOS to iOS (I'm assuming you're trying to send something to an iPhone), just make sure both Bluetooth and AirDrop are enabled on the iPhone. This is usually configured from Control Center. But I think both AirDrop and Bluetooth toggles are visible by default if you just swipe up from the bottom of the screen, then long press the "network widget" as I like to call it, then long press the AirDrop button to configure who can send you stuff via AirDrop. After that, from MacOS, just right click the file you want to send -> Share -> AirDrop and your iPhone should pop-up so you can send that file to it.
-
Update Partition (10.15.5) not visible in Clover
arsradu replied to denkteich's topic in The Archive
Hello! Which MacOS version are you upgrading from? 10.15.4 to 10.15.5? Or something else? Usually, missing partition in bootloader is related to drivers. APFS or HFS. So...if both ApfsDriverLoader.efi and HFSPlus.efi or VboxHFS.efi are present in your drivers/UEFI folder (I'm guessing your system uses UEFI), then I'm not sure... Another thing to look for is hidden drives (can be done from config). In Clover GUI, you can press F3 to show all drives. It should be something like "boot macos from Install" or something like that. Also, which hardware are we talking about? Could you, please, add the hardware info to your signature? It might make things a little clearer. :)) -
Yeah... So are you using a headless 0x04120004 in Device Properties (reversed bytes that would be 04001204)? Cause if so, that's why you probably don't experience any lag. I don't have any video playback issues though... With the iGPU enabled (now it's set to PEG + multi-monitor, 64MB shared memory). And iTunes works fine, too. At least some video samples I've tried.
-
Hey @Syonagar Many thanks! Apparently, as I suspected, the issue is indeed the way I have them configured... Which, in a regular Mac would probably work perfectly fine. But...in this case, it's just not a configuration supported by Apple. Not without heavy modifications and specific hardware. Booting off of the dGPU (with headless connector or disabled "dual-monitor support" in BIOS), all good. Booting off of the iGPU alone, and also being physically connected to that, all good. However, having the iGPU enabled, with the default/recommended (aka "non-headless" connector), creates this issue. Since, as Hervé mentioned above (and I think he might be right), hanging at gIOScreenLockState usually means the system is trying to figure out which graphics to use. In this case, I think it's trying to use iGPU by default, but it can't, cause I'm not connected to that port, and then reverts to the dGPU, which works fine. One question I would have: do you use FV2? Do you have transparent screen with user logo for the second stage boot when FV is enabled and using only the dGPU? Cause I couldn't get myself to work. The only way that works is with a default connector set up in Device Properties and iGPU enabled. Whether the BIOS is set to Integrated Graphics first, or Dedicated Graphics (+ multi-monitor support), as long as it's not a headless connector, it should work fine. So, the problem is not necessarily on the iGPU side. It's just...mixing them (setting iGPU in BIOS but being connected to the dGPU). it does work... But not that great. :)) I suppose this is not really how it's intended to work. Meaning, if you set IGD, you're supposed to be physically connected to the integrated display port on your motherboard. Not roaming around on the dGPU. :)) And I would enable PEG + multi-monitor, except it doesn't really make any difference in this case, since it's still using the default ig-platform-id. And changing that to headless, while it solves the hanging issue, it breaks FV (and I think other things, too). So yeah...having them both...apparently doesn't really work that well. Unless there's something I'm missing.
-
Thank you, Hervé. I think the problem is the way I have them configured... I mean, iGPU alone works fine. dGPU alone works fine (assuming I don't enable iGPU in BIOS, or if i'm using a "headless" connection in config). So I'd say they work ok separately. Just not in this configuration. Anyway, thank you very much for sharing your opinion.
-
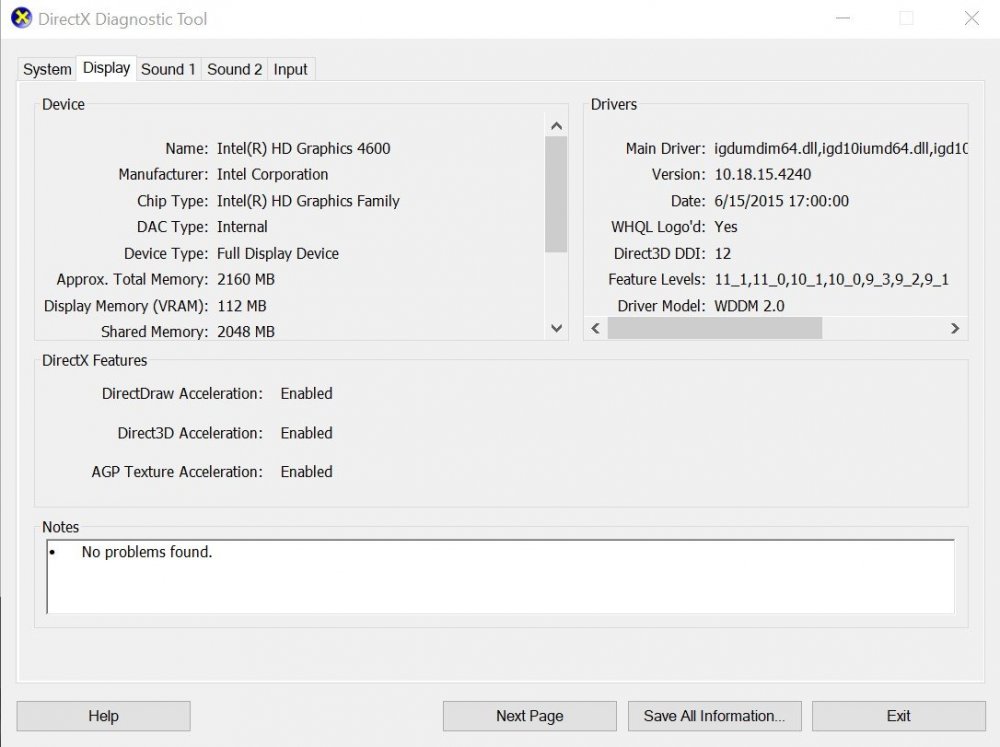
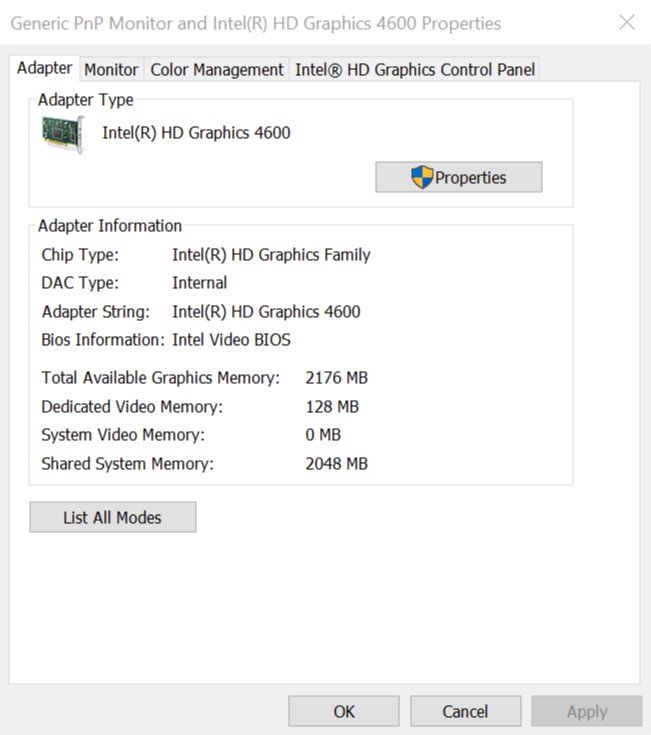
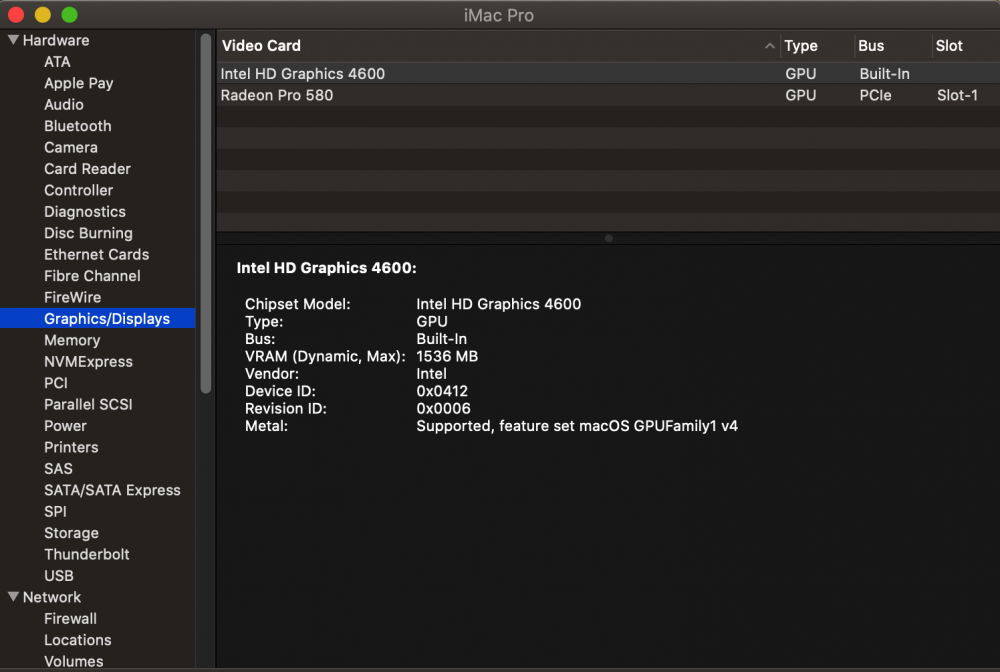
Hey Hervé, So, after what you said yesterday about hanging at gIOScreenLockState, I thought I'd try a couple more things. And some of them are really interesting, and if you have the time, I'd really appreciate your opinion. So, first of all, the issue does not occur if I'm using only the iGPU (and being plugged into it, too). The issue seems to occur if I'm not actually plugged into the iGPU, but into the dGPU. And it could be why gIOScreenLockState is hanging. As you said, it's probably trying to figure out what to do. It does boot correctly after that, it's just that it also increases the boot time by a lot! Also, something else I found interesting. So, I don't add a specific value for VRAM in Device Properties. For as far as I understood, you only need ig-platform-id and (maybe) device-id. But only the first one will actually make a difference. So I thought: ok, let's try to boot into Windows and see how is my iGPU recognised. This is from Dxdiag as you can see. And this is from display properties. What I found interesting is the amount of memory. So...now I'm confused. Should it be..2048MB VRAM instead of 1536MB? Which value do I want from those? :)) For as far as I know, changing the amount of VRAM doesn't really make any difference. It's only cosmetic. But I'm just asking. Also, as I said, even without setting that, it still works fine, but only when I'm physically connected to the iGPU. Now, you would probably say: just use headless connector and only use the dGPU. Well, yeah, but that's the thing. For FV2 issue to be solved I need the iGPU with framebuffer. Otherwise it's like it's not even there. So, to resume: 1. with framebuffer and connected to the iGPU -> all good 2. with framebuffer and connected to the dGPU -> lag (no matter if it's set to Integrated Graphics first in BIOS, or dedicated graphics + "multi monitor"). As long as I'm not physically connected to it, lag. 3. without framebuffer and connected to the iGPU -> can't boot into the OS, computer restarts when attempting second stage boot. Makes sense. 4. without framebuffer and connected to the dGPU -> all good, but also can't have FV2 second stage boot correctly, since that seems to work only with FB. And I think the FCPX doesn't work either in this configuration. I might be wrong. So, looking forward to your opinion. Thank you very much!
-
It is set up...I would say correctly, yes. Unless I'm missing something. The iGPU (+ the dGPU) are correctly recognised, with the right amount of VRAM in System Report -> Graphics. Not sure what else should I be looking for... I mean, you're the expert in iGPUs here. :))
-
Oook... Kexts folder... As I told you, you have 2 Ethernet kexts. Please, remove IntelMausi.kext and IntelMausiEthernet.kext, download the one above, and place it in Clover/kexts/Other. Also, make up your mind. Are you using FakeSMC or VirtualSMC? :)) You should not be using both. So please, remove VirtualSMC from your kexts, for now. Let's use FakeSMC. You're using a bunch of kext (probably normal for a laptop). I can't help you with those, since I don't know exactly what they do, or if you really need them. Drivers folder... Again, make up your mind. You want FakeSMC or VirtualSMC? If you want FakeSMC, then please, remove VirtualSMC.efi from your drivers. Also, you're disabling VboxHfs in config, but you don't even have it in your drivers folder... So...what are you disabling? ACPI/patched folder... About sound...we can discuss that after we get your computer booting. Looks like you're using some custom SSDT but also AppleALC kext... Which I'm not sure are supposed work together. So...maybe try without the SSDT and let AppleALC do its job. You can just place that SSDT-ALC292.aml outside the /patched folder, if you don't want to delete it. Also, you've got a LOT of SSDTs... Do you need all of those? I see some of them which seem to be for renaming USB (from EHC1 to EH01 and EHC2 to EH02)? I could be wrong. But...if that's what they're for, that can be easily achieved from config (and it looks like you already set it there, too!)... I think one place is enough! No need to do it from SSDT and also, config. Also, you seem to be using a patched DSDT along with (probably also) patched SSDTs. Which is never a good idea. Either you put everything in one patched DSDT and basically make sure everything you need IS already included there. Ooor...you just add your custom SSDTs for the stuff you need and let the original DSDT do its job. In this particular case, I don't even know what to recommend you... See? This is exactly why you don't just download EFIs without understanding what's inside them. Personally I would move that DSDT out of the way, as well and test without it. Config.plist... About the iGPU, looks like you're adding device properties (including AAPL,ig-platform-id) from config. So...do you still need ig-platform-id in Graphics and Inject Intel ON? I'm not sure... I'd say probably not, but again, it could be a laptop thing. Also, in config -> System Parameters, if you don't load your kexts from S/L/E, you can set Inject Kexts to Yes instead of Detect. And, to be honest, I would recommend using all your custom kexts from EFI, rather than L/E or S/L/E. Why? Because you tend to forget about them, and then you'll have duplicated kexts and not knowing where do they come from. So...keep it all in EFI. It's a lot easier to manage, in my opinion. Once you're done making these changes, try again. About OC...I'm not using it on a laptop, but I think it does work. However, it's a lot different than Clover. And...I would suggest reading and understanding everything before diving nose first into it. Cause it might hurt. If, however, you wanna give it a try, a few things I wanna tell you: 1. know your hardware! This is incredibly important. Especially on a laptop! Laptops are notoriously harder to hackintosh, due to their different hardware and implementations. 2. make a backup of your current, working EFI folder! 3. when you're done with that, make ANOTHER backup to the first backup, and then one more, just for good measure. I'm not kidding. Well, ok, I'm half kidding. But believe me. You're gonna thank me later. Make sure you always have a working USB drive you can boot from. 4. take your time to read! This is not gonna be a walk in the park. You need time and patience. With that being said, here's an awesome guide to get you started. It's still a very technical text, but it's a lot easier to read and understand than other similar documents on OC. 5. OC doesn't have an installer. And I'm not sure if it will. Maybe some day. But until then, everything you do is directly operating inside that EFI folder. If you still wanna do it, I wish you good luck!
-
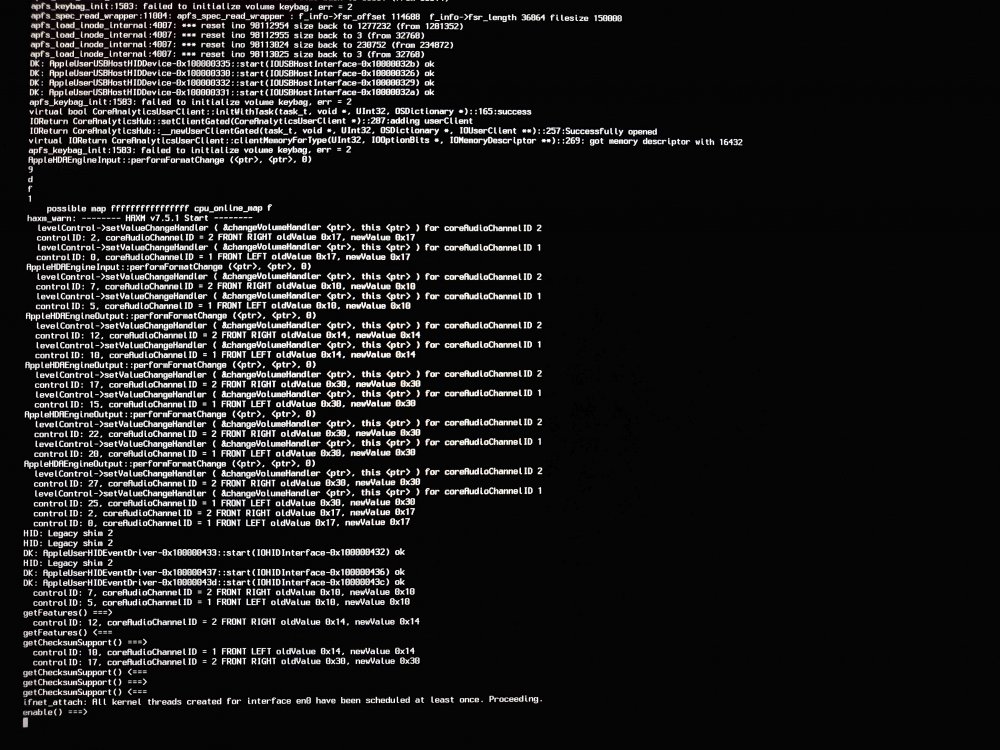
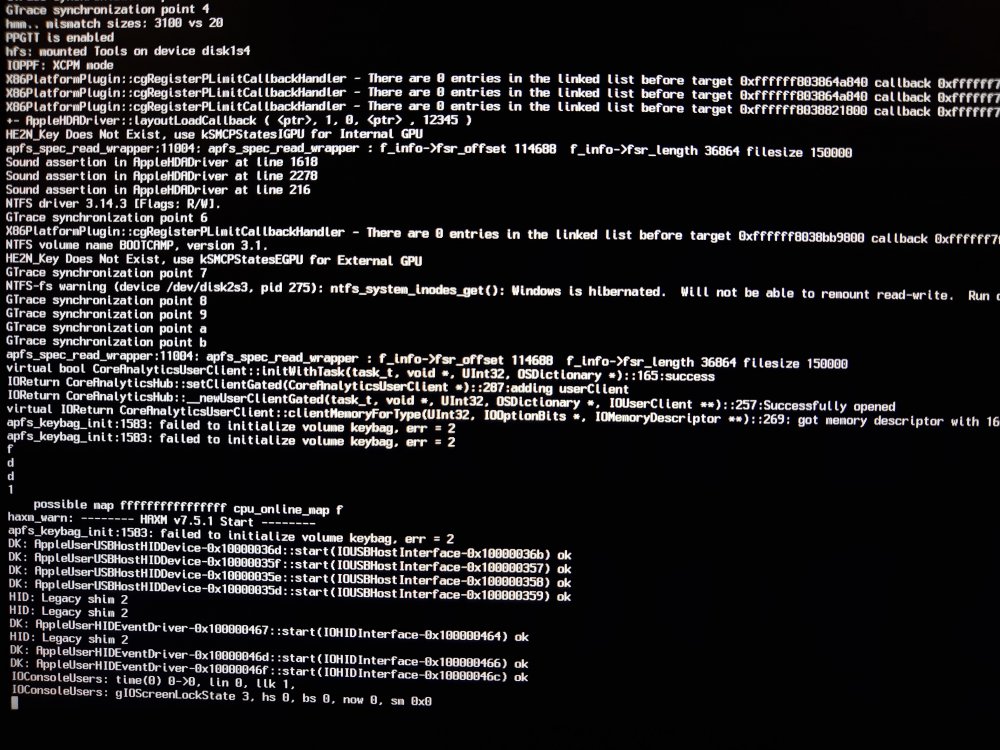
Many thanks for the reply, Hervé. I did try to analyse verbose mode... But...it didn't tell me much. You can see below a few scenarios. Maybe you can figure out more than I did, from them. But...I mean, aside from a (probably normal...to some extent?) hang at gIOScreenLockState 3, I didn't notice anything out of the ordinary. And it was actually that particular message in the log that made me look into a possible iGPU issue and disable it to confirm that, in fact, that was indeed what was slowing everything down. Initially I did this test with all kexts in place and it was hanging at some Ethernet stuff... See below. Which, didn't make much sense at all. But I thought: ok, if it's the Ethernet kext, let's try without it. So, I didn't just try without that, I removed everything aside from: Lilu + VirtualSMC + WEG. Basically, reduced everything to minimum for booting. It was still hanging at the same place. But then...this showed up (see below). Which, as I said above, made me try disabling the iGPU in BIOS and realising that, between booting with iGPU and without it, there's a difference of 17-18 seconds (I rounded it up to 20 just to be easier to work with). :)) And yes, I actually timed it. :)) Also, this is not on even on a mechanical drive. It's on a SATA SSD. I mean, it's not NVMe, but it's still an SSD. And the difference with and without the iGPU is huge! If it helps, the place where it hangs is right in the middle of the loading bar, right before switching to second stage and onto the Desktop. Everything loads normally until there, and after that point.
-
Hi guys, So, I'm curious, since most of you guys are using laptops, which, for as far as I know, can't use dual GPUs in MacOS (usually the dGPU needs to be disabled, for as far as I know), and since I'm guessing most, if not all of you, are using Lilu + WEG ( probably + device properties) for graphics, I was wondering how is your experience using only the iGPU. I'm particularly interested about boot times and, for those who tried that, FV2 second stage boot screen (which, normally should be transparent with user logo, not black screen with only the loading bar). And, in my experience, that can only be achieved with iGPU enabled. That's on a more general note. On a more specific one, I was wondering if you guys have any tips for improving performance on a Haswell HD4600 iGPU. Or any older iGPU for that matter. The reason why I'm asking is because, although I'm using a desktop, with a dedicated GPU, some things work better (or work at all) only with the iGPU enabled. For example MacOS specific video editing software, or, as I said before, FV2's second stage boot. So, I'm only curious how you guys are dealing with only the iGPUs (or if you're like me and using both, I'd love to know more about that, too) and if you have any tips on improving its performance. I don't want to switch to the iGPU entirely (after all, that's why I bought a dedicated GPU), but when your boot times are almost 20 seconds slower with the iGPU enabled than without it, and when you do have some benefits from enabling it...it kinda makes you wonder if there's anything that can be done to improve that. Now, granted, it's an old CPU with an old iGPU. I don't expect any miracles. Just hoping for, maybe, some improvements. Also, if anyone managed to get that second-stage boot correctly displayed with FV2 and a dedicated GPU (maybe entirely without the iGPU), I would be really curious to know how. Thank you very much! And keep up the great work!
-
You're welcome. Looking forward to your (hopefully good) results.
-
For as far as I know, Clover is already doing a pretty good job at injecting the correct EDID. Also, if I'm not mistaken (which I could be), the "Inject EDID" option refers to a Custom EDID you provide. If you don't have one, or if you're planning to inject the original one, it's not gonna make much of a difference. One other thing you can try is updating WEG. Yours seems a bit old, whereas Lilu is newer. It's usually best to keep them both updated since one relies on the other to work. In this case, WEG is a plugin for Lilu. Same for AppleALC for sound. Take a look at the Intel Framebuffer patching page here: https://github.com/acidanthera/WhateverGreen/blob/master/Manual/FAQ.IntelHD.en.md For Laptop (Capri Framebuffer), the recommended values are: 0x01660003 (default), 0x01660009, 0x01660004. Also, if I'm not mistaken, when you add AAPL,ig-platform-id to Device Properties, you need to do it with reversed bytes. Meaning: 0x01660003 becomes 03 00 66 01 (type Data). Same for the other ones.
-
Uhm... you still have ApfsDriverLoader.efi in drivers/UEFI right? I don't think this has anything to do with apfs, but just check that it's there. Also, you seem to use some really weird kexts. :)) IntelMausi can be downloaded directly from Mieze. I didn't know Acid guys also have their fork for it...I guess that could work, too. But..if you're not using OC, I would keep Acidanthera stuff to a minimum. They're generally made for OpenCore. By the way, in case you're using Clover Configurator, that also has a Kext updater section on the left hand side. You can use that to update your kexts easily. You don't need to outsource them from all over the internet. If you want, you can remove the stuff from your SMBIOS and upload your EFI folder here so we can take a look. Uploaded the correct kext for Ethernet in case you wanna use it. But first check out yours. You seem to have it already. So... there should be only one. And if you still need IntelMausiEthernet, you can use the attached one. IntelMausiEthernet.kext.zip
-
Clover installer doesn't replace your existing EFI with a new one. Otherwise you would always have to hunt for kexts and drivers and stuff like that. So yes, it will update the existing folder. And yes, it will also create a backup of your drivers64UEFI. But again, the new location is drivers/UEFI. And drivers should be renamed without -64 suffix. You can copy that EFI... But I would recommend updating and (if necessary) cleaning up the existing installation. At least that's yours. Lilu and Whatevergreen are usually good. If you had them before, you should definitely add them back/keep them. Same for AppleALC. If you used it before for sound, you should add it back, too. So, as you wish. But...if you had a proper EFI on your SSD that worked with everything, you just need to update Clover. And, as I said, do some cleanup, in case you have duplicated drivers. By the way, make sure your drivers actually ARE present in drivers/UEFI or drivers/BIOS before you decide to delete drivers64UEFI and drivers64.
-
Download Clover from the official website. Install it on your SSD drive. Make sure the folder structure is ok and config is properly configured for your needs. Make sure your drivers are all present in their corresponding folder (again, /drivers/UEFI, not /drivers64UEFI.) Also, that all your kexts (especially FakeSMC or VirtualSMC) are present there. Keep your USB drive as a backup in case you can't boot. Enjoy your new Catalina.
-
Setting what up? Catalina? :)) I think you can do that on your own. If you need help to get it booting from the SSD, I can help you with that. In fact, I already told you what I think would be the best course of action. Please, make sure you always have at least one working backup of your EFI folder. And use the Clover installer (from the official website) to install/update the one you have on your SSD drive.
-
Ah, ok. Now I saw your previous post. Alright then. Let me know how it goes. Please, take good care of that EFI if it works ok (at least as a good backup option). Fingers crossed. And please, don't rush. Cause, as you can see, you can get very easily from a perfectly bootable system, to an unbootable one.
-
Well, we need to fix that EFI installation of Clover. And it's gonna be interesting, cause I don't know in which state your current EFI is. :)) That's why I thought maybe you can upload it here. It might be faster this way. Also, I can see what did you do to it. :)) From Windows it's complicated. Cause you don't have a really easy way to mount and edit that EFI. At least that was my experience last time I was stuck outside MacOS. Anyway, if you wanna go Windows, you can try mounting it this way. What you need to check is this: 1. general files and folder structure (make sure your config.plist is present for example) You should have CLOVER in EFI (partition)/EFI (folder)/CLOVER 2. make sure your drivers folder is updated (check out my post above) 3. check /kexts Generally you should pay attention to these: /EFI /BOOT BOOTX64.efi /CLOVER config.plist (check with a GOOD text/xml editor that your config is ok) /ACPI (if you're using custom DSDTs/SSDTs in ACPI/patched, this is important). So make sure your files are present here. /drivers /UEFI (your UEFI drivers from drivers64UEFI should be here, without the -64 suffix) /BIOS (if you don't use Legacy booting, I guess you should have minimum to no drivers here) /kexts (make sure your necessary kexts, especially FakeSMC.kext or VirtualSMC.kext are present here)
-
Yeah, that's not what I meant. And doing the opposite means you probably replaced your existing (but working) 4871 with 5118... The reason you probably don't see your system is because you're missing the APFS driver from that 5118. That's why I suggested taking 4871 which is working and updating it to 5118. Not the other way around. :)) Cause now you can't boot. Do you have any working operating system you can use to fix your USB drive first? It's a good thing Clover makes those backups, cause you can use them to just copy-paste from EFI-backups into EFI(partition)/EFI(folder). But the problem is you need access to that partition. Which is not gonna be easy, since your system partition is probably APFS. Do you have another USB drive with a working version of Clover that could get you back into the OS? Or can you make one?
-
Hi guys! I see the Bug Report section is not really working. Either pointing to non existing sections or...just WIP like this section....So..I couldn't find anything useable for reporting bugs. Is there a working dedicated section for that? Should we use a thread here in the Feedback section? I just wanted to mention a few issues regarding the post editor. It's got some issues. For example, deleting attachments and saving...the attachments are still there. Basically you can't delete attachments. Also, it seems to have some weird caching or something... You change something and it's not visible... You need to exit that thread, come back, and even then it's still not updated. Anyway, I'm just curious if you guys are aware of these issues and if there's any dedicated section/thread we can use to report these bugs until any of the official sections are working.
-
It sounds like your SSD contains Clover 4871, and I'm not sure about that 5118 but it sounds like it's probably not bootable. One things's for sure, it shouldn't switch like that from one to the other. That's the UEFI bios trying to find a bootable partition. I'm thinking either it's missing some drivers (NOTE: driver location has changed, by the way, so it could be why it fails to boot) oor...something else is not right. Config should be the same. Drivers from /drivers64UEFI should now be under drivers/UEFI Drivers from /drivers64 should now be under drivers/BIOS You should not have any drivers named "[driver name]-64.efi". Since Clover only supports 64-bit drivers. For newer Clover, your drivers should be under drivers/UEFI (for UEFI systems) and driver/BIOS (for Legacy systems). So, what I would suggest is...if you have 4871 (to your SSD I suppose) then...what you could do is copy/paste that EFI folder from your SSD to your USB drive containing the Catalina installer. Make sure your drivers are respecting this exact location. One other thing that Clover does is it makes backups of itself on your system partition in a folder called EFI-backups. That's usually useful. But you can delete some of the old "snapshots". So, what I would do...is this: 1. if the 4871 Clover is working (doesn't matter right now that you can't use it for Catalina, it just matters that you can use it to boot), then copy-paste that to the USB drive you want to use for booting Catalina installer 2. use the official Clover installer pkg (I would suggest downloading from their official website) to update the Clover on your USB (so you can use it to install Catalina later on). 3. make sure the drivers folder structure is ok! This is important. Otherwise, you can end up with an unbootable system. At least when booting from your USB. 4. do a test boot from the USB into your current system (not Catalina installer). Make sure you can boot whatever version you've got right now with that USB drive. If you can, then you can move on to actually using the same drive for installing Catalina. 5. when you're done, update your SSD Clover to the same version as the one on the USB drive. Either copy-paste from USB to SSD, or just use the installer I mentioned at Step 2 to update that, as well. Again, please, double/triple check the drivers folder structure after Clover update! If you need more help, remove the SMBIOS information from your config and upload your updated Clover EFI folder.


