
Leaderboard


Popular Content
Showing content with the highest reputation on 07/09/18 in all areas
-
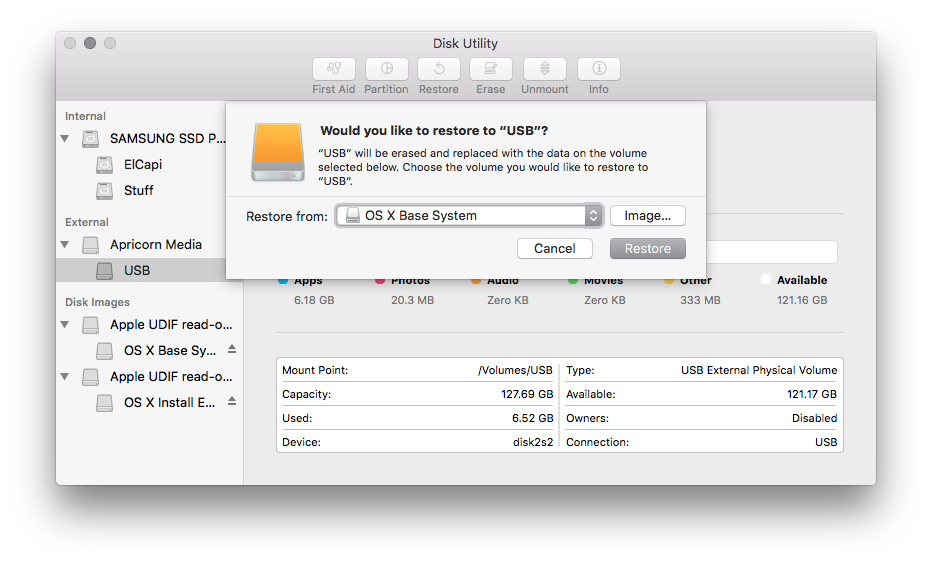
Dell Latitude/Inspiron/Precision/Vostro/XPS - Clover Guide Up to Sierra Only High Sierra Guide below Mojave Guide Catalina Guide Warning: Follow guide at your own risk, I hold no responsibility if you brick your system or destroy all data during the process. If you're creating the installer from a real Mac, make sure you don't accidentally select the real Mac drive when installing Clover loader. It may cause your Mac to not boot again. You've been warned! BIOS: Set to Default, apply, then set SATA Operations to AHCI, set Boot List Option to UEFI Disable Secure Boot, Disable Wake on LAN/WWAN/WLAN, Disable TPM (optional) Enable Legacy Options ROMs for Broadwell system and below Requirements: 1. A downloaded OS X El Capitan / Sierra Application from the Mac App Store 2. USB flash drive (16GB minimum) 3. Clover Configurator (Included in Hack_Tools attached below - might not be the latest) 4. Clover Loader 5. ShowHiddenFiles.app (Included in Hack_Tools attached below) 6. A system running OS X to create the USB Installer 7. A supported Wireless card, Intel wireless are NOT supported Overview 1. Prepare a Bootable USB Drive (8GB minimum) 2. Install OS X El Capitan / Sierra 3. Post Installation 1: Prepare Bootable USB Drive This step extracts the OS X Installer contents, then installs Clover bootloader to the USB stick. 1. Insert the USB drive on a running OS X system 2. Open /Applications/Utilities/Disk Utility 3. Highlight the USB drive in left column 4. Click on the Partition tab 5. Click Current and choose 1 Partition 6. Click Options... 7. Choose GUID Partition Table 8. Under Name: type USB (You can rename it later) 9. Under Format: choose Mac OS Extended (Journaled) 10. Click Apply then Partition 11. Go to Applications, right click on Install OS X El Capitan / Sierra =>Show Package Contents=>Contents=> SharedSupport 12. Mount InstallESD.dmg 13. Launch ShowHiddenFiles and select Show Special Files ( app attached at the end of guide) 14. Mount BaseSystem.dmg (hidden) from OS X Install ESD 15. Use Disk Utility to restore OS X Base System to USB (see image below) 16. After restore is complete, USB is now renamed to OS X Base System. Go ahead and rename it to Install OS X El Capitan 17. Go to Install OS X El Capitan/ Sierra=>System=>Installation and delete the alias Packages 18. Copy Packages from root of OS X Install ESD to Install OS X El Capitan/Sierra=>System=>Installation 19. Copy BaseSystem.dmg and BaseSystem.chunklist (hidden files) from OS X Install ESD to root of Install OS X El Capitan/Sierra 20. Launch ShowHiddenFiles and select Hide Special Files 21. Download Clover 22. Launch Clover package installer 23. Hit Continue, Continue, Change Install Location... 25. Choose Install OS X El Capitan/Sierra 26. Hit Continue, then hit Customize. Select these items: Install for UEFI booting only Install Clover in the ESP UEFI Drivers\Recommended Drivers ApfsDriverLoader AptioMemoryFix AudioDxe DataHubDxe FSInject HFSPlus SMCHelper (leave off if you have VirtualSMC.kext in bootpack) Additional drivers PartitionDxe Themes (Optional) Note: For non UEFI BIOS, see Note1 of post #2 27. Click Install 28. After installation of Clover, the hidden EFI Partition will appear on the Desktop 29. Download the Generic EFI + Bootpack for your model in post #2, replace the contents to the root of the EFI partition, replacing the existing folders ( Boot and Clover folders - not merge) Note: Make sure to check the Update section in Post #4 for updated file if any 30. You are now ready to install OS X El Capitan/Sierra Note: Make a directory in the USB Installer and copy Hack_Tools, Clover package and EFI folder to it for easy access in Step 3 2: Install OS X El Capitan/Sierra 1. Turn on the computer with the USB Installer connected 2. Press F2 to configure the BIOS Sata Operaton -> AHCI Secure Boot -> Disabled Boot List Option -> UEFI. Enable Legacy Option ROMs (Disabled for Skylake and above) Apply and Exit 3. Hit F12 during boot, choose under UEFI Boot: 4. When Clover boot screen appears, choose Install OS X El Capitan/Sierra 5. The system will then boot into the OS X Installer 6. Choose your language and hit -> to continue 7. For a new installation of OS X, you MUST erase and format the destination drive according to the following steps before continuing. *If you are upgrading from Lion, Mountain Lion, Mavericks, or Yosemite and you want to keep your files and apps, skip steps a-i. a. From the menu bar, click Utilities -> Choose Disk Utility b. Highlight your target hard drive for the El Capitan installation in left column. c. Click Erase tab d. Under Scheme: GUID Partition Map e. Under Name: type Macintosh SSD (You can rename it later) f. Under Format: choose Mac OS Extended (Journaled) g. Click Erase h. Click on Partition Tab to add more partition if you prefer i. Close Disk Utility 8. Click Continue, Continue, Agree 9. Select Macintosh SSD, or name of your existing drive, where you want to install El Capitan and click Continue 10. Upon completion, system will restart 11. Press the F12 to choose boot device 12. Choose under UEFI Boot: 13. When Clover boot screen appears, choose Macintosh SSD or name of your existing drive The system will boot into the new drive, and complete the installation: 14. Launch the terminal and enter the following command diskutil list Note: If you see the following, then follow steps in Post #3 Under Core Storage before proceeding /dev/disk1 (internal, virtual): 3: Post-Installation Install Clover loader to Macintosh SSD 1. Launch Clover package installer 2. Hit Continue, Continue, Change Install Location... 3. Choose Macintosh SSD 4. Hit Continue, then hit Customize. Select these items: Install for UEFI booting only Install Clover in the ESP UEFI Drivers\Recommended Drivers ApfsDriverLoader AptioMemoryFix AudioDxe DataHubDxe FSInject HFSPlus SMCHelper (leave off if you have VirtualSMC.kext in bootpack) Additional drivers PartitionDxe Themes (Optional) Install Clover Preference Pane (Optional) Note: For non UEFI BIOS, see Note1 of post #2 5. Launch ESP Mounter Pro, select the disk you have OS X installed on (ie. disk0s1) - app in Hack_Tools 6. Copy the EFI folder from the USB installer to EFI partition of Macintosh SSD (replace not merge) 7. Copy kexts from /EFI/Clover/Kexts/Other/CopytoLE to /Library/Extensions of Macintosh SSD Note: Ignore warning/error messages and click OK, then run commands below. 8. Repair permission and rebuild cache. Run command from terminal (or run permission.sh found in Hack_Tools) sudo chmod -Rf 755 /L*/E* sudo chown -Rf 0:0 /L*/E* sudo touch -f /L*/E* sudo chmod -Rf 755 /S*/L*/E* sudo chown -Rf 0:0 /S*/L*/E* sudo touch -f /S*/L*/E* sudo kextcache -Boot -U / 9. Go to System Preferences Enable Clicking for Trackpad Allow apps downloaded from: Anywhere for Security & Privacy (optional) Note: For Sierra and up, run this in terminal instead: sudo spctl --master-disable 10. Generate own SMBios and SSDT.aml (For Haswell and up, you can enable PluginType in Config instead) Launch /EFI/Clover/Config.plist with Clover Configurator (Included in Hack_Tools attached below) On the left, click on SMBIOS Click on the Up/Down arrow on the right Select the model most suited for your system or use same model included in bootpack, generate a new serial Close Clover Config and save the file. Execute ssdtPRGen.sh from terminal (Included in Hack_Tools attached below) Place generated SSDT.aml in /EFI/Clover/ACPI/Patched Please use beta version of ssdPRGen.sh to generate SSDT.aml for newer system 11. Make sure to disable hibernation as it's a prerequisite to get sleep & wake to work properly on a Hackintosh: sudo pmset hibernatemode 0 sudo rm -f /var/vm/sleepimage sudo pmset hibernatefile /dev/null 12. Congratulations! You are done! Hack_Tools.zip When posting for HELP, please include full system specs and attach debug files. If you're not able to start the installer, then attach the Clover folder and include screenshot(s) of the error / KP by booting with verbose + debug 0x100 mode Credits: All apps, kexts and DSDT patches used in creating this guide go to the developers that created them. I take no credit other than putting this guide and bootpacks together.
 1 point
 -
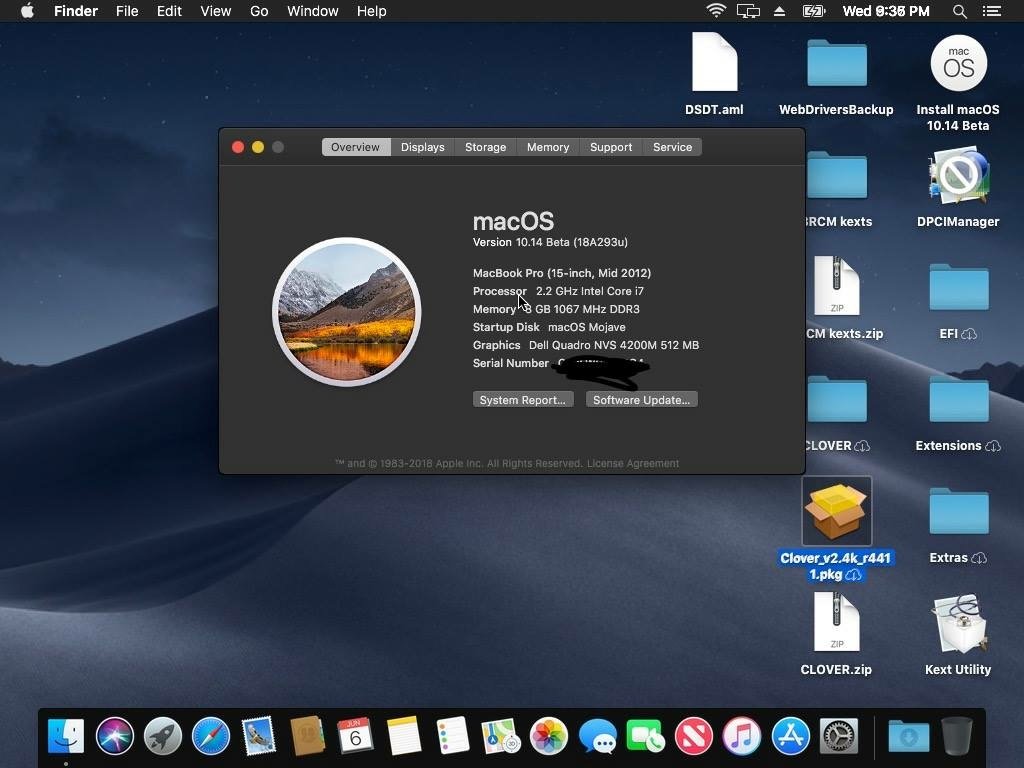
I was able to get the NVS 4200M working in 10.14 Mojave; but, after a few boots it would get stuck in a IOConsoleUsers GIOLockScreenState and ACM:Created/DeletedCredentials loop
1 point
-
Go to Options when you see the Clover loader, use the right arrow to navigate Select ACPI patching-> Tables Dropping-> Go all the way down and deselect Drop all OEM SSDT Check all the Drop "SSDT-xx" below that Select Return Change DSDT name: BIOS.aml or anything other than DSDT.aml Select Return, Return Hit spacebar to select Verbose mode + debug 0x100 mode1 point
-
If Smarttouchpad works better, then remove VoodooPS2Controller. This is a PS2 Controller, not I2C, so it won't enable touchpad for you. You can ask for assistance here https://gitter.im/alexandred/VoodooI2C1 point
-
Ok, just added a bootpack for HS https://osxlatitude.com/forums/topic/8506-dell-latitude-inspiron-precision-vostro-xps-clover-guide/?do=findComment&comment=546321 point
-
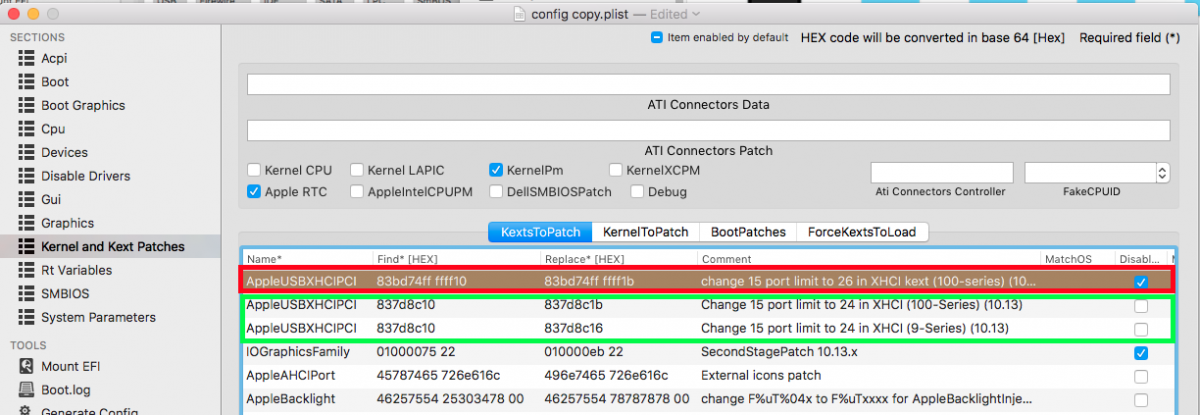
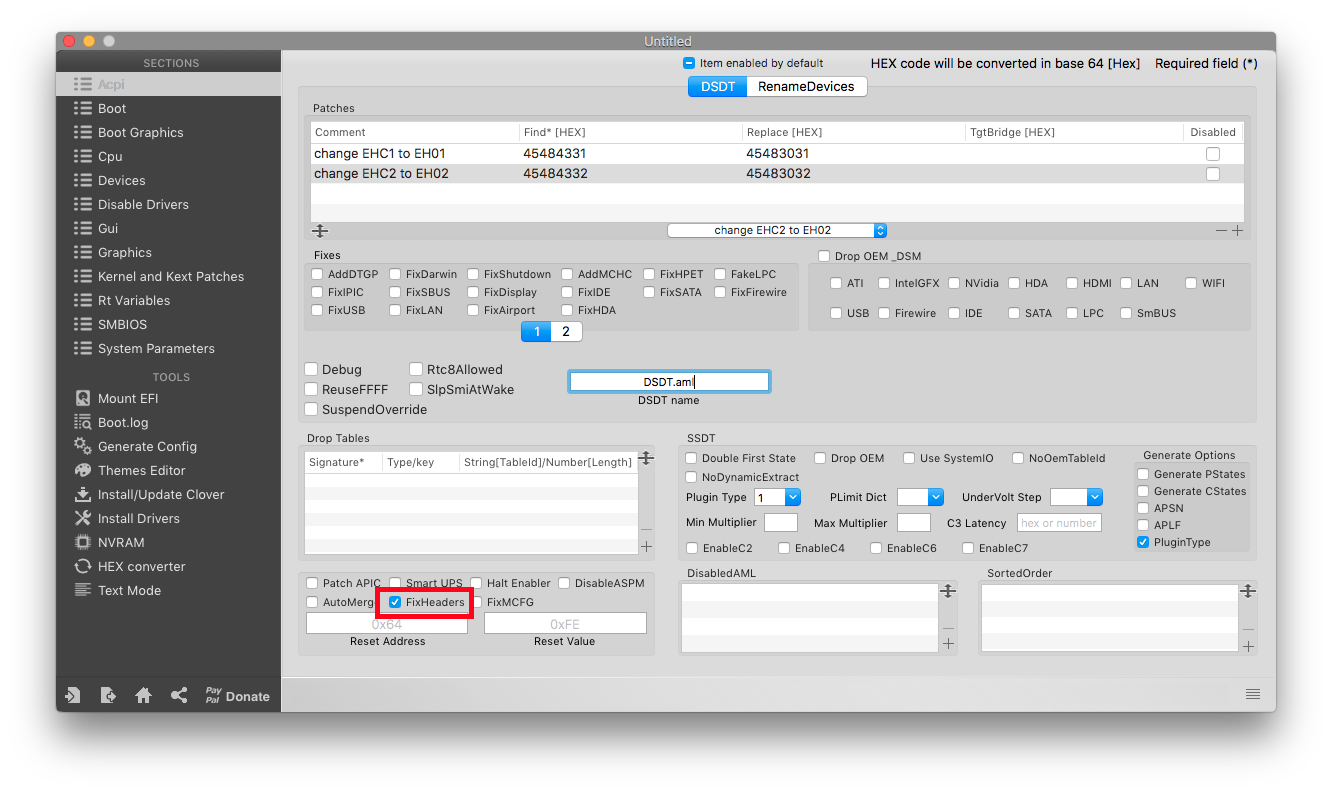
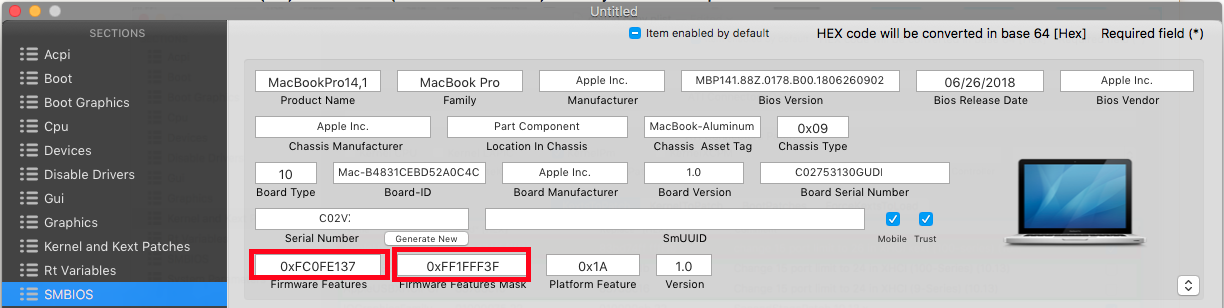
High Sierra Clover Guide Warning: Follow guide at your own risk, I hold no responsibility if you brick your system or destroy all data during the process. If you're creating the installer from a real Mac, make sure you don't accidentally select the real Mac drive when installing Clover loader. It may cause your Mac to not boot again. You've been warned! New Installation Note: By default, upgrading or new Install of HS on an SSD drive, it'll automatically convert to APFS format. If you want to use APFS format, skip step 4 (1) Create the USB installer via Terminal with "createinstallmedia" (a minimum of 16GB UFD is needed or an external USB drive) sudo /Applications/Install\ macOS\ High\ Sierra.app/Contents/Resources/createinstallmedia --volume /Volumes/"target_USB" --applicationpath /Applications/Install\ macOS\ High\ Sierra.app --nointeraction Note: target_USB = name of the USB drive you're writing to (2) Install Clover with following config, add appropriate Sierra bootpacks Only + Generic EFI from post #2 above ( See note1 below for updating bootpack for HS if there isn't one for your model in post #2) UEFI: Install for UEFI booting only Install Clover in the ESP UEFI Drivers\Recommended Drivers ApfsDriverLoader AptioMemoryFix AudioDxe DataHubDxe FSInject HFSPlus SMCHelper (leave off if you have VirtualSMC.kext in bootpack) Additional drivers PartitionDxe Themes (Optional) Install Clover Preference Pane (Optional - only available on installed disk, not installer) Legacy: Install Clover in the ESP Boot Sectors Install boot0af in MBR Clover for BIOS (Legacy) booting CloverEFI 64-bits SATA BIOS Drivers, 64 bit\Recommended Drivers ApfsDriverLoader AudioDxe FSInject HFSPlus SMCHelper XhciDxe Themes (Optional) Install Clover Preference Pane (Optional - only available on installed disk, not installer) (3) Boot with the USB installer, start Disk Utility and initialize your SSD as an APFS drive. Close Disk Utility, select Install MacOS. If you DO NOT want APFS, then select HFS+ format instead. Then Close Disk Utility and follow step 4, otherwise continue to Step 5 (4) Open the terminal (on the menu bar click Utility>Terminal), and launch this command /Volumes/"Image Volume"/"install macOS High Sierra.app"/Contents/Resources/startosinstall --volume /Volumes/"HighSierra" --agreetolicense --converttoapfs NO Note: HighSierra = name of the drive you're targeting (5) System will auto reboot after files has been copied (6) Boot with USB installer, select "Boot macOS Install from HighSierra". Installation will continue installing and reboot (Might have to do this rebooting a couple of times) (7) Boot with USB installer, finish the customization (8) Follow post install steps from Post # 1 NOTE1: Updating the Sierra Bootpack to be use for High Sierra unless there's a High Sierra bootpack already 1) Edit config.plist from Sierra Bootpack (I recommend using Clover Configurator 4.59 or newer) and activate FixHeaders option under Acpi: 2) Update USB port limit for High Sierra where applicable, if current Sierra Bootpack doesn't have it, then you don't need this. Either disable 10.12 (Red) and add 10.13 (Green - 9 or 100 Series) or modify 10.12 to 10.13 port limit Update: New USB port Limit patch for 10.13.4(5) and 10.13.6 credits to PMHeart 3) Under SMBIOS, update the definition so that Firmware Features and Firmware Feature Mask is now populated 4) [Recommended] Update the Sierra kexts under /EFI/CLOVER/kexts/Other/ Common links for new kexts: https://github.com/vit9696/Lilu/releases https://github.com/vit9696/Lilu/blob/master/KnownPlugins.md https://bitbucket.org/RehabMan/ Upgrading to High Sierra and keeping HFS+ format If you want to keep HFS+ format, run this command instead of launching the "Install MacOS High Sierra.app" /Applications/Install\ macOS\ High\ Sierra.app/Contents/Resources/startosinstall --agreetolicense --converttoapfs NO If you want to install or upgrade to a different partition/drive /Applications/Install\ macOS\ High\ Sierra.app/Contents/Resources/startosinstall --volume /Volumes/"targetdrive" --agreetolicense --converttoapfs NO Note: Repair permission and rebuild cache if you lost audio after upgrade. You must upgrade Clover, Config.plist and kexts as noted in NOTE1: Updating the Sierra Bootpack to be use for High Sierra When posting for HELP, please include full system specs and attach debug files. If you're not able to start the installer, then attach the Clover folder and include screenshot(s) of the error / KP by booting with verbose + debug 0x100 mode
1 point
-
Requirements: macOS Sierra/High Sierra downloaded from the App Store A PC or Virtual Machine running Mac OS X 10.7 or later Clover Bootloader Clover Configurator Kext Utility My m6700 has 32GB RAM, nVidia K3000m, Intel HD4000, 500GB Samsung SSD, 2x Seagate 2TB Hard Drives, Atheros AR9285 Wifi Card. These instructions should work with other configurations but you may need to get a compatible Wifi card. First thing to do is download the following: macOS Sierra from the App Store Clover Bootloader v2.4k r4220 (included in m6700.zip) Clover Configurator (included in m6700.zip) Kext Utility (included in m6700.zip) Attached m6700.zip file below You need to have a computer or virtual machine running Mac OS X 10.7 or later. Now we can began. The first thing is to prepare a USB drive for the macOS Installer. Open up Disk Utilities, click on the USB drive then click on Erase. For a Name use USB, Format use Mac OS Extended (Journaled), Scheme use GUID and then click apply. Now to make the USB drive a bootable USB drive. If you want to install Sierra use Terminal & type the following command: sudo /Applications/Install\ macOS\ Sierra.app/Contents/Resources/createinstallmedia --volume /Volumes/USB --applicationpath /Applications/Install\ macOS\ Sierra.app –nointeraction If you want to install High Sierra use Terminal & type the following command: sudo /Applications/Install\ macOS\ High\ Sierra.app/Contents/Resources/createinstallmedia --volume /Volumes/USB --applicationpath /Applications/Install\ macOS\ High\ Sierra.app –nointeraction Once the process is finished your USB Drive is named Install macOS Sierra or Install macOS High Sierra which ever one you choose. Now open Clover Bootloader in the m6700.zip, click continue 2 times, Change Install Location and choose the USB Drive. Click Install. Open the USB Drive in finder and delete the replace the EFI Folder with the EFI Folder included with m6700.zip. Copy the m6700 folder to the USB drive. Now comes the fun part. Boot the m6700 with the USB attached. First hit F2 to enter the BIOS. Set the SATA to AHCI, Enable Optimus and disable Secure Boot. Click apply and reboot. On reboot hit F12 to enter the boot menu, select USB drive and hit enter. If you get an error message that there is an Invalid Partition Table, just hit enter and it will boot up. At the Clover screen select Boot OS X Install from Install macOS Sierra. Congrats in a little while you will be greeted with the install screen. At the install screen click Continue twice, choose your hard drive to install to. If you do not see a drive to install to, go to the menu bar click Utilities then Disk Utilities. Click on the drive you wish to install macOS Sierra to. Go to Erase. For a Name use macOS, Format use Mac OS Extended (Journaled), Scheme use GUID and then click apply. Now install macOS Sierra. After the install is finished leave the USB drive attached and reboot. On reboot hit F12 to enter the boot menu, select USB drive and hit enter. If you get an error message that there is an Invalid Partition Table, just hit enter and it will boot up. At the Clover screen select macOS and it will boot up to the setup screen. Once you get to the Desktop open Clover Bootloader and install Clover. Once Clover is installed copy the EFI folder from the USB drive to macOS drive. To get the sound working copy AppleHDA_IDT.kext from the m6700 folder to System/Library/Extensions use the kext Utility to repair permissions. Next run Carillon Installer-2. Now you are set with a nice Mac Book Pro clone. Enjoy. NB: K3000m works with both Sierra & High Sierra m6700.zip1 point
-
Updates Deprecated1 point
-
Troubleshooting Clover rebooting early If you encounter any of the bullet below and rebooted, make sure that your 1 DIMM be on slot A. OsxAptioFixDrv: Starting overrides for System\Library\CoreServices\boot.efi Using reloc block: yes, hibernate wake: no +++++++++++++++++++++++++++++++++++++++++++++++ OsxAptioFixDrv: Starting overrides for System\Library\CoreServices\boot.efi Using reloc block: yes, hibernate wake: no Error allocating 0x#### pages at 0x####... alloc type 2 Error loading kernel cache (0x9) Boot failed, sleeping for 10 seconds before exiting... OsxAptioFixDrv: Starting overrides for System\Library\CoreServices\boot.efi Using reloc block: yes, hibernate wake: no Error allocating 0x#### pages at 0x####... alloc type 2 Could not allocate runtime area Boot failed, sleeping for 10 seconds before exiting... Core Storage 1) From terminal, enter diskutil list. Note the virtual drive in red. >diskutil list /dev/disk0 (internal, physical): #: TYPE NAME SIZE IDENTIFIER 0: GUID_partition_scheme *256.1 GB disk0 1: EFI EFI 209.7 MB disk0s1 2: Apple_CoreStorage Macintosh SSD 63.5 GB disk0s2 3: Apple_Boot Recovery HD 650.0 MB disk0s3 /dev/disk1 (internal, virtual): #: TYPE NAME SIZE IDENTIFIER 0: Apple_HFS Macintosh SSD +63.1 GB disk1 Logical Volume on disk0s2 75DADC16-4B7F-4C7D-9660-10A1C2A9FC02 Unencrypted 2) From terminal, run diskutil cs revert /dev/disk1 3) Reboot with USB Installer and select the Installed drive 4) Continue with 3. POST-INSTALLATION Credits to peluko iMessage and FaceTime https://github.com/camielverdult/Ramblings-of-a-hackintosher-High-Sierra/blob/master/iMessage.md1 point
-
Clover Bootpacks I'll be adding more bootpacks when I have them confirmed working by members of this forum... Don't forget to check the Update section below (post #4) for updated files and information!!! Note: Sierra bootpacks already have the updated files listed in post #4 Note: Bootpack (EFI) consists of combining the Generic EFI + the model you're downloading!!! Instruction: 1) Download the Generic EFI folder. Generic EFI Folder EFI_v5119.zip 2) Download model below and add the contents into the Generic /EFI/Clover <- folder Latitude UEFI Only - GUID Scheme - Kabylake (OS X 10.12.6 and Up)- (See Note2 below) Mojave 7480_Mojave.zip For Optimus models, add to /EFI/Clover/ACPI/Patched DisableDiscreteGraphics.zip Sierra / High Sierra 5480_HD620_v1.6.4_HS.zip 5480_HD630-Optimus_HS.zip (BIOS 1.9.3) - Skylake (OS X 10.11.4 and Up)- (See Note2 below) El Capitan E7x70.zip - latest Sierra / High Sierra bootpack here Sierra 5480_BIOSv1.5.2.zip E5470_1.17.3_HS.zip High Sierra E5470_1.18.6_HS.zip - Broadwell - (See Note2 below) El Capitan E7450_update.zip - latest Sierra /High Sierra bootpack here E5450_HD5500.zip E5550.zip Sierra E5550_A15.zip E5550_A15_Disable_GT820M.zip E5450_HD5500_A15.zip 3450_A13.zip High Sierra E5450_HS_A19.zip - Haswell El Capitan E7440.zip E6540.zip E5540.zip E5450_HD4400.zip 3550.zip 3540.zip 3440.zip 3340.zip Sierra E7440_A20.zip E6540_Optimus_A17.zip E6540_HD4600_Only.zip E6440_A14.zip - based off Hervé's work E5540_Sierra.zip E5440_A13.zip 3550_HD4400_A12.zip High Sierra E7440_HS.zip E6440_A14_HS E5440_A21_Disable-Nvidia.zip Mojave E6440_HD4600_Only_Mojave.zip - IvyBridge El Capitan E6230.zip - 1366x768 E6430.zip - 1600x900 and above E5530.zip - Rename Config/DSDT depending on display resolution Sierra E6530_HD4000_Only.zip 6430u_1366x768.zip - BIOS A06 See here for 6430u HiRes (1600x900) file E6430_A12.zip - check Readme.txt inside bootpack E5530_A12.zip E6330_A11.zip - check Readme.txt inside bootpack E6230_A11.zip E6230_HD3000.zip -> this has SandyBridge CPU High Sierra E6230_A11 Legacy - GUID Scheme - See Note1 below - SandyBridge El Capitan E6420.zip - 1600x900 E6x20_NVS.zip E6220.zip - 1366x768 E5420.zip Sierra E6220_A13.zip E5520_A14.zip - check Readme.txt inside bootpack E5420.zip - check Readme.txt inside bootpack E6420_HD3000_A23.zip- check Readme.txt inside ACPI/Patched folder E6420_Optimus_A23.zip - check Readme.txt inside ACPI/Patched folder E6520_Optimus_A19.zip - check Readme.txt inside ACPI/Patched folder High Sierra E6520_Disabled-NVS_HS.zip E6220_A13_HS.zip Inspiron UEFI Only - GUID Scheme - Broadwell - (See Note2 below) El Capitan 5458.zip Inspiron_5548.zip 5558_HD5500_Only.zip 5558_HD5500_DisableNvidia.zip Sierra 3543_A08.zip 5548_HD5500_Only.zip 5548_m270-Disabed_A07.zip 5558_920M-Disabled_A14.zip High Sierra 5558_920M-Disabled_A14_HS.zip - Haswell El Capitan 5558_HD4400.zip 3542.zip Sierra 3542_A12.zip High Sierra 5558_HD4400_HS.zip Precision UEFI Only - GUID Scheme - Skylake (OS X 10.11.4 and Up)- (See Note2 below) El Capitan 5510_HD530_Disabled-Nvidia.zip Sierra 5510_HD530_1.2.25.zip 7510_HD530_1.12.4.zip - (See more info here) Vostro UEFI Only - GUID Scheme - Kabylake Sierra / High Sierra Vostro_3468_Biosv01.07.00_HS.zip Vostro_3468_2.3.0_HS.zip XPS UEFI Only - GUID Scheme - Haswell Sierra / High Sierra XPS 12 9Q33_A07.zip Note1: For Exx20 (SandyBridge models), use Legacy - GUID Scheme. Not UEFI Install Clover with the following settings in 1: Prepare Bootable USB Drive step 26 above: Legacy: Install Clover in the ESP Boot Sectors Install boot0af in MBR Clover for BIOS (Legacy) booting CloverEFI 64-bits SATA BIOS Drivers, 64 bit\Recommended Drivers ApfsDriverLoader AudioDxe FSInject HFSPlus SMCHelper XhciDxe Themes (Optional) Install Clover Preference Pane (Optional - only available on installed disk, not installer) Note2: Systems with Broadwell / Skylake / Kabylake CPU such as Latitude E7450 and Inspiron 5548, you'll need to set the DVMT prealloc to 96MB in order to bypass KP and to enable full graphics with full QE/CI. For more info, see here. /!\ New Development: If you don't want to mod the BIOS as it might be difficult for some models, you could skip this step by adding 2 new kexts to /EFI/Clover/kexts/Other Lilu.kext & Whatevergreen Notes3: To prevent artifacts with HD 4000, the following models should not exceed BIOS A11. Downgrade to A02/A03 and then upgrade to A11 if it has exceeded: E6x30, E5x30 Latitude 6430U should stay at A06 Fix can be found here, no longer need to use old BIOS1 point

This leaderboard is set to London/GMT+01:00