
Leaderboard

Popular Content
Showing content with the highest reputation on 07/03/21 in all areas
-
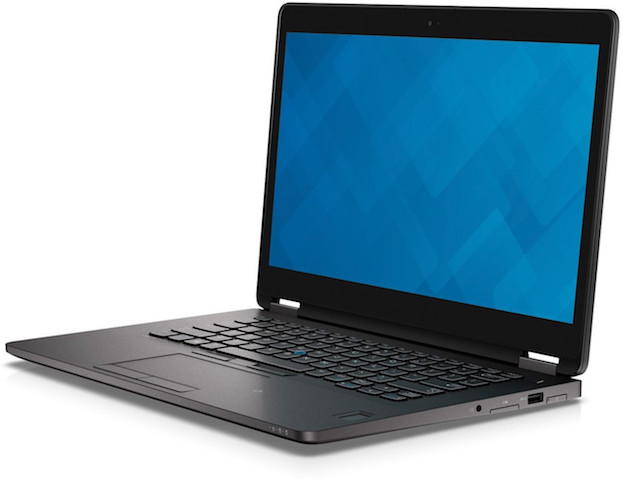
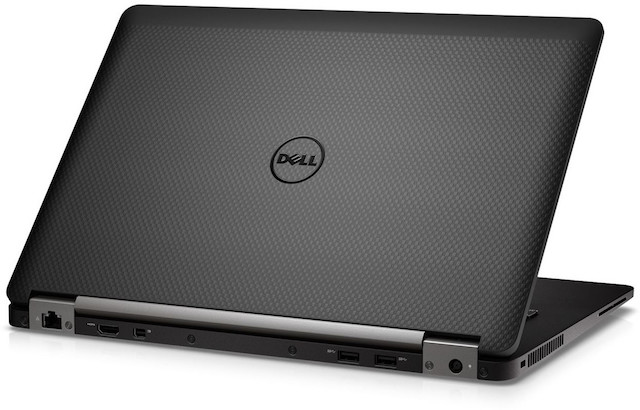
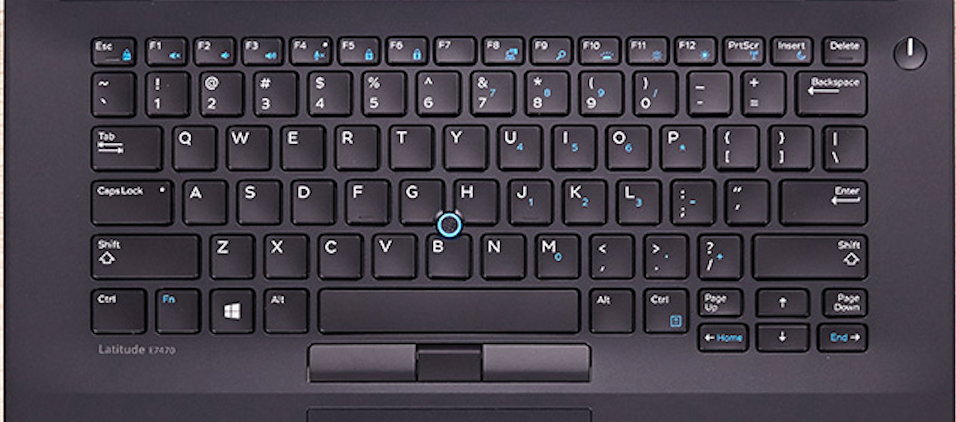
El Capitan Guide Specifications: Processor : Intel® Core i5-6300U / i7-6600U Processor Graphics Processor(GPU) : Intel® Integrated HD Graphics 520 Chipset : 6th Generation Intel®Core Storage : Samsung PM851 256GB M.2 Form factor Sata-SSD RAM : 16GB DDR4 SDRAM 2133 MHz; 2 slots supporting up to 16GB Wifi : Intel Wireless Gigabit Ethernet 802.11AC (M.2, 8260AC), Bluetooth 4.1 LAN : Intel I219-LM PCI-E Gigabit Ethernet Adapter Audio : Realtek® High Definition Audio ALC293 (ALC3235) USB 3.0 : Intel USB 3.0/3.1 xHCI Controller Touchpad : Alps Multi-touch Touchpad v7 Hardware Webcam : USB3.0 UVC HD WebCam Card reader : SD 4.0 Memory Card Reader Monitor : (14) FHD (1920x1080) Anti Glare (16:9) WLED, 300 nits, Magnesium Alloy LCD back Battery : 55 Wh ExpressCharge Capable (4-cell) Lithium-Ion Interface : 1 x Microphone/Headphone Combo jack 1 x Mini DisplayPort for external monitor 3 x USB 3.0 port(s) (one with PowerShare) 1 x RJ45 LAN Jack for LAN insert 1 x HDMI Working: Graphics with Acceleration Audio with patched AppleHDA Bluetooth /Wireless (Replaced with DW1560 / DW1830) HDMI Video / Audio mini DisplayPort / Audio LAN USB3.0 Webcam Battery Fn Hotkeys (Brightness & Audio control) Alps Touchpad / Trackstick Sleep, Processor P&C-States with Native power management Not working: Finger Sensor, smart card reader if you have one SD Card reader, unsupported, no driver DisplayPort on Port Replicator - no DP audio Work in Progress: HDMI Audio (no support yet) HDMI Audio Supported, updated files in the Sierra guide below Slow to boot/Restart/Shutdown Better when dual booting with Win10/not sure why Prerequisite: Set DVMT to 96MB (0x3) Source = FireWolf™s guide Steps to change the DVMT value (Done on Windows or WinPE) 1) Universal BIOS Backup ToolKit 2.0.exe - to backup the BIOS (DellInc.-1.5.3.rom) At time of writing - BIOS version 1.5.3 2) UEFITool.exe to find the module labeled Setup and extract the PE32 image section (setup.bin) Update: For Dell Only: Search with this GUID then extracting the PE32 body under it would be faster /easier than finding the module per guide 899407d7-99fe-43d8-9a21-79ec328cac21 3) Universal IFR Extractor.exe to extract setup.bin to a readable text file 4) Use notepad to search for DVMT in the text file, 2 were found at 0x432 and 0x433 Both with value of 0x1 but only 0x432 needs to be set to 0x3 5) Format a USB drive to fat32 and create a folder name EFI (SD Card works too) 6) Download the EFI Shell and extract the Boot folder into the newly created EFI folder i.e.. /EFI/Boot/bootx64.efi 7) Boot system with the USB and select UEFI Boot At the grub prompt, enter these commands, hit enter after each command, then exit and reboot setup_var 0x432 0x3 To verify, just enter setup_var 0x432 and hit enter, the value will be listed Note: Settings will retain after BIOS update but will reset if you select "Restore Settings" in BIOS!!! /!\ New Development: If you don't want to mod the BIOS as it might be difficult for some models, you could skip this step by adding 2 new kexts to /EFI/Clover/kexts/Other Lilu.kext & Whatevergreen BIOS Settings: Set to "Load Default", Apply, then set the following: TPM = Disabled Secure Boot = Disabled UEFI = Enabled SATA Operation = AHCI Wake on Lan /WLan = Disabled Enable Legacy Option ROMs = Disabled Installation: See here install guide, use below bootpack E7x70.zip Note: Must be OS X 10.11.4 and newer for Skylake support Post Install: Enable Brightness Control and Trackstick Scrolling Trackstick Scrolling Download and Install Karabiner Launch Karabiner/Preferences/Change key/Point Devices/CursorMove to ScrollWheel Enable MiddleClick+CursorMove to Scrollwheel Brightness Control Launch Karabiner/Preferences/Misc & Uninstall Under Custom Setting, click Open private.xml Replace file with the attached -> private.xml.zip Go back to Change Key Tab and select 'Reload XML' The new custom file will show on the very top call 'Remap Brightness Key' & 'Remap Volumes Key' Place the check marks there. Now use F11 & F12 for Brightness, use F1, F2, & F3 for Volumes Control (Keyboards with same/similar layout will work with custom xml above too) Note1: Personally use SmartScroll for Trackstick scrolling with Inertia. Don't really use Touchpad, 2 fingers scrolling and tap and drag does work. Note2: Please use this beta version of ssdPRGen.sh generate SSDT.aml for Skylake system Note3: If you're installing Sierra, there's a known artifact issue on the upper left corner! Update: Fix can be found here Credits: FireWolf, Joe82, EmlyDinEsh, Bronxteck, Hervé, Rehabman, Piker-Alpha, Sontrg, toleda, Dr. Hurt, Clover Team, ...everyone involved with getting Skylake supported
 1 point

This leaderboard is set to London/GMT+01:00