
Leon
-
Posts
1235 -
Joined
-
Last visited
-
Days Won
58
Content Type
Profiles
Articles, News and Tips
Forums
Everything posted by Leon
-
Morning everyone, Things are moving forward as planed and some cool things will come over the corse of this week,. IPboard upgrade: First of all - we are testing the latest 4.4.2 of IPboard over att http://dev.osxlatitude.com - so faar it seems a few theme issues will have to be fixed - but besides that it looks good.. so expect and upgrade later this week New server: OSXL will be moving to a new hosts - so faar we have been on shared hosting - usually sponsored - but have now decided to move to our own box - this will improve performance but also allow us to integrate features and new services better - the server move is expected to happen with the next two seeks. Discord: Join us on discord - IPboard and the forum is awesome .. a great solution.. but why not take the chance to hang out with the rest of us.. Joins us at: https://discord.gg/Wz7EU3
- 1 reply
-
- 1
-

-
 Hi, After a recent upgrade we found that users now was forced to login using their "Username" and no longer could use their "E-mail" to login, this have created a great deal of support tickets and general confusion. We are truly sorry about that - to the Team's defense this was a chagne in the IPboard software - a fix is now implemented. In other news we are currently working on a new / better hosting solution since the sponsored hosting we currently are using will be going away. To this end we have bought our own box and are taking the chance to experiment with other web server software and newer PHP version - ultimately we would have liked to go with Litespeedtech's litespeed web server and asked if they were interested in sponsoring us (being the non-profit site we are) - they could at best offer us 25% rebate - Sadly. We are currently using Apache - but as everyone knows - its not known for its extreme performance. If you have experince with webhosting or feel like helping out - please contact me at [email protected] //Leon PS. We also identified an issue with sparpost (the mail service we use) - that is fixed now and you should start to recieve mails from the site.
 -
Hi there, I got a bit of important news to share with you. As you know - OSXL and its services is privately funded by the team and via donations we get (keep em coming, the few that donates rocks!) - we dont have any ads and we dont bundle any malware - we like to keep the site clean to give you the best experince we can. But - running this site have its costs - its a fact we can't get around - so it got us thinking - how can we get some funding for the site without selling out of the core values that drives the site. God knows we have had plenty of companies that want to advertize, sell their products or outright buy OSXL - so the discussions started - if we were to offer 3rd. party products on the site - it should not be without requirements. 1. It should benefit the users 2. It should be of interest to the users 3. It should benefit the site 4. No crap, scam or bad deals. With that in mind - i am happy to present our first partner - i welcome RapidSeedbox to OSXL. "With RapidSeedbox, you do not have to worry about any logs, contracts or ISP’s. You will enjoy full privacy with us. Our Seedbox product is built with your security & anonymity in mind." Basiclly - here is the deal - If you order a Seedbox via RapidSeexbox using the link below you get 25% of the first month and OSXL gets a 10% kickback - so you save money, get the best seedbox the market can offer and you help fund OSXL in the process - seems like a win-win for everyone? Head over to: https://members.rapidseedbox.com/aff.php?aff=1430 and use the code "RAPID25-OSXL" Have fun //Leon
-
Hi there, As some of you may or may not know - OSXL is currently looking into integrating a cryptocurrency - the reason behind this is many - but mostly to have fun - and to allow developers and people who help - to be rewarded for the hard work they do. Unlike other sites that generate their own currency we will most likely go with a coin/token that already is out there - and we are studying a few like: XRP, Kin, Bos, Rise and ETN Today my attention fel to a new: Initiative Q. They are running a campaign - if you head over and signup you will get a bunch of coins for free - so head over and signup and let me know what you think: Link: https://initiativeq.com/invite/HV_cnzp77 Also, if you have any experince with crypto - like development - drop me a message about joining our crypto team.
-
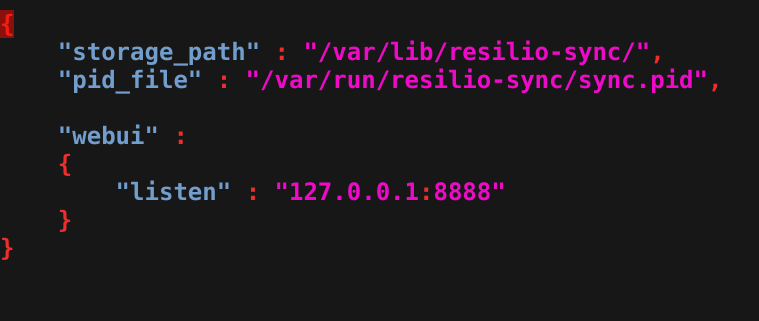
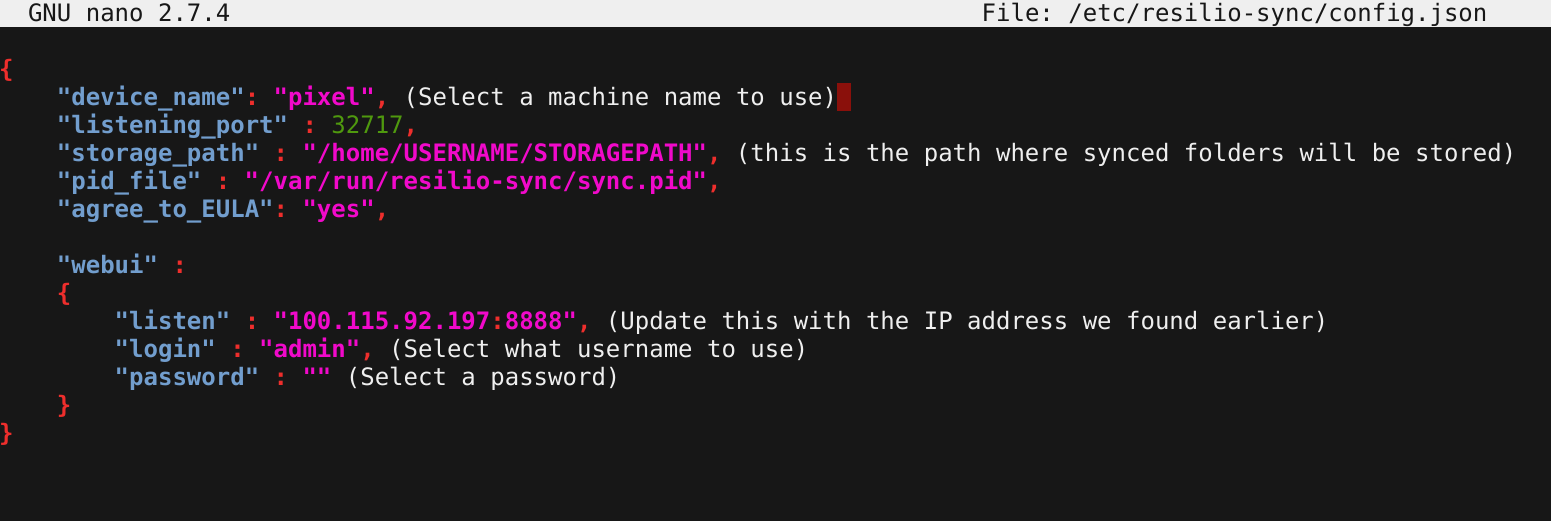
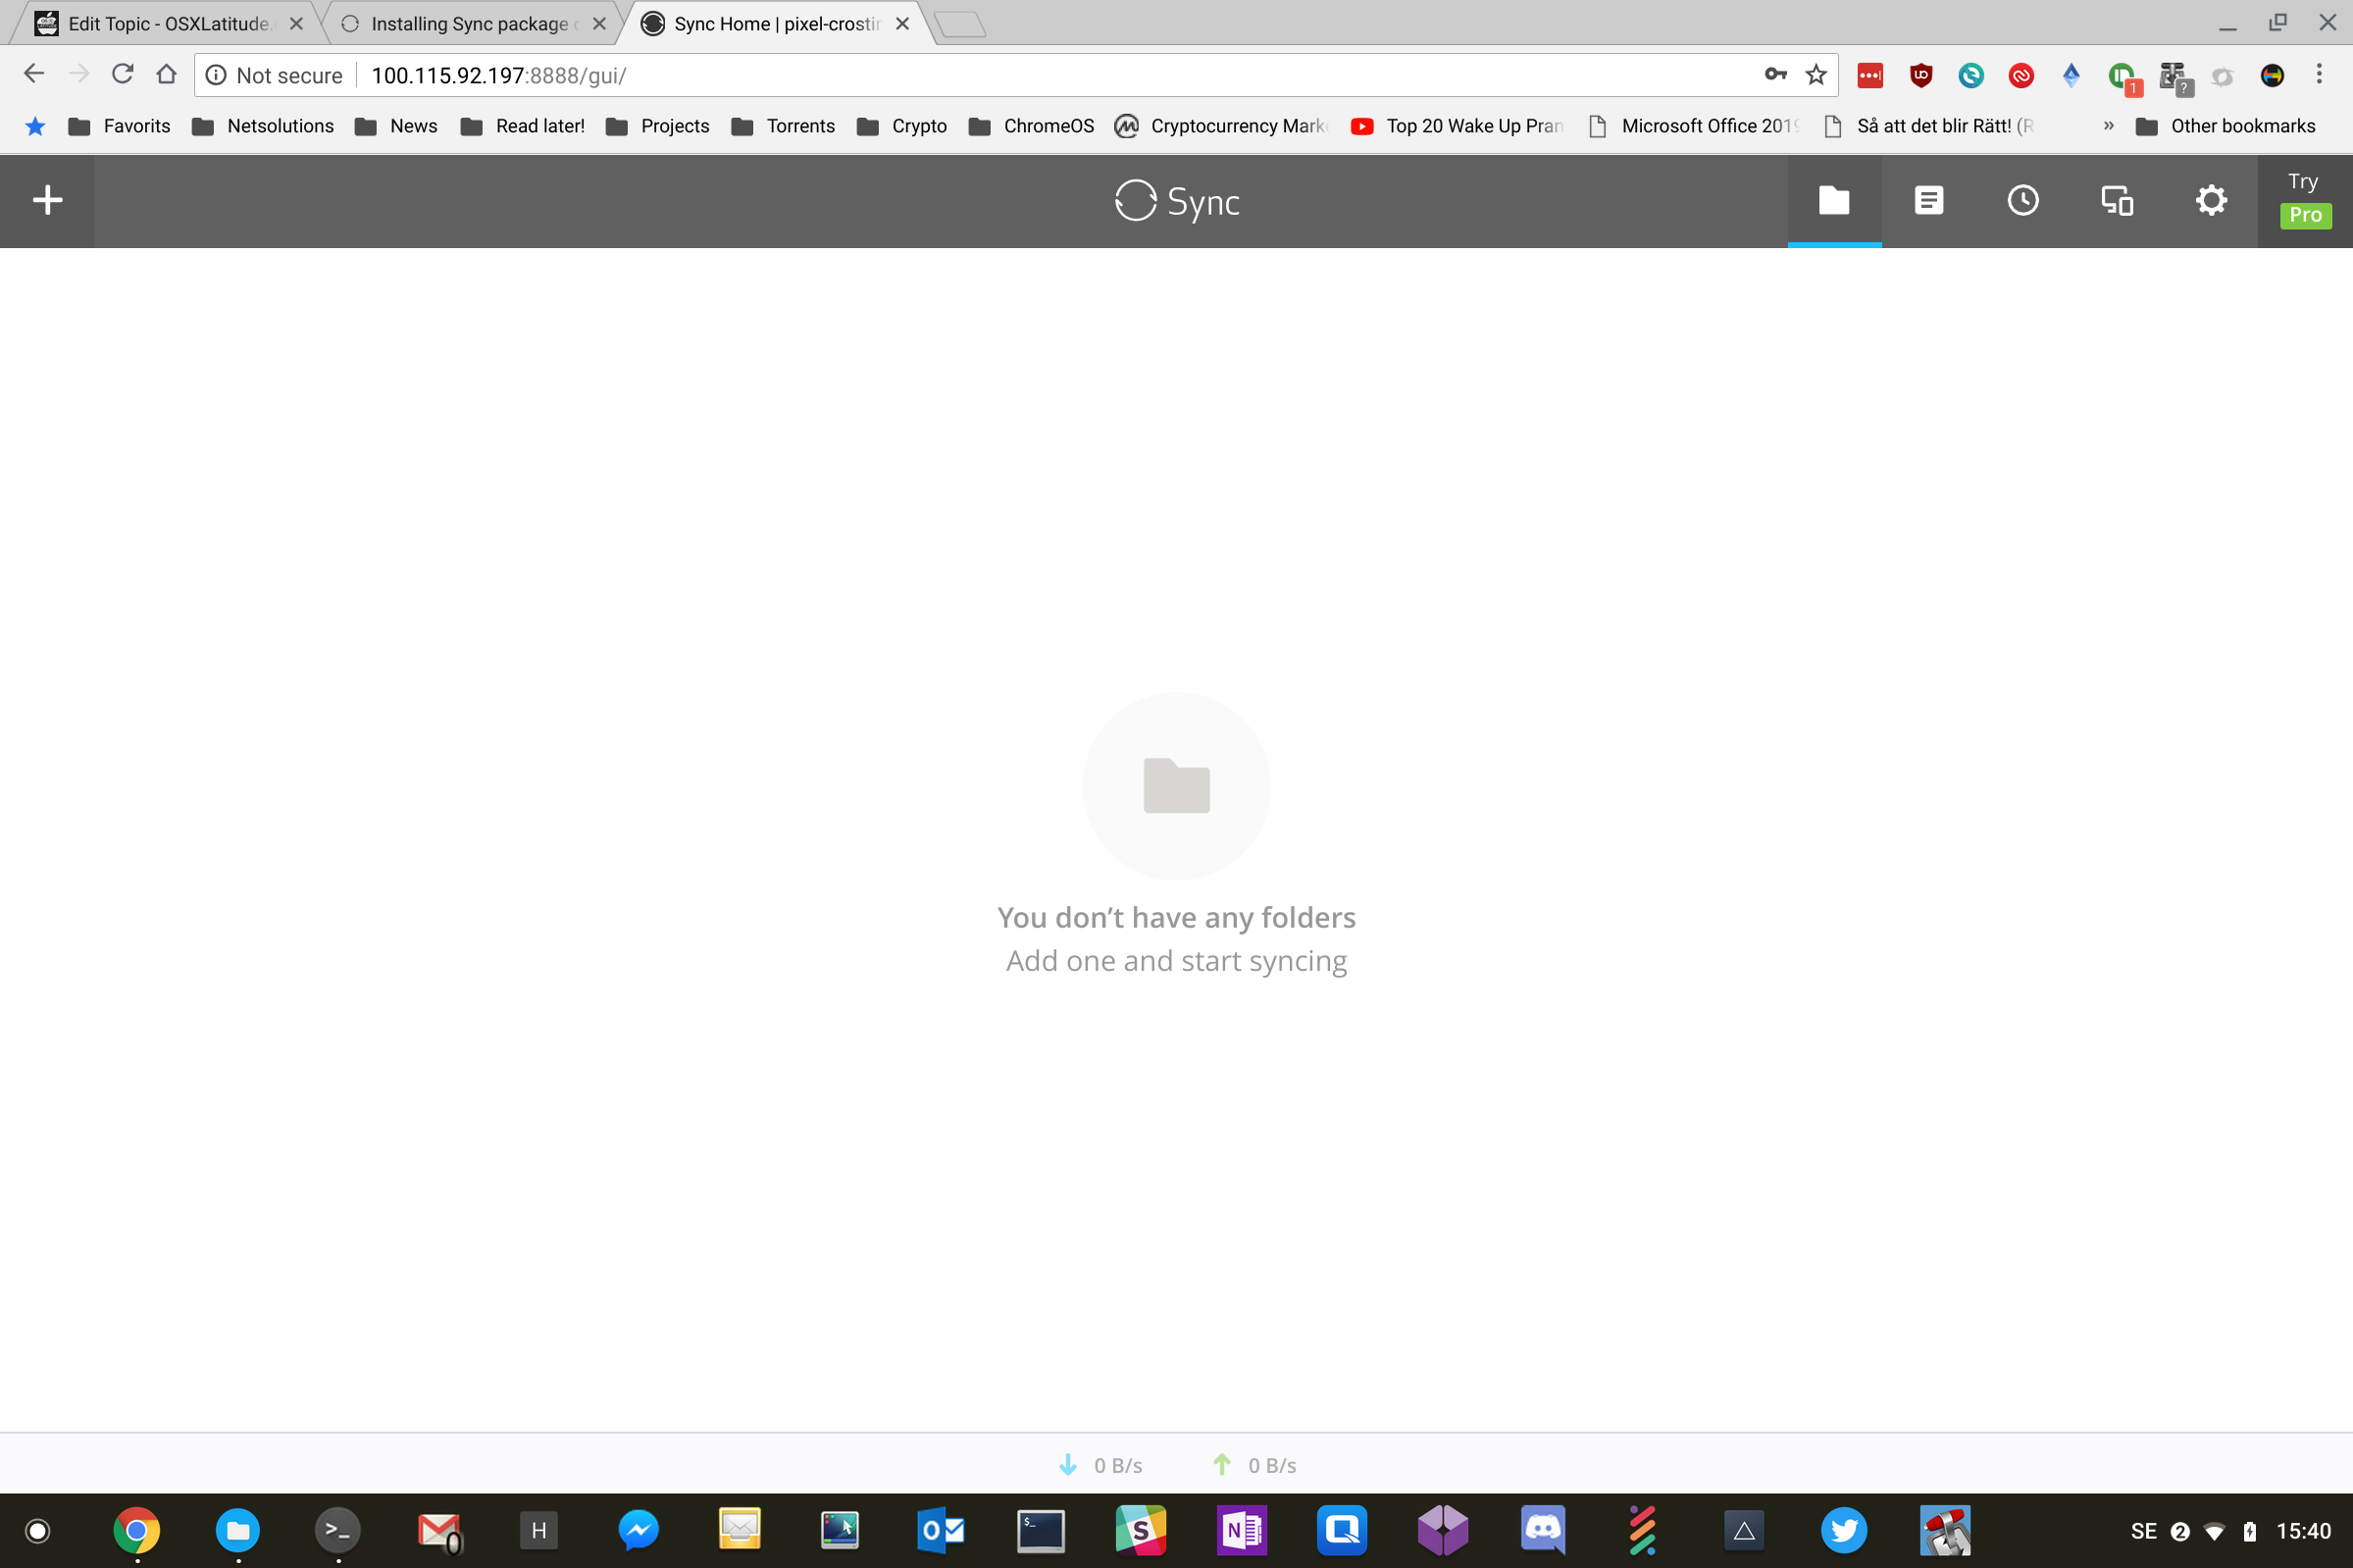
Hi, One of my favorite sync software is ResilioSync (former torrentsync) - its unique because its a real "mesh" sync - whereas others are essentially extremely centralized - in line with as much other - i dont like centralized systems. In this post we are going to discuss how you can install resiliosync in crostini - and more important - how you can manage it. Installation Resiliosync can either be installed via a DEB package (which for most users maybe is the most easy way to go around it) since is not in the default debian package tree - however - if you choose to go with a package tree installation you will also get updates.. so thats what we are going for here. Instructions for this is on: https://help.resilio.com/hc/en-us/articles/206178924-Installing-Sync-package-on-Linux - but for the sake of the arguement - i'll post them here also. Start by opening up a crostini console and change to root, type: sudo su Lets add the rep. to the package tree, type: echo "deb http://linux-packages.resilio.com/resilio-sync/deb resilio-sync non-free" | sudo tee /etc/apt/sources.list.d/resilio-sync.list Add public key with the following command: wget -qO - https://linux-packages.resilio.com/resilio-sync/key.asc | sudo apt-key add - Update packages index, type: sudo apt-get update; Install sync, type: sudo apt-get install -y resilio-sync ResilioSync is now installed.. but we need to configure it and figure out howto access it. First its important to find the IP address of your crostini - to my knowledge this IP is static and wont change... type: ifconfig In this case - you can see that my crostini IP address is: 100.115.92.197 - remember this ip address for later The configuration for Sync is stored in: /etc/resilio-sync/ Listing the files in there: root@penguin:/etc/resilio-sync# ls -la total 12 drwxr-xr-x 1 root root 92 Sep 12 13:19 . drwxr-xr-x 1 root root 2402 Sep 12 13:19 .. -rw-r--r-- 1 root root 174 May 23 16:42 config.json -rwxrwxr-x 1 root root 951 May 23 16:40 init_user_config.sh -rw-r--r-- 1 root root 193 May 23 16:40 user_config.json config.json is the file we are looking for - i will use "nano" to edit it with - if you dont have nano, install it with "apt-get install -y nano" Now lets edit the file and have a look at it, type: nano /etc/resilio-sync/config.json The standard config.json file looks like this: { Now its time to update / and add a few items.. like device_name, storage_path, listen, login and password... have a look at this: NOTICE: the storage path is for settings - not where you will actually sync folders to.. that will be decided via the webinterface Make your changes and save your file using CTRL+O Remember to create the primary storagepath folder.. in my case i use /home/leon/synced (since i can access /home/leon from the chrome OS files app) - i also chmod the folder in order to make sure sync can access it - there is properly a better way todo this, but its just me who is going to access it - so security is less important. root@penguin:/etc/resilio-sync# mkdir /home/leon/synced/ root@penguin:/etc/resilio-sync# chmod -R 777 /home/leon/synced/ Now that we have configured sync, its time to restart the sync application and access the webinterface. We'll do it like this: root@penguin:/etc/resilio-sync# /etc/init.d/resilio-sync stop [ ok ] Stopping resilio-sync (via systemctl): resilio-sync.service. root@penguin:/etc/resilio-sync# /etc/init.d/resilio-sync start [ ok ] Starting resilio-sync (via systemctl): resilio-sync.service. Open a web browser an goto: http://YOUR_CROSTINI_IPADDR:8888/gui/ .. follow the guide to setup the last things - if everything went ok you should have something like this on your screen: Congratulations - you now have ResilioSync on your chromebook and you can access it via your files app. Let the sync begin //Leon Notes: Make sure Resiliosync starts automaticlly (when you start crostini): Type: $ systemctl enable resilio-sync $ service resilio-sync start

-
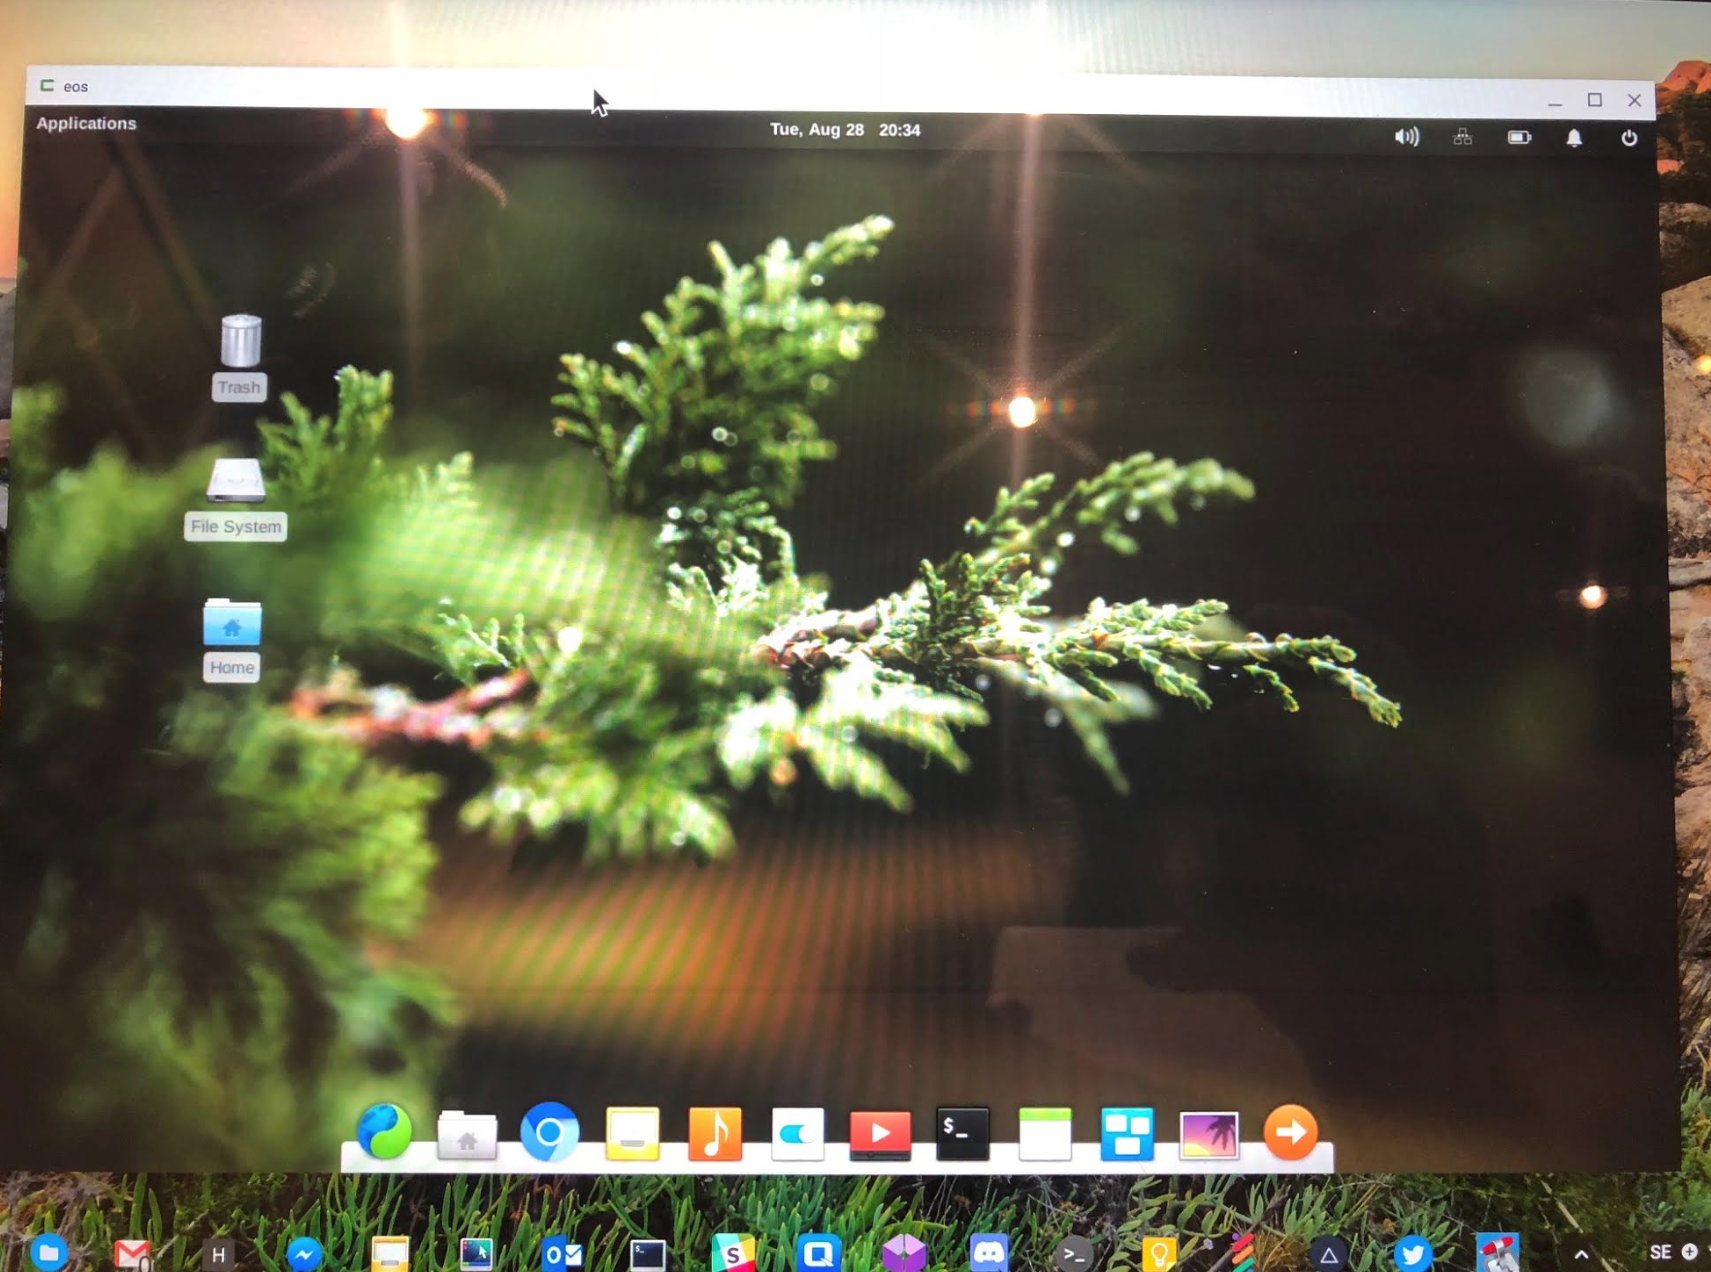
Hi, In a earlier thread we discussed howto make a good container for running Ubuntu 16.x with the unity interface - and while unity is a pretty sweet interface - Elementary OS might just suit us macOS geeks a tad better - sadly, no such target exists in crouton today and the solutions found on github for adding it dosent seem stable .. or well.. buggy at best. So, how now the best solution seems to install a standard ubuntu with xfce4 and modify it to suit our needs. I can't take the credits for making this guide - but i did put together a crouton backup that you can download directly from OSXL. Download link: http://files.osxlatitude.com/leon/crouton/eos-20180828-1804.tar.gz Quick restore guide: 0. As always, you need to be in developer mode, have crouton on your machine at have created atleast one machine 1. Download the file into your downloads folder 2. Open a console CTRL+ALT+T, change to shell and nagivate to your download folder 4. Now restore the container with: sudo edit-chroot -f /media/removable/your_path_on_drive_to_backup_file -r chrootname_of_your_choice 5. After restore, test to run it with "sudo startxfce4" 6. If it dident work to run it, try upgrading it with XIWI (notice that need to have the XIWI plugin installed in chrome for that to work) ... type: sudo sh ~/Downloads/crouton -t xiwi -u -n chroot_name_that_you_used_before If you did everything right you should get something pretty like this... btw.. user is "lsb" and password is "123123" ------ If you rather wanna do the hard work urself - just follow this guide: http://bobsbitsandbytes.blogspot.com/2013/09/installing-pantheon-theme-on-chromebook.html Enjoy!
-
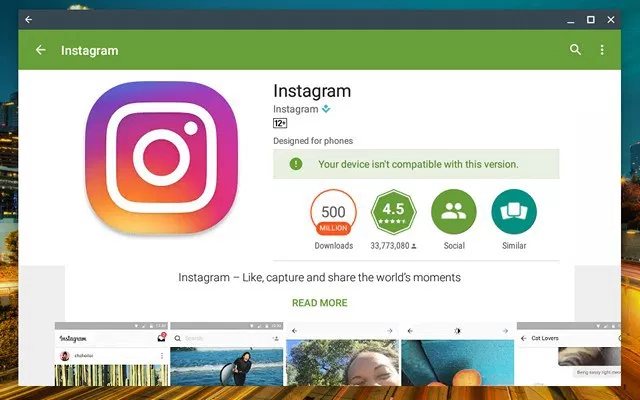
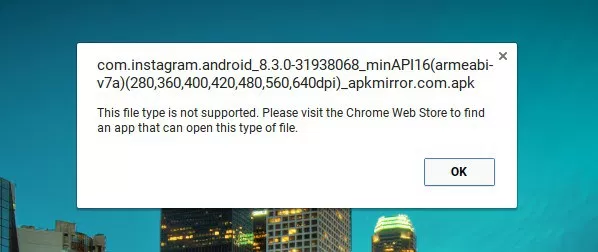
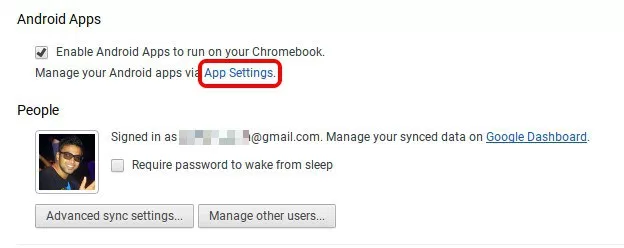
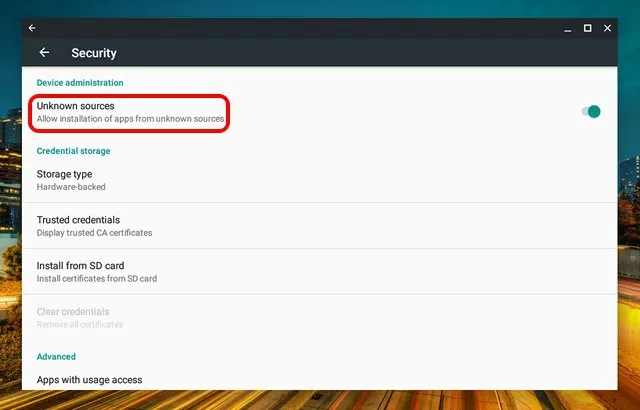
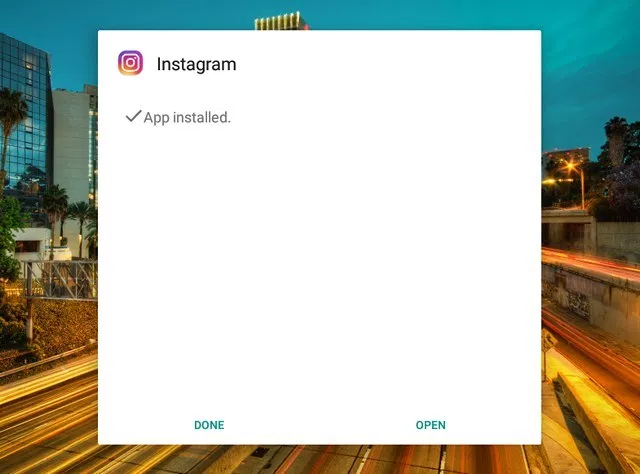
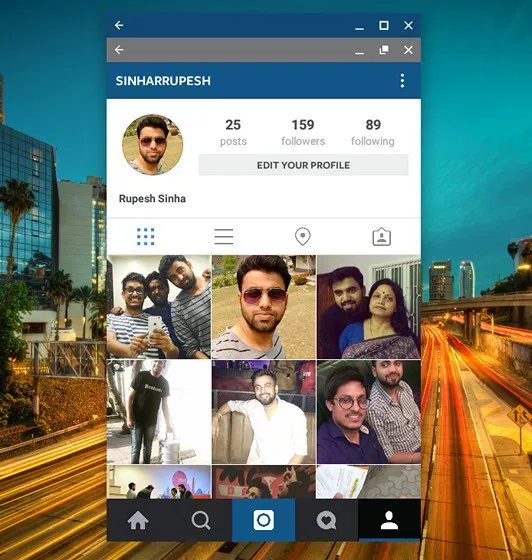
Orginal: https://beebom.com/how-to-install-android-apps-from-apk-files-on-chromebook/ Android apps coming to Chromebooks might very well be the defining moment for Google’s Chrome OS platform. In our usage of Android apps on Chromebook, we have found Chromebook’s functionality to have multiplied innumerably. However, there’s one catch, that is, many apps on the Play Store aren’t compatible with the Chromebook. For instance, apps like WhatsApp, Instagram, Uber, Inbox by Gmail, Chromecast, PayPal and more are incompatible because of various reasons like the fact that Play Store treats the Chromebook as an Android 6.0 tablet, the lack of GPS on Chromebooks etc. Thankfully, you can always sideload Android apps through APK files but Chromebook natively does not support these files. The good news is, there’s a way to install APK files on Chromebook and that’s what we are about to tell you. So, without further ado, let’s get on with it, shall we? Note: To install APKs, you will have to enable “Unknown Sources” and the option is only available on Chromebooks with developer mode enabled. To do it, check out our detailed post on how to enable developer mode on Chromebook. The Play Store is available on the Chrome OS 53 update through the developer channel and it’s only available for Chromebook Flip, as of now. So, before you try to install any APK files, check out our post on how to get Play Store. If you have the aforementioned Chrome OS build, here are the steps to install APK files on Chromebook: 1. Firstly, you will need a file manager Android app from the Play Store. So, open up Play Store and install the file manager you want. We used Solid Explorer in our test. 2. Then, download the APK files of apps you want to install from APKMirror.com. Meanwhile, go to Chrome OS Settings and click on “App Settings” in the Android Apps section. 3. The Android like Settings page should open up. Here, go to Security and turn on “Unknown sources”. 4. Once the APK file is downloaded, open the file manager app and go to the Downloads folder. Here, open the APK file and you should see the usual app installation interface from Android. Press “Install“. 5. The app installation might take a little longer than usual but the good news is, all the APKs we tried to install, did install without any fuss. Once the app is installed, tap “Open” to start using the app. Note: While most of the apps install via the APK files route, not all of them work. For instance, Instagram works fine but apps like Uber, which require location services don’t work.
-
Orginal: https://www.reddit.com/r/Crostini/wiki/howto/backup How to Backup Containers Performing routine backups is always a good practice, and containers are no exception. Currently, this process is not the most straightforward due to the locked down termina VM, so here's how you can protect your data in case you need to powerwash. Everything will assume working with the default penguin container when you enable Linux within Chrome OS settings. Backup We will use LXC/LXD's image management tools to create and export the image. Enter into the termina VM through crosh by pressing ctrl+alt+t in the Chrome browser. Then we must stop the container, publish it, export the image to a backup file, and put that file somewhere we can access it. The termina VM is extremely locked down and the only writable locations are /tmp and $LXD_CONF (/mnt/stateful/lxd_conf). Step 1: Stop Container An alternative way to stop container from the below instructions is to issue the command sudo shutdown -h now from within the container itself crosh> vsh termina (termina) chronos@localhost ~ $ lxc list +---------+---------+------+------+------------+-----------+ | NAME | STATE | IPV4 | IPV6 | TYPE | SNAPSHOTS | +---------+---------+------+------+------------+-----------+ | penguin | RUNNING | | | PERSISTENT | 0 | +---------+---------+------+------+------------+-----------+ (termina) chronos@localhost ~ $ lxc stop penguin --force (termina) chronos@localhost ~ $ lxc list +---------+---------+------+------+------------+-----------+ | NAME | STATE | IPV4 | IPV6 | TYPE | SNAPSHOTS | +---------+---------+------+------+------------+-----------+ | penguin | STOPPED | | | PERSISTENT | 0 | +---------+---------+------+------+------------+-----------+ Step 2: Publish Container (termina) chronos@localhost ~ $ lxc publish penguin --alias backup Container published with fingerprint: 8ff49b7f315b5253ec2c5a38c97567bb33d4bd16c957d903ace4d9d9b56e9ef9 Step 3: Export Image (termina) chronos@localhost ~ $ lxc image export backup $LXD_CONF/backup Image exported successfully! Step 4: Start Container (termina) chronos@localhost ~ $ lxc start penguin (termina) chronos@localhost ~ $ lxc list +---------+---------+------+------+------------+-----------+ | NAME | STATE | IPV4 | IPV6 | TYPE | SNAPSHOTS | +---------+---------+------+------+------------+-----------+ | penguin | RUNNING | | | PERSISTENT | 0 | +---------+---------+------+------+------------+-----------+ Step 5: Push Backup File Into Container Because of the locked down nature of the termina VM, we can't easily get at the file we just created so we will move it into our container's home directory where it will appear within the Chrome OS Files App. Note: you have to substitute "YOURUSERNAME" in the path below with the username in your penguin container. (termina) chronos@localhost ~ $ lxc file push $LXD_CONF/backup.tar.gz penguin/home/YOURUSERNAME/backup.tar.gz Alternate Step 5 Instead of simply pushing the file to the VM, we can mount the $LXD_CONF directory in our penguin container. This makes it much easier to use in the long run, saves on storage, and avoids the no space left on device error. (termina) chronos@localhost ~ $ lxc config device add penguin lxd-conf disk source=$LXD_CONF path=/mnt/lxd_conf This creates a directory inside the container at /mnt/lxd_config that contains all of our images. Use the mv command inside penguin to move the backup to your user directory and finally use ChromeOs's files app to move the backup somewhere safe! USERNAME@penguin ~ $ sudo mv /mnt/lxd_conf/FILENAME.tar.gz /home/USERNAME/FILENAME.tar.gz Copy the file out of your Linux Files in the ChromeOS File App and you are done! Step 6: Access your Backup File from Files App You can now open your Files App in Chrome OS, browse to Linux Files and access your backup file. Restore This section is in need of updating and isn't up to date with the above backup section. Feel free to take a moment and improve on it This is essentially the reverse of the backup steps. Once your archive is inside some "helper" container, we can pull it into the "/tmp" directory on the termina VM using the following: lxc file pull helper/tmp/backup.tar.gz /tmp We then import the image: lxc image import /tmp/backup.tar.gz --alias backup Finally we can create a new container using this image instead of the default Google image: lxc init backup penguin Issues With 4+ GB Images (or Anything Other Files) and Getting Them into Termina This sub-section was updated on 7/24/18 and is tested working on a Pixelbook running the Dev Channel Version 69.0.3473.0, in case this breaks later There are some odd issues with the way lxd works which end up making it difficult to import large files into Termina. Images can, however, quickly surpass this size, presenting obvious issues. Luckily, there is a process to get around this. First, you will need to use the split command to break apart your file into pieces smaller than 4 GB. To be safe, I will tell it to make 3 GB files. USERNAME@penguin ~ $ split -b 3GB backup.tar.gz backupSplit.tar.gz. This command will produce as many 3 GB files as needed to break apart all of backup.tar.gz into parts. (6GB = 2 files) The parts will have names backupSplit.tar.gz.aa backupSplit.tar.gz.ab backupSplit.tar.gz.ac ... backupSplit.tar.gz.zz. Then, use any method (see Alternate Step 5 above for my personal favorite method) to get the new 3GB files into termina. Once they are all there, we will use the cat command to recombine them. <useless nerd stuff> This command, short for catinate, is really interesting. It basically prints out the raw contents of any file in Linux, even those such as tar files that we wouldn't normally consider to have any raw content. This works because what split is doing is actually cutting the raw data at that point. These two tools, originally meant to work with text files and generally do totally different things, work together really well in this use case! Anyway, we can then use the linux commands > and >>, called append, to take the raw command line output output of catand add it to a file, as we'll see in a second. > just stores the would-be command line output to the file specified after the command while >> specifically appends the output to the end of the specified output. </useless nerd stuff> Method 1 We can do the recombination in a few ways. If it's just a few files, we can do it this way: (termina) chronos@localhost ~ $ cat backupSplit.tar.gz.aa > backupRecompiled.tar.gz (termina) chronos@localhost ~ $ cat backupSplit.tar.gz.ab >> backupRecompiled.tar.gz (termina) chronos@localhost ~ $ cat backupSplit.tar.gz.ac >> backupRecompiled.tar.gz This takes the raw content of the first file backupSplit.tar.gz.aa and puts it in backupRecompiled.tar.gz. It then appends the contents of backupSplit.tar.gz.ab and backupSplit.tar.gz.acto the end of that file. Method 2 If for some reason you have a stupidly huge backup that produces more than ~5 parts, you will want to do this in a better way. This better way is to use something of which I forgot the name (someone please correct me!), but basically acts as a for loop in this case. See below: (termina) chronos@localhost ~ $ cat backupSplit.tar.gz.?? > backupRecompiled.tar.gz This uses the question mark wildcards (??) to have the cat command run on all of the files starting with backupSplit.tar.gz. and ending with any two characters. I am listing both Methods 1 and 2 here is because 1) Method 1 is a better explanation of how these commands work and 2) Method 1 worked better for me (Method 2 should work and is the more elegant solution, but I guess it didn't feel like it on my system ¯\_(ツ)_/¯) After you have your full, recombined image in termina, proceed back up the section on restoring and start with lxc image import. Good luck with your data recovery!
-
Running Linux applications in ChromeOS certainly bring a bunch of great features to ChromeOS - but what applications are worth checking out ? - Here we'll maintain a index of the best and most useful. Note: So far - it seems like the applications that scales best to higher DPI (at least on my Pixelbook is Gnome optimized applications) Name Type Installation Notes Geary Mail client 1. Run apt-get install geary Works great Skype VoIP/Chat 1. Get from https://www.skype.com/en/get-skype 2. Run dpkg -i skypeforlinux-64.deb Gnome Software Center Repo 1. Run apt-get install gnome-software gnome-packagekit Needs a reboot LibreOffice Office 1. Run apt-get install libreoffice Change scaling to fit display Gimp Graphics 1. Run apt-get install gimp Great for advanced editing Pinta Graphics 1. Run apt-get install pinta Much like MS-Paint, easy to use Firefox Browser Read more here Firefox esr Browser 1. Run apt-get install firefox-esr Vivaldi Browser 1. Get from https://vivaldi.com/download/ 2. Run dpkg -i vivaldi*.deb (installation will fail) 3. Run apt-get -f install Iceweasel Browser 1. Run apt-get install iceweasel Resilio Sync Sync See this guide - Howto install resiliosync on Crostini Atom IDE 1. Get from https://atom.io/ 2. Run apt-get install atom-amd64.deb 3. Run apt-get -f install Deluge Torrents Run apt-get install deluge Great torrent client Visual studio code IDE 1. Download from https://go.microsoft.com/fwlink/?LinkID=760868 2. sudo dpkg -i <file>.deb 3. Run apt-get -f install Slack Chat 1. Download from https://slack.com/downloads/linux 2. sudo dpkg -i <file>.deb 3. Run apt-get -f install Brave browser Browser Follow guide on: https://community.brave.com/t/installing-brave-inside-crostini/47142 Crypto Currency tools Exodus wallet Crypto wallet Read more here Seems to run quite nicely Whats your favorite Linux applications ? - Leave a message
-
Hi there, By now you have properly heard the internet gossip of the latest buzzword in the chromeOS sphere - Crostini - but what it is. In a nutshell, it’s a way to run regular Linux applications on Chrome OS without compromising security or enabling developer mode. The (available for certain devices in canary channel) official setting states that it’s to “Run Linux tools, editors, and IDEs on your Chromebook.” Crostini is a culmination of several years of development that enabled the functionality to run securely enough to meet Chrome OS’s high-security standards. To understand why it’s only just appearing, it’s best to look at what came before. In this forum we will dig more into how it works, what applications is good - and which is not really suited - over time - we'll also have a look at the technicalities behind the scene. Enjoy! //Leon Other resources: - Reddit: https://www.reddit.com/r/Crostini/
-
Hi there, (this post is a bit of a my research notes - so it might be a long post) It happens now and then that i come across a Macbook with a dead GPU - so far the best solution is to patch the motherboard - but that itself can be pricey - let alone time costly - also - who wants to repair a 2011 macbook - that said - so lighting struck me - since the machine have 2 graphics cards (an intel and a AMD) - why not just disable the AMD Card ? In my first test i just removed the kexts.. that worked.. so.. so.. screen artifacts and genereally the machine was running extremely slow - something more was needed - the solution is to disable the GPU in NVRAM. Solution found here: https://apple.stackexchange.com/questions/166876/macbook-pro-how-to-disable-discrete-gpu-permanently-from-efi/196709?utm_medium=organic&utm_source=google_rich_qa&utm_campaign=google_rich_qa The key is to: sudo nvram fa4ce28d-b62f-4c99-9cc3-6815686e30f9:gpu-power-prefs=%01%00%00%00 So, to recap - what i did: 1. Removed the AMD kexts.. 2. Patched NVram Result: Machine boots into macos and feels quite normal.. HDMI dosent work.. but i can live with that - also, i fear that the NVram might get reset or kexts will zombie back after an update.. so i created 2x scripts. 1. /scripts/gpupatch.sh 2. /Library/LaunchAgents/com.user.loginscript.plist The combination of both will run gpupatch.sh on each boot, check if AMD drivers exists and remove them - and finally.. patch NVram.. my hope is that if something breaks i can just boot.. and reboot and it should work. Lets have a look at the files - first gpupatch.sh ------------ dt=$(date '+%d/%m/%Y %H:%M:%S'); sudo nvram fa4ce28d-b62f-4c99-9cc3-6815686e30f9:gpu-power-prefs=%01 echo "$dt - Patched GPU" >> /scripts/gpupatch.log if [ -d "/System/Library/Extensions/AMD10000Controller.kext" ]; then sudo rm -Rf /System/Library/Extensions/AMD10000Controller.kext echo "$dt - Removed kext AMD10000Controller.kext" >> /scripts/gpupatch.log fi if [ -d "/System/Library/Extensions/AMD7000Controller.kext" ]; then sudo rm -Rf /System/Library/Extensions/AMD7000Controller.kext echo "$dt - Removed kext AMD7000Controller.kext" >> /scripts/gpupatch.log fi if [ -d "/System/Library/Extensions/AMD8000Controller.kext" ]; then sudo rm -Rf /System/Library/Extensions/AMD8000Controller.kext echo "$dt - Removed kext AMD8000Controller.kext" >> /scripts/gpupatch.log fi if [ -d "/System/Library/Extensions/AMD9000Controller.kext" ]; then sudo rm -Rf /System/Library/Extensions/AMD9000Controller.kext echo "$dt - Removed kext AMD9000Controller.kext" >> /scripts/gpupatch.log fi if [ -d "/System/Library/Extensions/AMD9500Controller.kext" ]; then sudo rm -Rf /System/Library/Extensions/AMD9500Controller.kext echo "$dt - Removed kext AMD9500Controller.kext" >> /scripts/gpupatch.log fi if [ -d "/System/Library/Extensions/AMDFramebuffer.kext" ]; then sudo rm -Rf /System/Library/Extensions/AMDFramebuffer.kext echo "$dt - Removed kext AMDFramebuffer.kext" >> /scripts/gpupatch.log fi if [ -d "/System/Library/Extensions/AMDMTLBronzeDriver.bundle" ]; then sudo rm -Rf /System/Library/Extensions/AMDMTLBronzeDriver.bundle echo "$dt - Removed kext AMDMTLBronzeDriver.bundle" >> /scripts/gpupatch.log fi if [ -d "/System/Library/Extensions/AMDRadeonVADriver.bundle" ]; then sudo rm -Rf /System/Library/Extensions/AMDRadeonVADriver.bundle echo "$dt - Removed kext AMDRadeonVADriver.bundle" >> /scripts/gpupatch.log fi if [ -d "/System/Library/Extensions/AMDRadeonVADriver2.bundle" ]; then sudo rm -Rf /System/Library/Extensions/AMDRadeonVADriver2.bundle echo "$dt - Removed kext AMDRadeonVADriver2.bundle" >> /scripts/gpupatch.log fi if [ -d "/System/Library/Extensions/AMDRadeonX4000.kext" ]; then sudo rm -Rf /System/Library/Extensions/AMDRadeonX4000.kext echo "$dt - Removed kext AMDRadeonX4000.kext" >> /scripts/gpupatch.log fi if [ -d "/System/Library/Extensions/AMDRadeonX4000GLDriver.bundle" ]; then sudo rm -Rf /System/Library/Extensions/AMDRadeonX4000GLDriver.bundle echo "$dt - Removed kext AMDRadeonX4000GLDriver.bundle" >> /scripts/gpupatch.log fi if [ -d "/System/Library/Extensions/AMDRadeonX4000HWServices.kext" ]; then sudo rm -Rf /System/Library/Extensions/AMDRadeonX4000HWServices.kext echo "$dt - Removed kext AMDRadeonX4000HWServices.kext" >> /scripts/gpupatch.log fi if [ -d "/System/Library/Extensions/AMDRadeonX5000.kext" ]; then sudo rm -Rf /System/Library/Extensions/AMDRadeonX5000.kext echo "$dt - Removed kext AMDRadeonX5000.kext" >> /scripts/gpupatch.log fi if [ -d "/System/Library/Extensions/AMDRadeonX5000GLDriver.bundle" ]; then sudo rm -Rf /System/Library/Extensions/AMDRadeonX5000GLDriver.bundle echo "$dt - Removed kext AMDRadeonX5000GLDriver.bundle" >> /scripts/gpupatch.log fi if [ -d "/System/Library/Extensions/AMDRadeonX5000HWServices.kext" ]; then sudo rm -Rf /System/Library/Extensions/AMDRadeonX5000HWServices.kext echo "$dt - Removed kext AMDRadeonX5000HWServices.kext" >> /scripts/gpupatch.log fi if [ -d "/System/Library/Extensions/AMDRadeonX5000MTLDriver.bundle" ]; then sudo rm -Rf /System/Library/Extensions/AMDRadeonX5000MTLDriver.bundle echo "$dt - Removed kext AMDRadeonX5000MTLDriver.bundle" >> /scripts/gpupatch.log fi if [ -d "/System/Library/Extensions/AMDRadeonX5000Shared.bundle" ]; then sudo rm -Rf /System/Library/Extensions/AMDRadeonX5000Shared.bundle echo "$dt - Removed kext AMDRadeonX5000Shared.bundle" >> /scripts/gpupatch.log fi if [ -d "/System/Library/Extensions/AMDRadeonX6000HWServices.kext" ]; then sudo rm -Rf /System/Library/Extensions/AMDRadeonX6000HWServices.kext echo "$dt - Removed kext AMDRadeonX6000HWServices.kext" >> /scripts/gpupatch.log fi if [ -d "/System/Library/Extensions/AMDShared.bundle" ]; then sudo rm -Rf /System/Library/Extensions/AMDShared.bundle echo "$dt - Removed kext AMDShared.bundle" >> /scripts/gpupatch.log fi if [ -d "/System/Library/Extensions/AMDSupport.kext" ]; then sudo rm -Rf /System/Library/Extensions/AMDSupport.kext echo "$dt - Removed kext AMDSupport.kext" >> /scripts/gpupatch.log .. and now com.user.loginscript.plist <?xml version="1.0" encoding="UTF-8"?> <!DOCTYPE plist PUBLIC "-//Apple Computer//DTD PLIST 1.0//EN" "http://www.apple.com/DTDs/PropertyList-1.0.dtd"> <plist version="1.0"> <dict> <key>Label</key> <string>com.user.loginscript</string> <key>ProgramArguments</key> <array><string>/scripts/patchgpu.sh</string></array> <key>RunAtLoad</key> <true/> </dict> </plist> Yes - i could have done the script different and much simplar - but i wanted you to be able to see what files i removed. Comments welcome.
-
Love what the team have done - truly awesome
-
Hats of for Microsoft.. when they do updates.. they really do updates. -- What's new/changed in April update Start · Start now uses the Fluent Design Reveal effect in the apps list, on tiles and on the rail · Right-clicking on an UWP app will now show a quick link to Advanced Options for that app as "Settings" · Explorer, Music, Files and Pictures are now added to the Rail by default · The number of groups in the All apps list has been reduced by 29 and 36 for Chinese (Simplified) and Japanese respectively · On Pro for Workstation and Enterprise, the default apps have been changed to be more productivity-focused Cortana + search · If Cortana recognizes a book, shopping item, restaurant, recipe movie, TV show or other things, she will now prompt you to put it in a list · Cortana is no longer capable of providing proactive content · Cortana can now recognize your location to show location based notifications · Cortana will now suggest Activities to resume to · Your profile picture and controls to lock your account, log off or switch to another user are now visible within Cortana · The List and Collections features have been merged into the Collections app · Cortana now supports natural language compatibility for Spotify · Cortana Lists can no longer be accessed from the rail · The Cortana app profile page has been revamped · Skills in Cortana's notebook now come with tips Taskbar + Action center · Links like "Collapse" and "Clear all" now use your accent color in the non-colored Action center · Swiping with 2 fingers will now dismiss all notifications · When using a 12-hours clock, Action center will now use "AM" and "PM" instead of "a" and "p" · Notification Toasts that do not support being dismissed into the Action center will now show an X instead of an arrow · The language icon has been updated in the Input flyout to match the icon used on the touch keyboard · The app view for people in MyPeople is now a list instead of a grid · The Near Share-quick action has been added · Action center now uses reveal · The "Clear all" option has been renamed "Clear all notifications" · Timeline replaces Task View in the taskbar · Timeline has been added to show activities of apps that support it · Currently open apps are now shown on top of your timeline · Virtual Desktops has been relocated to the top of Timeline · The taskbar now uses an acrylic background · The Clock & Calendar, Volume, My People, Input and Share flyouts now use an acrylic background · When a toast is dismissed while writing content in its interactive fields, the content will now be saved and will stay accessible in the Action center · If a warning or alert is triggered by Windows Update, a new tray icon will appear to inform you of this · You can now drag-and-drop people to rearrange them in My People · People that aren't pinned to the taskbar can now also cause a pop in My People · My People will now suggest apps to install that support My People · The Reveal effect in the clock and Calendar flyout has been updated to make the day with focus appear lighter · The Focus Assist Quick Action is no longer a toggle but a multi-step button · The context menu now contains an option to remove everything from that hour or day from your Timeline · Timeline will only show 4 days of activity by default · Switching between the Focus Assist modus between priority online, alarms only or off can now be done again from the Action center context menu · The People flyout now uses the accent color when "Show accent color on Start, taskbar and action center" is selected in Color Settings User Interface · CalendarView now uses Reveal · The Reveal effect has been softened · The Network flyout on the lock screen has been updated from its Windows 8.1 look to allign with the Windows 10 version · When the touch keyboard is invoked or dismissed, it will now animate · Reveal now fully works in the Light · Animations for headers, pane opening and item selection has been added to NavigationViews · Border Reveal is no longer applied in ListView and TreeView · AppBarButtons now have a 2px margin between them File Explorer · The on-screen keyboard's colors have been inverted · The cloud state of files and folder in the Navigation Pane will now be shown there Microsoft Edge Edge 42 · Edge will be added as a shortcut on the desktop by default · A tab can now be muted by clicking the sound icon or from its context menu · "Extensions" has been renamed "Add more features" and move to the top of the ellipses menu · Address fields and other related fields can now be filled in automatically by Edge · Settings to manage form entries have been added to Advanced Settings · Text spacing settings have been added for Reading View · The active tab, address bar, favorites bar and "Find on Page"-bar are no longer acrylic · The title bar has been updated with a more transparent acrylic · The dark theme has been reworked with a darker UI · Buttons and lists in Edge's UI now use the reveal effect · Icons on the address bar will appear slightly smaller · Favorites in the favorite bar can now be set to not show their label individually · It is no longer possible to hide labels for all favorites at once · The favorites bar can now be hidden by right-clicking on it · Edge now supports Activities · Precision Touch Pads will now allow you to pinch-to-zoom or use two-finger panning to interact with websites in the same way a touchscreen would · The Hub is now wider and the sections are now displayed on the side instead of the top with their title in a collapsible view · Card information can now be saved and automatically filled in in the future and settings for this behavior have been added · A "Notes"-pop-over menu has been added to navigate between notes · Books can now show recommendations if the library is empty · You can now filter by expired rentals in the book library · The URL bar will now show the Books icon and title rather than the URI · Support for Audio Narrated Books with EPUB Media Overlays has been added · The Favorites Bar will now be enabled automatically if there is at least 1 favorite in it on Start and the New tab page independently from the "Show favorites bar" setting · You can now set Edge to never remember passwords for a certain domain · Auto-filling saved passwords is now supported in InPrivate mode · Extensions now work in InPrivate mode when set to do so · When opened with a mouse, the ellipses menu will now be smaller · When viewing a certificate, users can now show the certificate itself in a sidebar · In full screen-mode, the full Edge UI will now be available by moving your mouse to the top of the screen · "Clutter-free printing" has been added as a new option to the Print dialog, allowing you to remove ads · Dragging a website from the address bar to the Favorites bar will now show the favicon and name of the website · The last opened Reading List item now has a new design which uses Acrylic · Windows Defender Application Guard should now be lighter and faster · Widnows Defender Application Guard now allows you to download files to the host PDF + EPUB · Free EPUB books can now be saved · Books can now be removed, pinned or searched for in the Microsoft Store from the Book hub · Bookmarks for EPUBs and PDFs can now be edited within the same flyout · EPUB, PDF and Reading View has been redesigned with Fluent Design in mind · Go-to-page in the Seek bar has been updated to support PDF Page Labels and EPUB Page List · Reflowable EPUB books and Reading View for websites can now break the words on the page into syllables or highlight different parts of speech like nouns, verbs and adjectives · Books, PDFs and Reading View pages now work full-screen · Reading progress, notes, bookmarks and annotations will now roam faster to other devices voor books · General improvements to EPUB books and PDFs and Books when using a screen reader · You can now export and clear your book data F12 Tools · The tools can now be docked vertically EdgeHTML 17 · Support for Service Workers is now fully enabled, introducing support for offline web sites and push notifications · CSS backdrop-filter is now available · Subresource integrity is now available · The ANGLE Backend is now used for WebGL · Edge will now fire a Pointer Event with pointerType of "touch" when using Precision Touch Pad gestures · "Enable iterative drawing algorithm" has been added as an option enabled by default · "Enable OpenType variable fonts" is now enabled by default · Full support for CSS extensions for OpenType Font Variations · Support to use Notification API in extensions · Support for elements on HTMLFieldsetElement · Support for ping on anchor element about:flags · "WebGL Uses ANGLE Backend" has been added · "Enable OpenType variable fonts" has been added Internet Explorer · When using the Japanese touch keyboard, address bar suggestions will now show as you type rather than waiting for the candidate string to be committed Settings System · Sound has been added as a new page and allows you to change the volume, audio output device, microphone input device and test your microphone · You can now enable "Near Share" on the Shared experiences page and set its download location · The brightness of SDR content on a HDR display can now be adjusted under "Display" · Detailed information about your display can now be seen in "Advanced display settings" linked on the Display page · "Advanced display settings" shows information about your desktop resolution, active signal resolution, refresh rate, bit depth, color format and color space · "Advanced scaling" has been added under Display and allows you to enable "Fix scaling for apps" · When Windows detects an app that might have become blurry, a toast will be shown requesting to fix this · A top level link to Storage Settings has been added to free up space · "Free up space now" can now clean Windows upgrade log files, System created Windows Error Reporting Files, Windows Defender Antivirus, Thumbnails, Temporary Internet Files, Device driver packages, DirectX Shader Cache, Downloaded Program Files, Diagnostic data viewer database files and Delivery Optimization Files in addition to its previously available 4 categories · "Show suggestions occasionally in Timeline" has been added under Multitasking · "Quiet Hours" has been added as a new page · You can now set when Quiet Hours has to turn on automatically · Quiet Hours can now be set to turn on automatically in presentations, in full screen games or when you are at home · Apps and people that may break through Quiet Hours can now be set · A summary can now be accessed to see what you missed during Quiet Hours · Sound has been moved to the second place in the menu · A number of links to other sound settings have been added to Sound · "App volume and devices preferences" has been added under Sound and allows you to manage the audio input and output for each app individually · A link to System info has been added under About · Quiet Hours has been renamed Focus Assist · The Multitasking icon has been updated to reflect Timeline · "Graphics Settings" has been added under Display to allow you to choose the preferred graphics performance an app should have, with options for System default, Power saving and High performance · Volume icons will now show as muted when the volume is muted · Resetting the App volume and device preferences page will now also reset app specific volumes you've set back to default · Account Protection and Device Security have been added to About Devices · The font and size used in the handwriting panel can now be changed between Segoe UI, Segoe Print and Segoe Script · Options to enable multilingual text prediction has been added under "Typing" Network & Internet · You can now select a network for which to show the overview of used data · A data limit can now be set under Data usage · Background data can now be restricted in general or when roaming · A settings has been added to tell Windows to prefer Cellular data over Wi-Fi · Wi-Fi and Ethernet connections can now be set to have background data restrictions · Pinning the Data usage page to Start will now result in a Live Tile · The option to create a new HomeGroup has been removed Personalization · The number of people you can pin can now be changed from 1 and 10 or all people in the flyout in My People · Suggestions in the My People flyout can now be disabled · Fonts has been added as a new page to manage Fonts · Details about fonts have been added and you can now preview a font with your own string Apps · "Startup" has been added as a new page to provide settings for apps that should start at startup · UWP apps that are set to launch at startup will now show the tasks they are specified to do by their developer · Per-app app settings now will show all permissions the app supports · The publisher and version of the app is now shown in the app detail page · A link to battery usage, lock screen notification settings and default apps has been added to the app settings pages · An app can now be terminated and/or uninstalled from its detail page · You can now manage which execution aliases you want apps to be able to use · You can now set Windows to automatically adjust a video based on the lightning in your environment · You can now sort your startup apps · You can no longer set how video playback should work while on battery power · "Stream HDR video" has been enabled for more devices · You can now calibrate your display with built-in HDR video output with "Change calibration settings for HDR video on my built-in display" Accounts · When allowed, Windows will now repopulate Windows Spotlight and badges on the lock screen if the PC is at rest in on the lock screen · "Use my sign-in info to automatically finish setting my device after an update or restart" now affects startup of applications · Security questions and answers can now be added to local accounts to help with password recovery · On Windows 10 devices in S mode, you can now setup a PC with Windows Hello or PIN without a password · The "Use my sign-in info..." text has been updated Time & language · The default keyboard can now be changed independently from the display language · Enabling hardware keyboard suggestions can now be done from the Keyboard settings · The "Choose a language to install" UI has been revamped into a model instead of a full page · Each language entry now shows if it supports display, text-to-speech, speech recognition and/or handwriting · When installing a new language, the user gets the option to add additional usecases (like text-to-speech, etc.) and to set it as the display language · Language resources are now managed by the Microsoft Store, allowing them to be updated on a more regular basis · You can now change the behavior of the Emoji Panel to hide after selecting one emoji Ease of Access · The rail has been reorganized and now contains grouping headers · The descriptions for some settings have been rewritten · "Display" has been added as a new page with options to change the scaling of your primary screen, change the brightness, disable animations, disable transparency, disable the desktop background and the duration of a notification's visibility · Keyboard shortcuts are now shown under their relevant settings instead of at the bottom of the page for "Magnifier" · Background and window has been split up in "Change caption background" and "Dim window content" under "Closed captions" · Narrator's keyboard shortcut can now be disabled · Narrator can now be set to start automatically after login or before login for all users · The voice volume for Narrator can now be changed independently · Narrator can now let you hear voiced Narrator errors · Narrator can now be set to play an audio cue to confirm if an action was performed · You can now switch the Narrator cursor movement mode between Normal and Advanced · Narrator can now be set to sync the cursor and system focus · Narrator can now be set to read and interact with the mouse · You can now lock the Narrator keys to make sure you don't have to press them for each command · Under "Keyboard" it is now possible to disable the shortcut key for Sticky Keys, Toggle Keys and Filter Keys · Options to move faster when holding Ctrl and slower when holding Shift have been removed from "Mouse" · You can no longer set mouse keys when Num Lock is enabled under "Mouse" · The speech output for Narrator can now be changed under "Select audio channel for Narrator speech output" · Color options will now show a colorwheel to help you choose the right filter · "High contrast" and "Color" have been split up in their own pages · Color Filters now provides a description of the filter you're using · Narrator now allows to control the verbosity of text characteristics · Aduio has been added as a new page and allows you to change the volume, enable mono audio and show visual audio alerts · Speech Recognition has been added as a new page and allows you to enable Windows Speech Recognition · Eye Gaze Control has been added as a new page · Adds "Curser, pointer, and touch feedback" and moves cursor thinness, pointer size and color and touch feedback settings to this new page · The current Narrator settings can now be set to be used for login · The hotkey to send feedback when Narrator is running can now be set to Caps Lock + E · Under Audio, a new "Change other sound settings" link has been added to the classic sound settings · "Other options" has been removed · Under Display, it is now possible to disable automatically hiding scrollbars · Under Color filters, it is now possible to disable the color filters hotkey · "Cursor, pointer and touch feedback" has been renamed "Cursor & pointer size" · "High Contrast Black" is now the default High contrast theme · Help links have been added to Narrator to help you learn to use Narrator · Speech now includes information and settings for dictation, Cortana and Windows Speech Recognition · A number of "Related settings"-links have been added to Ease of Access Cortana/Search · Under "Notifications" a setting has been added to disable collection suggestions Privacy · "Activity history" has been added and contains all data Cortana uses for "Pick up where you left off" · "Documents", "Pictures" and "Videos" have been added as new pages under Privacy, allowing you to disable access to these 3 areas of your device on a per-app basis · Activity history can now be filter by accounts · Access to Account info, Contacts, Callendar, Call history, Email, Tasks, Messaging, Documents, Pictures and Videos can now be disabled on a system level, stopping anything from requesting these permissions · Win32 apps installed from outside the Microsoft Store are now also affected by the "Let apps use my camera hardware" setting · Windows Camera is no longer hidden from the list of apps that can use your camera · You can now choose if Windows should sync your activities with the cloud, this enables a 30 day history in Timeline · Under "Diagnostics & feedback" you can now find a setting to enable data viewing · A button has been added to downoad and open Diagnostic Data Viewer ○ You can now view your diagnostics data by event ○ Diagnostic events can now be searched through ○ You can now filter on category · Privacy has been split in "Windows permissions" and "App permissions" subsections · "File system" has been added as a new page to allow apps access to your file system · You can now delete all Diagnostic data from "Diagnostics & feedback" · The user dictionary can now be viewed under "Speech, Inking & Typing" Update & Security · The bandwidth used by foreground downloads can now be limited for Windows Update and Microsoft Store updates · "View installed update history" has been moved to the bottom of the Windows Update page · The description explaining how Windows Update works has been removed · "Options for restarts" has been removed from Windows Update · Windows Update now shows an additional button with more restart options when an update is waiting for a reboot to install · Windows Update will now show a longer message when your device is up-to-date as well as a link to see what's new · "Windows Defender" has been renamed "Windows Security" · Windows Security now list protection areas and direct links to their pages in the Windows Defender Security Center including Virus & threat protection, Account protection, Firewall & network protection, App & browser control, Device security, Device performance & health and Family options · On a PC with AC power, Windows Update will keep an inactive PC from going to sleep for 2 hours when installing an update General · The Settings home page has been rearranged into a horizontal grid · The rail now uses an acrylic background · Improved search strings to find more relevant results · General improvements to settings to help Narrator navigate between search, the navigation list and the main landmarks, headers will no longer be seen as at the bottom Gaming · Game Mode settings can now be reset with the "Reset Game Mode Settings"-setting · Game Bar has been redesigned with support for the dark and light theme · Game Bar now gives quick access to your captures, toggle your microphone and camera and edit the title of your Mixer stream · Game Bar settings has been made easier to use · A clock has been added to the Game Bar System · An extended user-mode API for third-party virtualization stacks and applications to create and manage partitions at the hypervisor level, configure memory mappings for the partition and create and control execution of virtual processors has been added · When a Bluetooth device is ready to pair and is detected in range, Windows will show a notification to connect to it · Ultimate Performance has been added as a new power scheme for Pro for Workstation and Enterprise devices · When forcing a shutdown by holding the power button, Windows will show a message and collect data before shutting down · It is now possible for enterprises to run custom actions during feature updates · It is now possible for enterprises to run post rollback scripts · The OOBE privacy settings have been revamped with every setting now having its own page · Support for the High Efficiency Image File Format has been added Accessibility · It is now easier to scroll with Eye Control · Direct right and left click has been added to the Eye Control launchpad · Start, Timeline, Settings and Device calibration has been added to the Eye Control launchpad · You can now hide the launchpad · Narrator is now available when entering save mode via msconfig.exe Language and input · The on-screen keyboard now uses an acrylic background · The full on-screen keyboard is now available for all languages except Korean, Japanese, Traditional Chinese and Simplified Chinese · Reorganized the handwriting panel options · Improved re-recognition of words when writing a letter on top of another · Words can now be split in the handwriting panel by drawing a vertical line where it needs to split and will provide space to write in between the words · The Japanese IME can now provide text suggestions from AI chatbot Rinna · The hardware keyboard can now also show text suggestions · Shape-writing is now enabled on the wide keyboard · The gesture to add a space in-between letters on the handwriting panel has been changed to a carrot · The handwriting panel will now commit written text by drawing an angle of 90° · Improves the button layout for Chinese Simplified Handwriting · The on-screen keyboard's buttons now use Acrylic and are once again lighter than the background · New and improved recognition of words to provide better emoji predictions in Arabic (Saudi Arabia), Danish (Denmark), German (Germany), Greek (Greece), English (Great Britain), Spanish (Spain), Spanish (Mexico), Finnish (Finland), French (France), Hebrew (Israel), Hindi (India), Italian (Italy), Dutch (Netherlands), Norwegian (Norway), Polish (Poland), Portuguese (Brazilian), Portuguese (Portugal), Russian (Russia), Swedish (Sweden), and Turkish (Turkey) · The emoji panel will no longer close after inserting one emoji · The Tamil keyboard has been added · Updates the Sinhala and Myanmar keyboards for more comprehensive ways of inputting sequences · Improved input of compositions on the Amharic keyboard · The Amharic keyboard will now insert Amharic script directly instead of English letters with predictions · The Emoji Panel is now supported in 190 locals, with 152 supporting tooltips · The data behind the emoji panel has been revamped further to include more words · Hardware keyboard suggestions now respect your theme color · The on-screen touch keyboard now supports the split layout for all languages except Korean, Japanese and Chinese (Simplified) · The standard touch keyboard layout is now available for Japanese, Korean, Quick and ChangJie for Traditional Chinese · When pausing after using the split gesture in the handwriting panel, the space will now close again · The shift key on the touch keyboard will now stay visually pressed when double tapped to indicate caps lock is engaged · The full touch keyboard now supports keyboard shortcuts that contain 3 keys · The dictation UI has been updated · The Embedded Handwriting Panel is now available · Improved handwriting recognition with Hindi support · The on-screen keyboard will now dynamically switch between the 3 first languages set on the device · Text Prediction has been added for Assamese, Bashkir, Belarusian, Greenlandic, Hawaiian, Icelandic, Igbo, Irish, Kyrgyz, Luxembourgish, Maltese, Maori, Mongolian, Nepali, Pashto, Sakha, Tajik, Tatar, Tswana, Turkmen, Urdu, Uyghur, Welsh, Xhosa, Yoruba and Zulu · Search in the emoji keyboard has been enabled for more than 150 locals · If shapewriting is not supported, the shapewriting trail will no longer be visible Apps · The Web Media Extensions pack for Edge is now a default app, adding support for OGG Vorbis and Theora Control Panel · Options to manage HomeGroups have been removed · "Clock, language and region" has been renamed "Clock and Region" · Settings to change the input methodes and managing languages have been removed Microsoft Store · Fonts can now be downloaded from the Store Paint · A warning has been added to Paint to alert users that the program will be removed from Windows in favor of Paint 3D and be made available through the Store Snipping Tool · Snipping Tool now has an "Edit in Paint 3D" button Task Manager · When a process is suspended or has a suspended child process, an icon will be shown in the Status column of the Processes tab Windows Defender Security Center · Windows Defender Application Guard is now available on Windows 10 Pro · The context menu in the system tray now allows you to do a quick scan, update Defender definitions, change the notifications and open Windows Defender Security Center · Windows Defender systray icon now uses a modern context menu · The Home heading has been updated to say "Security at a glance" · Under "Virus & threat protection" the "Quick scan" button has been renamed "Scan now" and "Scan history" has been renamed "Threat history" · Controller folder access settings have been moved to their own page named Ransomeware protection · Account protection has been added with links to connect to a Microsoft Account and to setup Windows Hello and Dynamic Lock · Device Security has been added with options to enable Memory integrity and options to manage processor security · You can now let Windows Defender Security Center alert you when there are problems with Dynamic Lock under Settings Windows Subsystem for Linux · WSL can now be configured to some extend with wsl.conf · AF_UNIX allows for socket connections between Linux processes on WSL and Windows native processes · NTFS has a new flag to set on directories to indicate all operations in those directories should be treated as case sensitive Other features · Pressing Ctrl + Shift and then Ok in the Run dialog will now launch the application elevated · The Share dialog box now contains Near Share which allows you to share files and urls over Bluetooth · The properties-window of an executable file now allows you the change the behavior for overriding the system DPI · WSL processes that set themselves up to run in the background will now keep running after closing the last console window · WSL processes that require elevation and that do not require it can now run at the same time · WSL is now supported over OpenSSH, VPN, Enter-PSSession and/or other Windows remoting tools · Wslpath has been added as a new tool to convert Linux paths to their Windows equivalents · Windows Command line Toolchain with bsdtar and curl are now available in Windows · Unix style sockets (AF_UNIX) are now available on Windows · Support for Work Folders with Files-on-Demand · Get-DeliveryOptimizationLog has been added to the available PowerShell cmdlets to retrieve decoded logs for Delivery Optimization · If an UWP app requires access to your pictures, videos or documents it will now have to ask for permission · Setting up Windows Hello Face, Fingerprint or PIN unlock can now be done from the lockscreen · "Update and shutdown" is now an option if updates are bending to install once more And further · Upgrades will now remember to disable hibernate and Fast Startup · Yu Gothic Bold got improved with a consistent baseline alignment and improved clarity of various Kana characters · Introduces a number of new policies to manage Delivery Optimization · Hive data is now stored in the Registry process · Localizations can now be found in the Microsoft Store · Improved reliability for Near Share · Full support for Adobe-style OpenType Variable Fonts · Windows 10 S users will see their PC run in "Windows 10 Pro in S Mode" · A number of emojis have been updated for a more consistent design · Bluetooth mice should now perform better when the system is under load
-
Hi, Sometimes i tend to mess with other stuff than just macs - having bought a Pixelbook lately (i5) and ended up upgrading that to the i7 model i decided it was time to play a bit with crouton - read more here: https://github.com/dnschneid/crouton Anywhere - here is a small guide for making Ubuntu-unity running great.. i will keep it updated over time. First make sure that your machine is in Developer mode – if you don’t know how – Google it. Open a new shell using CTRL+ALT+T – type "shell" to enter a linux shell Download the latest crouton from https://goo.gl/fd3zc Navigate to the downloads folder and run: "sudo sh ~/Downloads/crouton -t unity-desktop -n unity" to start downloading/installing Ubuntu-unity As per the time of writing it will download Ubuntu Xenial - you can easily change "unity-desktop" to another interface.. use "sh ~/Downloads/crouton -t list" to get a list of interfaces. The "-n" switch defines the "name" of the installation - if not defined it will use the name of the ubuntu distro.. but by giving it a name you can have several distros/interfaces. Once its done, you can start unity by running "sudo startunity" - however – lets tweak it a bit and install Xiwi – Xiwi allows you to run Ubuntu both full screen or in a Window – however – on the negative side you wont get graphic acceleration Start by installing the chrome Xiwi extention – Head over to: https://chrome.google.com/webstore/detail/crouton-integration/gcpneefbbnfalgjniomfjknbcgkbijom - and install it. Now type: sudo sh ~/Downloads/crouton -t xiwi -u -n unity Like before you can now use "sudo startunity" to start Ubuntu.. Use the fullscreen on the keyboard to switch between full screen and window mode – on some systems you might even get a black screen to begin with – it will work fine in fullscreen if you goto window mode and back again. There is plenty of switches for xivi and crouton to play around with - a good page to bookmark is: https://github.com/dnschneid/crouton/wiki/Crouton-Command-Cheat-Sheet Notes: Terminal seems to be broken – use xterm to install an alternative terminal emulator such as konsole.. Run "apt-get install konsole" - on a pixelbook the text font in konsole might need a bit of tweaking Sleeping the chromebook seems to crash Unity
-
Attachments was stored as part of the forum - but i think we got most
-
Hi, As you probably have noticed the site is messed up - our former hostmaster had a crash and we had to recover a lot of data and move to a new host. It's an ongoing process - but it's gonna take some time.. OSXL is no little site - it's actually approaching 30gb What will happen now is: 1. Migrate the site and recover missing files from backup 2. Fix errors 3. Upgrade to latest IPboard Right now we are running on an older php version because IPboard doesn't support PHP 7, that also means we have no opcode cache so the site is pretty slow. That will all be fixed and we are working as fast as we can. //Leon
-
Hi, I know that some of you have been wondering for a long time what's going on - not many news coming from the team - and you have properly been wondering - what's going on .. is the team dead. Nope, not entirely - we just enjoyed a long needed break. Many years have passed since we started OSXLatitude - and while most of us back then most likely had a lot more time - time changes.. we grow older (and uglier *hint hint mario*) - but this dosen't mean that OSXL is dead - thanx to all of you - all of you amazing users that have keep the site alive - we have decided to give OSXL a much needed facelift - on all fronts. During the next couple of months we will be renewing all fronts of OSXL.. and we are reviewing all ideas... here are a few... 1. New Site design 2. New version of EDP 3. Community cryptocurrency coin 4. New features and services ... and much .. much more.. so for those of you who thought the OSXL team is dead.. that's far from the truth.. So keep an eye on the site. Cya around Leon
-
Hi, I lately ran into a problem with some Lacie 2Big Network v2 NAS units and had to restore the firmware onto the disks - for those who dont know - these damn units have the firmware on the actual disks and not in a ROM (ARGHHHH!!!!) - and speaking with Lacies support is jumping out an airplane and hoping it wont hurt.. it will.. trust me. Anyway, after some (alot) of Googling i found the solution, but it was bits here and there and nothing that really got the job done fully - so... hopefully this post will help out people. First of all.. some reference points: - http://lacie.nas-central.org/wiki/Installing_firmware_on_fresh_disks_(2Big_2)(the big one, but not the entire solution) Cache copy: https://web.archive.org/web/20180210210928/http://lacie.nas-central.org/wiki/Installing_firmware_on_fresh_disks_(2Big_2) YOU NEED TO READ THE ABOVE LINK BEFORE GOING ON Requirements: a. A 2Big Network v2 NAS (other models might be supported as well) b. A machine running Ubuntu (or some other debian based linux) c. 2x Disks of the same brand/model/size ... others might work as well d. You have downloaded all of the files attached to this post. How-to: 1) Start by connecting the first disk via USB to your Linux machine and run "fdisk -l" to find out the device path .. in my case its /dev/sdd 2) Init the disk by running: gzip -dc //mbr+label.gz | dd of=/dev/sdd (Take a moment to understand what we are doing there) 3) Now we need to fire up fdisk to recreate the partition scheme (Run: fdisk /dev/sdd) - mine looks like this: Device Boot Start End Sectors Size Id Type /dev/sdd1 63 4016249 4016187 1.9G 5 Extended /dev/sdd2 4018176 1953525167 1949506992 929.6G fd Linux raid autodetect /dev/sdd5 126 514079 513954 251M fd Linux raid autodetect /dev/sdd6 518144 620543 102400 10M 83 Linux /dev/sdd7 622592 724991 102400 10M fd Linux raid autodetect /dev/sdd8 727040 2365439 1638400 500M fd Linux raid autodetect /dev/sdd9 2367488 4005887 1638400 1200M fd Linux raid autodetect After you have created the above config, its time to run some commands on the disk. This is how it looks like (get a copy in step2.sh): (IMPORTANT: If your disk is called anything else than /dev/sdd you have to change that in the below lines) echo -------- preparing raid arrays -------- echo -- Fixing /dev/sdd5 - swap mdadm --create /dev/md0 --level=1 --raid-devices=2 /dev/sdd5 missing --metadata=0.90 mkswap -f /dev/md0 mdadm --stop /dev/md0 echo -- Fixing /dev/sdd7 - initfs mdadm --create /dev/md0 --level=1 --raid-devices=2 /dev/sdd7 missing --metadata=0.90 mke2fs -j /dev/md0 mkdir /tmp/md0 mount /dev/md0 /tmp/md0 cd /tmp/md0 tar xzf /home/lsb/Desktop/lacie/sda7.tgz cd .. umount /tmp/md0 mdadm --stop /dev/md0 echo -- fixing /dev/sdd8 - ro layer rootfs mdadm --create /dev/md0 --level=1 --raid-devices=2 /dev/sdd8 missing --metadata=0.90 mke2fs -j /dev/md0 mount /dev/md0 /tmp/md0 cd /tmp/md0 tar xzf /home/lsb/Desktop/lacie/sda8.tgz cd .. umount /tmp/md0 mdadm --stop /dev/md0 echo -- Fixing /dev/sdd9 - rw layer rootfs mdadm --create /dev/md0 --level=1 --raid-devices=2 /dev/sdd9 missing --metadata=0.90 mke2fs -j /dev/md0 mdadm --stop /dev/md0 echo -- Fixing /dev/sdd2 - data partition mdadm --create /dev/md0 --level=1 --raid-devices=2 /dev/sdd2 missing --metadata=0.90 mkfs.xfs -f /dev/md0 mdadm --stop /dev/md0 echo -- Fixing /dev/sdd6 - kernel gzip -cd /home/lsb/Desktop/lacie/sda6.gz | dd of=/dev/sdd6 ... now repeat the above on disk2, pop in the disks, start your NAS and you sound see it come online again. Hope it helps somebody out there from alot of headaches. Files: - http://files.osxlatitude.com/leon/Lacie/lacie1.zip
-
Hi, The other day i decided to setup a small hummingboard as a btsync server - following several guides online and using their own package tree it installed without issues. However, launching "btsync" would cause several issues (aside from configuration issues). Launching the binary gave a "No such file or directory" .. that means its either compiled wrong or missing some lib. So.. lets have a look at the file $ file btsync - Showed me that it was right platform $ hexdump -C btsync | less 00000150 04 00 00 00 2f 6c 69 62 2f 6c 64 2d 6c 69 6e 75 |..../lib/ld-linu| 00000160 78 2e 73 6f 2e 33 00 00 04 00 00 00 10 00 00 00 |x.so.3..........| Intersting... $ ls -l /lib/ld-linux.so.3 ls: cannot access /lib/ld-linux.so.3 No such file or directory Allright.... $ sudo ln -sf /lib/ld-linux-armhf.so.3 /lib/ld-linux.so.3 Now lets try and lauch btsync again... $ ./btsync BitTorrent Sync forked to background. pid = 3666 PROFIT!!
-
No problem, Leon. I truly was baffled by the reaction - it happens everyday, usually due to a third party theme. It was never a big deal until ... it was made into one. Glad we could move forward from this and I'm sorry you misunderstood our position. Past is the past, indeed. Thank you for taking the time to follow up. Regards, Lindy Throgmartin Management Team Just got that mail.. i think we should agree that its a settled score and we now try and move forward - both sides mades mistakes - i could have been forthcoming also - tried harder to reach a settlement - but in the end i think we managed to land a good agreement. Again - i am so proud that in the time of need - our users - you - choose to stand with us - not just for the money - but for the encouragement - and its in situations like this that i am reminded why we founded OSXL - because we wanted to create a community where we work together, stand together and are a part of something bigger Cheers everyone.
-
UPDATE: While we havent recieved an offical word from IPB - we have recieved a payment notification (even with a small rebate) to offically remove the copyright notification. I want to thank everyone who have donated to make this happen - i am happy to say that OSXL remains online and ads free forever. We are still counting coins - but with the money that came in we are even able to renew the license for the software. From whatever is left, i suggest the following options: 1) Add the IP:Chat to OSXL - Yes, you will be able to chat with each other 2) Donate them to other projects whoms technology we all benefit from 3) Make online video of Bronxtech and Herve get drunk ? *bad humor warning* Again, i want to extend my... our.. gratitude for everyone who took their time and money to make this happen... you all rock! - and you have my promise i will do my best make OSXL the best site for you i can. ------- Ps. If anyone would pref. to get their donated money back instead - please send me a PM.. its not alot left.. but some is - and i have no intention of keeping them myself - otherwise they will goto the running cost of the site.
-
Good news x2 We have reached the 500$ mark ... and even a bit over - _AND_ seems like IPB have accepted the deal. I have yet to hear from him - but i guess i will get a letter from him sooner or later.
-
Use paypal
-
Hi Mark, That "She" happens to be a "He" who also happens to be the CEO of the company - sadly. If they choose not to accept the offer that i have sent them - then we do have a few options. 1) Logically we will have to find some other software, there is both free.. and not so free options 2) We'll have to migrate all data over there Basiclly - and this is said thruthfully - i dont give a damn about american laws - i live in EU - we have our own (hell) to deal with over here. And when it comes to choosing between our users and some CEO in USA - then its a pretty choice to. I asked him simple questions and reached out for a solution.
-
Calagan, in some way i can agree with you - but i am still left with "why now??" - they have upgraded our software plenty of times, we have used this theme for quite a long time - why wait until now ?