


v3ct0r
-
Posts
383 -
Joined
-
Last visited
-
Days Won
24
Content Type
Profiles
Articles, News and Tips
Forums
Posts posted by v3ct0r
-
-
Just tried -f again, I get stuck at the same point, but this time I have more text.
When you boot, do you boot to the Flash Drive, and then select the Hard Drive you installed Mavericks on?
Or do you boot straight from the Hard Drive?
-
Hey Guys,
Thanks for the Guide Patel!
At first I was having some issues with getting into setup

To get around this I used -x as mentioned previously.
Now I have Mavericks completely installed, but can only ever boot using -x. This is the error I get
Any ideas??
Can you boot with -f?
-
Do you have Intel our Nvidia graphics?
I have Intel integrated HD graphics.
Did you remove the AppleIbtelHDGraphics.kext and AppleIbtelHDGraphicsFb.text ?
-
Do you have Intel our Nvidia graphics?
-
I guys sorry for the Haidas i was so distracted plus recently moved. Still not settled in yet...Hate moving!!!
I noticed the Mav guide is for Nvidea whats up with intel GPUs
Hervé thought it was best to change it to Nvidia only, but I will change it back ASAP...I've just been too busy to get to my computer recently
-
Its an intel graphics inside
Patel's guide very clearly stipulates it applies only to the nVidia model... Can't you guys read at all? It really is frustrating to try and give people good support when they don't even make the effort to read instructions!
I would like to change the Nvidia only title, seeing as the only real modification necessary to make the Intel graphics work is the removal of two kexts...just haven't gotten around to it yet
-
Its an intel graphics inside
There's the problem!
Try removing AppleIntelHDGraphics.kext and AppleIntelHDGraphicsFb.kext from /System/Library/Extensions
-
Where does it hang (boot with -v to find out)?
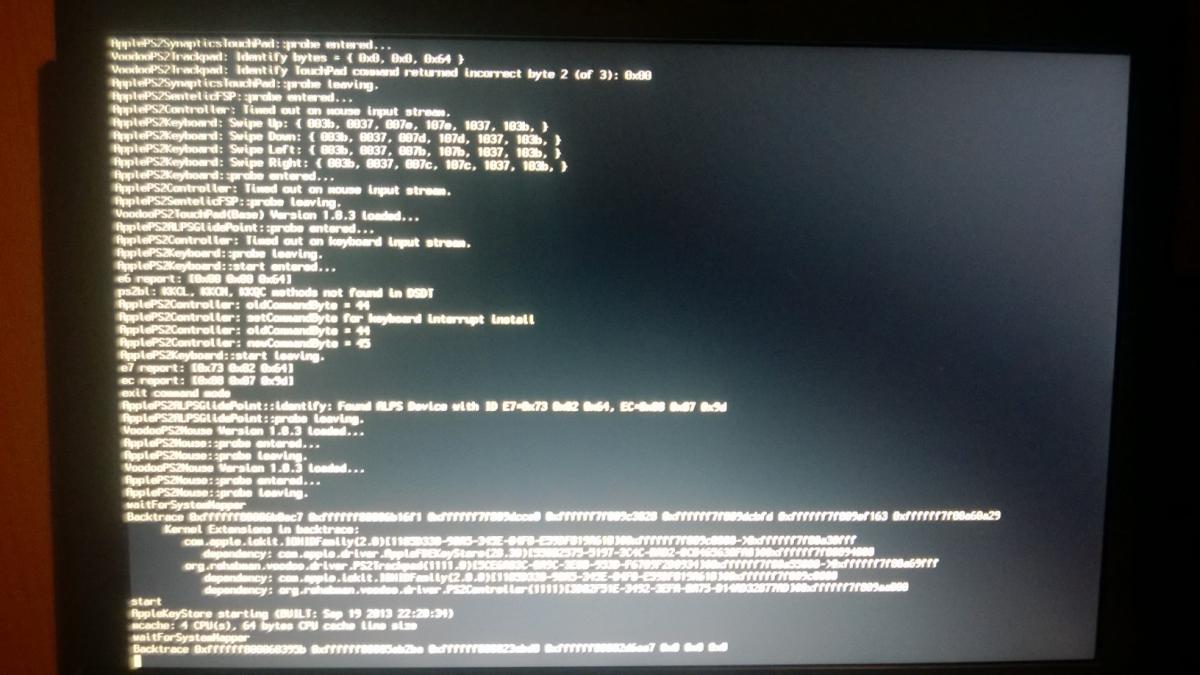
I don't know if suerte's hang is the same as mine, but here's a quick pic of what's on screen at the time. The keyboard bits at the end is me hitting random keys, to see if it was registering keyboard input (which it obviously is).
Just for kicks, try and remove the voodoo ps2, keyboard, and controller kexts...
-
Unfortunately, my wife's MacBook Pro is at work, so I'm trying to do this through virtualbox on my 6410.
I am 99% sure Virtualbox is your culprit. I would try with the MacBook pro when you get access...
-
Sorry if I asked this before, but do you have Intel or Nvidia graphics?
-
Try unplugging the flash drive and plugging it back in again. Do you see it in disk utility?
-
I tried a new flash stick, and now i see the loading screen, the apple logo and the loading spinner, but at that moment, nothing happens. I let it spinning for maybe 15 min.
What could be the problem, i dont copy the mbr files.
Where does it hang (boot with -v to find out)?
-
 1
1
-
-
myHack KPs when it gets to the last merging step of the "Install Extra" program. Also KPs immediately when I try and run myFix or Install Chameleon.I went back into myHack and tried to install the extras and I got a KP when it was writing to the USB stick.
That sounds like an issue with whatever machine you are using to create the installer with...is it an E6410?
-
I don't think the flash drive is done for yet
You shouldn't need to run myFix after updating the flash drive with the MBR patch.
-
Hi everybody !
I've recently have a Latitude E6410 and I also love OS X.
My Latitude have 64GB SSD, Intel 520M and integrated Intel HD graphics.
Does it work with OS X with Qe/Ci, sleep ?
What version I can install ? 10.9, .8 ?
I have a Macbook Air at my home for preparing usb keys.
Thanks !
Hey adaigre,
You can install whichever version of os x you'd like! Both versions work nicely on the E6410, however right now, I am still working out some of the issues people are having on maverick, so if you want to get it up and running quickly, I would suggest mountain lion, as more people are knowledgeable on the matter and can help you much quicker.
-
For anyone getting the "boot0 error", try to "Install chameleon" to the flash drive using myHack
-
I have the same issue, had typed up a lot of what's on the screen in verbose mode but was deleted. Essentially, some dependency issues revolving around ps2 controller and touchpad.
Do you have Intel or Nvidia graphics?
-
I tried twice to make the myHack install disk last night and it failed. One on a Mac VM and the other on a MacBook pro, both with OS X versions downloaded directly from the Mac App store. The program starts fine, and starts writing the initial files (~1000 MB of data) to the drive. About halfway through, the write stops, myHack reports that ~500 out of ~480 MB have been copied (104%) it then continues to try and make the disk with several chdir error messages. The program states that it completed succesfully, but the USB drive won't function at boot. The system outputs two lines of text: boot 1 or boot 0 and a spinning cursor and then hangs.
Try a different flash drives. I've had defective ones do that in the past
-
Just a quick heads up guys. The guide is available at the link provided above.
This is our Help & Support thread, so any questions/comments/concerns you have regarding the installation of Mavericks on your machines, you can submit them here.
-
Good to hear. I had a lot of problems using that and kext wizard getting my cache to work, as you probably remember
I too think it's better using just one tool. Mixing the tools was causing problems for many other people too.
-
-
Troubleshooting
-
iMessage Sign-In​
​For those of you having trouble getting iMessage to work/not sign you in, please see Deano019s's post or barkerman's post with pokenguen's advice here.
-
Shutdown & Booting With "-f"
​​This should fix any problems you are having with Shutdown as well as having to boot with "-f". Simply drop the two files from the zip below in /Extra. You may have to type in your password when prompted. After a reboot, you should be able to boot without -f and shutdown should work as it should.
-
Trackpad/Trackstick Update
Thanks to bpedman & yeahoon's help, we now have a fully working Trackstick along with middle button scrolling, and multitouch (up to two fingers for now)! Just drop the VoodooPS2Controller.kext from the zip file below into /Extra/Extensions (you may have to type in your password when prompted) and reboot!
-
No sound
​First, check for any output devices in the Sound section of System Preferences. If nothing is found, delete AppleHDA.kext from /S/L/E and run a Full myFix using myHack. Reboot and check the Sound section of the System Preferences again. Select the desired output and you should have working sound.
-
VT for Direct I/O
​If you'd like VT for Direct I/O enabled, enter "dart=0" without the quotes at the bootloader (bronxteck). Alternatively, you can replace your org.chameleon.boot.plist in /Extra with the one attached. Note that if you made any changes to the original version that came with the boot pack, you will have to make those changes to this one too.
-
boot0:Error Fix
​​If you experience a boot0:Error when booting from the hard drive, reboot using the installation drive and open up myHack from the Utilities menu. Select "Install Chameleon" and then the partition you installed Mavericks on. When done, click on the Apple Logo (in the top left hand corner of the screen) and Restart.
-
9
-
iMessage Sign-In​
-
Updates
-
Ethernet
​Looks like I forgot this one! Drop this kext into /Extra and run a myFix on the drive using myHack
-
Intel Graphics
​For anybody with Intel Graphics, please see Jake Lo's Post for an overview of how to get it working. Please note, you WILL NOT have full graphics acceleration (QE/CI), only Core Image (CI)!
-
SD Card Reader
​Thanks to Pablo Iglesias (see his thread here), the SD Card Reader on the E6410 is now working! Download the kext below, add it to S/L/E, and run a full myFix to see if it works for you. If it doesn't, consult the thread to find detailed instructions on how to add your SD Card Reader's device ID to the kext manually.
-
E6410 M.zip Update 1.0
The E6410 M.zip has been updated to include the Ethernet and SD Card Reader kexts
-
E6410 M.zip Update 1.1
The Shutdown & Boot fixes, along with the new Trackpad/Trackstick Update has been added to the E6410 M.zip.
-
Mavericks Update 10.9.1
STATUS:
GOOD
UPDATE METHOD:
APP STORE/SYSTEM UPDATE
MODIFICATIONS NEEDED:
NONE
-
Mavericks Update 10.9.2
STATUS:
GOOD
UPDATE METHOD:
APP STORE/SYSTEM UPDATE
MODIFICATIONS NEEDED:
If you receive a kernel panic like the one described here, make sure "Enable VT for Direct I/O" is unchecked in the BIOS under Virtualization Support.
If you have no sound, check the "No Sound" part of the Troubleshooting post below.
Otherwise,
NONE
-
Major Guide Update!
The guide has been updated to reflect the following:
All fixes to date are included
VoodooPS2Keyboard Kernel Panics on first boot are gone
No more Post Installation steps required!
Installer creation has been slightly simplified.
-
Mavericks Update 10.9.3
STATUS:
GOOD
UPDATE METHOD:
APP STORE/SYSTEM UPDATE
MODIFICATIONS NEEDED:
NONE
-
Mavericks Update 10.9.4
STATUS:
GOOD
UPDATE METHOD:
APP STORE/SYSTEM UPDATE
MODIFICATIONS NEEDED:
NONE
-
Mavericks Update 10.9.5
STATUS:
GOOD
UPDATE METHOD:
APP STORE/SYSTEM UPDATE
MODIFICATIONS NEEDED:
NONE
-
5
-
Ethernet
-
The Guide
Hello all,
As of last night/this morning, I finally got my E6410 nVidia to work with OS X Mavericks! This is my second guide for the E6410 nVidia (the first one was a Mountain Lion Guide). As far as what's changed between the two, this guide is for Mavericks, it is easier (in my opinion), and I've had to link files externally, as I have run out of space on my OSXLatitude account!
Also, if you experience any problems with the guide, please refer to the Troubleshooting section at the bottom of this post.
First off, the machine I am working with is a Dell Latitude E6410 nVidia (no surprises there) with:- 2.53 GHz Intel Core i5
- 4 GB 1067 MHz DDR3
- NVS 3100M 512 MB
- BIOS version A14
What works:
- Audio
- Webcam
- Trackpad & Nub (big thanks to bpedman and yeahoon)
- Wifi - Dell 1510/Broadcom 4322 (big thanks to Darvinko )
- Ethernet
- Graphics (1280x800; max resolution for my LCD)
- Bluetooth (big thanks to alerphjuan)
- Two-Finger Scrolling with Trackpad
- SD Card Reader (see the "Updates" post below)
What doesn't work:
- Sleep
Before we begin with the guide, we need to get a few things out of the way:
- If you are new to this, please first read about what a hackintosh is and what creating/using/maintaing one entails (a simple google search for "hackintosh" worked for me)
- Read through this guide COMPLETELY before beginning
- This guide assumes that you have backed up all your data (if you need it) and are okay with erasing EVERYTHING on your hard drive
- I am not responsible if your laptop doesn't turn out as you'd hoped/expected (don't expect everything to work )
- Although this guide may look long and daunting, it should only take about 1-3 hours (3.5 hours max). I tried to make it as quick and easy as I could
If you have any questions/comments/concerns that you would like to share, please post them in the Help & Support -> Dell Systems -> Latitude E Series -> E6xxx -> Mavericks on Intel/nVidia (depending on your graphics configuration): https://osxlatitude.com/index.php?/forum/51-e6xxx/
If you have agreed with/done the above, you may proceed with the guide...
You will need the following:- A working Mac/Hackintosh
- A Dell Latitude E6410 (shocker) w/NVS 3100M (the guide assumes you have the NVS 3100M Graphics Card, though the basic myHack installation should still work with Intel Graphics (see Step 23 under Creating the Installer)), A12 (or greater) BIOS (found here)
- A hard drive that you are okay with erasing completely
- An 8 GB or greater flash drive that you are okay with erasing
- A copy of OS X Mavericks from the Mac App Store (It's free!)
- This zip file:
- Patience, hope, and a pinch of faith in the guide
Once you have those 7 things (the last one especially
), continue...
A quick note:
For those of you coming from any version of Mountain Lion that was previously installed on your E6410 using my old guide, you may skip Steps 16-25 if you would like to perform an "Upgrade" installation. Simply select the partition that you have Mountian Lion on and install. So far, I have not found any problems with this method.
For those of you that never had OS X on your E6410 or those that just want to start fresh, you will need to perform a "Clean" install. Please read through the entire guide and complete all steps for the best results.
Also, for those who have MBR Disks, you can install Mavericks to said disk by copying the following files from the MBR Support folder after you finish Creating the Installer:
1. Copy OSInstall.mpkg to [iNSTALLER ROOT]/System/Installation/Packages
2. Copy OSInstall to [iNSTALLER ROOT]/System/Library/PrivateFrameworks/Install.framework/Frameworks/OSInstall.framework/Versions/A
Creating the Installer- Make sure your Mavericks copy is in the Applications folder on your working Mac/Hackintosh
- Extract the E6410 M.zip file that you downloaded above to a convenient location. No matter where you do it, just remember the location!
- Plug in your 8 GB or greater flash drive now
- NOTE: If the drive doesn't show up, make sure it is partitioned/formatted as the following (you may use Disk Utility to do this): 1 Partition, GUID Partition Table, and Mac OSX Extended (Journaled)
- Open the E6410 M folder and then the Applications folder.
- Run myHack by double-clicking it and enter your password when prompted
- From the drop-down, select "Create a OS X Installer" and click "Ok"
- Make sure "Create OS X 10.9 Install Disk" is selected; if not, select it from the drop-down
- Click "Ok" and select the flash drive (NOTE: Make sure you select the correct one if you have more than one connected to your system; the application will erase the selected flash drive)
- When prompted, select "Browse Manually" and navigate to the Applications folder and select the Install OS X Mavericks app
- Click "Open"
- After a few seconds, you will receive a confirmation on whether or not you would like to begin the copy. Click "Ok"
- The process will take 20-40 minutes depending on the computer/flash drive being used
- Towards the end, you will receive a question about adding MBR Support. Click "No".
- When it finishes, click "Ok" and "Quit"
- Re-open myHack from the Applications folder and type in the same password you used in Step 5
- From the drop-down, select "Install Extra" and click "Ok"
- Again, make sure you choose the correct flash drive at the next prompt
- At the next prompt, choose "Use My Own" from the drop-down and click "Ok"
- Navigate to the E6410 M folder and select Extra
- Click "Open"
- The process should take 2-5 minutes
- Click "Ok" and "Quit" when it finishes
- If you have Intel Graphics, remove AppleIntelHDGraphics.kext and AppleIntelHDGraphicsFB.kext from [Root of Installation Drive]/System/Library/Extensions
Installation
- Plug your myHack Installation flash drive into the E6410
- Make sure your battery life is greater than 50% if you plan on not connecting to a power source
- Turn on the laptop and press F12 to enter the "One time boot menu..."
- Select "BIOS Setup" from the list by using the up and down arrow keys to scroll and the Enter button to select
- Click on "Load Defaults" and then OK
- At the warning (If you get one), click OK
- Then, expand the "System Configuration" settings (in the left pane) by clicking on the red "+" next to it
- Click on "SATA Operation" (also in the left pane) and select "AHCI"
- At the warning (If you get one), click OK
- Expand the "Virtualization Support" settings (in the left pane)
- Click on "Enable VT for Direct I/O"
- Uncheck "Enable VT for Direct I/O"
- Click on "Apply" in the bottom right and then "Exit"
- Turn the machine back on if it doesn't come up by itself and press F12 again to enter the "One time boot menu..."
- At the menu, select "USB Storage Device"
- When you reach the bootloader (the silver screen with different hard drives and flash drives on it), make sure the "myHack OS X Install Disk" is selected and wait for the computer to boot
- If you (and I) did everything right, the machine should boot up into the installer without a hitch (If it doesn't, refer to the troubleshooting steps below)
- Select your language and click on the arrow below to continue
- At the next screen, select "Utilities" from the menu bar on top
- Click on "Disk Utility"
- When it opens, select the hard drive (not the partition; you should see a "Partition" tab to the right; you won't see this if you've selected a partition) you are okay with erasing completely (again, make sure it's the right one)
- When you've verified you've selected the hard drive, navigate to the "Partition" tab (again, you won't see this if you selected a partition)
- Select "1 Partition" from the drop-down under "Partition Layout" (unless you're an advanced user; then you can select as many as you need/want)
- Then, next to "Format", select "Mac OS Extended (Journaled)"
- Give your partition a name (on a normal mac, the partition is normally labeled "Macintosh HD")
- Then click on "Options..." and make sure "GUID Partition Table" is selected; if it's not, select it
- Lastly, click on "Apply"
- When that finishes, hit Command+Q (or just click the red "X" in the top left of the window)
- You should now be at the Install OS X screen now; Click "Continue" and "Agree"
- Select the partition you would like to install OS X to and click "Install" (and "Continue" if not connected to a power source)
- The process will take about 20-50 minutes
- When asked for an Extra folder, select "Use My Own" from the drop-down and double-click on the Extra folder on the Flash Drive (it should be the only one there)
- Click "Open"
- At the following 3 prompts, click "Yes" for all of them
- If the machine reboots (you may have to hold down the power button to turn it off, and then press it again to turn it back on), select the partition you installed OS X to from the bootloader (press any key before the progress bar fills up completely) and press Enter
- Welcome to OS X Mavericks on your E6410!
Finally, I would like to thank everyone who has helped make this a possibility (Special thanks to Darvinko, Tengokuu, dafob, jebediah, alerphjuan, jansenspencer, roar2000, and the everyone else over in the Mountain Lion thread), bpedman & yeahoon (for the trackpad/trackstick) as well as the creator of myHack, Conti. I couldn't have gotten this working without them.
Remember:
If you have any questions/comments/concerns that you would like to share, please post them in the Help & Support -> Dell Systems -> Latitude E Series -> E6xxx -> Mavericks on Intel/nVidia (depending on your graphics configuration):
-
7

 )
) )
)
Mavericks on E6410 nVidia
in The Archive
Posted
I was just going to suggest deleting it from /S/L/E & /Extra! Beat me to it!