dm4n
-
Posts
32 -
Joined
-
Last visited
dm4n's Achievements
Advanced Member (5/17)
3
Reputation
-
Thanks. My Boot-ROM-Version is 144.0.0.0.0 BIOS date in Clover Configurator> SMBIOS> 08/08/17 I did find an OSXAptioFix driver in the Drivers64 or Drivers64-UEFI folder and removed that, will check if that makes a difference.
-
@Hervé I'm using Clover v5070. @Next One That's awesome, thanks. Will have a play with those config setting and the ssdt. CMOS battery has been recently replaced. OS is Mojave 10.14.6 and SMBIOS is Mac 5,1. AppleRTC box is checked in Clover Configurator> Kernel and Kext Patches. Update: Still getting the RAID reset problem on startup.
-
Hi @Next One, Would you be willing to share your Config and EFI folder for the T3500? I'm getting a startup issue where the BIOS seems to be resetting the RAID settings and I'm having to F2 into BIOS every boot and change RAID and SpeedStep. This is on the latest Clover. Thanks
-
Update: Mojave installed and updated to 10.14.3 (supplemental update). All good, except for rare graphic glitching that appears resolved after turning off Hardware Acceleration option in Spotify. Next will test VirtualSMC vs current FakeSMC.
-
Yes, I heard of the VESA mode 103 issue too, but bios loads fine with the RX 560 in my setup - I'm able to F2 into the bios setup screen on startup.
-
Recommend a Metal compatible GPU for Dell Precision T3500?
dm4n replied to dm4n's topic in The Archive
Thanks all. I went with AMD RX 560 - working pretty well with Mojave and nice shift from running my monitor in 1080 to 4K. -
Successfully update to Mojave 10.14 after upgrading the GPU to Gigabyte Radeon RX 560 (Metal capable GPU required by Mojave). Did both clean install on my test SSD and update from macOS 10.13.6 on main SSD and storage HDD. The GPU requires WhateverGreen.kext and Lilu.kexts placed in EFI>Clover>kexts>Other. I also added these kexts and NullCPUPowerManagement.kext to the installer usb to get the installer working.
-
Hi All, Can anyone recommend a Metal GPU for the Dell T3500 that would make it possible to install OS X Mojave? Currently rocking an ATI Radeon HD5670. Perhaps relevant is that T3400 owners have reported an issue where the newer AMD cards don't support the low-resolution Dell BIOS screen during boot, giving a 'Vesa 103' error. Thanks for any assistance!
-
High Sierra Success! This has been one of the trickier install processes. I had difficulties updating to High Sierra from Sierra on my 64Gb test ssd, using the (full sized) Install macOS High Sierra app. After many fails, I opted to erase the test drive and do a fresh install. I made an install usb of High Sierra with Clover, disconnected all other drives in the BIOS settings and was able to install from the usb. One essential prior step, given that there are multiple SSD's and HDD's in my T3500 - was to mount all the EFI partitions and delete nvram.plist from all of them , before attempting to install HS. I also used sudo nvram -c in Terminal (not sure if essential) This got me past the "OSInstall.mpkg appears to be missing or damaged" install problem. The installer rebooted a couple of times, and there were a few nailbiting moments - waiting to see if this would work, or another round of troubleshooting. Such is Hackintosh Post installation, sound was achieved using Voodoo HDA package here Then (the next morning) it was time to brave the install on main rig. This time, I wanted to upgrade from existing Sierra install. I wasn't sure whether the usb installer would allow an upgrade or would automatically do a fresh install (kudos to anyone who can check that), so I opted to use the Install macOS High Sierra app. I copied the the config.plist from the installer usb and placed the Fake.smc kext form there into EFI > kexts > 10.13 of the main volume. Also, you will need to once again mount all EFI partitions and delete nvram.plist - found out the hard way. Once again, I disconnected all other drives in BIOS and restarted and started the installer on the main volume. The installation went differently this time, progress was very slow. I'm not 100% sure that installation didn't actually happen twice, if that is even possible. But it came good. I've included a zip for those interested with 2 files - config install.plist was used in both the installer usb for fresh install and installed to the EFI partition of the target volume for the upgrade from Sierra to High Sierra. After installation I changed the SMBIOS from iMac 14.2 to Mac Pro 5,1 in config.plist. Running with 14,2 System Definition seemed to make installation of HS easiest. Both ssd's were converted to APFS format. Ensure that apfs.efi is installed to your Drivers64 folder in your installer usb or EFI partition. Thanks to all the dedicated contributors to the hackintosh community who made this possible Good Hack! Archive.zip
-
Has anyone got High Sierra working on their T3500? I'm trying to create a usb installer for a clean install on a test SSD in my rig.
-
Update: I've got OS Sierra Beta 7 working on the test drive in my machine. Changed SMBIOS using Clover Configurator to MacPro 5,1 and used the Magic Wand button to generate the other SMBIOS field entries. After adding a 10.12 Kext folder to my main drives EFI partition and updating Clover to latest version - all works except for the current sound issues with Voodoo HDA. Update: Successful update to 10.12 Final Release using the AppStore method. Sound issues fixed with latest VoodooHDA package. Update #2: successfully updated to macOS Sierra 10.12.2 using the AppStore. Was getting weird usb keyboard and mouse glitches in 10.12.1 - basically they stopped working but would resume after replugging - this issue has diminished in latest update issue continues after update. Cheers!
-
Update to 10.11.4 via AppStore, using latest Clover v3368 → all good.
-
Successfully updated to El Capitan from Yosemite running Clover bootloader. Note: Important to Update Clover bootloader to latest first. First tested the installation process on my backup internal drive on SSD. Switched off other drives in BIOS. Update Method: Appstore - no usb installer required for upgrading using Clover. Downloaded the installer from the Appstore. Before running the installer - the config.plist (found in EFI partition) must be edited: add (not replace) the following to the section - <key>RtVariables</key> Credit: see Post#5 here 4. Add latest FakeSMC.kext to EFI partition → in EFI>Clover>kexts>10.11 folder (you'll probable have to create this folder) After the Installer app had completed - the system went into a boot-loop. After more forum-searching - it seems EvoReboot.kext was the problem → 5. deleted EvoReboot.kext from S/L/E by typing the following in Terminal I also repaired Permissions using Kext Utility app. 6. Run Install OS X El Capitan.app Good hack!
-
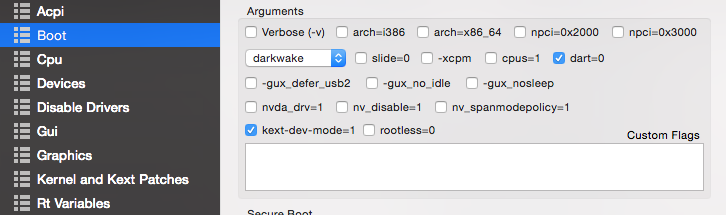
For a general overview check out the link on Post #3 I used Clover Configurator - attached screenshot

-
Successfully Updated to Yosemite 10.10 Previously the system was running 10.9.5 using the Chameleon + MyHack method. I wanted to use the Clover bootloader as it seemed a more elegant / native / something cool solution. So the experiment was whether I could convert from Chameleon to Clover AND upgrade from Mavericks to Yosemite, without having to do a clean install. As I have a 4 internal SATA drives in the machine (see sig) I use the 64 GB Crucial ssd as a backup OS with important apps. This was the test drive. After successfully installing on this drive I repeated on my main drive. I followed the Clover Yosemite guide at the other infamous hackintosh site - installing the Clover bootloader in the EFI partition of the drive. Note that it's a hands-on process - the system needs to boot from the usb 2 times during the process - and the User needs to make sure that the usb is selected for the second reboot (check the guide). Afterwards the system booted up from the test drive and Setup proceeded. I used Clover Configurator to generate a working plist - you will likely need to modify to your hardware eg I used the Patch VBios command to get full resolution on the bootloader screen. Note the the autogenerated config.plist has some unnecessary but non-harmful entries - I had mine pruned. iCloud and AppStore works. Have yet to get Facetime and iMessage working which I don't use - apparently have to call Apple for a code - but elsewhere reported that that works. Edit: called Apple and they kindly gave me the required code I use HWSensors to monitor CPU and temperatures - I found that it didn't supply all data when FakeSMC + Plugins was installed in the drives EFI partition, but did when installed in S/L/E so I have duplicated the FakeSMC + HW Plugins kext in both locations. Yosemite + Clover is lovely Edit: Got TRIM support using Clover Configurator and the steps in Post #80 here Good Hack!