


Leon
-
Posts
1235 -
Joined
-
Last visited
-
Days Won
58
Content Type
Profiles
Articles, News and Tips
Forums
Posts posted by Leon
-
-
Add the whole folder so i can have a look.
-
Great progress - and yes - you are allowed to discuss almost everything here you want.. we are no tonycrap or IM..

Would you mind posting your "extra" folder ?
imessage can be tricky as hell.. but there is a few guides around that could help.
I have the x201s myself but havent been experimenting with yos yet -
Yesterday I finally got around to dual-booting my MacBook, with a nice fresh copy of Windows 7. Everything was great, except for a laggy download of the Windows Support Software. So, earlier today, I got around to installing the drivers. It turns out, my old MacBook didn't support BootCampx64. I then did a quick search on how to fix this issue.
I came up with a number of answers, but this is an answer aimed at people who were in my situation which is:- I could not right click on the BootCampx64.msi file, because of the missing drivers.
- Or if I could right click, then changing the properties of BootCampx64.msi resulted in not having the required elevated access privileges.
My solution (done from within Windows, obviously):
- Without the drivers installed, you can still right click on the BootCampx64.msi file by click it with 'Shift-F10' which apparently acts as an alternate right click.
- If you have the first step down, try opening the properties of the file, and change the compatibility to earlier versions of Windows.
- If that still doesn't work, then open the start menu. Then go to Programs » Accessories » CMD, and hover over CMD.
- Press Shift-F10, or right click if you are able, on CMD (the Windows Command Prompt).
- Select the option in the drop-down menu, 'Run as Administrator.'
- Then open CMD and get a shell window.
- Now, when you open CMD, you should be running it as C:Windowssystem32.
- At the Command Prompt, type in cd /d C:
- You should now have C: at the far left of the prompt.
- Type in cd Users. Then type in dir.
- Find your username, and then type in cd username, e.g. cd John Smith
- Continue the dir, cd process until you come into the directory in which the BootCampx64.msi is. (You may have dragged the WindowsSupport folder onto the desktop, or someplace else).
- After you have reached the directory, simply type in BootCampx64.msi.
- The program should start.
- All of the drivers should start installing. You probably won't be able to move your mouse if you have a trackpad, as I do, because the Apple Trackpad driver is one of the last to be installed.
If it seems like the process is taking a while, be patient.
Sources:
This earlier hint, this Apple forum thread, and this very helpful article.-
 1
1
-
Something like that yes..
-
Hi,
Lately i have been messing with Elementary OS, its a quite nice linux distro that unlike most others works and acts alot more like OSX.
Anyway - tip of the day - howto enable Elementary Tweaks on the latest beta of Freya
Original link: http://www.reddit.com/r/elementaryos/comments/2cv41d/installingelementarytweaksonfreya/
Install Tweaks$ sudo add-apt-repository ppa:versable/elementary-tweaks-isis$ sudo apt-get update$ sudo apt-get install elementary-tweaksOpen schema file in text editor:$ sudo scratch-text-editor /usr/share/glib-2.0/schemas/org.gnome.desktop.interface.gschema.xml
Insert the following text BEFORE the closing tag at the end of the file:false Overlay Scrollbar Toggle the overlay scrollbar. $Install dconf-editor$ sudo apt-get install dconf-editorGo to org->gnome->desktop->interface on dconf-editorFind and enable ubuntu-overlay-scrollbars optionIt then says to reboot but I would think logging out then back in of the desktop would be enough. Hope this works for everyone. Sorry if I screw up the markdown... First $permalink
Compile schemassudo glib-compile-schemas /usr/share/glib-2.0/schemas/Now open Tweaks and all works -
Anyone had luck with Yosemite on the Lenovo's yet ?
-
Right, so next step is to get it to work under Linux (Ubuntu or rather Elementary OS) .. any suggestions ?
-
Honestly.. i dont know.. but it seems to be the solution in this case atleast.
Logically.. it would be more cool to have it working as a WWAN device.. on the other hand.. using the watcher does give quite alot of info. -
Links:
- Info: http://bc.whirlpool.net.au/bc/hardware/?action=h_view&model_id=1210
- Mode switch (Windows): http://www.szelins.com/download/usermanual/H685_MC7710_from_DIP_to_QMI.pdf
Following is my research notes on the mc7710
First of all - i figured out that the card operates either in QMI or DIP (Direct IP) mode - To identify what mode your card is in check the ProductID under sysinfo.
0x68A2 = QMI
0x68a3 = DIP
This seems to have alot of inpact on wether you can use it under osx/linux or not - under windows - logically... both work - mine is in QMI,
There is a guide here for howto change it - but i havent had much luck with it yet: http://www.szelins.com/download/usermanual/H685_MC7710_from_DIP_to_QMI.pdf
My progress on the different OS:OSX 10.9.4:
- Patched Cellphonehelper.kext makes it show up in the topbar, but says "PIN LOCKED" when i click on it (the sim card is not locked)
- Sierrawatcher: Card _MUST_ be in direct ip mode (DIP) or it wont work.. i'm pretty sure it will enable 4G/LTE also.
Use this watcher software: Generic_Mac_Watcher_B3563.mpkg.zip
Tried to patch the different plists and while card gets detected its unable to connect - dies with error "unable to comm. with modem"
Linux:
Not detected
Windows:
Works perfect using Sierrawatcher softwareUpdate:
Switching modes from QMI to DIP worked by using another machine solves the problem and it now works as a DIP device in OSX using the watcher software.
DirectIP vs. QMI
DirectIP:
- Independent control of user plane and data plane
o Different USB interfaces for control vs data
- Data sessions can be controlled by AT commands
- Simple to setup a data session (one AT cmd to configure profile, one to trigger data session)
o User can test manually from a terminal program
- Currently supports multiple concurrent data sessions (PDP contexts) to host
o Note: works in HSPA but not fully tested on LTE
- No support for CDMA (therefore can’t be used with MC7750).
- No SDK support on MC77xx platforms as we don’t officially support CNS on MC77xx
- Windows and Linux driver support available
QMI:
- Control and data planes are multiplexed together
o Share a single USB interface for control & data
- Data sessions can only be controlled via QMI protocol
- Compared to AT cmds, much more complicated to setup a data session as control services need to be initialized before any QMI commands can be sent
o Need some sort of host program to do this (can’t be done manually)
- Currently, does not support multiple concurrent data sessions to host
o QCT has no plans to support but Sierra looking to add this support ourselves
o May be more complicated than DirectIP due to fact that we will need to split control and data planes for subsequent data sessions (i.e. one control interface for multiple data paths)
- Supports CDMA (currently only option for MC7750).
- Supported via QMI SDK in Linux and Windows
- Windows and Linux driver support available -
Hey, could you please upload the pictures from your first thread to osxl.
Thank you. -
Since its still a rather new card i would think its a driver issue - and by that try and track down the people behind the driver and ask them.
-
Weirdly enough.. it started working after a bunch of reboots.. gonna do a bit of performance tests before i start experimenting with the mc7110 instead
-
Ok, it seems like its the installer that needs to be updated - i have asked mick to update it and re-upload...
-
WTF.. i thought i fixed that.. can you send me a screen shot ?
-
Hi,
When i try to connect i get:
Wed Jun 18 22:51:12 2014 : publish_entry SCDSet() failed: Success!
Wed Jun 18 22:51:12 2014 : publish_entry SCDSet() failed: Success!
Wed Jun 18 22:51:13 2014 : Initializing phone: ATE0V1&F&D2&C1S0=0
Wed Jun 18 22:51:13 2014 : Initializing PDP context: AT+CGDCONT=1,"IP","internet.telenor.se"
Wed Jun 18 22:51:13 2014 : Dialing: ATD*99***1#
Wed Jun 18 22:51:13 2014 : Waiting for connection
Wed Jun 18 22:51:13 2014 : No carrier.
Wed Jun 18 22:51:13 2014 : CCLExit: -6021 (No carrier.)
Wed Jun 18 22:51:13 2014 : Connect script failed
-
The STA driver does not work good with all cards.
To remove the STA driver, look here: http://ubuntuforums.org/showthread.php?t=2123176
In other words.. try: sudo apt-get purge broadcom-sta -
Awesome work guys/girls - and welcome to OSXL.
Would love to see your take on the laptop version.-
1
-
-
Awesome, thanx mate.. i have added it to the main thread
-
BIOS i am not so worried about.. for the x201 we have a patched bios to whitelist that.. it will be quite slow to get past bios but the card will work.
The x201s only comes with one antenna for WWAN, so i have wired in an antenna mine manually... adding one more shouldent be the biggest problem -
I dont really care that much about the price.. have you found any 4G/LTE that might work with osx ?
-
Awesome.. just ordered one..
Another question.. all these are HSPA+ .. have you seen any real 4g/LTE cards ? -
Hi,
Overtime your installation will be filled with stuff that you test.. some of it you might not use anymore or you just want to trim it.
Cleaning out in automatic starting things can also help you speed up your system boot time and generel run time.1) The autostart is usually not in the User-Autostart-Items, but you should check them anyway:
Open the System-Preferences > Users > Select your user > Start-Objects
Check if there is something started you want to deactivate and do so if.
2) Normally the start of apache is handled by the launchd-service: You can either change this manually, or with the help of a old little tool named "Lingon". To do it manually, you need to find the launchd-folders:
~/Library/LaunchAgents
~/Library/LaunchDaemons

/Library/LaunchAgents
/Library/LaunchDaemons

/System/Library/LaunchAgents
/System/Library/LaunchDaemons
There you'll find .plist-files, that define when and what to start. To remove a object from auto-start use launchctl on the terminal to remove it from the actual launchd and then simply delete the file.
user$ launchctl unload *filename.plist*
Make sure you do not delete the wrong files! This may lead to a fatal situation on your machine. Btw: The .plist-Files can be read with BBEdit, TextWrangler or the PropertyList Editor from the Apple Developer-Tools.
-
Hi,
I have cleaned up in this topic - moved all the good posts into the main post - thank you everyone for your contributions.
One question - somebody mentioned a bios update v. 1.40 (we currently use 1.22) with whitelist and SLIC.
Also mentioned on this link: http://forums.mydigitallife.info/threads/20223-Remove-whitelist-check-add-ID-s-to-break-hardware-restrictions-mod-requests/page293
However the file is no longer for download.. anyone got a copy ? (file: Lenovo ThinkPad X201_1.40-(6quj18us)_lenovo21_WList.rar)
-
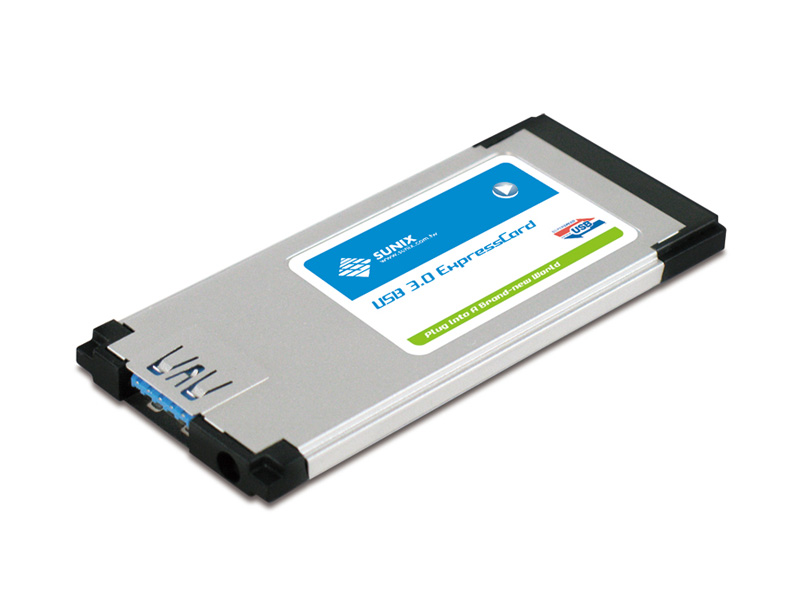
Hi,
ExpressCards is a neat way of extending your laptop with new functionality - in this case we are going to have a look at USB 3.0 - my test machine is a Lenovo x201s running Mavericks 10.9.3The Sunix USB 3.0 ExpressCard
The card is automatically detected - however you will need to install a kext to get it to work.
GenericUSBXHCI.kext - Download: GenericUSBXHCI.kext.zip
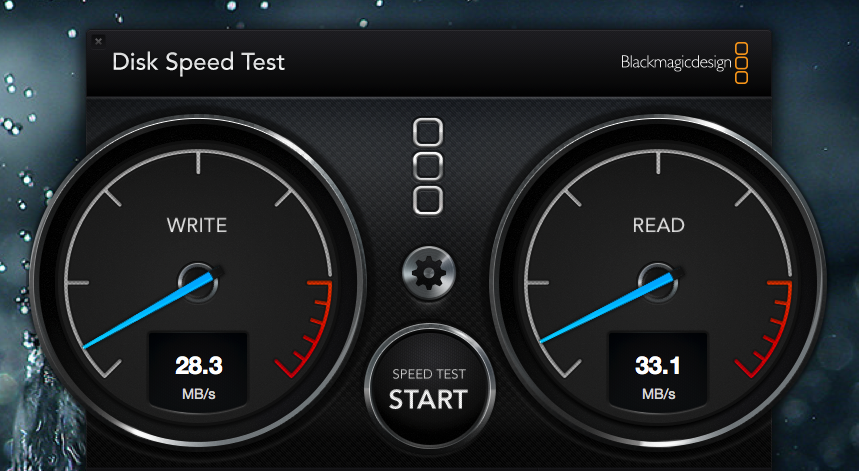
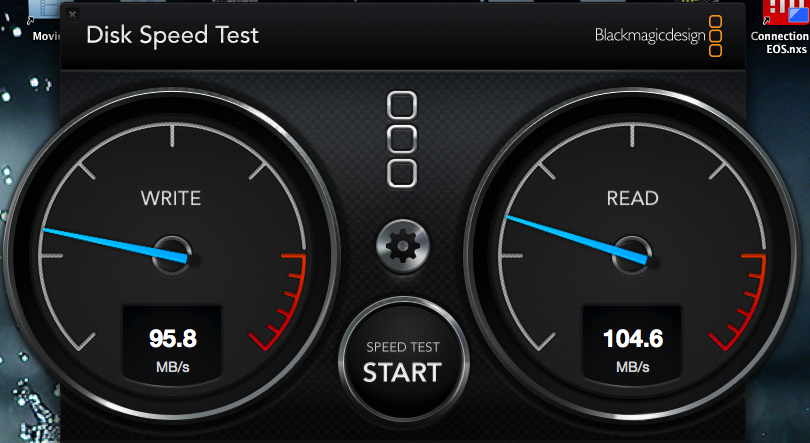
So lets look at performance using a external USB 3.0 disk - 7200rpm.
USB 2.0 Performance:
USB 3.0 Performance:
Install OSX on Lenovo Thinkpad X201s (and maybe x201)
in The Archive
Posted
No, a zipped version of /Extra and any kexts you have added to sle