
Leaderboard


Popular Content
Showing content with the highest reputation on 04/11/19 in all areas
-
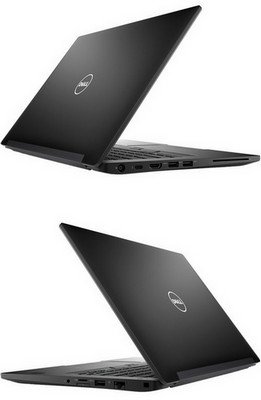
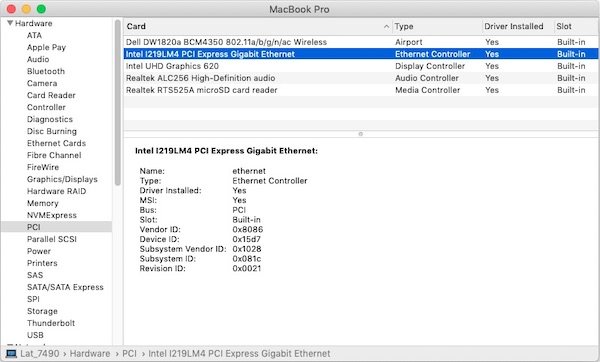
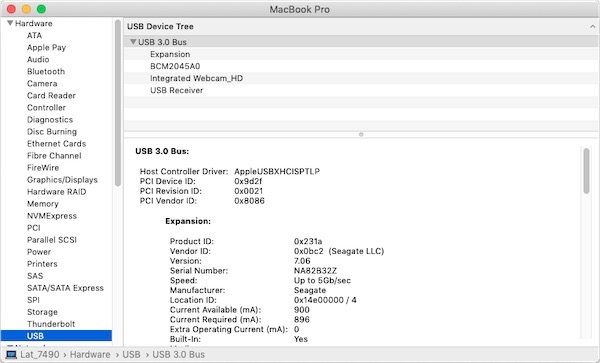
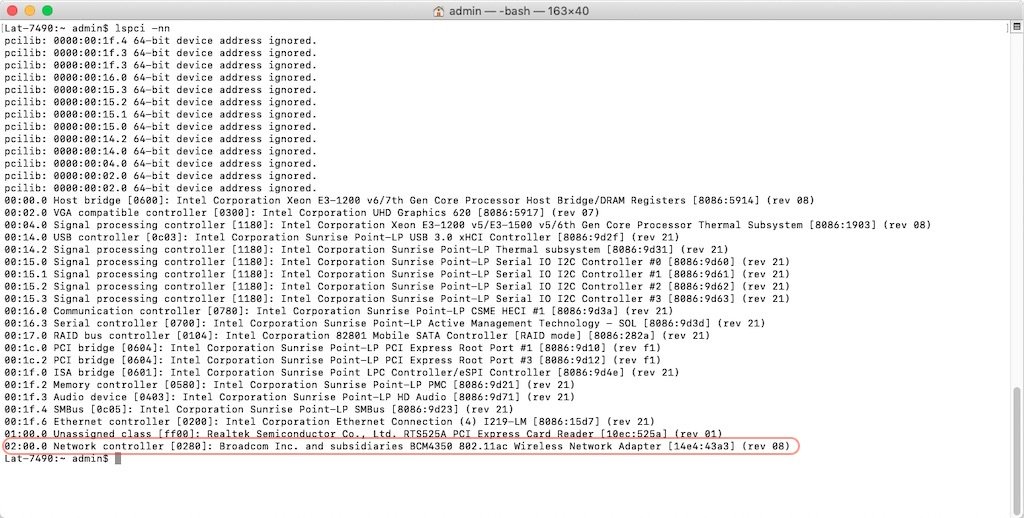
Last update: 16 Sep 2020 Specifications: BIOS v1.8.0 v1.9.3 v1.10.0 v1.11.0 v1.12.2 v1.13.1 v1.14.0 v1.15.1 v1.16.0 (needs SATA in AHCI mode, not RAID or disk won't be seen) Intel 8th gen Kaby Lake R quad-core i7-8650U 1.9GHz CPU (Turbo boost up to 3.9GHz for 3 & 4 cores and up 4.2GHz for 1 & 2 cores) integrated Intel UHD620 GPU 300-1150MHz (PCI ven id 0x8086, dev id 0x5917) 14" 1920x1080 FHD non-touch LCD 16Go DDR4-2400 RAM M.2 2280 512GB SATA SSD (in Key M slot) Intel i219-LM Gigabit Ethernet (PCI ven id 0x8086, dev id 0x15d7) Realtek ALC256 (ALC3246) High Def audio (PCI ven id 0x10ec, dev id 0x0256) Dell DW1820A M.2 802.11ac combo wireless card (PCI ven id 0x14e4, dev id 0x43a3) + Bluetooth 4.1 (PCI ven id 0x0a5c, dev id 0x6412) integrated Realtek HD webcam (USB internal, PCI ven id 0x0bda, dev id 0x5650) integrated Realtek RTS525A microSD 4.0 card reader (PCI ven id 0x10ec, dev id 0x525a) Alps I2C HID Multi-Touch Touchpad (PCI ven id 0x1028, dev id 0x081c) Alps I2C HID TrackPoint (PCI ven id 0x044e: dev id 0x1212) 1 x M.2 2230 WLAN slot (Key A for Key A/E cards) 1 x M.2 2242 WWAN slot (Key B for Key B & Key M/B cards) 1 x 3.5mm universal jack (combo audio) 3 x USB 3.1 gen1 Type-A (right port with PowerShare) 1 x HDMI v1.4 1 x DisplayPort on USB Type-c Lat7490:~ admin$ lspci -nn 00:00.0 Host bridge [0600]: Intel Corporation Xeon E3-1200 v6/7th Gen Core Processor Host Bridge/DRAM Registers [8086:5914] (rev 08) 00:02.0 VGA compatible controller [0300]: Intel Corporation UHD Graphics 620 [8086:5917] (rev 07) 00:04.0 Signal processing controller [1180]: Intel Corporation Xeon E3-1200 v5/E3-1500 v5/6th Gen Core Processor Thermal Subsystem [8086:1903] (rev 08) 00:14.0 USB controller [0c03]: Intel Corporation Sunrise Point-LP USB 3.0 xHCI Controller [8086:9d2f] (rev 21) 00:14.2 Signal processing controller [1180]: Intel Corporation Sunrise Point-LP Thermal subsystem [8086:9d31] (rev 21) 00:15.0 Signal processing controller [1180]: Intel Corporation Sunrise Point-LP Serial IO I2C Controller #0 [8086:9d60] (rev 21) 00:15.1 Signal processing controller [1180]: Intel Corporation Sunrise Point-LP Serial IO I2C Controller #1 [8086:9d61] (rev 21) 00:15.2 Signal processing controller [1180]: Intel Corporation Sunrise Point-LP Serial IO I2C Controller #2 [8086:9d62] (rev 21) 00:15.3 Signal processing controller [1180]: Intel Corporation Sunrise Point-LP Serial IO I2C Controller #3 [8086:9d63] (rev 21) 00:16.0 Communication controller [0780]: Intel Corporation Sunrise Point-LP CSME HECI #1 [8086:9d3a] (rev 21) 00:16.3 Serial controller [0700]: Intel Corporation Sunrise Point-LP Active Management Technology - SOL [8086:9d3d] (rev 21) 00:17.0 SATA controller [0106]: Intel Corporation Sunrise Point-LP SATA Controller [AHCI mode] [8086:9d03] (rev 21) 00:1c.0 PCI bridge [0604]: Intel Corporation Sunrise Point-LP PCI Express Root Port #1 [8086:9d10] (rev f1) 00:1c.2 PCI bridge [0604]: Intel Corporation Sunrise Point-LP PCI Express Root Port #3 [8086:9d12] (rev f1) 00:1f.0 ISA bridge [0601]: Intel Corporation Sunrise Point LPC Controller/eSPI Controller [8086:9d4e] (rev 21) 00:1f.2 Memory controller [0580]: Intel Corporation Sunrise Point-LP PMC [8086:9d21] (rev 21) 00:1f.3 Audio device [0403]: Intel Corporation Sunrise Point-LP HD Audio [8086:9d71] (rev 21) 00:1f.4 SMBus [0c05]: Intel Corporation Sunrise Point-LP SMBus [8086:9d23] (rev 21) 00:1f.6 Ethernet controller [0200]: Intel Corporation Ethernet Connection (4) I219-LM [8086:15d7] (rev 21) 01:00.0 Unassigned class [ff00]: Realtek Semiconductor Co., Ltd. RTS525A PCI Express Card Reader [10ec:525a] (rev 01) 02:00.0 Network controller [0280]: Broadcom Inc. and subsidiaries BCM4350 802.11ac Wireless Network Adapter [14e4:43a3] (rev 08) For recommended BIOS settings, see here. NB: The E7490 is able to boot from microSD card.
 1 point
 -
Post full system specs and debug file1 point
-
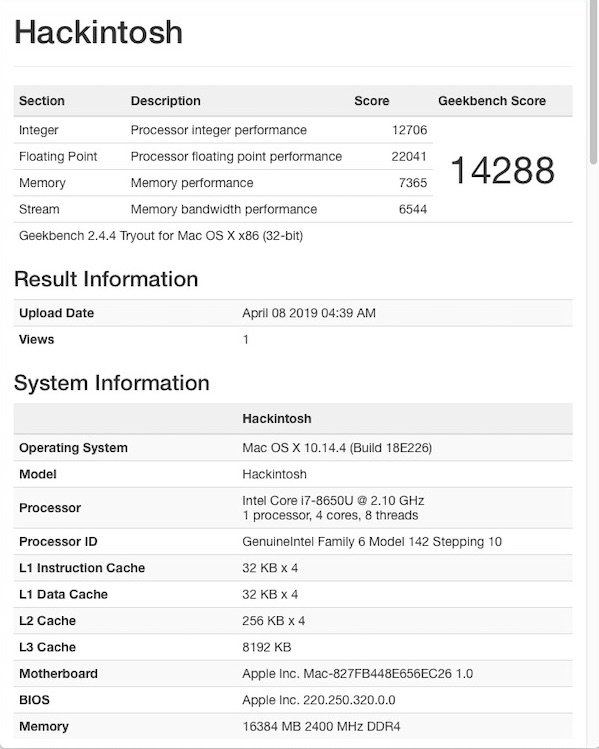
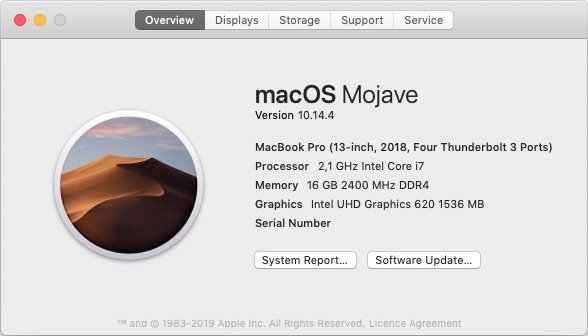
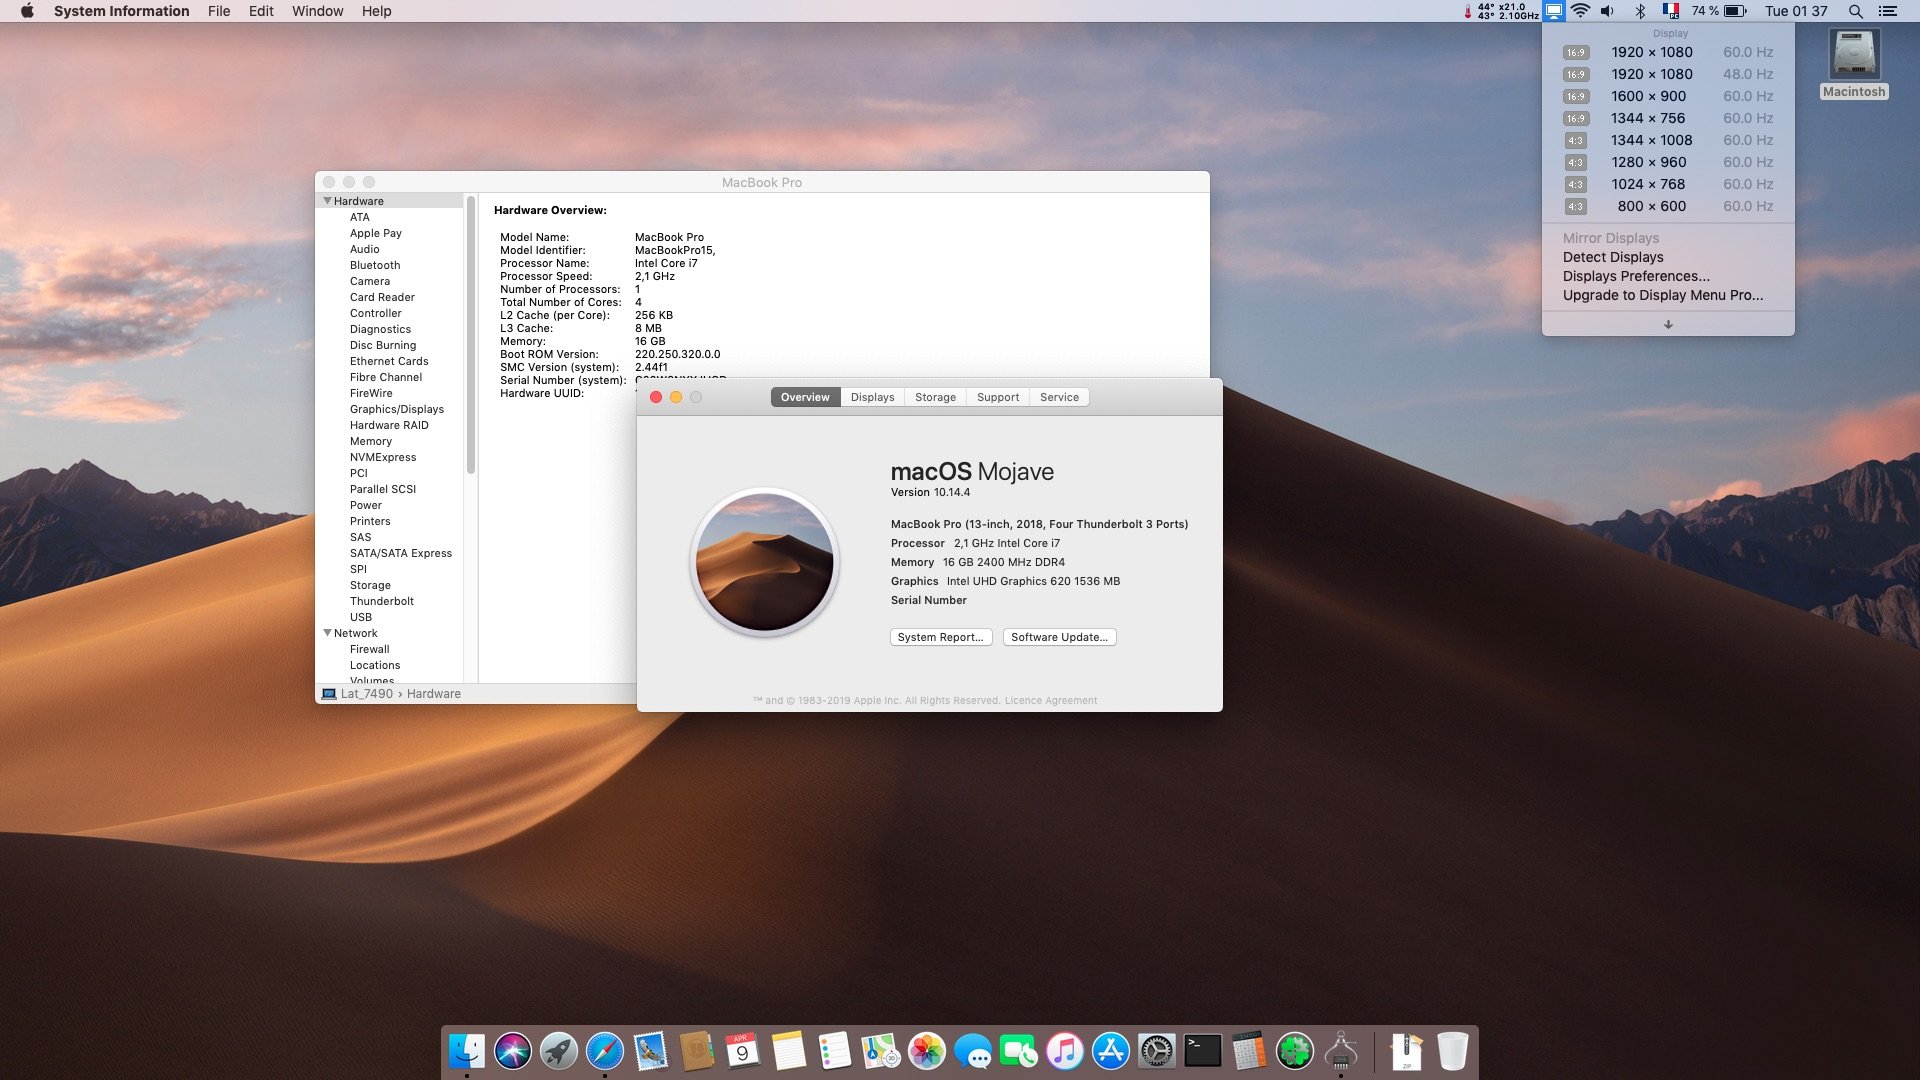
Last update: 17 Jun 2020 Target macOS release: Mojave 10.14.x This is a Clover-based installation using the well-known/well documented vanilla method detailed below: Working: full graphics acceleration on Intel UHD620 iGPU, including brightness control (with Lilu v1.3.5 + WEG v1.2.7) multi-display with HDMI OOB, including HDMI-to-DVI adaptation (HDMI-to-VGA not successful) and VGA/DP over USB Type-C audio, including HDMI, microphone input and headset output (with AppleALC v1.3.6 & layout 11 + CodecCommander v2.7.1) GigEthernet LAN connection (with IntelMausiEthernet 2.4.0 kext) wireless and bluetooth with any compatible card (a DW1820A in my case) left and right USB ports (with Hackintool-generated USBPorts), including USB Type-C integrated webcam (OOB) CPU power management sleep (Lid, Energy Saver settings, Apple menu, Fn-Insert, PWR button) & wake (Lid, PWR button) battery management (with ACPIBatteryManager v1.90.1) keyboard (with VoodooPS2Controller v1.9.2) touchpad (with VoodooI2C v2.1.4 + VoodooI2CHID v1.0), including tap-to-click (mandatory in PrefPane settings), scroll & zoom, rotate or other multi-finger gestures. On occasions, won't work until system is rebooted one or several times. Not working: Touchpad buttons TrackPoint Not tested: RTS525a microSD card reader with Cholonam's revised sinetek-rtsx kext GeekBench v2.4.3 (32bit) gives a 14200+ rating: 1) 10.14 USB installer creation Using a USB key of 8GB minimum, create a Mojave USB installer through the following Terminal command: sudo <path>/Install\ macOS\ Mojave.app/Contents/Resources/createinstallmedia --volume /Volumes/<USB key> where: <path> = location of Mojave installation package (eg: /Applications if freshly downloaded) <USB key> = name of formatted USB volume (eg: USB_8GB) The process will take several minutes. Once completed: install Clover bootloader on the USB installer with the following customised settings: Clover for UEFI booting only Install Clover in the ESP UEFI Drivers AudioDxe-64 DataHubDxe-64 FSInject-64 SMCHelper-64 ApfsDriverLoader-64 AppleImageLoader-64 AptioMemoryFix-64 Fat-64 HFSPlus NvmExpressDxe-64 PartitionDxe-64 Ps2MouseDxe-64 UsbKbDxe-64 UsbMouseDxe-64 Themes (optional) Install Clover Preference Pane (optional) you may use version r4919 attached below: Clover_v2.4k_r4919.pkg.zip once Clover is installed, launch Clover Configurator app and mount the freshly created EFI partition of the USB installer Clover_Configurator.zip open this EFI partition and transfer/copy the files & folders from the Latitude 7490 Mojave Clover pack below to the EFI/Clover folder: Clover_Pack_7490.zip Clover_Pack_7490_#2.zip Clover_Pack_7490_#3.zip Clover_Pack_7490_#4.zip Clover_Pack_7490_#5.zip Clover_Pack_7490_#6.zip Clover_Pack_7490_#7.zip Clover_Pack_7490_#8.zip 7490_Mojave_Clover_Pack_#9.zip 2) 10.14 installation boot the Mojave USB installer at the Clover main menu, select the "Install macOS Mojave" partition (but don't press [ENTER]) press [SPACE], select -v verbose option in the menu, then choose to boot with the selected options proceed with installation, creating & formatting the target Mojave installation through Disk Utility as/if required on 1st reboot, boot off the USB installer and select the freshly created "macOS install from <target Mojave partition>" repeat this until this partition is no longer offered and only the target Mojave partition is left to boot Reboot the target Mojave partition via your USB installer 3) Post-installation tuning Once the target Mojave partition has booted, complete the 1st boot configuration tuning Once at the desktop, install Clover bootloader on the Mojave partition/disk with the customised settings listed above Once Clover is installed, launch Clover Configurator app and mount the freshly created EFI partition of the Mojave partition/disk Open this EFI partition and transfer the files & folders from the above Latitude 7490 Mojave Clover pack to the EFI/Clover folder You may then reboot and verify that Mojave boots off your disk through Clover Edit: 16 Apr 2019 - - - - - - - - - - - - Tuned-up Clover pack #2: removed unnecessary SSDTs removed unnecessary patches removed unnecessary settings added NoTouchID kext to fix authentication lag when making changes to /LE and/or /S/L/E replaced I2C kexts to fix TouchPad laggy/jumpy movement Edit: 31 Jul 2019: - - - - - - - - - - - - Revised Clover pack #4: patched DSDT added to inject support for Fn-F11/Fn-F12 brightness keys. Edit: 09 Aug 2019: - - - - - - - - - - - - - Revised Clover pack #5: fixed mistake in patched DSDT affecting _PWR resources which killed Sleep when laptop running on mains. Edit: 15 aug 2019: - - - - - - - - - - - - - Revised Clover pack #6: Adjusted Clover config to add "DellSMBIOSPatch" in order to avoid truncated Mac model name in "About This Mac". Edit: 08 Sep 2019: - - - - - - - - - - - - - Revised Clover pack #7: Patched DSDT of pack #6 was causing system reset. Re-patched raw DSDT from BIOS 1.11.0 to inject support for Fn-F11/Fn-F12 brightness keys (no other patch) and all seems Ok. Edit: 05 Oct 2019: - - - - - - - - - - - - - Revised Clover pack #8: Injected HDMI connector type to iGPU FB@1 to recover from a picture issue (like yellow veil) with HDMI output + loss of HDMI audio, all due to default DP connector type on the framebuffer. This worked OOB initially (certainly did with my initial 10.14.4 build) but clearly not any more with subsequent Mojave versions, at least 10.14.6. Edit: 20 Apr 2020: - - - - - - - - - - - - - Added a note about Realtek RTS525a SD card reader. Edit: 17 Jun 2020: - - - - - - - - - - - - - Revised Clover pack #9: Moved patched DSDT out of ACPI/patched folder since it's causing KP for most people. It was only patched to support brightness control through Fn-F11/Fn-F12. Jake Lo has provided SSDT alternatives in other guides/threads so it's best to use that. I'll try them asap on the 7490 and update accordingly.
1 point
-
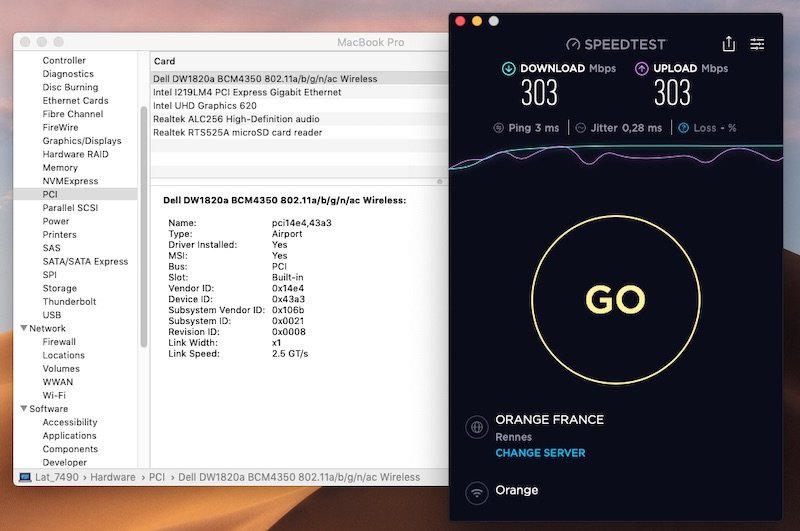
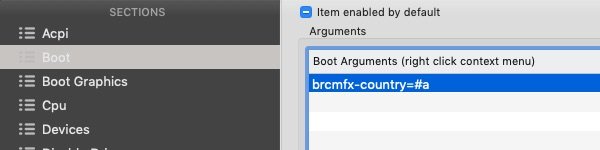
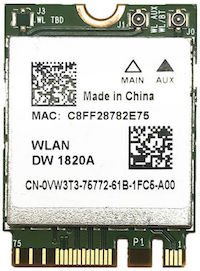
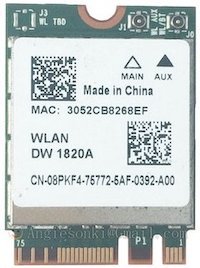
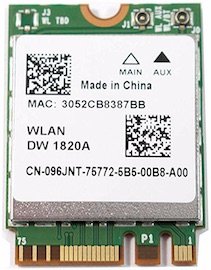
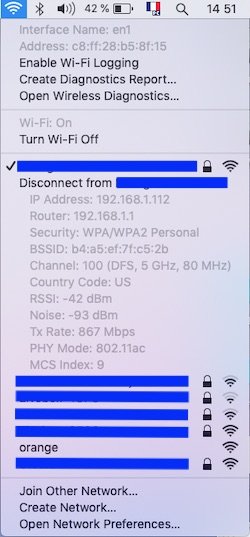
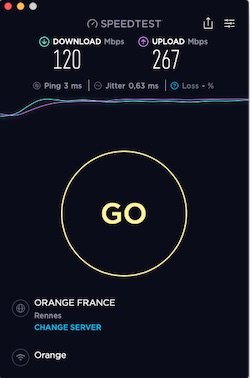
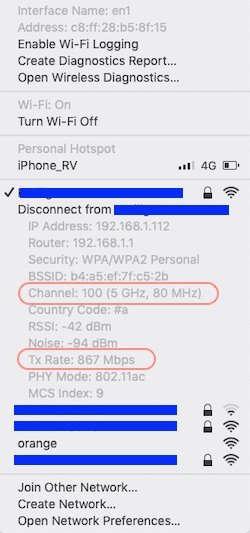
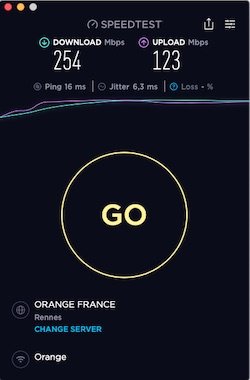
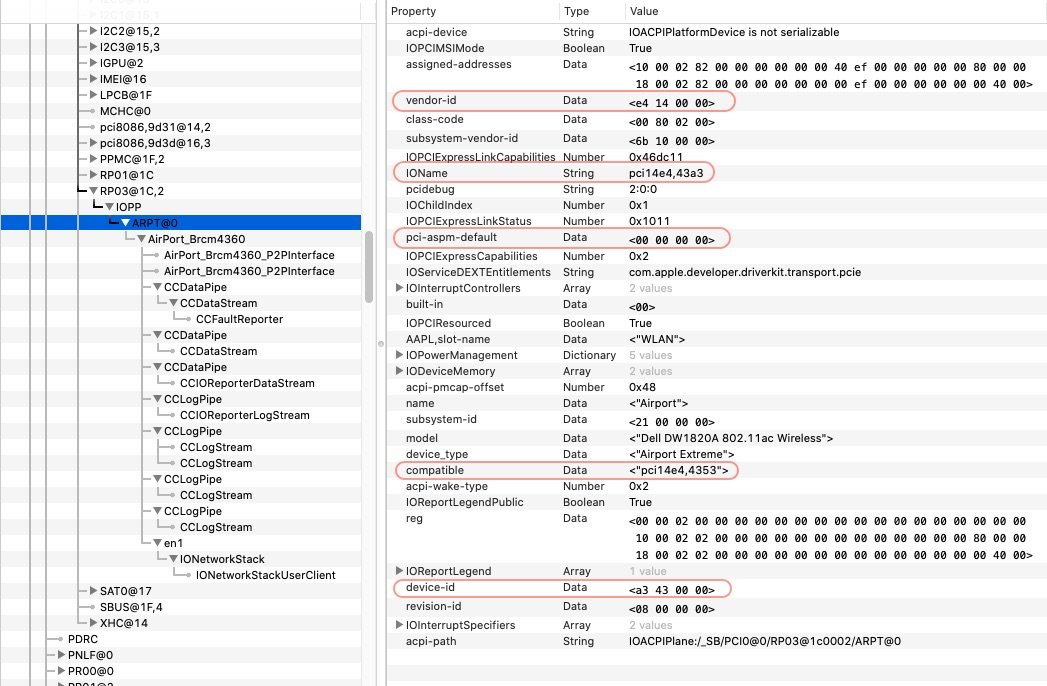
Last update: 28th Jan 2020 Dell DW1820A: Ok Ok Ok DW1820A is a pretty good combo card providing 2.4/5GHz 802.11ac wireless at 867Mbps + Bluetooth 4.1. As stated at Wikidevi, there appears to be a few different models of the card. Whilst they all carry the same Broadcom id 14e4:43a3, they each carry a different subsystem id/part #: 1028:0021 (part # CN-0VW3T3) -> 100% Ok with ASPM disabled (originally tested 100% Ok on my Latitude 7490 without ASPM tuning) 1028:0021 (part # CN-096JNT) -> 100% Ok with APSM disabled 1028:0022 (part # CN-096JNT) -> 100% Ok with APSM disabled 1028:0023 (part # CN-0VW3T3) -> 100% Ok with APSM disabled 1028:0023 (part # CN-08PKF4) -> 100% Ok with APSM disabled I acquired a Dell DW1820A a few months ago and was able to play with that card on a Latitude 7490 laptop (fitted with an M.2 2230 Key A+E WLAN slot) that I targeted for Mojave. The model I received was CN-0VW3T3. Before it was later established that not all DW1820A were equal, I purchased a 2nd one and, as it turned out to be, was lucky to receive another 0VW3T3 model. /!\ The 1st thing I want to report is that I encountered difficulties booting my Mojave USB installer and installing macOS with the card plugged in. I had to disable wireless in BIOS to be able to install Mojave. Once it was installed, booting Mojave with wireless enabled in BIOS would cause quite severe lag and performance degradation once at the desktop, as if the card just clogged up CPU ressources. This was because I had not applied any particular tuning for the card and, of course, this was resolved once I implemented the necessary fix detailed below. /!\ Searching through the Web for that DW1820A/BCM4350, I came accross a few forum posts/threads that mentionned: rolling back the Yosemite IO80211Family kext to get the card to work, although with instability and regular KPs removing AirPortBrcmNIC plugin kext from IO80211Family kext, patching AirPortBrcm4360 plugin kext with the id of the DW1820A and installing AirportBrcmFixup kext with a couple of parameters (Credits to Hugotai, cf. his post @Voldemort's place, 2nd Dec 2018) Whilst I did not really contemplate doing the 1st thing, I did envisage the 2nd one and started to look at the differences between Yosemite's version of IO80211Family kext and Mojave's. The main difference I had already noticed was that device id 14e4:43a3 was handled by AirPortBrcm4360 up to Sierra 10.12 and by AirPortBrcmNIC since High Sierra 10.13. Further reading and experimenting showed me that AirPortBrcmNIC kext was the root cause of the problem. Building on Hugotai's success, I seeked to work out an easier solution to bypassing AirPortBrcmNIC kext that would not require kext removal and Info.plist patching but, instead, something that could be implemented through hardware properties injection, either through DSDT/SSDT patching or bootloader (Clover or OpenCore) configuration. Once Hugotai's solution was verified and confirmed, I worked out the following Clover-based solution (because that's what I was using) for HighSierra/Mojave: identify the IOReg/ACPI device to which the DW1820A card is attached (use IORegistryExplorer app to that effect). Eg: RP0n@xx,yy->PXSX@0. in the absence of individual ACPI device entry under the PCI bridge for the card, select "FixAirport" ACPI Fix in Clover. That'll create a device "ARPT" @0 under the bridge and that's what you'll inject properties to. This may also require to select "AddDTGP" ACPI Clover fix if your DSDT does not possess any DTGP method. If running with Clover, use Clover Configurator app to that effect. inject the following properties either in DSDT or through bootloader config (latter recommended): compatibility of the card with Broadcom chips 14e4:4353 or 14e4:4331 that are handled by IO80211Family's PlugIn kext AirPortBrcm4360 ASPM disabling (required for most cards to avoid CPU clogging and system freeze) optionally, add SysProfiler's cosmetic info such as PCIe Slot, card's make and model, etc. and that's it ! Nothing to do to IO80211Family kext or its PlugIns which all remain untouched/unmodified/full vanilla in /S/L/E. It really could not be simpler... NB: if your card's country code absolutely requires to be changed, say for full 5GHz/80MHz operations, add the following steps: install AirportBrcmFixup kext in /L/E + repair permissions + rebuild your cache or inject it through Clover's EFI/CLOVER/kexts/Other add boot argument brcmfx-country=XX (where XX is the target value, eg: US, FR, #a, etc.) to the Boot section of your Clover config but, beware, I found that using AirportBrcmFixup (v1.1.9 at time of writing) with country code other than default's US setting of the card impacted my wireless performance (fluctuating and reduced RX/TX rate). For instance, with country code set to FR (for France), I would not connect at 80MHz on my 5GHz Wireless network, only at 40MHz which resulted in a local wireless connection limited to 400Mbps (vs. 867Mbps) and reduced my overall Internet RX rate by about 60% and TX rate by about 10%: with country code set to #a (to get full 80MHz connection), I could not obtain DFS channel mode to my local router and I noticed fluctuating/unstable RX/TX rates: without AirportBrmfixup, my wireless connection runs solid at 867Mbps and SpeedTest returns a solid TX and RX rates at 300Mbps (i.e. the maximum speed of my Internet connection). Properties injection through DSDT: On my laptop, the DW1820A was found attached to device RP03.PXSX located at IO address 0x001C0002, i.e. 1C,2. The DSDT patch required to inject properties could look like this (devices names will differ from one computer to another of course!): Device (RP03) // PCIe Root Bridge { name (_ADR, 0x001C0002) [...] [...] [...] Device (PXSX) // DW1820A card attached to this device (FixAirport Clover ACPI fix required if such device is missing) { Name (_ADR, Zero) [...] [...] [...] Method (_DSM, 4, NotSerialized) // _DSM: Device-Specific Method { If (LEqual (Arg2, Zero)) { Return (Buffer (One) { 0x03 }) } Return (Package () { "AAPL,slot-name", // Optional Buffer () { "WLAN" }, "device_type", // Optional Buffer () { "Airport Extreme" }, "name", // Optional Buffer () { "Airport" }, "model", // Optional Buffer () { "Dell DW1820A 802.11ac wireless" }, "compatible", // Mandatory Buffer () { "pci14e4,4353" // Declares compatibility with BCM43224; "pci14e4:4331" for BCM94331 may also be used }, "pci-aspm-default", // Mandatory for most cards Buffer (One) { 0x00 // Disables ASPM for PCIe device } }) } } } Properties injection through bootloader config: An easier alternative is to inject those properties in bootloader config (for Clover via Clover Configurator app for instance). This can be done within the Devices properties section by injecting the desired properties in the Properties sub-section: In the left part, add the PCIe address of the targeted device in the form PciRoot(0x0)/Pci(<root device address>)/Pci(<actual device address>) In the right part, add the above properties in single lines and with the right types (String, Data, Number) For instance, in the case of my laptop booting with Clover, the target device will be PciRoot (0x0)/Pci(0x1C,0x02)/Pci(0x0,0x0) for PCI0@0->RP03@1C,2->PXSX@0. Then, properties will be injected as lines of keys of 3 x possible types: strings, hex data blocks or numbers. For instance, to declare compatibility with 14e4:4353, the line will consist of Property Key set to compatible, Key Value set to pci14e4,4353 and Key Type set to STRING. The complete properties injection will be: Device = PciRoot(0x0)/Pci(0x1c,0x02)/Pci(0x0,0x0) Key = compatible | Value = pci14e4,4353 | Type = STRING Key = pci-aspm-default | Value = 0 | Type = NUMBER Key = AAPL,slot-name | Value = WLAN | Type = STRING (optional) Key = device_type | Value = Airport Extreme | Type = STRING (optional) Key = name | Value = Airport | Type = STRING (optional) Key = model | Value = Dell DW1820 (BCM4350) 802.11ac wireless | Type = STRING (optional) Once the device properties are injected in bootloader config or DSDT, there's nothing left to do but reboot the computer. The DW1820A card will then be fully active and able to connect to 2.4/5GHz networks at full speed. Results: On the Bluetooth side, once the usual Broadcom firmware patching kexts are installed (eg: Rehabman's BrcmFirmwareRepo + BrcmPatchRAM2 for instance), the BT4.1 module will be fully operational and capable of supporting AirDrop and Handoff! Links: Clover Configurator app Rehabman's Broadcom Firmware patching kexts Acidanthera AirportBrcmFixup kext - - - - - - - - - - Edit: 06 Jan 2020 Updated with freshly found ASPM disabling property injection that fixes all outstanding stability issues. DW1820A #096JNT and Foxconn T77H649 now tested 100% Ok. DW1820A #08PKF4 should be just the same. - - - - - - - - - - Edit: 28 Jan 2020 Finally got to test a DW1820A #08PKF4 and it's also 100% Ok with ASPM disabled.
1 point


This leaderboard is set to London/GMT+01:00