
Leaderboard


Popular Content
Showing content with the highest reputation on 05/14/19 in all areas
-
Yes.1 point
-
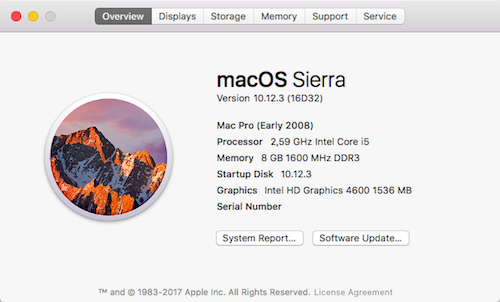
Last update: - Target macOS release: Sierra 10.12.x This is an Enoch-based installation using the well-known/well-documented vanilla manual method detailed below: Working: full QE/CI with HD4600 graphics (with DSDT patch for Azul FB #12) HDMI output (with patched AppleIntelFrameBufferAzul kext) full audio, including jack microphone input and headset output (with patched AppleHDA kext) HDMI audio (with patched AppleIntelFrameBufferAzul kext) built-in Gigabit Ethernet (with AppleIntelE1000e kext) native speedstep (with tuned Kozlek's FakeSMC (SMC keys=2.13f9/SMC compatible=smc-huronriver) and MBP11,1 SMBIOS profile) Turbo boost to x33 3.3GHz (getting CPU multipliers x8/17/26 + Turbo multipliers x27/28/29/30/31/32/33) sleep & wake (with DSDT patch for EHCx/XHC/HDEF/GLAN _PRW; sleeps Ok on Energy Savings settings/Apple menu option/power button/lid closure; wakes Ok through lid opening/power button wireless with any compatible card battery management and monitoring (with ACPIBatteryManager kext v1.70.2) SD card reader (with DSDT patch for compatibility with Apple's default reader) integrated webcam OOB keyboard backlight control OOB (for backlit models) All USB3.0 ports (with DSDT EHCx/XHC/Darwin patch + FakePCIID_XHCIMux & USB injector kexts) Express card slot OOB Not Working: VGA output unsupported DVI output no longer available off port replicator through previous Azul FB patches Not tested: SmartCard reader fingerprint scanner 1) 10.12 USB installer creation Double click on InstallESD.dmg found in Install macOS Sierra.app/Contents/SharedSupport to mount the dmg image Then mount BaseSystem.dmg (hidden file) open /Volumes/OS\ X\ Install\ ESD/BaseSystem.dmg Use Disk Utility to restore the contents of BaseSystem.dmg on a USB key (or HDD partition) formatted Mac OS extended (journaled). Remove link for Packages in folder System/Installation of your USB key rm /Volumes/OS\ X\ Base\ System\ 1/System/Installation/Packages Copy folder Packages located in InstallESD.dmg to folder System/Installation of your USB key cp -R /Volumes/OS\ X\ Install\ ESD/Packages /Volumes/OS\ X\ Base\ System\ 1/System/Installation Copy the 2 hidden files (BaseSystem.dmg & Basesystem.chunklist) of InstallESD.dmg to the root of your USB key cp /Volumes/OS\ X\ Install\ ESD/BaseSystem.* /Volumes/OS\ X\ Base\ System\ 1 Install Enoch r2848 (latest at time of writing ) on the USB installer with all default settings Enoch-rev.2848.pkg.zip Copy the above Enoch r2848 installer package to the root of the USB installer Copy the following (unzipped/extracted) E6440 bootpack to the root of the USB installer E6440_i5-4300M_HD4600_Sierra-Pack.zip Create a folder called Kernels under /System/Library (normally, it won't exist at that stage) Copy the appropriate Sierra kernel to /System/Library/Kernels. Copies of the kernels are available here 2) 10.12 installation Boot the 10.12 USB installer (it may take a little time to kick in) with -f -v boot flags At macOS installer main screen, open up Disk Utility in Utilities menu If applicable, partition your target disk in GPT/GUID scheme Create your target 10.12 partition and format it as OS X Extended (Journaled) Close Disk Utility and proceed with macOS 10.12 installation as usual 3) Post-installation fine-tuning Reboot the 10.12 USB installer (it may take a little time to kick in) At macOS installer main screen, open up Terminal in Utilities menu Verify CoreStorage installation disk mode diskutil list If CoreStorage activated for Fusion drive (i.e. presence of a logical disk), revert to legacy mode diskutil corestorage revert <device> (for example: /dev/disk1) Identify your freshly made 10.12 partition name df Copy the Extra folder from the USB installer to your identified 10.12 disk partition cp -R /Extra /Volumes/<your fresly made 10.12 partition name> (for example: cp -R /Extra /Volumes/OSX_disk) Reboot the 10.12 USB installer, press a key at delay bar (or F8) to interrupt boor process and select your freshly made 10.12 disk partition. You'll then be booting Sierra for the 1st time Complete the 1st boot installation finalisation Once at the 10.12 desktop, run the Enoch r2848 package from your USB installer to install Enoch on your HDD; it should be installed on the 1st partition of the disk Eject the 10.12 USB installer and put it aside Disable hibernation (can be done later, but should be done): open up Terminal and type the following commands sudo pmset hibernatemode 0 sudo pmset hibernatefile /dev/null sudo rm -f /var/vm/sleepimage copy all kexts from /Extra/Extensions to /Library/Extensions (ignore and acknowledge the permissions-related error messages) copy patched AppleHDA from /Extra/Extensions/Copy_to_SLE to /System/Library/Extensions (ignore and acknowledge the permissions-related error messages) repair kexts permissions and rebuild cache sudo chmod -Rf 755 /S*/L*/E* sudo chown -Rf 0:0 /S*/L*/E* sudo chmod -Rf 755 /L*/E* sudo chown -Rf 0:0 /L*/E* sudo touch -f /S*/L*/E* sudo touch -f /L*/E* sudo kextcache -Boot -U / Edit /Extra/kernel.plist and set KernelBooter_kexts parameter to No <key>KernelBooter_kexts</key> <string>No</string> If your E6440 is fitted with a different CPU than the i5-5300M, download Pike R Alpha's SSDT generator tool and generate your own CPU-specific SSDT. Copy the resulting SSDT.aml file to /Extra folder (it's normally prompted by the tool). Reboot your finalised Sierra installation Please note that: Loading injected kexts from /E/E with boot option KernelBooter_kexts=Yes is slower than loading cached kexts placed in /S/L/E or /L/E. After any kexts modification, whether to /S/L/E or to /L/E, repair permissions and rebuild cache as detailed above. In Sierra, the AppleHDA binary patch for codec ALC292 consists of: replace 8419D411 by 9202EC10 (2 x instances) replace 8508EC10 by 00000000 (2 x instances) replace 8408EC10 by 00000000 (2 x instances) Other E6440 laptops fitted with a different CPU will require a different (and suitable) SSDT table than provided in the above pack (can be looked up on the web or created with Pike R Alpha's SSDT generator tool).
 1 point
 -
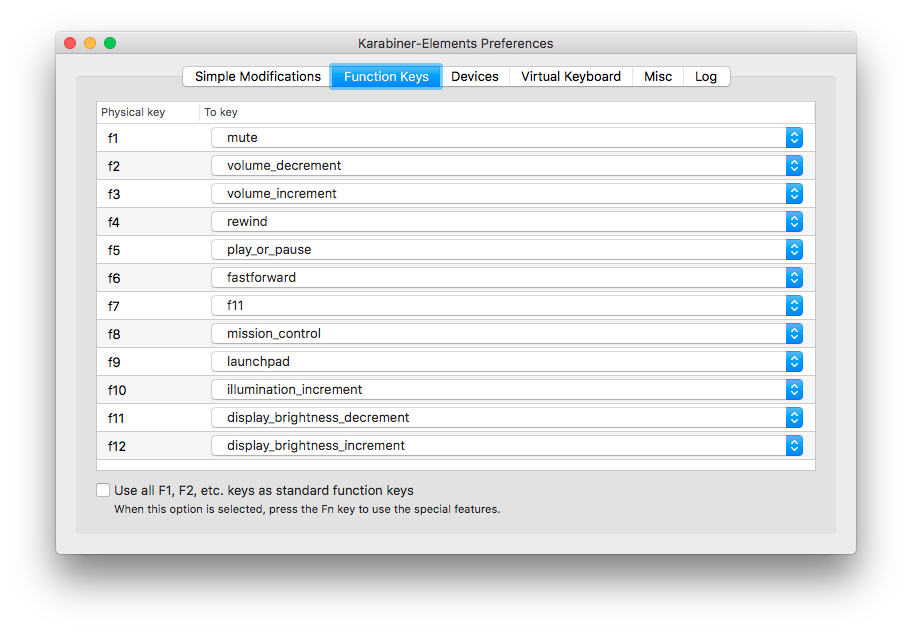
Sierra Guide See here for install guide, just replace with Sierra bootpack. E7x70_Sierra.zip - See Update files below Known Issue & Workaround: HDMI-Output works but if connect HDMI-Cable the local Display goes off and never recovers. I had tried different configurations but none panned out. Here's a workaround: Close the LID until you see the HDMI display becomes the primary display, then open the LID. It'll switch LCD as primary and HDMI as secondary. NOTE: Workaround is only needed on clean boot, no issue if system has gone through a sleep/wake cycle Update: Fixed it by modifying EDID with this kext, but not work for Mojave. Post Install: Enable Brightness Control and Trackstick Scrolling Trackstick Scrolling Download and install Smartscroll for trackstick scrolling Touchpad - 2 fingers scrolling, 2 finger tab for right click, tap and drag Brightness Control Download and Install Karabiner-Elements Launch Karabiner-Elements Copy karabiner.json to ~/.config/Karabiner karabiner.json.zip or copy the settings according to diagram below Now use F11 & F12 for Brightness, use F1, F2, & F3 for Volumes Control
1 point
This leaderboard is set to London/GMT+01:00