
Leaderboard


Popular Content
Showing content with the highest reputation on 05/15/21 in all areas
-
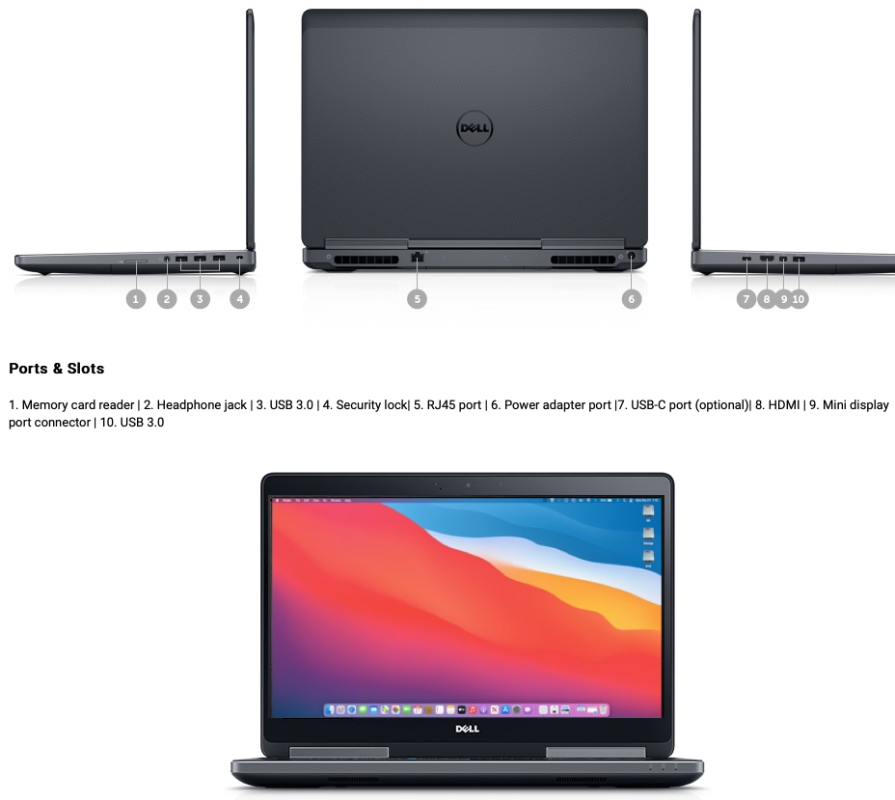
OPENCORE - High Sierra -> Monterey Specification: BIOS 1.21.3 Intel Core i7-6920HQ Quad Core 2.90GHz, 3.80GHz Turbo, 8MB 45W 4 DIMM slots: Up to 32GB DDR4 2667MHz SuperSpeed memory Nvidia Quadro M2000M with 4GB GDDR5 dedicated memory Intel® HD Graphics 530 15.6" FHD (1920x1080) Anti-Glare LED-backlit (45% color gamut) Support for two storage devices: one M.2 PCIe solid state drive and one M.2 PCIe/2.5” SATA drive: Dell Fast Response Free Fall Sensor standard Solid State Drive (SSD): 256GB, 512GB, 512GB SED, 1TB 2.5” SATA 6Gb/s M.2 PCIe NVMe Solid State Drive (M.2 SSD): 256GB, 512GB, 512GB SED, 1TB SSD Integrated Intel 82580 10/100/1000 Gigabit Ethernet Intel® 8260 Dual-Band 2x2 802.11 ac (Miracast) Bluetooth® 4.1 Dual integrated high quality speakers Optional integrated light sensitive HD video webcam 1 x SD Card Reader (SD, SDHC, SDXC, supporting up to 64GB) 1 x Thunderbolt® 3 (optional) 4 x USB3.0 with PowerShare 1 x mDP 1 x HDMI 1 x Headphone and microphone combo jack 1 x SmartCard Reader (optional) Chassis lock slot support Working: Full HD530 Graphics Acceleration Internal speaker / Headphone / Autoswitch (ALC293) Keyboard / Touchpad with VoodooPS2Controller (scrolling, left and right mouse button...etc) Wireless /Bluetooth - replaced Intel with DW1560 / DW1830 / DW1820A Brightness Slider with Fn+F11 / Fn+F12 HDMI / mDP / USB-C - Video / Audio 3 Displays (Internal + HDMI + mDP or USB-C to HDMI or mDP adapters) Internal USB ports HD Webcam USB-C to HDMI / mDP Display USB-C to USB-C Display Sleep / Wake with LID close / Open SD Card Reader Not Working: NVIDIA Quadro M2000M disabled via SSDT patching ThunderBolt (not tested) Installation: Download macOS Monterey / Big Sur / Catalina / Mojave / HS Format a 16GB USB drive (GUID / Extended (Journaled)) Create USB Installer with createinstallmedia command Download attached folder and rename as EFI Mount EFI partition and add EFI folder Configure BIOS setting according to guide Boot with USB installer Complete installation Post Installation: Mount EFI partition of newly installed drive and copy EFI folder over Update / Change in Config.plist under PlatformID->Generic (use genSMBIOS or Hackintool.app) MLB, ROM, SystemSerialNumber and SystemUUID To Enable track stick scrolling, install Smart Scroll.app NOTE: Rename config-IntelWifi to config.plist if you're using an Intel Wireless / BT combo (not tested) 7510_OC_0.8.5.zip 7510_OC_0.7.5.zip 7510_OC_0.6.7.zip
 1 point
 -
Sorry, I have the option on the E6430 BIOS version A24, so I assume it's the same on the E6230.1 point
-
No such settings in the BIOS of the E6230. It's just Standard or Express Charge. No custom mode. For a generic/non-Dell battery, I reckon Standard is the desired mode of operation.1 point
-
You can check your BIOS under Power Management/Primary Battery Charge Configuration. If you have the setting set to Custom, you can have the charge stop at certain %. See if that's what you have it set to. Change it to Adaptive or whatever settings you like.1 point
-
No such thing as "battery health" for our E6x30 Series and probably most (if not all) Hacks. It's a feature available for some Apple Macs with TB3 ports only. Don't know where you got that it was available on Hackintosh platforms. Your screenshot shows everything you can expect to see in your Energy Saver PrefPane; you won't get anything else. You should, of course, disable those 2 x options to ensure Sleep works at its best on your E6230. If you want more detailed info about your battery, go to SysInfo->Power.1 point
-
No such limitation in macOS; check your BIOS settings. Note that non-Dell batteries can also behave a little strangely. Injected kexts (from Clover or OC) do not get listed in SysInfo->Software->Extensions, only cached kexts (cached from /S/L/E or /L/E).1 point
-
@thawri You might have to fully disable the dgpu. Go to the BIOS Boot Option Create a new boot option, call it DVMT or whatever you like Point it to /EFI/Boot/DVMT/Bootx64.efi Save and reboot, press F12 Select the new boot option DVMT or whatever you assign it At the grub shell, select Option 1 for "#1 iGPU-only configuration. No dGPU. " You can restore if with Option 2 if you decide to enable it for Windows. The script is tailored for Precision 7510 / 7710 since they have the same BIOS Test to see if that works, it works for my 7510. Place system to sleep over night by closing lid, woke it up the next day without an issue. It might take a couple of second for screen to show or you could try tapping the ESC key. Darkwake =No and igfxonln=1 are already set on the boot arg. You could try different darkwake value to see if the screen will wakeup faster.1 point
This leaderboard is set to London/GMT+01:00