
EMlyDinEsH
-
Posts
1102 -
Joined
-
Last visited
-
Days Won
196
Content Type
Profiles
Articles, News and Tips
Forums
Everything posted by EMlyDinEsH
-

Details about the Enhanced Keyboard for Smart Touchpad driver
EMlyDinEsH replied to EMlyDinEsH's topic in Smart Touchpad
Keyboard layout ID: This is only meant for ISO keyboard which needs to be detected using an ISO keyboard layout for the some keys to work. This is optional and is not needed for ANSI/Japanese keyboards, but you can use if you want the keyboard to be detected with an Apple keyboard layout. Default Keyboard type is set to Cosmo layout for ISO, PS2 layout Type for ANSI. To configure keyboard layout id, enter the keyboard id decimal value at the plist entry "IOKitPersonalities->ApplePS2Keyboard->Keyboard type(ID)" from the plist file "info.plist" inside the AppplePS2Keyboard kext. Keyboard ID(0xXX) /* Comments */ 0x03 /* Unknown ANSI keyboard */ 0x1B /* Default Apple PS2 Controller ANSI keyboard */ 0x2F /* Apple M89 Wired (ISO) Keyboard */ 0x2C /* Apple M90 Wireless (ISO) Keyboard */ 0xC6 /* Gestalt Cosmo USB Domestic (ANSI) Keyboard */ 0xC7 /* Cosmo USB International (ISO) Keyboard */ 0xC8 /* Cosmo USB Japanese (JIS) Keyboard */ 0xCC /* Andy USB Keyboard Domestic (ANSI) Keyboard */ 0xCD /* Andy USB Keyboard International (ISO) Keyboard */ 0xCE /* Andy USB Keyboard Japanese (JIS) Keyboard */ 0x1F /* Apple Q6 Keyboard Domestic (ANSI) Keyboard */ 0x20 /* Apple Q6 Keyboard International (ISO) Keyboard */ 0x21 /* Apple Q6 Keyboard Japanese (JIS) Keyboard */ 0x22 /* Apple Q30 Keyboard Domestic (ANSI) Keyboard (or) USB Pro Keyboard w/ F16 key Domestic (ANSI) Keyboard */ 0x23 /* Apple Q30 Keyboard International (ISO) Keyboard (or) USB Pro Keyboard w/ F16 key International (ISO) Keyboard */ 0x24 /* Apple Q30 Keyboard Japanese (JIS) Keyboard (or) USB Pro Keyboard w/ F16 key Japanese (JIS) Keyboard */ 0x25 /* Apple Santa/Fountain Keyboard Domestic (ANSI) Keyboard */ 0x26 /* Apple Santa/Fountain Keyboard International (ISO) Keyboard */ 0x27 /* Apple Santa/Fountain Keyboard Japanese (JIS) Keyboard */ 0x30 /* German and (Turkish? may be) ISO Keyboard */ 0x31 /* Spanish and Italian ISO Keyboard */ 0x32 /* French ISO Keyboard */ 0x33 /* Brazilian ABNT2 Keyboard */ -
Details about the Enhanced Keyboard for Smart Touchpad driver
EMlyDinEsH replied to EMlyDinEsH's topic in Smart Touchpad
Fn Keys Mode: I've implemented this feature in order to simulate the Fn key functions of Apple for the notebooks which has real Fn keys not working and also to provide/improve the keyboard experience close to Apple keyboard. There are three modes in this feature. They are: Note: In version 3.0.2 (or) lesser, ApplePS2Keyboard kext is found inside the ApplePS2Controller kext. From v3.3, ApplePS2Keyboard is located inside ApplePS2ElanTouchpad and From v4.2 its in ApplePS2SmartTouchpad kext. Mode 1 works without Fn key press and has Apple keyboard Fn key Mappings by default It overrides the regular function keys(F1 - F12) with Fn keys, so to access those regular function keys you need to Hold "Shift + Caps" and press the respective Function key to access. uses the Fn key mapping values from the plist entry "Fn Keys Mode 1" you can change these mappings as you like by using the allowed keys and editing the plist file "ApplePS2Keyboard.kext/Contents/Info.plist" at the section "IOKitPersonalities->ApplePS2Keyboard->Fn keys Mode 1" Mode 2 works using the Context menu key (or Hold "Shift + Caps") as Fn key and has my custom Fn key mappings uses the Fn key mapping values from the plist entry "Fn Keys Mode 2" you can also change these mappings as you like by using the allowed keys and editing the plist file "ApplePS2Keyboard.kext/Contents/Info.plist" at the section "IOKitPersonalities->ApplePS2Keyboard->Fn keys Mode 2". Mode 3 works using the Context menu key (or Hold "Shift + Caps") as Fn key but has Fn key mapping of the Notebook vendor uses the Fn key mapping used by the notebook vendor like Dell, Samsung, Acer and Asus. for vendor mapping you need to edit the plist entry "Fn keys Layout" to the vendor values explained below. Allowed vendor values for the Fn keys Layout: 'NONE' clears the mapping and makes the mode like disabled. I meant this value to provide vendor mapping of the Fn keys positions in Fn key mode 3 and fix some of the minor issues of Fn keys in my driver for few notebooks, because there are some scan codes used by Fn keys which are getting conflicts in ADB-scan code mapping due to each vendor doing different functions for the same scan code. ASUS ACER DELL SAMSUNG MSI GIGABYTE LENOVO NONE Allowed key values for mapping the Fn key functions are: F1 - F12, Pause, ArrowDown, ArrowUp, ArrowLeft and ArrowRight. Enter the value "disable" in plist for disabling the Fn key mapping you don't want. You can enable/disable this feature by editing the plist entry "Fn keys Mode" to the below values: 0 - to disable Fn keys mode 1 - 3 - each mode works like I've explained above Use Right context menu key (or) Hold "Shift + Caps" for mode 2 Fn Key Mode 2 F1 - Sleep F3 - Misson control F3 - KBBacklightDown(Asus keyboard backlight) F4 - Launchpad F4 - KBBacklightUp (Asus keyboard backlight) F5 - Brightness decrease F6 - Brightness increase F7 - Display sleep F8 - Video Mirror F9 - Disable/Enable Touchpad F10 - Volume Mute F11 - Volume decrease F12 - Volume increase Left Arrow - Media Previous (Media Rewind on key Hold) Down Arrow - Play/Pause Right Arrow - Media Next (Media Fast on key Hold) Pause/Break key - Context menu Fn Key Mode 1 F1 - Brightness decrease F2 - Brightness Increase F3 - Mission control F3 - KBBacklightDown(Asus keyboard backlight) F4 - Launchpad F4 - KBBacklightUp (Asus keyboard backlight) F5 - Display Sleep F6 - Video Mirror F7 - Media Previous (Media Rewind on key Hold) F8 - Media Play/Pause F9 - Media Next (Media Fast on key Hold) F10 - Volume Mute F11 - Volume decrease F12 - Volume increase Pause/Break Key - Enable/Disable touchpad NOTE: Display sleep disables both keyboard and Touchpad, so if you try to wake the screen other than Fn + Fx combination then both keyboard and touchpad are not enabled back. You need to press "ESC" key to enable them back. -
Following are the fixes and features added to the keyboard by Smart touchpad driver: Integrated deeply with Elan touchpad driver in order to get the some of the élan features to work. Rewritten keyboard keys dispatch and processing from the scratch. Mapped Fn key scan codes from Acer, Asus, Dell, MSI, GIGABYTE and Samsung to ADB codes of OSX functions Added support for extended function keys F13-F24 simulation using Shift + F1 - 12 Added option to create custom OSX shortcuts using three key combinations which can be assigned to Extended Function keys. Added ISO layout option which can be enabled/disabled by editing the plist entry "Use ISO Layout" to Yes/No (or) true/false. Added option to detect keyboard with Apple Keyboard layouts (Read Keyboard layout post below). Added new Fn key mode feature (Read Fn keys mode post for details) ​Added keyboard shortcuts for enabling/disabling the touchpad features Added support for Asus keyboard backlight Added option to map Delete to Command + backspace shortcut Added option to map Num Lock to Clear Added option to disable Num Lock LED status Added option to configure right Context menu, ALT and Control keys with different values Added custom keyboard layout to fix the keys which are not mapped properly ​Added option to make Shift + Caps lock combination to act as Fn key ​Added option to choose finer brightness and volume controls Assigned Print Screen key to the OSX Screen capture shortcut Assigned Control + Pause/Break key to eject Optical drive Assigned Scroll Lock key for enabling/disabling Inertial and Continuous(hold ALT key) scroll Assigned Context menu key to show Contextual menu Fixed not working Num Lock and its LED status by soft control ​and many other improvements.
-
Details about the Smart Touchpad driver Features
EMlyDinEsH replied to EMlyDinEsH's topic in Smart Touchpad
14. Support for Asus Keyboard backlight with Idle Auto on/off: My driver supports Asus keyboard backlight control using Fn keys mode in keyboard and Idle Auto on/off which can be enabled from touchpad plist keyboard section. Following are the options that controls and enables Asus Keyboard backlight: Set the entry "EnableAsusKBacklightSupport" to Yes for enabling keyboard backlight controls in F3 and F4 by default. Set the entry "AsusKBacklightHas16Levels" to Yes for enabling 16 keyboard backlight levels. Set the entry "EnableAsusKBacklightAutoOff" to Yes for enabling keyboard backlight Auto on/off after idle timeout . Set the entry "AsusKBacklightAutoOffTimeOut" to your required timeout value in milli seconds for enabling keyboard backlight Auto off after idle timeout. Default timeout is 10 sec (10000ms). You also need to use the following patches in DSDT: Add the following methods to your ATKD device section in DSDT (or) use the attached patch files in DSDT editor. NOTE: Some systems may need additional tweaking depending on their DSDT. NOTE 2: Some notebooks might have "SBRG" instead of "LPCB" or something different. So, try to check the method “SLKB†in your DSDT for the the following line values and modify “^^PCI0.LPCB.EC0.WRAM (0xxxx, Local1)â€. 4 Levels Keyboard backlight: Name (BOFF, Zero) Method (SKBL, 1, NotSerialized) { If (Or (LEqual (Arg0, 0xED), LEqual (Arg0, 0xFD))) { If (And (LEqual (Arg0, 0xED), LEqual (BOFF, 0xEA))) { Store (Zero, Local0) Store (Arg0, BOFF) } Else { If (And (LEqual (Arg0, 0xFD), LEqual (BOFF, 0xFA))) { Store (Zero, Local0) Store (Arg0, BOFF) } Else { Return (BOFF) } } } Else { If (Or (LEqual (Arg0, 0xEA), LEqual (Arg0, 0xFA))) { Store (KBLV, Local0) Store (Arg0, BOFF) } Else { Store (Arg0, Local0) Store (Arg0, KBLV) } } Store (DerefOf (Index (PWKB, Local0)), Local1) ^^PCI0.LPCB.EC0.WRAM (0x04B1, Local1) // Haswell/Ivy ^^PCI0.LPCB.EC0.WRAM (0x044B, Local1) // Sandy/Ivy Return (Local0) } Method (GKBL, 1, NotSerialized) { If (LEqual (Arg0, 0xFF)) { Return (BOFF) } Return (KBLV) } 16 Levels Keyboard backlight: Name (BOFF, Zero) Method (SKBL, 1, NotSerialized) { If (Or (LEqual (Arg0, 0xED), LEqual (Arg0, 0xFD))) { If (And (LEqual (Arg0, 0xED), LEqual (BOFF, 0xEA))) { Store (Zero, Local0) Store (Arg0, BOFF) } Else { If (And (LEqual (Arg0, 0xFD), LEqual (BOFF, 0xFA))) { Store (Zero, Local0) Store (Arg0, BOFF) } Else { Return (BOFF) } } } Else { If (Or (LEqual (Arg0, 0xEA), LEqual (Arg0, 0xFA))) { Store (KBLV, Local0) Store (Arg0, BOFF) } Else { Store (Arg0, Local0) Store (Arg0, KBLV) } } Store (DerefOf (Index (KBPW, Local0)), Local1) ^^PCI0.LPCB.EC0.WRAM (0x04B1, Local1) // Haswell/Ivy ^^PCI0.LPCB.EC0.WRAM (0x044B, Local1) // Sandy/Ivy Return (Local0) } Name (KBPW, Buffer (0x10) { /* 0000 */ 0x00, 0x11, 0x22, 0x33, 0x44, 0x55, 0x66, 0x77, /* 0008 */ 0x88, 0x99, 0xAA, 0xBB, 0xCC, 0xDD, 0xEE, 0xFF }) Method (GKBL, 1, NotSerialized) { If (LEqual (Arg0, 0xFF)) { Return (BOFF) } Return (KBLV) } KeyboardBacklight 16Levels Patch (Nehelem).txt KeyboardBacklight 16Levels Patch (Haswell:Ivy).txt KeyboardBacklight 16Levels Patch.txt KeyboardBacklight Patch (Haswell:Ivy).txt KeyboardBacklight Patch.txt -
Details about the Smart Touchpad driver Features
EMlyDinEsH replied to EMlyDinEsH's topic in Smart Touchpad
13. Enhanced Keyboard support with integration: For details, look here: Enhanced Keyboard -
Details about the Smart Touchpad driver Features
EMlyDinEsH replied to EMlyDinEsH's topic in Smart Touchpad
12. CUSTOMIZATION OF FEATURES We can customize the touchpad features by the editing "info.plist" file located inside the kext (ApplePS2SmpartTouchpad.kext/Contents/). In the plist, go to the section "IOKitPersonalities->Smart-Pad->Preferences" and edit the value of the feature like you want. NOTE: You need to install the kext again after editing the plist. Values for boolean controlled features: Yes/No if you use Xcode/Plist editor (or) true/false if you use Text editor for editing the plist. SleepInitDelay: Sets the delay after sleep before enabling the touchpad. Its needed for some touchpads as they fail if we try to enable immediately after sleep because they might be not ready yet. Default value is 1500 ms. BUTTONS: Read here : #2 POINTER: Read here : #2 DRAGGING: Read here : #4 SCROLLING: Read here : #5 SWIPING: Read here : #6 TAPPING: Read here : #3 FINGERS PRESS: Read here : #9 MOUSE: Resolution (Value 0 - 3) : Sets the mouse resolution for basic mouse mode (or useful in unsupported touchpad). SampleRate (Value 10, 20, 40, 60, 80, 100, 200) : Sets the mouse sample for basic mouse mode (or useful in unsupported touchpad). Scaling (Value 0 - x) : Sets the mouse scaling for basic mouse mode (or useful in unsupported touchpad). OTHERS: DisableTPadOnLIDClose (Yes/No) : Disable touchpad when laptop lid is closed ? TPadStatusCheckPollRate (Value 0 - 60000): Sets the poll rate (in milli sec) for checking the status of the touchpad for Fn key disable in Asus. MaxTouchEndPressure (Value 0 - 255) : Sets the max pressure used to detect the end of the touch. MaxTouchEndDelta (Value 0 - 200) : Sets the max delta used to detect the end of the touch. Read more here : #7 Read more here : #8 Read more here : #11 KEYBOARD: EnableAsusKBacklightSupport - Enable Asus Keyboard backlight support? Default: Disabled AsusKBacklightHas16Levels - Asus keyboard backlight has 16 levels support? Default: Disabled EnableAsusKBacklightAutoOff - Enable Idle keyboard backlight on/off? Default: Disabled AsusKBacklightAutoOffTimeOut - Idle Timeout value for keyboard backlight auto off. Default: 10 sec (10000 ms) -
Details about the Smart Touchpad driver Features
EMlyDinEsH replied to EMlyDinEsH's topic in Smart Touchpad
11. APPLE TRACKPAD PREFPANE SUPPORT Trackpad Settings at Apple Trackpad Pane in System preferences: When using gestures to scroll or navigate, move content in the direction of the finger movement: Works Tracking Speed: Change this value to your optimal level Double clicking Speed: Works Scrolling Speed: Must change this value once after installing driver for working scroll Trackpad Gestures: Horizontal Scrolling: Enable/Disables for horizontal scroll in two finger and edge scroll Vertical Scrolling: Enables/Disables for vertical scroll in two finger and edge scroll Zoom: OSX zoom works Clicking : Enables/Disables Clicking and Tapping Dragging : Enables/Disables dragging Two finger Tap for secondary click: Swaps the the Two and Three finger Tap functions Ignore accidental input : Working, you can tweak Accidental input Timeout value in the plist file for timeout of the accidental input. -
Details about the Smart Touchpad driver Features
EMlyDinEsH replied to EMlyDinEsH's topic in Smart Touchpad
10. ACCIDENTAL INPUT PREVENTION AND PALM DETECTION ACCIDENTAL INPUT: You can prevent accidental inputs that happen from the touchpad when you are typing by enabling the Option "Ignore accidental input" in Trackpad prefpane at System preferences. Customization: You can configure accidental input with the following plist options. Located at IOKitPersonalities->Smart-Pad->Preferences->Keyboard in the plist. TriggerAccInputForKeyPressCount (Value 0 - 10) : Sets the number of key presses needed to trigger accidental input. TimeOutEnablesTPadAfterAccInput (Value 0 - 5000) : Sets the timeout for enabling the touchpad back when it was disabled for accidental input. TapEnablesTPadFromAccInput (Yes/No) : Allows to enables touchpad back when it was disabled by accidental input using a single finger tap gesture instead of waiting for timeout. PALM DETECTION: You can also enable/disable Palm detection which can be customized for the pressure and width of the palm by editing plist options from "Others" section of the touchpad plist. Default its enabled and configured to the best values found by the testers in beta testing. If you have problem disable this and PM me for support. Customization: You can configure palm detection with the following plist options. Located at IOKitPersonalities->Smart-Pad->Preferences->Others in the plist. PalmDetection (Yes/No) : Enables/Disables palm detection. PalmCheckMinPressure (Value 0 - 255) : Sets the minimum pressure needed to identify the touch as palm. PalmCheckMinWidth (Value 0 - 15) : Sets the minimum width needed to identify the touch as palm. -
Details about the Smart Touchpad driver Features
EMlyDinEsH replied to EMlyDinEsH's topic in Smart Touchpad
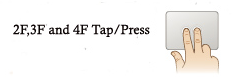
9. FEATURES TOGGLE I implemented this feature in order to enable/disable some of the features on the fly using gestures, which cannot be enabled/disabled from Trackpad prefpane. To perform this toggle, you have to Hold "Left Shift Key" in Keyboard and then "Swipe with three fingers" (or) "tap 2/3/4 fingers quickly" (or) "press and hold 2/3/4 fingers firmly" to enable/disable the features. Indicator: On performing this toggle, the pointer will move a bit Up/Down/Left/Right which indicates the feature is toggled. If the pointer moved Up/Right direction then its turned on, if moved Left/Down direction then its turned off. Three Fingers swipe toggles: Down : Toggles Edge Swiping. Up : Toggles Corner Tapping. Left : Toggles Pinch zoom. Right : Toggles Rotations. Two Fingers Tapping: Two Times : Toggles Edge scrolling. Three Times : Toggles Edge circular scrolling. Three Fingers Tapping: Two Times : Toggles scroll acceleration modes. Three Times : Toggles pointer acceleration value from 0 - 20. Four Fingers Tapping: Two Times : Toggles virtual buttons mode. Two Fingers Press: Toggles two finger press Three Fingers Press: Toggles three finger press Four Fingers Press: Toggles four finger press. -
Details about the Smart Touchpad driver Features
EMlyDinEsH replied to EMlyDinEsH's topic in Smart Touchpad
8. CLICKING AND FINGERS PRESS To perform Fingers press, Tap and hold your finger(s) firmly with some pressure on the touchpad for 2-3 seconds. To perform clicking, press the button under the touchpad in click-pad. Single finger Click/Press: (Finger press drag)Does dragging Two Fingers Click/Press: Default it does zoom reset. It can configured to other actions by editing plist with supported gesture actions value. Three Fingers Click/Press:Opens Finder window (or) Changes Language if you have more than one input source. You can change this to Finder/other from keyboard shortcuts for the shortcut "Command + Space". It can configured to other actions by editing plist with supported gesture actions value. Four Fingers Click/Press:Opens Force quit window by default. It can configured to other actions by editing plist with supported gesture actions value. Five Fingers Click/Press:Shows Desktop by default. It can configured to other actions by editing plist with supported gesture actions value. Customization: You can configure taps with the following plist options. Located at IOKitPersonalities->Smart-Pad->Preferences->Tapping in the plist. 2FingersPressAction (Value 0 -23) : Sets the action to be triggered on two fingers press. 3FingersPressAction (Value 0 -23) : Sets the action to be triggered on three fingers press. 4FingersPressAction (Value 0 -23) : Sets the action to be triggered on four fingers press. 5FingersPressAction (Value 0 -23) : Sets the action to be triggered on five fingers press. FingersPressTimeOut (Value 0 -3000) : Sets the time needed (after timeout) to trigger finger press.
-
Details about the Smart Touchpad driver Features
EMlyDinEsH replied to EMlyDinEsH's topic in Smart Touchpad
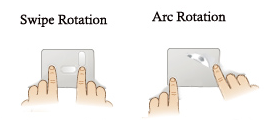
7. ROTATION Rotation works on photos to rotate them and in browser to reload page. We can do rotate in three ways: Arc Rotation : Place a finger on the touchpad in a fixed position either at Left (or) Right corner and draw an arc at the corner opposite to the fixed finger position using second finger. Left arc does left rotate and right arc does right rotate. Swipe Rotation :Place a finger on the touchpad in a fixed position at middle of the touchpad vertically and swipe the second finger from up to down for rotating Right or from down to up for rotating left. Place a finger on the touchpad in a fixed position at middle of the touchpad horizontally and swipe the second finger from left to right for rotating Right or from right to left for rotating left. Circular Rotation : (Only for ELAN v3 hardware)Place two fingers on the touchpad vertically and move them to right horizontal position to rotate right. Place two fingers on the touchpad horizontally and move them to left vertical position to rotate left. Customization: You can configure rotation with the following plist options. Located at IOKitPersonalities->Smart-Pad->Preferences->Others in the plist. Rotation (Yes/No) : Enables/Disables rotate feature. CircularRotate (Yes/No) : Enables/Disables circular rotate feature. RotationDelta (Value 0 - 500) : Sets the delta (movement) needed from moving finger to trigger rotate. RotationMaxCFDelta (Value 0 - 500) : Sets the max delta (movement) allowed for the fixed finger in detecting rotate. Some high sensitive touchpad might need higher values to work better. PinchRotateMinSamples (Value 0 - 10) : Sets the minimum number of samples needed to detect rotate. NOTE: I did my best to get this working as much as possible and works very well if you do the gesture like i explained. And you have to keep the first finger on the touchpad for 1-2 secs before rotating with other finger which I've used to avoid conflicts with other features. Will try to improve this in future as far as possible.
-
Details about the Smart Touchpad driver Features
EMlyDinEsH replied to EMlyDinEsH's topic in Smart Touchpad
6. ZOOM Two Fingers Pinch Zoom :Spreading and pinching two fingers triggers zoom in and out in single step when fingers are removed from touchpad after the gesture. OS X Zooming using Keyboard Button and 2F Vertical swipe :Hold the key chosen from the Trackpad prefpane and swipe two fingers vertically to zoom OS X. You can select the key in Trackpad prefpane option at System preferences from the option "Zoom while holding". Four/Five fingers Pinch Gesture like Apple touchpads (Only for the touchpad with 5 fingers support) :Opens launchpad. Customization: You can configure zoom with the following plist options. Located at IOKitPersonalities->Smart-Pad->Preferences->Others in the plist. PinchZoom (Yes/No) : Enables/Disables zoom feature. PinchZoomDelta (Value 0 - 500) : Sets the delta needed to trigger zoom. PinchRotateMinSamples (Value 0 - 10) : Sets the minimum number of samples needed to detect zoom.
-
Details about the Smart Touchpad driver Features
EMlyDinEsH replied to EMlyDinEsH's topic in Smart Touchpad
5. SWIPES Performing swipe gesture triggers the functions configured to them. The functions can be configured by editing plist file with the value from the the available "Supported OS X action values to config gestures" list above. Three Fingers: Swipe Left and Right: Performs backward and forward functions in Browser, Finder and others. (ISO keyboards need keyboard layout config in keyboard plist) Swipe Down: Performs Application switch Swipe Up: Opens Launchpad Four Fingers: Swipe Left: Hide/show Dock Swipe Right: Shows Properties/info for the selected file/folder Swipe Down : Minimize app Swipe Up: Close App Edges: Its is performed using one (or) two finger(s) by swiping from the edge of the touchpad to the middle (Swipe IN) (or) middle of the touchpad to the edge (Swipe OUT). And Swipe OUT works only after swipe IN in reverse without finger lift. Left Edge Swipe: Performs Left and Right Desktop/App Switch for IN and OUT swipes (Apps will switch only when they are in Full Screen). Right Edge Swipe: Opens (Swipe IN) and Closes (Swipe OUT) Notification centre. Bottom Edge Swipe: Default disabled. Top Edge Swipe: Toggles full screen. NOTE for NC (soft mode): From10.8 or later in Full screen and 10.7, NC (soft mode) works as Spotlight. So, Hold Shift key and do the gesture from 10.8 (or) later to get NC working in Full screen. Assign Keyboard shortcut to Notification center function from 10.8 or later instead of using Soft mode: Assign key combination (Command + Shift + N) to Notification centre shortcut at Keyboard Preferences as shown below in picture to get this working using the function value 14. Customization: You can control swipes with the following plist options. Located at IOKitPersonalities->Smart-Pad->Preferences->Swiping in the plist. 3FingerSwipeDownAction (Value 0 - 23) : Sets the action triggered by the 3 fingers swipe down. 3FingerSwipeLeftAction (Value 0 - 23) : Sets the action triggered by the 3 fingers swipe left. 3FingerSwipeRightAction (Value 0 - 23) : Sets the action triggered by the 3 fingers swipe right. 3FingerSwipeUpAction (Value 0 - 23) : Sets the action triggered by the 3 fingers swipe up. 4FingerSwipeDownAction (Value 0 - 23) : Sets the action triggered by the 4 fingers swipe down. 4FingerSwipeLeftAction (Value 0 - 23) : Sets the action triggered by the 4 fingers swipe down. 4FingerSwipeRightAction (Value 0 - 23) : Sets the action triggered by the 4 fingers swipe down. 4FingerSwipeUpAction (Value 0 - 23) : Sets the action triggered by the 4 fingers swipe down. 3FingerSwipes (Yes/No) : Enables/Disables 3 fingers swipes. 4FingerSwipes (Yes/No) : Enables/Disables 4 fingers swipes. MultiFingerSwipesDeltaX (Value 0 - 500) : Sets the X delta (movement) needed to detect 3F and 4F swipes. MultiFingerSwipesDeltaX (Value 0 - 500) : Sets the Y delta (movement) needed to detect 3F and 4F swipes. EdgeSwipeBottom (Value 0 - 23) : Sets the action triggered by the bottom edge swipe. EdgeSwipeLeft (Value 0 - 23) : Sets the action triggered by the left edge swipe. EdgeSwipeRight (Value 0 - 23) : Sets the action triggered by the right edge swipe EdgeSwipeTop (Value 0 - 23) : Sets the action triggered by the top edge swipe EdgeSwipes (Yes/No) : Enables/Disables edge swipes. EdgeSwipes2Ways (Yes/No) : Enables/Disables 2 ways edge swipes. It allows swipes to be triggered in both ways either we start from center to edge or from edge to center instead of starting only from edge to center. EdgeSwipesResetPointer (Yes/No) : Want to reset the pointer to center of the screen after edge swipe ?. EdgeSwipeFingers (Value 0 - 2) : Sets the number of fingers are used in edge swipes. 0 is for both 1f and 2f. EdgeSwipeDetectHArea (Value 0 - 100) : Sets the % of touchpad area on edges allowed to detect start of horizontal (left and right) edge swipes. EdgeSwipeDetectVArea (Value 0 - 100) : Sets the % of touchpad area on edges allowed to detect start of vertical(top and bottom) edge swipes. EdgeSwipeDeltaX (Value 0 - 500) : Sets the X delta (movement) needed to detect edge swipes. EdgeSwipeDeltaY (Value 0 - 500) : Sets the Y delta (movement) needed to detect edge swipes.
-
Details about the Smart Touchpad driver Features
EMlyDinEsH replied to EMlyDinEsH's topic in Smart Touchpad
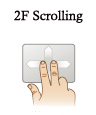
4. SCROLLING Need to enable the options "Use two finger to scroll" and "Allow horizontal scrolling" in Trackpad prefpane for enabling scrolling. Note: You have to change the Scroll speed value from the Trackpad pref for the first time after installing the driver to work. Two Finger scroll: Swipe two fingers either horizontally for horizontal scroll (or) vertically for vertical scroll. Edge Scrolling: Swipe one finger vertically on the right edge of the touchpad for vertical scrolling and horizontally on the bottom edge of the touchpad for horizontal scrolling. Scroll Acceleration modes: (v3.8 or later) There are four modes of acceleration for scrolling in my driver, which can be set by editing the plist entry "2FScrollAccelMode" for 2f scroll and "EdgeScrollAccelMode" for Edge scroll. They are: Optimized Acceleration (mode 0) : This is optimized mode which works best across all the touchpads same. Fixed acceleration (mode 1) : This mode has fixed acceleration/speed and varies only with scroll speed value. Extended acceleration (mode 2) : Its an extended version of optimized mode with more acceleration. Super acceleration (mode 3) : This mode reflects the acceleration of your fingers and works based on that. It doesn't depend on scroll speed values from Trackpad prefpane but you can use it extend the speed even more for high resolution touch pads. Super Extended acceleration (mode 4) : This is same as mode 3 but extends the acceleration. NOTE: Additional controls Hold "Left shift" Key for reversing the direction of the scroll Hold "Command + Control" keys to speed up the scroll 2x Hold "Command + Option" keys for Auto scroll (as alt function) when both Inertia (primary function) and Auto scroll are enabled. SCROLL EFFECTS Auto scroll:​ Use the finger(s) to flick (doing a quick swipe and removing the fingers from touchpad) for scrolling in the direction you want to get the auto scroll (speed depends on the flick strength). Continuous scroll:Scroll the direction you want and hold the finger(s) firmly to get the continuous scroll in the direction you've scrolled. Inertial scroll:Use the finger(s) to flick (doing a quick swipe and removing the fingers from touchpad) for scrolling in the direction you want to get inertial effect (speed and motion depends on the flick strength). Sling scroll:Do the vertical scroll and hold the fingers at the very top/bottom of the touchpad between 1-2 secs then release, which will do scroll in reverse direction quickly to scroll back. Circular scroll with Edge scrolling:Start the gesture on the edge and do some scroll before moving the finger to the center of the touchpad, now try to draw a circle around the center of the touchpad which will do scrolling continuously as long as you draw the circle in clockwise (or) anti-clockwise for either horizontal or vertical scroll. Customization: You can control scrolling with the following plist options. Located at IOKitPersonalities->Smart-Pad->Preferences->Scrolling in the plist. 2FScrollAccelMode (Value 0 - 5) : Sets the acceleration mode to use for 2 fingers scroll. Inertial2FingScroll (Yes/No) : Enables/Disables Inertia for 2 fingers scroll. Continuous2FingScroll (Yes/No) : Enables/Disables continuous for 2 fingers scroll. Auto2FingScroll (Yes/No) : Enables/Disables auto for 2 fingers scroll. Sling2FingScroll (Yes/No) : Enables/Disables sling for edge scroll. 2FContScrollMaxDelta (Value 0 - 200) : Sets the max delta allowed to trigger continuous scroll. EdgeScrolling (Yes/No) : Enables/Disables edge scroll. EdgeScrollAccelMode (Value 0 -5) : Sets the acceleration mode to use for edge scroll. InertialEdgeScroll (Yes/No) : Enables/Disables Inertia for edge scroll. ContinuousEdgeScroll (Yes/No) : Enables/Disables continuous for edge scroll. AutoEdgeScroll (Yes/No) : Enables/Disables auto for edge scroll. SlingEdgeScroll (Yes/No) : Enables/Disables sling for edge scroll. EContScrollMaxDelta (Value 0 - 200) : Sets the max delta allowed to trigger continuous scroll. EdgeVScrollArea (Value 0 - 100) : Sets the % of touchpad area on the bottom allowed to detect vertical edge scroll. EdgeVScrollAdaptArea (Value 0 - 100) : Sets extra % of touchpad area on the right allowed to extend vertical edge scroll to use when its active. EdgeHScrollArea (Value 0 - 100) : Sets the % of touchpad area on the bottom allowed to detect horizontal edge scroll. EdgeHScrollAdaptArea (Value 0 - 100) : Sets extra % of touchpad area on the right allowed to extend horizontal edge scroll to use when its active. EScrolSpeedFactor (Value 0 - 1000) : Sets the % of the speed multiplier for edge scroll. EdgeCircularScroll (Yes/No) : Enables/Disables circular for edge scroll. EdgeCircularScrollDelta (Value 0 - 100) : Sets the delta needed to trigger circular scroll. NoInertiaForHScroll (Yes/No) : Disables inertia for horizontal scroll. InertialScrollLevel (Value 0 - 10) : Sets the level of inertia. Higher the more inertia. ScrollDirectionSamples (Value 0 - 10) : Sets the number of samples are used to analyze the direction of scroll to change. ScrollLevelAtBoot (Value 0 - 9) : Sets the scroll speed level to use at boot. This is meant for those who need scroll level greater than 6 at boot, because there is a bug in OSX prefpane which is not saving the speed level above 6. Value 0 disables this and will try to load prefpane value at boot. ScrollLevelFactor (Value 0 - 10) : Sets the scroll speed multiplier. This will increase the speed levels of prefpane by multiplying. ScrollLevelGranularity (Value 0 - 100) : Sets the granularity of the scroll speed to get precise scroll levels. This will provide more control over the scroll speed by multiplying against the value we get from the combination of ScrollLevelFactor and Prefpane scroll speed. Default value is 70% of the value we get from ScrollLevelFactor and Prefpane scroll speed. ScrollStopDetectSamples (Value 0 - 10) : Sets the number of samples used to detect scroll stop. This is useful in touchpad which generate noise data due to its high sensitivity during idle or slow scrolls. ScrollMaxIdleStateDelta (Value 0 - 100) : Sets the max delta allowed to detect idle state after scroll in touchpad which generate noise data due to high sensitivity. ScrollMaxIdleDetectTimeout (Value 0 - 100) : Sets the max time (in milli sec) used in detecting idle state after scroll. SlingTriggerArea (Value 0 - 100) : Sets the % of touchpad area used at top and bottom to trigger sling scroll. SlingScrollStartTimeOut (Value 0 - 3000) : Sets the idle time (time spent) needed at trigger area to trigger sling scroll.
-
Details about the Smart Touchpad driver Features
EMlyDinEsH replied to EMlyDinEsH's topic in Smart Touchpad
3. DRAGGING Need to enable the option "Dragging" in Trackpad prefpane from System preferences for dragging to work. Left button drag : Click & Hold the left button then drag with another finger. Double tap drag : Double tap and hold a single finger without lifting then move to drag. Finger press drag : Tap and hold a single finger with some pressure for 1.2 secs without lifting then move to drag. Click drag (ClickPad): Click and hold the button under the whole touchpad area of click-pad then move to drag. Note for finger press drag: If you want to disable this drag then set the value of "FingerPressDragTimeOut" to 0. You can release drag in three ways: Finger lift to release Drag will be released immediately after the finger is removed from the touchpad. Timeout to release Drag will be released after a timeout. You can set timeout value by editing plist entry "FLiftDragReleaseTimeOut". Tap to release Drag will be released after a single tap. You can enable this from the Trackpad prefpane by enabling option "Drag Lock". Customization: You can control dragging with the following plist options. Located at IOKitPersonalities->Smart-Pad->Preferences->Dragging in the plist. FingerPressDrag (Yes/No) : Enables/Disables finger press drag. FingerPressDragPressure (Value 0 - 255) : Sets the pressure needed to detect the touch as finger press drag. FingerPressDragTimeOut (Value 0 - 3000) : Sets the time (in milli sec) needed to to start the finger press drag. FLiftDragReleaseTimeOut (Value 0 - 3000) : Sets the time (in milli sec) used to release the drag after removing finger from touchpad. -
Details about the Smart Touchpad driver Features
EMlyDinEsH replied to EMlyDinEsH's topic in Smart Touchpad
2. TAPPING: Need to enable the option "Clicking" in Trackpad prefpane from System preferences for taps to work. Single finger tap:Single tap : Performs single click Double tap: Performs double click Triple tap : Performs paragraph selection in texts Two fingers tap:Single tap : Acts as middle click button action by default. It can configured to other actions by editing plist with supported gesture actions value. Double tap: Does zoom in and zoom out when "MulFingDoubleTaps" is enabled in plist. Three fingers tap: Single tap : Acts as right click button action by default. It can configured to other actions by editing plist with supported gesture actions value. Double tap: Shows application window when "MulFingDoubleTaps" is enabled in plist. Four fingers tap:Single tap : Opens Mission control by default. It can be configured to other actions by editing plist with supported gesture actions value. Five fingers tap: Single tap : Opens Dashboard by default. It can be configured to other actions by editing plist with supported gesture actions value. Corner taps:Need to enable the feature "Hot Corners" from Mission Control and configure it. You can Tap on any of the four corners to trigger the functions configured to each hot corner. Customization: You can configure taps with the following plist options. Located at IOKitPersonalities->Smart-Pad->Preferences->Tapping in the plist. 2FingersTapAction (Value 0 -23) : Sets the action to be triggered on two fingers tap. 3FingersTapAction (Value 0 -23) : Sets the action to be triggered on three fingers tap. 4FingersTapAction (Value 0 -23) : Sets the action to be triggered on four fingers tap. 5FingersTapAction (Value 0 -23) : Sets the action to be triggered on five fingers tap. 1FTapPressure (Value 0 - 255) : Sets the pressure needed to detect the touch as tap. 1FClickTimeOut (Value 0 - 3000) : Sets the max time (in milli sec) used to detect the touch as click. 12TapTimeOut (Value 0 - 3000) : Sets the max time (in milli sec) used to detect the touch as Corner or 2 fingers tap. MulFingTapTimeOut (Value 0 - 3000) : Sets the max time (in milli sec) used to detect the touch as 3-5 fingers tap. TapMaxDelta (Value 0 - 200) : Sets the max delta (movement) allowed in detecting the touch as single finger tap. MulFingTapMaxDelta (Value 0 - 200) : Sets the max delta (movement) allowed in detecting the touch as multi finger tap. MulFingDoubleTaps (Yes/No) : Enables/Disables multi finger double taps. TrackpadTappingCorners (Yes/No) : Enables/Disables corner taps. DisableBottomCornersTap (Yes/No) : Enables/Disables only bottom corner taps when Corner taps are enabled. CornerTapStartABS (Yes/No) : Want to start pointer from absolute position of the touch after corner tap instead of reset to center of the screen ? CornerTapAreaHeight (Value 0 - 100) : Sets the % of the touchpad area used for the height of the corner detect area. CornerTapAreaLength (Value 0 - 100) : Sets the % of the touchpad area used for the length of the corner detect area. Note for 2 and 3 fingers tap: You can swap Two and Three finger single taps action in Trackpad prefpane by enabling/disabling the option "Tap trackpad using two fingers for secondary click". Note for Multi finger double taps: Enabling the option "MulFingDoubleTaps" in plist will make multi fingers single tap to have some delay due to the detection of double taps.
-
Details about the Smart Touchpad driver Features
EMlyDinEsH replied to EMlyDinEsH's topic in Smart Touchpad
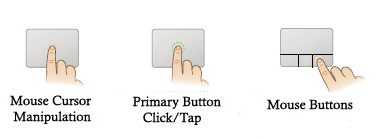
1. MOUSE MODE: Enables click-pad and touchpad with physical buttons to act like a mouse with three left, right and middle buttons and pointing the cursor. Note: Click-pads Click-pad has only single button under the whole touch area. So, the touchpad bottom area is divided into three parts for the buttons left, right and middle. BUTTONS: Left button : Performs Left click Right button : Performs Right click Middle button : Performs Middle click You can configure middle button for different actions from Mission Control in "Keyboard and Mouse Shortcuts" as shown in below picture. For Middle click: Click-pad: Press and click at middle of the touchpad button area Touchpad with physical left and right buttons: Click both left and right buttons same time Customization: You can control buttons with the following plist options. Located at IOKitPersonalities->Smart-Pad->Preferences->Buttons in the plist. ClickpadVirtualButtons (Yes/No) : Enables virtual buttons for click-pads by dividng the bottom area into three parts, otherwise only one button "Left" will work default. ClickpadVirtualButtonsArea (Value 0 -100) : Sets the % of touchpad area (bottom) used by the virtual buttons. DisablePhysicalClicks (Yes/No) : Enable/Disable physical buttons. VirtualMiddleButton (Yes/No) : Enable/Disable virtual middle button for click-pad. 2FingersClickAction (Value 0 - 23) : Configures the gesture 2 fingers button click action from supported actions list in click-pad. POINTING: This driver tries to provide extensive control over pointing the cursor to give a smooth feel in acceleration. Following are the plist options that controls the pointing. Located at IOKitPersonalities->Smart-Pad->Preferences->Pointing in the plist. AccelerationPrefValue (Value 0 - 4) : These are acceleration tables used by apple for their devices. Each table has different acceleration curves, so try them and choose which its for you. PointerCustomAcceleration (Value 0 - 20): This value controls the dispatch rate of the pointer position and by doing so its can alter the acceleration level. Increasing the value will reduce acceleration and decreasing will speed up. PointerResolution (Value 100 - 3000) : This is the resolution of the pointer used by OS X. Increasing the value will smooth the acceleration by reducing its speed and decreasing will speed up but reduces smoothness. PointerSmoothLevel (Value 1 - 20) : Controls the smoothness of the pointing. Increasing the value will smooth the acceleration by reducing its speed and decreasing will speed up but reduces smoothness. PointerSmoothSamples (Value 0 - 10) : Number of samples to used to smooth the pointing. Increasing the value will smooth the acceleration by reducing its speed and decreasing will speed up but reduces smoothness. EnhancedAccelerationLevel (Value 0 - 15) : It extends the acceleration of the pointer for speeds of the pointing higher that Minimum delta key. EnhancedAccelerationMinDelta (Value 0 - 255) : It sets the minimum delta needed to apply extend acceleration. SlowMoveNoiseMaxDelta (Value 0 - 30) : Some touchpad's generate noise (random x and y delta) during slow moves which causes the pointer to move like a wave. Use this value to ignore those noise data. Sensitivity (Value 0 - 255) : Sets the sensitivity (Pressure or Z value) of the touchpad.
-
Following are the features supported by the Smart touchpad driver in Mac OSX: Mouse mode Tapping Dragging Scrolling Swipes Zoom Rotation Clicking and Fingers Press Features Toggle Accidental inputs prevention and Palm detection Apple Trackpad Prefpane support Customization of features Enhanced Keyboard support Support for Asus Keyboard backlight with Idle Auto on/off Prefpane for controlling touchpad features [coming later as its got my least prority] For full details about each feature, check out the respective posts below. Supported OS X Action values to config gestures: 0 : To disable the gesture 1 - Applications Switch 2 - App close 3 - Launchpad 4 - Mission control 5 - Dashboard 6 - Left Space/Full Screen apps switch 7 - Right Space/Full Screen apps switch 8 - Application windows 9 - Minimize app 10 - Toggle Full screen Switch 11 - Backward 12 - Forward 13 - Desktop 14 - Notification center (keyboard shortcut) 15 - Show Properties/Info 16 - Hide/Show Dock 17 - Notification center (soft mode) 18 - Zoom reset (works in Photos, Browser etc., where it supports) 19 - Finder 20 - Force Quit 21 - Right click 22 - Middle click 23 - 34 as F13 - F24 35 - Left click
- 14 replies
-
- 14
-

-
ELAN, FocalTech and Synaptics (Smart Touchpad) Driver
EMlyDinEsH replied to EMlyDinEsH's topic in Smart Touchpad
Will provide an option to disable it in my next release which is due for tomorrow. -
Did you set the Internal Mic verb command connection type to 'a0' like i've explained in the AppleHDA guide? also try to remove/add the Mixer/selector nodes and change boost values in Platforms xml and see.
-
ELAN, FocalTech and Synaptics (Smart Touchpad) Driver
EMlyDinEsH replied to EMlyDinEsH's topic in Smart Touchpad
Not sure about vmware. Please test this and report me. What you mean log tap dragging? is it double tap drag? Plz explain so i can make an option. -
Fn HotKey and ALS sensor driver for Asus Notebooks
EMlyDinEsH replied to EMlyDinEsH's topic in Miscellaneous
No keys working? Can you send me your ioreg(use v2.1 ioregistryexplorer app) and System log after installing my kext/dsdt i sent? -
Fn HotKey and ALS sensor driver for Asus Notebooks
EMlyDinEsH replied to EMlyDinEsH's topic in Miscellaneous
Well, its possible with Elan touchpad driver of mine. If you have Elan touchpad then you can enable this Fn Keys mode by editing Keyboard plist file. -
Fix for no Audio issue after Sleep in Realtek codecs
EMlyDinEsH replied to EMlyDinEsH's topic in The Archive
Do you get Bezel animation pop up after sleep with EAPDFix kext? Can you send me your IOreg and System log after sleep with EAPDFix so i can check? Also have you tried IOAudioFamilyxxx patched? -
do you get screen working fine with a and b platform id? If so then send me an ioreg file so i can check.