
Leaderboard


Popular Content
Showing content with the highest reputation on 01/09/22 in all areas
-
Of course you need a mini-PCIe adapter board for an Apple BCM94360CD card; please refer to our dedicated thread on the matter as stated above. We also have a couple of inventories re: compatible/non-compatible cards. They cannot be exhaustive of course but look these up. Mini-PCIe slots and cards have been deprecated since circa 2015 so you're highly unlikely to find what you wish for (a Big Sur compatible mini-PCIe card with BT 5.0). As for Apple, they've long stopped using mini-PCIe cards in favour of their own proprietary interface...1 point
-
Glad to hear that! It is probably some debug code that is used for diagnostics which breaks some features.1 point
-
Here you go: Artifacts.zip1 point
-
Can you check if the issue persists if you use acidanthera's VoodooPS2. Because VoodooPS2Controller and VoodooPS2Keyboard were updated to the latest version from acidanthera.1 point
-
Give this a try, updated to OC 0.7.5 Updated kexts and replaced a few as well Just rename it as EFI and replace it Latitude 7490 - OC0.7.5.zip1 point
-
Remove every kexts you have in /L/E found in the kextcache_log.txt Remove VoodooPS2Controller and replace with ApplePS2Controller found in my E7470 bootpack https://osxlatitude.com/forums/topic/9179-dell-latitude-e7x70-clover-uefi-only/?do=findComment&comment=955481 point
-
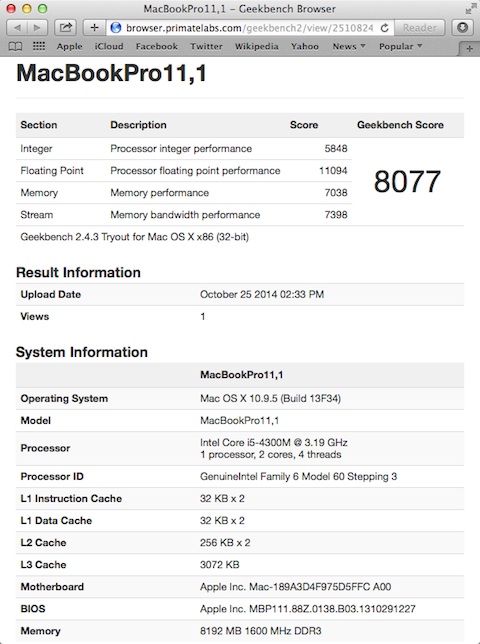
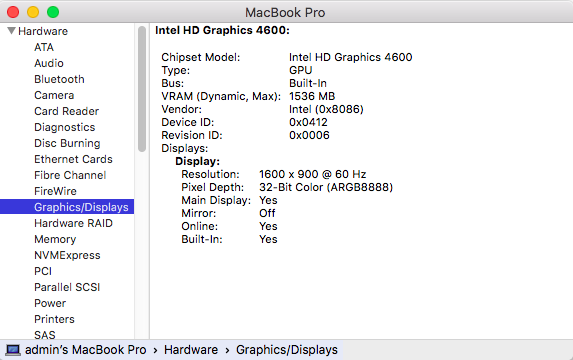
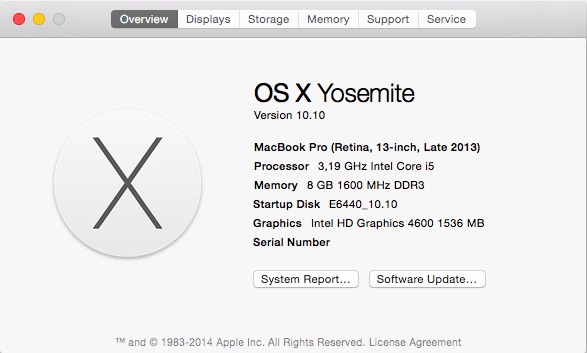
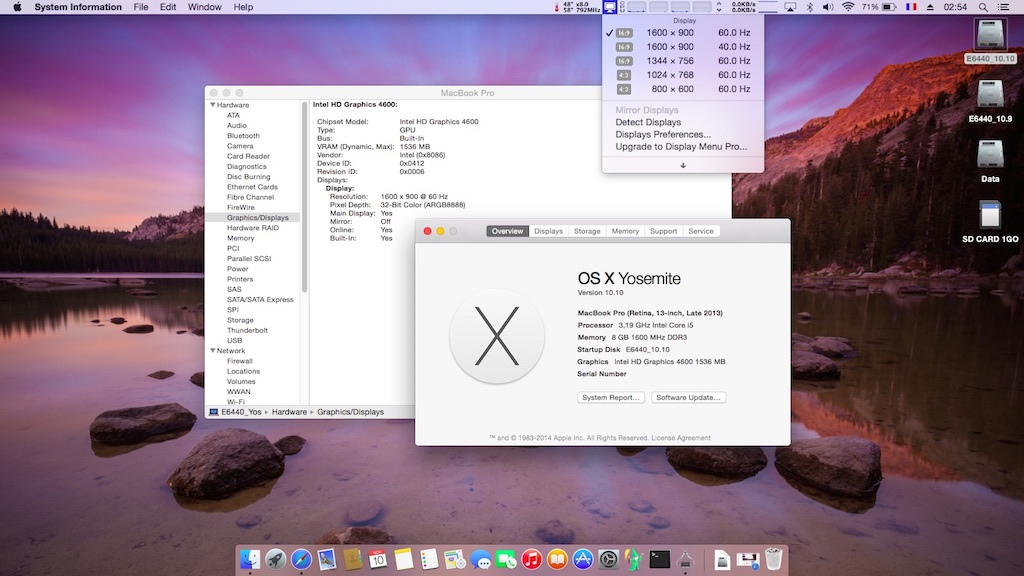
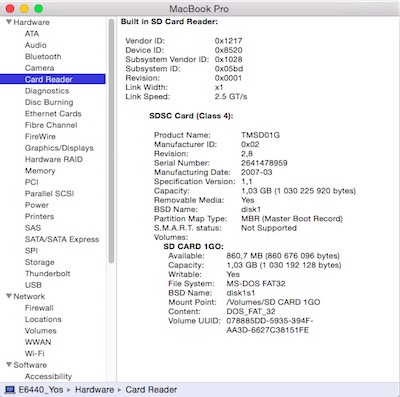
Last update: 05 Aug 2016 Specifications: BIOS A05/A08/A13/A14/A21 (needs HDD set to AHCI mode) Intel QM87 (8 Series) Express chipset Intel dual-core Haswell i5-4300M 2.6GHz CPU (Turbo boost to 3.2GHz/3.3GHz for 2cores/1core active) -> needs Haswell-patched kernels integrated Intel HD4600 GPU 400-1250MHz (PCI ven id 0x8086, dev id 0x0416) discrete AMD Radeon HD 8690M 2Go GPU (PCI ven id 0x1002, dev id 0x6660) -> unsupported 14" 1600x900 WideScreen LCD 8Go DDR3L-1600 RAM Intel i217-LM Gigabit Ethernet (PCI ven id 0x8086, dev id 0x153a) Realtek ALC3226 (Codec=ALC292) High Def audio (PCI ven id 0x10ec, dev id 0x0292) Intel Centrino N6235 wireless card (PCI ven id 0x8086, dev id 0x088e - unsupported) + Bluetooth 4.0 (PCI ven id 0x8087, dev id 0x07da) Sonix Technology integrated HD webcam (USB internal, PCI ven id 0xc45, dev id 0x649d) O2 Micro SD card reader (PCI ven id 0x1217, dev id 0x8520) CD/DVD drive 1 x headset jack 4 x USB 3.0 ports 1 x VGA output 1 x HDMI output 1 x 34mm ExpressCard slot pc34:~ admin$ lspci -nn pcilib: 0000:01:00.0 64-bit device address ignored. pcilib: 0000:00:02.0 64-bit device address ignored. 00:00.0 Host bridge [0600]: Intel Corporation Haswell DRAM Controller [8086:0c04] (rev 06) 00:01.0 PCI bridge [0604]: Intel Corporation Haswell PCI Express x16 Controller [8086:0c01] (rev 06) 00:02.0 VGA compatible controller [0300]: Intel Corporation Haswell Integrated Graphics Controller [8086:0416] (rev 06) 00:03.0 Audio device [0403]: Intel Corporation Haswell HD Audio Controller [8086:0c0c] (rev 06) 00:16.0 Communication controller [0780]: Intel Corporation Lynx Point MEI Controller #1 [8086:8c3a] (rev 04) 00:19.0 Ethernet controller [0200]: Intel Corporation Unknown device [8086:153a] (rev 04) 00:1a.0 USB controller [0c03]: Intel Corporation Lynx Point USB Enhanced Host Controller #2 [8086:8c2d] (rev 04) 00:1b.0 Audio device [0403]: Intel Corporation Lynx Point HD Audio Controller [8086:8c20] (rev 04) 00:1c.0 PCI bridge [0604]: Intel Corporation Lynx Point PCI Express Root Port 1 [8086:8c10] (rev d4) 00:1c.2 PCI bridge [0604]: Intel Corporation Lynx Point PCI Express Root Port 3 [8086:8c14] (rev d4) 00:1c.4 PCI bridge [0604]: Intel Corporation Lynx Point PCI Express Root Port 5 [8086:8c18] (rev d4) 00:1c.5 PCI bridge [0604]: Intel Corporation Lynx Point PCI Express Root Port 6 [8086:8c1a] (rev d4) 00:1c.6 PCI bridge [0604]: Intel Corporation Lynx Point PCI Express Root Port 7 [8086:8c1c] (rev d4) 00:1c.7 PCI bridge [0604]: Intel Corporation Lynx Point PCI Express Root Port 8 [8086:8c1e] (rev d4) 00:1d.0 USB controller [0c03]: Intel Corporation Lynx Point USB Enhanced Host Controller #1 [8086:8c26] (rev 04) 00:1f.0 ISA bridge [0601]: Intel Corporation Lynx Point LPC Controller [8086:8c4f] (rev 04) 00:1f.2 SATA controller [0106]: Intel Corporation Lynx Point 6-Port SATA AHCI Controller [8086:8c03] (rev 04) 00:1f.3 SMBus [0c05]: Intel Corporation Lynx Point SMBus Controller [8086:8c22] (rev 04) 01:00.0 Display controller [0380]: Advanced Micro Devices [AMD] nee ATI Unknown device [1002:6660] 03:00.0 Network controller [0280]: Intel Corporation Centrino Advanced-N 6235 [8086:088e] (rev 24) 05:00.0 Network controller [0280]: Atheros Communications Inc. AR928X Wireless Network Adapter (PCI-Express) [168c:002a] (rev 01) 0e:00.0 SD Host controller [0805]: O2 Micro, Inc. Unknown device [1217:8520] (rev 01) For recommended BIOS settings, see here. Target OS X release: Mavericks 10.9.5 Installation fully successful with myHack v3.3.1 and attached Latitude E6440 bootpack on a SATA-III 6Gb/s mSATA SSD, fitted into full-size mSATA/PCIe/USB internal slot, partitioned GUID, formatted Mac OS X (journaled). Initial build in 10.9.4, followed by 10.9.5 update. Reset BIOS to default and set SATA mode to AHCI to begin with Mavericks installation with myHack USB installer should be done via left-side USB port (right + rear ones won't work initially). Make sure you use a Haswell-patched kernel to boot the installer, i.e. boot the USB installer with Chameleon options: -f -v Do not forget to copy this patched kernel to the root of the Mavericks partition upon installation completion but before you proceed with 1st reboot. Use Terminal from Utilities menu to that effect. Try and be quick because there is only a handful of seconds before the auto-restart countdown expires. If you miss it, just restart the USB installer and go straight to Utilities->Terminal to proceed. Use the following command to copy Haswell-patched kernel: cp / /Volumes//mach_kernel Working: full QE/CI with HD4600 on 1600x900 LCD (with DSDT patch) HDMI video output in mirror and extension modes (hot plugging/unplugging Ok with patched Azul framebuffer) keyboard backlight & backlight control OOB trackpad + nub LCD brightness control OOB audio output (speakers/jack/HDMI with ALC292-patched AppleHDA, speakers only with VoodooHDA v2.8.1v or later + AppleHDADisabler) built-in Gigabit Ethernet (with AppleIntelE1000e kext v2.5.4d) Intel N6235 Bluetooth OOB (with removal of AppleHPET kext) integrated Webcam OOB display & system sleep/wake (with DSDT patch + hibernatemode set to 0 + deletion of /var/vm/sleepimage). Sleeps through lid closure, power button, Fn-F1, Apple Menu->Sleep and energy savings settings. Wakes through lid opening or On/Off button. wireless with compatible mini PCIe card/USB dongle (I added an Atheros AR5B93 half-size mini-PCIe card in the WWAN slot - works OOB) battery management & monitoring (with VoodooBattery or AppleSmartBatteryManager kext v1.32) limited native SpeedStep (multipliers 8, 17, 26) @0.8/1.7/2.6GHz + TurboBoost (multipliers 27-32/33) @2.7-3.2/3.3GHz (Kozlek's FakeSMC v6.11.1328 tuned up for MBA6,2/SMC keys 2.13f9/smc-huronriver + SMBIOS MBP11,1 + tuned-up SSDT) all USB3.0 ports OOB (with DSDT patch + removal of AppleHPET kext) SD card reader (with DSDT patch) Not tested yet: ExpressCard Not working yet: VGA video output (feasible on HD4600?) GeekBench 2.4.3 (32bit) gives a good 8000+ rating: Mavericks full /Extra pack: E6440_i5-4300M_HD4600_Mav-Pack.zip E6440_i5-4300M_HD4600_Mav-Pack#2.zip E6440_i5-4300M_HD4600_Mav-Pack#3.zip E6440_i5-4300M_HD4600_Mav-Pack#4.zip E6440_i5-4300M_HD4600_Mav-Pack#5.zip E6440_i5-4300M_HD4600_Mav-Pack#6.zip E6440_i5-4300M_HD4600_Mav-Pack#7.zip E6440_i5-4300M_HD4600_Mav-Pack#8.zip E6440_i5-4300M_HD4600_Mav-Pack#9.zip Haswell-patched 10.9 kernels: mach_kernel_10.9.4_haswell.zip mach_kernel_10.9.5_haswell.zip mach_kernel_10.9.5-SecurityUpdate_Haswell.zip mach_kernel_10.9.5-SecurityUpdate2015-005_haswell.zip DSDT patches applied: original raw DSDT clean-up (12 errors) Azul framebuffer #12 injection USB sleep (devices EHC1/EHC2/XHC) audio after sleep Display PrefPane brightness bar Lid closure sleep SD card reader (compatibility with device listed in AppleSDXC kext) Other E6440 laptops fitted with same graphics hardware config (GPU + LCD) but different CPUs will require a different SSDT table than provided in the above pack (can be looked up on the web or created with SSDT generator tool -> See RampageDev's blog for detailed guide). In such cases and in order to avoid CPU power management-related kernel panics (KP), NullCPUPowerManagement kext is recommended until the CPU-specific SSDT is generated. The kext just needs to be added to /Extra/Extensions followed by myHack->myFix (quick). - - - - - - - - - - Edit #1: 22 Oct 2014 added a patched DSDT to obtain Sleep/Wake (raw DSDT extracted from BIOS A05) cleaned up some kexts changed SMBIOS from MacBookAir6,2 to MacBookPro11,1 to gain 1 intermediate SpeedStep multiplier: x17 @1.7GHz - - - - - - - - - - Edit #2: 09 Nov 2014 all USB ports + Intel N6235 BlueTooth work OOB after removal of AppleHPET kext from /S/L/E post clean-up - - - - - - - - - - Edit #3: 14 Feb 2015 added DSDT patches for Display PrefPane brightness bar + sleep on lid closure added 10.9.5 Security Update 2015-002 Haswell-patched kernel - - - - - - - - - - Edit #4: 11 Mar 2015 added revised SSDT table modified to support x17 intermediate CPU multiplier + Sleep through Fn-F1 - - - - - - - - - - Edit #5: 10 Apr 2015 Replaced joe82's AppleSDXC kext patch by DSDT patch to support SD card reader natively OOB - - - - - - - - - - Edit #6: 13 Apr 2015 Little cleanup of the thread - - - - - - - - - - Edit #7: 5 Jul 2015 Added 10.9.5 Security Update 2015-005 Haswell-patched kernel - - - - - - - - - - Edit #8: 5 Aug 2016 Revised DSDT to fully support USB3.0 ports natively (renaming of XHC to XHC1, Darwin OSYS) and fix issue of instant Wake on Sleep (removal of _PRW methods for devices GLAN/HDEF/EHC1/EHC2/XHC1) Added Rehabman's FakePCIID + FakePCIID_XHCIMux kexts to support USB USB3.0/USB2.0 mux Removed ACPIPoller kext and patched AppleSDXC kexts Replaced VoodooHDA/AppleHDADisabler by patched AppleHDA (to be copied to /S/L/E) Replaced VoodooBattery kext by Rehabman's ACPIBatteryManager kext
 1 point
 -
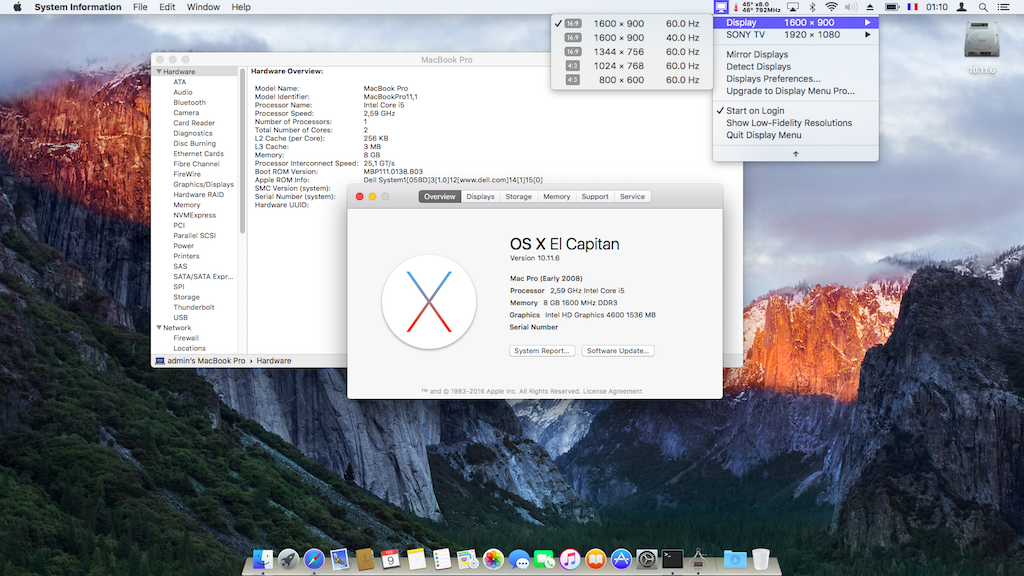
Last update: - Target OS X release: El Capitan 10.11.xThis is an Enoch-based installation using the well-known/well-documented vanilla manual method detailed below: Working: full QE/CI with HD4600 graphics (with DSDT patch for Azul FB #12) HDMI output with patched AppleIntelFramebufferAzul kext DVI output through port replicator E-Port K07A002 with patched AppleIntelFramebufferAzul kext full audio, including jack microphone input and headset output (with patched AppleHDA kext) HDMI audio (with patched AppleIntelFrameBufferAzul kext) built-in Gigabit Ethernet (with AppleIntelE1000e kext) native speedstep (with tuned Kozlek's FakeSMC (SMC keys=2.13f9/SMC compatible=smc-huronriver) and MBA11,1 SMBIOS profile) Turbo boost to x33 3.3GHz (getting CPU multipliers x8/12/26 + Turbo multipliers x27/28/29/30/31/32/33) sleep & wake (with DSDT patch for EHCx/XHC/HDEF/GLAN _PRW; sleeps Ok on Energy Savings settings/Fn-F1/Apple menu option/power button/lid closure; wakes Ok through lid opening/power button wireless with any compatible card battery management and monitoring (with ACPIBatteryManager kext) SD card reader (with DSDT patch for compatibility with Apple's default reader) integrated webcam OOB keyboard backlight control OOB (for backlit models) all USB3.0 ports (with DSDT EHCx/XHC/Darwin patch + FakePCIID_XHCIMux & USB injector kexts) Express card slot OOB Not Working: VGA output unsupportedNot tested: SmartCard reader fingerprint scanner 1) 10.11 USB installer creation Double click on InstallESD.dmg found in Install OS X El Capitan.app/Contents/SharedSupport to mount the dmg image Then mount BaseSystem.dmg (hidden file) open /Volumes/OS\ X\ Install\ ESD/BaseSystem.dmg Use Disk Utility to restore the contents of BaseSystem.dmg on a USB key (or HDD partition) formatted Mac OS extended (journaled). Remove link for Packages in folder System/Installation of your USB key rm /Volumes/OS\ X\ Base\ System\ 1/System/Installation/Packages Copy folder Packages located in InstallESD.dmg to folder System/Installation of your USB key cp -R /Volumes/OS\ X\ Install\ ESD/Packages /Volumes/OS\ X\ Base\ System\ 1/System/Installation Copy the 2 hidden files (BaseSystem.dmg & Basesystem.chunklist) of InstallESD.dmg to the root of your USB key cp /Volumes/OS\ X\ Install\ ESD/BaseSystem.* /Volumes/OS\ X\ Base\ System\ 1 Install Enoch r2848 (latest at time of writing) on the USB installer with all default settingsEnoch-rev.2848.pkg.zip Copy the above Enoch r2848 installer package to the root of the USB installer Copy the following (unzipped/extracted) E6440 bootpack to the root of the USB installerE6440_i5-4300M_HD4600_EC-Pack.zip Create a folder called Kernels under /System/Library (normally, it won't exist at that stage) Copy the appropriate El Capitan kernel to /System/Library/Kernels. Copies of the kernels are available here 2) 10.11 installation Boot the 10.11 USB installer (it may take a little time to kick in) with -f -v boot flags At OS X installer main screen, open up Disk Utility in Utilities menu If applicable, partition your target disk in GPT/GUID scheme Create your target 10.11 partition and format it as OS X Extended (Journaled) Close Disk Utility and proceed with OS X 10.11 installation as usual 3) Post-installation fine-tuning Reboot the 10.11 USB installer (it may take a little time to kick in) At OS X installer main screen, open up Terminal in Utilities menu Verify CoreStorage installation disk mode diskutil list If CoreStorage activated for Fusion drive (i.e. presence of a logical disk), revert to legacy mode diskutil corestorage revert <device> (for example: /dev/disk1) Identify your freshly made 10.11 partition name df Copy the Extra folder from the USB installer to your identified 10.11 disk partition cp -R /Extra /Volumes/<your fresly made 10.11 partition name> (for example: cp -R /Extra /Volumes/OSX_disk) Reboot the 10.11 USB installer, press a key at delay bar (or F8) to interrupt boor process and select your freshly made 10.11 disk partition. You'll then be booting El Capitan for the 1st time Complete the 1st boot installation finalisation Once at the 10.11 desktop, run the Enoch r2848 package from your USB installer to install Enoch on your HDD; it should be installed on the 1st partition of the disk Eject the 10.11 USB installer and put it aside Disable hibernation (can be done later, but should be done): open up Terminal and type the following commands sudo pmset hibernatemode 0 sudo pmset hibernatefile /dev/null sudo rm -f /var/vm/sleepimage copy all kexts from /Extra/Extensions to /Library/Extensions (ignore and acknowledge the permissions-related error messages) copy patched AppleHDA from /Extra/Extensions/Copy_to_SLE to /System/Library/Extensions (ignore and acknowledge the permissions-related error messages) repair kexts permissions and rebuild cache sudo chmod -Rf 755 /S*/L*/E* sudo chown -Rf 0:0 /S*/L*/E* sudo chmod -Rf 755 /L*/E* sudo chown -Rf 0:0 /L*/E* sudo touch -f /S*/L*/E* sudo touch -f /L*/E* sudo kextcache -Boot -U / Edit /Extra/kernel.plist and set KernelBooter_kexts parameter to No (this will suspend kext injection from /E/E and speedup boot time) <key>KernelBooter_kexts</key> <string>No</string> If your E6440 is fitted with a different CPU than the i5-4300M, download Pike R Alpha's SSDT generator tool and generate your own CPU-specific SSDT. Copy the resulting SSDT.aml file to /Extra folder (it's normally prompted by the tool). Reboot your finalised El Capitan installation Please note that: Loading injected kexts from /E/E with boot option KernelBooter_kexts=Yes is slower than loading cached kexts placed in /S/L/E or /L/E. But it's a useful recovery method if add-on kexts placed in /L/E or kernel cache get screwed! As such, keep /E/E untouched. After any kexts modification, whether to /S/L/E or to /L/E, repair permissions and rebuild cache as detailed above. Other E6440 laptops fitted with a different CPU will require a different (and suitable) SSDT table than provided in the above pack (can be looked up on the web or created with Pike R Alpha's SSDT generator tool).
1 point
-
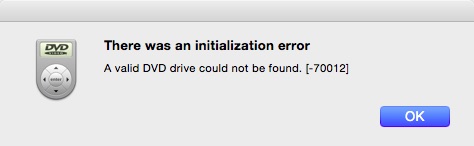
Sometimes, weird things happen. All of a sudden, DVD Player stopped working and returned the well known initialisation error: I installed the IOAHCISerialATAPI_injector kext and the DVD came back to life, though slightly differently and somehow improved this time. When looking at the Supported Features in the Help menu, HD is no longer reported Unsupported like it used to be: This applies to both Mavericks and Yosemite. I had been playing with DSDT/SSDT recently so the trouble may originates from that. 'need to see if I can suss out a way to get rid of that horrible little kext though. IOAHCISerialATAPI_Injector.kext.zip I'll add it to the next Yosemite boot pack.
1 point
-
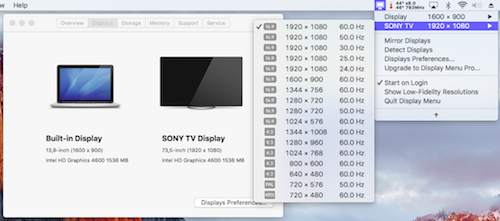
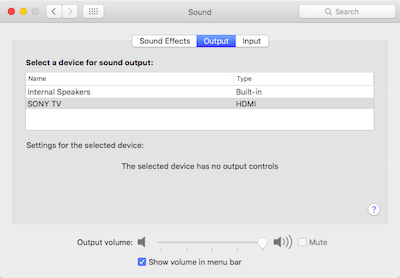
Moved on to Yosemite... Good news: everything that works under Mavericks also works under Yosemite. Installation process was the same one as I previously used for the D630n, i.e. manual USB installer creation + Clover boot loader: Mount InstallESD.dmg found in Install OS X Yosemite.app/Contents/SharedSupport Then mount BaseSystem.dmg (hidden file) open /Volumes/OS\ X\ Install\ ESD/BaseSystem.dmg Use Disk Utility to restore the contents of BaseSystem.dmg on a USB key (or HDD partition) formatted Mac OS extended (journaled). Remove link for Packages in folder System/Installation of your USB key rm /Volumes/OS\ X\ Base\ System\ 1/System/Installation/Packages Copy folder Packages located in InstallESD.dmg to folder System/Installation of your USB key cp -R /Volumes/OS\ X\ Install\ ESD/Packages /Volumes/OS\ X\ Base\ System\ 1/System/Installation Copy the 2 hidden files (BaseSystem.dmg & Basesystem.chunklist) of InstallESD.dmg to the root of your USB key cp /Volumes/OS\ X\ Install\ ESD/BaseSystem.* /Volumes/OS\ X\ Base\ System\ 1 | For those who want to use Clover as boot loader: Install Clover_v2k_r2695.zip (or later) to your USB key. Configure your config.plist to boot with option "kext-dev-mode=1" as follows: <key>Boot</key> <dict> <key>Arguments</key> <string>-v kext-dev-mode=1</string> </dict> * About option "kext-dev-mode=1": in Yosemite, "unsigned or malsigned" kexts will not be loaded. To use such kexts, the restriction can be lifted by adding option "kext-dev-mode=1" at boot phase. Copy all your kexts (FakeSMC.kext, etc.) to EFI/CLOVER/kexts/10.10 (consider this the "kext" boot pack). Grab kexts from the Mavericks boot pack. Copy the SSDT + Yosemite-specific DSDT to EFI/CLOVER/ACPI/patched E6440_HD4600_Yos10.10_DSDT.aml.zip Adjust Clover config.plist as required (you can use this file E6440_HD4600_Clover_config.plist.zip). Start your USB key. The OS X installer should then load. Proceed with installation as usual. The DSDT differs from the Mavericks version in the sense that it injects fake desktop HD4600 id 0x0412 to replace mobile HD4600 id 0x0416. The reason for this is that Apple did not include support for Mobile HD4600 in their Yosemite Azul framebuffer and AppleIntelHD5000Graphics kexts. In that same sense, those 2 kexts also require to be patched to add/inject the mobile HD4600 id 0x04168086 in the Info plist and binmod the kext binary file to replace desktop HD4600 id (86 80 12 04) by mobile HD4600 id (86 80 16 04). All this is quite extensively documented on the web and results from the work of several well-known Hackintoshers like Pike.R.Alpha or RehabMan and others... The following patched kexts should be copied to /S/L/E to replace the original ones (keep a backup somewhere). AppleIntelFramebufferAzul.kext.zip AppleIntelHD5000Graphics.kext.zip You may also do the same with the following patched kext in order to avoid the corrupt screen on Yosemite desktop initialisation. IOGraphicsFamily.kext.zip For those who wish to use Chameleon instead of Clover (you can safely use r2395 or r2401 and possibly above): copy the Haswell-patched kernel to be placed as is at Yosemite partition's root or in /S/L/K as "kernel" to replace the vanilla file (here again, keep a backup).Haswell-patched 10.10 kernel available here create /Extra folder with Yosemite-specific DSDT + SSDT + SMBIOS & boot plists using the following pack:E6440_i5-4300M_HD4600_Yos-Pack.zip E6440_i5-4300M_HD4600_Yos-Pack#2.zip E6440_i5-4300M_HD4600_Yos-Pack#3.zip E6440_i5-4300M_HD4600_Yos-Pack#4.zip E6440_i5-4300M_HD4600_Yos-Pack#5.zip copy the Yosemite pack kexts to /S/L/E, replacing any vanilla kext (keep a backup beforehand); alternatively, copy kexts to /L/E open Terminal and rebuild permissions and cache with commands sudo chmod -R 755 /S*/L*/E* + sudo chown -R 0:0 /S*/L*/E* + sudo touch /S*/L*/E* + sudo kextcache -Boot -U / (replace /S*L/*E* by /L*/E* if you copied kexts to /L/E) With Chameleon, it's critical to rebuild the cache with above 4 commands or the installation will become unbootable. Chameleon cannot boot Yosemite without cache! As such, bear that in mind any time you add or modify kexts in Yosemite. Remember to set hibernate mode to 0 (zero) and to remove /var/vm/sleepimage. The system requires additional tuning so additional posts will follow in due course. Again, other E6440 laptops fitted with same graphics hardware config (GPU + LCD) but different CPUs will require a different SSDT table than provided in the above pack (can be looked up on the web or created with SSDT generator tool -> See RampageDev's blog for detailed guide). In such cases and in order to avoid CPU power management-related kernel panics (KP), NullCPUPowerManagement kext is recommended until the CPU-specific SSDT is generated. The kext just needs to be added to /Extra/Extensions or /S/L/E.
1 point
-
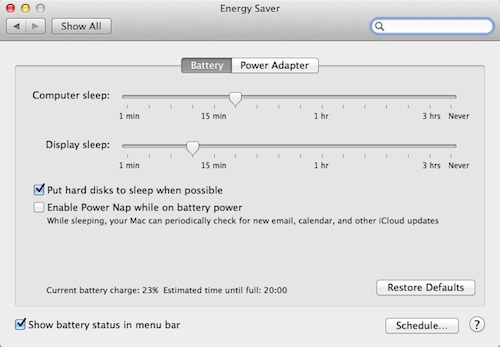
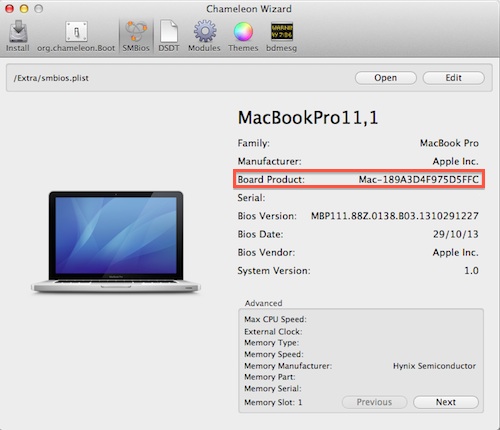
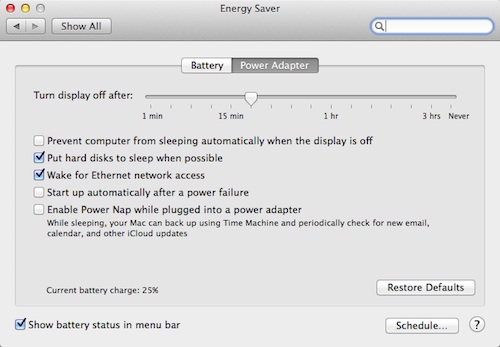
Apple having unified display and computer sleep for Haswell platforms, the Energy Saver preference panel only shows one sleep bar: To revert to the traditional separation, the Mac model platform plist needs to be edited to turn off this sleep unification. In plugin kext X86PlatformPlugin of /S/L/E/IOPlatformPluginFamily, a list of Mac model plists is found in the Resources subfolder. Each Mac model corresponds to the board number specified in the SMBIOS plist of a Hackintosh. In the present case of a MacBookPro11.1, the Mac model is 189A3D4F975D5FFC as displayed in Chameleon Wizard for instance: As such, the plist Mac-189A3D4F975D5FFC.plist should be modified as follows: -> before <key>UnifiedSleepSliderPref</key> <true/> -> after <key>UnifiedSleepSliderPref</key> <false/> Once the plist is changed, the kext cache can be rebuilt. On subsequent reboot, the Energy Saver panel will be back to its traditional form and can be adjusted as desired (otherwise, it's command lines only... ) :
1 point


This leaderboard is set to London/GMT+01:00