pokenguyen
-
Posts
304 -
Joined
-
Last visited
-
Days Won
22
Content Type
Profiles
Articles, News and Tips
Forums
Everything posted by pokenguyen
-
@bobdamnit: I checked your Extra pack and I see no IMEI injection there, maybe that's why you still need to patch kexts? Anyway, If durga is using HD4000 + HM75 chipset, he does not need to inject IMEI or changing the kexts, because he already has it right. What he needs is right bootflag or Graphics injection + Vanilla kexts.
-

Dell Inspiron 3x37-5x37-7x37 Clover Installation
pokenguyen replied to greg2204's topic in The Archive
Do you have ssdt.aml and ssdt-2.aml now? Remove /Applications/VoodooHDA and /System/Library/PreferencePanes/VoodooHDA.prefPane -
Nice, I recommend patching dsdt instead of kexts so it won't lose after updates.
-
Are you using 6 series Intel chipset with HD4000? You need to patch dsdt to inject IMEI id of 7 series chipset to get working graphics. Post your dsdt and screen resolution.
-
Dell Inspiron 3x37-5x37-7x37 Clover Installation
pokenguyen replied to greg2204's topic in The Archive
Try this dsdt.aml. Also, you don't have ssdt.aml in patched folder, and you have ssdt-2.dsl instead of ssdt-2.aml. Run HVT again, select ssdt generator, then copy /extra/ssdt.aml to patched folder, and compile your ssdt-2.dsl to ssdt-2.aml Always, be careful when following the guide. If you miss one step, all other steps will be useless. DSDT 2.zip -
How abut this? http://www.insanelymac.com/forum/topic/296190-driver-for-realteks-rtl810x-fast-ethernet-series/ Or you can try again with AppleRTL8169 kext, then go to System Preferences --> Network --> Advanced --> Hardware set Configure --> Manually Speed ---> 10BaseT/UTP
-
Dell Inspiron 3x37-5x37-7x37 Clover Installation
pokenguyen replied to greg2204's topic in The Archive
Send me your origin folder, I will try to fix it. -
Do you remove applertl8169ethernet kext before installing?
-
Try using RTL8111 or RTL8100 kexts instead.
-
Dell Inspiron 3x37-5x37-7x37 Clover Installation
pokenguyen replied to greg2204's topic in The Archive
@Maxsowon: Send me your files, not send me your screenshot @Kenhoang: He followed the guide EXACTLY and got throught it. -
Dell Inspiron 3x37-5x37-7x37 Clover Installation
pokenguyen replied to greg2204's topic in The Archive
send me your /EFI/Clover/ folder and S/L/E/AppleHDA.kext -
Dell Inspiron 3x37-5x37-7x37 Clover Installation
pokenguyen replied to greg2204's topic in The Archive
remove s/l/e/applehdadisabler then rebuild your cache by kext wizard -
Dell Inspiron 3x37-5x37-7x37 Clover Installation
pokenguyen replied to greg2204's topic in The Archive
then remove voodoohda, applehda disabler and install this kext. No need to repatch dsdt. http://www.osx86.net/files/file/3832-alc283-applehda/ Another thing, if you select the patch and nothing is shown on the upper right, it's problem of your interrnet connection, it can't download the patch. Also, replacing wiffi on this laptop is extremely easy, it's as easy as ram upgrade. -
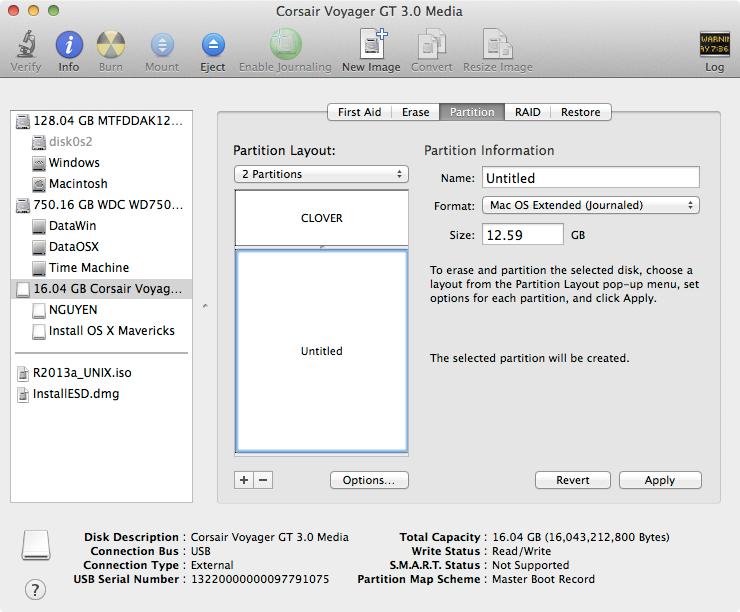
Dell Latitude 3x21/5x21 Clover Install Guide Dell Inspiron 3421 3521 3721 5421 5521 5721 Tested Models Known Issues - Wifi will not work, consider replacing by a BCM43225HMB (Bluetooth + Wifi) or AR9280 (Wifi only). - Sound is not good, share us if you find any working AppleHDA. Install OS X Mavericks/Yosemite 1. Prepare a USB with 8GB or more, format by Disk Utility: - Partition Layout: 2 Partitions - 1st Partition: Name CLOVER, Format: MS-DOS (FAT), Size: >300MB - 2nd Partition: Name Untitled, Format: Mac OS Extended (Journaled), Size: >7GB - Options: Master Boot Record 2. Download Clover.zip, extract then copy EFI folder to CLOVER partition. - Download Config.zip, extract then select right config.plist and copy to /EFI/Clover/: 3a. For OS X Mavericks - Download Mavericks Install app from AppStore. - Launch terminal and run the following script: sudo /Applications/Install\ OS\ X\ Mavericks.app/Contents/Resources/createinstallmedia --volume /Volumes/Untitled --applicationpath /Applications/Install\ OS\ X\ Mavericks.app --nointeraction - Your Mavericks Installer partition will be renamed "Install OS X Mavericks" 3b. For OS X Yosemite - Download Yosemite Install app - Right click to Yosemite Install app > Show Package Contents > Contents > Shared Support, open InstallESD.dmg. - Open OS X Install ESD partition, open BaseSystem.dmg (hidden file) - Use Disk Utility to clone OS X Base System to MacUSB partition. - Go to System/Installation of USB and delete the alias “Packagesâ€, then go to “OS X Install ESD†partition, copy the “Packages†to the folder System/Installation of your USB - Copy BaseSystem.dmg and BaseSystem.chunklist (hidden files) from OS X Install ESD to OS X Base System (on your USB) 4. Restart with USB plugged in a USB 2.0 port, select these options in BIOS: - Function keyboard: Function mode - Disk: AHCI - UEFI Boot: Enabled - Secure Boot: Disabled - Legacy Rom: Disabled - Add boot option: Add EFI\Boot\Bootx64.efi in USB, then move the boot entry to top. Save settings and restart. 5. Clover bootloader screen will show up (if not, add Clover in USB in BIOS again), select "Boot OS X Install from xxxxxxxx" (your OS X Installer partition). 6. Press spacebar if a nagging screen about Mouse/keyboard appears. Install screen will appear, use Disk Utility to format your drive as GPT, create a Mac OS X Extended (Journaled) partition and install Mavericks to your formatted partition. The installer will extract necessary files to "Install OS X Mavericks" (not your target partition). This takes a lot of time at the end, though you only see "a minute remaining". This will end PHASE 1. If you are installing Yosemite, jump to step 9 7. Restart and Clover bootloader screen (from USB) shows up, select "Boot OS X Install from Install OS X Mavericks" (your Mavericks Installer partition, not your install target partition). 8. Install screen will appear and continue installation. This time, installer will install files to your target partition and create Recovery HD partition. This will end PHASE 2. 9. Restart, Clover bootloader screen shows up, press F4 (this will dump your dsdt, ssdt) then select "Boot OS X from YourPartition". 10. If everything goes well, you can boot straight to OS X desktop. 11. Download HVT here, run the tool and select those: - CloverUEFI - Tools > Kext Wizard. - Tools > SSDTGenerator. - Tools > IASL - Tools > MacIASL. - Tools > Clover Configurator. - Fixes > Hibernate Mode > Disable Hibernate 12. Copy config.plist from USB to /EFI/Clover/ of EFI partition, then use Clover Configurator to IMPORT config.plist (in EFI partition) and edit those values: - ACPI > GeneratePStates/CStates: uncheck - SMBIOS: create your new SMBIOS (Macbook Air 5,2) with random Serial Number Then EXPORT config.plist to /EFI/Clover/ of EFI partition 13. Download https://www.dropbox.com/s/mut20ige5ylgj6o/Kexts Dell E5x30.zip, unzip and copy .kext files to /EFI/Clover/kexts/10.9 and 10.10 of EFI partition 14. Go to /EFI/Clover/ACPI/origin/ of USB, you will see lots of files (dumped by F4 at Clover screen). Copy those files to a DSDT folder on desktop: DSDT.aml, SSDT-*.aml. Go to terminal and type these: cd ~/Desktop/DSDT iasl -da DSDT.aml SSDT*.aml If you have errors after running the above command, delete the last file that shows up in error and run again. Don't worry, not all ssdt are necessary. The decompiled *.dsl files will be created in DSDT folder. 15. Run MacIASL in Tools folder on desktop, open DSDT.dsl by MacIASL, go to Preferences and set to ACPI 5.0. Click Patch button, download one of the patches here and apply: - 1366x768 screen: https://www.dropbox.com/s/jvhma2vkcfyhf6x/Dell Exx21 1366x768 patches.txt - 1600x900+ screen: https://www.dropbox.com/s/8udi7ki1qxgl1iz/Dell Exx21 1600x900 patches.txt Click Compile to check for errors, if no error, you can save the file with File Format: ACPI Machine Language Library, name DSDT.aml to /EFI/Clover/ACPI/patched/ (of HDD EFI partition). 16. Copy /Extra/SSDT.aml in your Mac partition to /EFI/Clover/ACPI/patched/ (of HDD EFI partition) 17. [FOR MODEL WITH NVIDIA/AMD] Go to DSDT folder on desktop, find SSDT-7.dsl, open MacIASL and apply the patch into definitionblock code_regex External\s+\((.*_SB_\.PCI0\.GFX0\.DD02\._BCM),\s+IntObj\) replace_matched begin External(%1, MethodObj) end; into method label _BCM parent_label DD02 code_regex Return\s+\(([^\)]*)\)\n.*Arg0 replace_matched begin %1(Arg0) end; # rename GFX0 into_all all code_regex \.GFX0 replaceall_matched begin .IGPU end; into_all all label \_SB.PCI0.GFX0 set_label begin \_SB.PCI0.IGPU end; # call _OFF from _SB.PCI0.PEG0.PEGP into method label _INI parent_label \_SB.PCI0.PEG0.PEGP code_regex . insert begin _OFF()\n end; Click Compile to check for errors, if no error, you can save the file with File Format: ACPI Machine Language Library, name SSDT-1.aml to /EFI/Clover/ACPI/patched/ (of HDD EFI partition).[/code] Go to step 17. If you have error when clicking Compile, close the ssdt-7.dsl then open ssdt-8.dsl, apply the patch: into definitionblock code_regex External\s+\((.*_SB_\.PCI0\.GFX0\.DD02\._BCM),\s+IntObj\) replace_matched begin External(%1, MethodObj) end; into method label _BCM parent_label DD02 code_regex Return\s+\(([^\)]*)\)\n.*Arg0 replace_matched begin %1(Arg0) end; # rename GFX0 into_all all code_regex \.GFX0 replaceall_matched begin .IGPU end; into_all all label \_SB.PCI0.GFX0 set_label begin \_SB.PCI0.IGPU end; # call _OFF from _SB.PCI0.PEG0.PEGP into method label _INI parent_label \_SB.PCI0.PEG0.PEGP code_regex . insert begin _OFF()\n end; into definitionblock code_regex . insert begin External(\_SB_.PCI0.PEG0.PEGP._OFF, MethodObj)\n end; Click Compile to check for errors, if no error, you can save the file with File Format: ACPI Machine Language Library, name SSDT-1.aml to /EFI/Clover/ACPI/patched/ (of HDD EFI partition). Then open ssdt-9.dsl, apply the patch: into_all all code_regex pnp0c14 replaceall_matched begin PNP0C14 end; into definitionblock code_regex External\s+\((.*_SB_\.PCI0\.GFX0\.DD02\._BCM),\s+IntObj\) replace_matched begin External(%1, MethodObj) end; into method label _BCM parent_label DD02 code_regex Return\s+\(([^\)]*)\)\n.*Arg0 replace_matched begin %1(Arg0) end; into method label WMMX code_regex If\s\(CondRefOf\s\(\\_SB\.PCI0\.GFX0\._DSM[^}]*\} replace_matched begin //nothing end; # rename GFX0 into_all all code_regex \.GFX0 replaceall_matched begin .IGPU end; into_all all label \_SB.PCI0.GFX0 set_label begin \_SB.PCI0.IGPU end; Click Compile to check for errors, if no error, you can save the file with File Format: ACPI Machine Language Library, name SSDT-2.aml to /EFI/Clover/ACPI/patched/ (of HDD EFI partition). 18. Recheck if config.plist, dsdt.aml, ssdt.aml, ssdt-1.aml are placed correctly in EFI partition of internal drive. 19. Run HVT again, select - Kexts > RTL8100. Then use Kext Wizard to install this kext http://www.osx86.net/files/file/3900-applehda-alc282-for-mac-os-x-1092/ 20. Restart, go to BIOS, add Boot entry of /EFI/Clover/Cloverx64.efi in your EFI partition, move it to the top, save and restart, you should see Clover screen and option to boot to Mavericks. Enjoy! Flickering Screen Fix If you have flickering all over your laptop display 1366x768, here is the fix: 1. Open terminal, run the script: sudo perl -pi -e 's|\x05\x03\x00\x00\x02\x00\x00\x00\x30\x02\x00\x00|\x05\x03\x00\x00\x02\x00\x00\x00\x30\x00\x00\x00|' /System/Library/Extensions/AppleIntelFramebufferCapri.kext/Contents/MacOS/AppleIntelFramebufferCapri 2. Download this config.plist https://www.dropbox.com/s/fupvhxiydtxercf/config.plist. Use Clover Configurator to mount EFI partition, then open the config.plist you just download, set: - ACPI > GeneratePStates/CStates: uncheck - SMBIOS: create your new SMBIOS (Macbook Air 5,2) with random Serial Number Copy config.plist to /EFI/CLOVER/ folder. Use Kext Wizard to repair permission, rebuild cache then restart. 3. Do step 8, 13, 14 in the guide, but use DSDT patch for 1600x900+ screen instead. Then overwrite DSDT.aml to /EFI/CLOVER/ACPI/patched/ Clear Network Settings to Fix iCloud/AppStore If you use any USB Wifi device, or use Mobile Phones to connect to Internet before completing the guide, you won't be able to access to AppStore or iCloud. You must reset your network settings: - Go to /Library/Preferences/SystemConfiguration/ and delete these files: CaptiveNetworkSupport com.apple.airport.preferences.plist com.apple.network.eapolclient.configuration.plist NetworkInterfaces.plist - Go to System Preferences > Network, delete all connection. Then restart - Go to System Preferences > Network, add your connection again. Update from Mavericks to Yosemite If you followed the old guide (without Yosemite mentioned), do extra steps: - Download latest HVT, run and select Clover UEFI, Clover Configurator > finish. - Go to /EFI/Clover/kexts/, create 10.10 folder and copy kexts here https://www.dropbox.com/s/mut20ige5ylgj6o/Kexts%20Dell%20E5x30.zip to 10.10 folder. - Use Clover Configurator to IMPORT /EFI/Clover/config.plist, go to Boot section and select kext-dev-mode=1. Then EXPORT config.plist to /EFI/Clover/. Run the OS X Yosemite installer and follow the guide. Done! Windows 8 UEFI Dual Boot - Use Disk Utility to prepare a Mac OS X Extended partition (don’t ever use Fat32, Disk Utility will mess up your drive) - Create a FAT32 usb drive, extract Windows 8 64-bit iso there - Boot to usb drive, format the new partition to NTFS, install Windows there. - Go to BIOS, move the Clover boot entry to top. Done!

- 1 reply
-
- 1
-

-
Dell Inspiron 3x37-5x37-7x37 Clover Installation
pokenguyen replied to greg2204's topic in The Archive
1. Can you get Voodoohda work now? 2. See known issues If you want that kext, remove both Voodoohda and applehda disabler kext in s/l/e, then repatch your dsdt with layout audio changed from 86 to the correct layout (ask the author of your kext). I don't see any better applehda than voodoohda, they still suck and no headphone port. Yes, I'm Vn. -
Wifi pci-e card for Mavericks (bcm4322, ar9285, bcm4312)
pokenguyen replied to maRRRco's topic in The Archive
Make sure you ask HP support to get the right card ID, because some whitelist laptops only allow their branded card. For example, HP 4530s only accept HP-branded AR9285 card, other Atheros 9285 card without HP branded are useless. Both 4322 and 9285 are good for Hackintosh. 4322 works oob, but 9285 needs a little injection kext. -
By mentioning Clover, did you try my guide?
-
Dell Inspiron 3x37-5x37-7x37 Clover Installation
pokenguyen replied to greg2204's topic in The Archive
Keep on the guide, sorry for your problem. The iasl in tool is updated recently, and it messed up my dsdt patches without my notice. I will replace iasl in HVT with old version and release new version soon. -
Dell Inspiron 3x37-5x37-7x37 Clover Installation
pokenguyen replied to greg2204's topic in The Archive
Ok, here it is, remove *.dsl files, then copy iasl to DSDT folder, then run ./iasl -da *.aml https://dl.dropboxusercontent.com/u/8160092/iasl.zip -
Dell Inspiron 3x37-5x37-7x37 Clover Installation
pokenguyen replied to greg2204's topic in The Archive
reinstall won't change your dsdt, ssdt, only buying new laptops or changing bios will make a difference. EDIT: Looks like the new iasl makes more error, I will update the patch to suit yours -
Dell Inspiron 3x37-5x37-7x37 Clover Installation
pokenguyen replied to greg2204's topic in The Archive
My guide is for tons of laptop, so there is 3437, 3537, 3737, 5437, 5537, 5737, 7437, 7537... and dsdt, ssdt are different between laptops, and even between BIOS versions. I have experience with my laptop (HP EliteBook), so I'm not completely clueless when installing this Dell. I tried once on 7537 first, try to fix its issue, then I collect dsdt, ssdt of other Dell laptops, figure out the common routine then write universal patches and put them in 1 guide. You can learn all about hackintosh in insanelymac, projectosx and another site that I can't mention here. -
Dell Inspiron 3x37-5x37-7x37 Clover Installation
pokenguyen replied to greg2204's topic in The Archive
Both AppleHDA and VoodooHDA are terrible, the headphone won't work. Same for other Dell Haswell laptops. At least you get sound after sleep with VoodooHDA. -
Dell Inspiron 3x37-5x37-7x37 Clover Installation
pokenguyen replied to greg2204's topic in The Archive
Take a sleep and continue tomorrow. I don't have time to fix everyone's careless mistakes. -
Dell Inspiron 3x37-5x37-7x37 Clover Installation
pokenguyen replied to greg2204's topic in The Archive
Not on your desktop, please read carefully again, please please!!!! They're in the DSDT folder on desktop. -
Dell Inspiron 3x37-5x37-7x37 Clover Installation
pokenguyen replied to greg2204's topic in The Archive
No, if you read the guide more carefully, you can see that: Only copy DSDT* and SSDT* files to DSDT folder, don't copy all files. I see that you have APIC, XSDT files and it causes your problem.