
Leaderboard


Popular Content
Showing content with the highest reputation on 06/09/18 in all areas
-
Last updated: 14 Jun 2025 We still get recurring questions about some well-known and older unsupported GPUs and graphics cards, so let's try and make a quick recap here. The list can be completed as required and necessary. The list will only apply to Snow Leopard 10.6 and beyond, not before. Intel ----- Gen3 ----- GMA 900: unsupported since SL. GMA 950: supported in SL and Lion in 32bit kernel mode only; unsupported since ML. GMA 3100/3150: unsupported. ----- ----- Gen4 ----- GMA 3000/X3000: unsupported GMA X3100: supported in SL and Lion in 32bit kernel mode only; unsupported since ML. GMA 4500/4500M/4500MHD/4700MHD: unsupported. ----- ----- Gen5 ----- GMA HD/GMA 5700MHD/1st gen Intel HD (i.e. Ironlake of Clarkdale & Arrandale CPUs): partially (CI (i.e. screen resolution) only) or fully (full QE/CI) supported on laptops from SL 10.6.4 to High Sierra depending on built-in LCD connector (LVDS=full support, eDP=partial support); unsupported since Mojave. Refer to bible thread on the matter. Partial graphics support usually means platform is more or less unusable and therefore unsuitable as a Hackintosh. Special patches required for OpenGL-only support in Mojave and Catalina (and later?). ----- ----- Gen6 ----- Sandy Bridge Intel HD (GT1): unsupported. Sandy Bridge Intel HD 2000 (GT1): unsupported. Sandy Bridge Intel HD 3000 (GT2): supported from SL to High Sierra; unsupported since Mojave. Special patches required for OpenGL-only support in Mojave and Catalina (works very poorly in Big Sur/Monterey so best avoided). ----- ----- Gen7 ----- Ivy Bridge Intel HD (GT1): unsupported. Ivy Bridge Intel HD 2500 (GT1): unsupported; some unconfirmed reports of apparent support in ML from 10.8.3 and partial support (CI only) in El Capitan. Ivy Bridge Intel HD 4000 (GT2): supported from Lion to Big Sur; unsupported since Monterey but patch exists (see footnote). Bay Trail Intel HD (GT1): unsupported. Haswell Intel HD (GT1): unsupported. Haswell Intel HD 4x00/5000/Iris 5x00 (GT2/GT3): supported from ML 10.8.5 to Monterey. Unsupported since Ventura but patch exists (see footnote). ----- ----- Gen8 ----- Cherry Trail Intel HD/HD 4xx (GT1): unsupported. Braswell Intel HD/HD 4xx (GT1): unsupported. Broadwell Intel HD (GT1): unsupported. Broadwell Intel HD 5x00/6000/Iris 6x00 (GT2/GT3): supported from Yosemite 10.10.3 to Monterey. Unsupported since Ventura but patch exists (see footnote). ----- ----- Gen9 ----- Apollo Lake Intel HD 5xx (GT1): unsupported. Skylake Intel HD 510 (GT1): unsupported. Skylake Intel HD 515/520/530/Iris 5x0 (GT2/GT3/GT4): supported from El Capitan 10.11.4 to Monterey. Unsupported since Ventura but patch exists (see footnote). ----- ----- Gen9.5 ----- Kaby Lake Intel HD 610 (GT1): unsupported. Kaby Lake Intel HD 615/620/630/Iris+ 6x0 (GT2/GT3): supported from Sierra 10.12.6 to Tahoe beta. Kaby Lake R Intel UHD 620 (GT2): supported as per Kaby Lake with KBL framebuffer 0x59160000 and faking KBL iGPU id 0x5916. 8th gen Amber Lake Y Intel UHD 617 (GT2): supported from Mojave 10.14.1 to Tahoe beta (with KBL settings). ----- Coffee Lake Intel UHD 610 (GT1): unsupported. Coffee Lake Intel UHD 630/Iris+ 6x5 (GT2/GT3): basic support in High Sierra 10.13.6 from 1st Security Update build 17G2208 (iGPU ids 0x3E92/0x3E9B/0x3EA5); extended support from Mojave to Tahoe beta. Coffee Lake R Intel UHD 610 (GT1): unsupported. Coffee Lake R Intel UHD 630/Iris+ 6x5 (GT2/GT3): supported as per Coffee Lake with faking CFL id 0x3E92 up to Mojave 10.14.3; natively supported from Mojave 10.14.4 to Tahoe beta. Whiskey Lake Intel UHD 610 (GT1): unsupported. Whiskey Lake Intel UHD 620 (GT2): supported as per Coffee Lake with CFL framebuffer and faking CFL id 0x3EA5. Comet Lake/Comet Lake R Intel UHD Graphics for 10th gen. processor (GT1/GT2): supported from Catalina 10.15.4 to Tahoe beta with CFL settings. Caution must be exercised though given that Intel somehow recycled Coffee Lake UHD6x0 (itself a refresh of Kaby Lake R graphics). for desktop CPUs, Intel reused the UHD6x0 naming convention: Comet Lake UHD 610 (GT1): unsupported Comet Lake UHD 630 (GT2) supported as per Coffee Lake things differ quite a lot for mobile CPUs: generally speaking, UHD Graphics of mobile Comet Lake i3/i5/i7/i9 "U" CPUs is equivalent to UHD 620 (GT2); those have 23 (i3) to 24xEUs (i5/i7/i9) and are expected to be supported (not necessarily OOB). generally speaking, UHD Graphics of mobile Comet Lake i3/i5/i7/i9 "H" CPUs is equivalent to UHD 630 (GT2); those have 23 (i3) to 24xEUs (i5/i7/i9) and are expected to be supported (not necessarily OOB). as an exception to those rules, some mobile "U" and/or "H" CPUs (eg: i5-10200H) have an iGPU with 12xEUs only which is equivalent to UHD 610 (GT1) -> unsupported. all mobile Celeron and Pentium have a 12xEUs UHD Graphics, i.e. equivalent to UHD 610 (GT1) -> unsupported. known ids of CML iGPU with 12xEUs only: 0x9B21, 0x9BAA, 0x9BA4, 0x9BAC (+ desktop id 0x9BA8) -> unsupported. known ids of CML iGPU ids with 23 to 24xEUs: 0x9B41, 0x9BC4, 0x9BCA, 0x9BCC (+ desktop ids 0x9BC5, 0x9BC8) -> expected to be supported (not necessarily OOB). a recap of CML iGPUs is available in the following Intel document: Intel UHD Graphics Open Source. Programmer's Reference Manual.pdf.zip ----- ----- Note about GT1 iGPUs ----- Basically, from Gen6 HD 3000 to Gen9.5 UHD 6xx iGPUs, there is no support for low-end/entry-level GT1-based Intel HD/UHD graphics. ----- ----- Gen11 ----- Ice Lake Intel UHD (G1): apparently supported from Catalina 10.15.4 to Monterey by faking id of G4/G7 counterparts as stated here. Ice Lake Intel Iris Plus (G4/G7): supported from Catalina 10.15.4 to Tahoe beta. ----- ----- Later generations (Gen12 and beyond) ----- No support for subsequent iGPU generations to be expected, Apple having switched to M1 silicon after Ice Lake generation. Lots of iGPU info available here: https://en.wikipedia.org/wiki/Intel_Graphics_Technology nVidia GeForce 6x00 and similar (Curie NV4x): unsupported since SL 10.6.3 at least (some cards supported in early SL versions only). GeForce 7x00 and similar (Curie G7x): supported in SL and Lion in 32bit mode only; unsupported since ML. Tesla generation (G8x, G9x, GT2xx) supported SL -> High Sierra; unsupported since Mojave. Special patches required for OpenGL-only support in Mojave and later (see footnote). Fermi generation (GFxxx): supported Lion -> El Capitan; buggy/poorly supported in Sierra and High Sierra; unsupported since Mojave. Kepler generation (GKxxx): supported from Lion 10.7.5/ML 10.8.2 to Big Sur but cards based on GK106 chip are best avoided (driver memory leak issue); unsupported since Monterey, special patches required for Monterey and later (see footnote). Maxwell generation (GMxxx): supported from (late) Yosemite to High Sierra and only with the nVidia Web Driver; unsupported since Mojave (no Web Driver). Pascal generation (GPxxx): supported from (late) Sierra to High Sierra and with the nVidia Web Driver; unsupported since Mojave (no Web Driver). Turing generation (TUxxx) and later: unsupported. Support for Kepler cards was dropped in Monterey beta7, marking the end of official support for the last nVidia cards (i.e. Kepler) that remained usable/supported in macOS until then. Special patches apply thereafter (see footnote). ATI/AMD Radeon X300/X600/X700: unsupported. Radeon X800: apparently supported in SL and Lion; unsupported since ML. Radeon X1000: X1300/X1400/X15x0: supported up to SL; limited support (CI only) in Lion; unsupported since ML. X1600/X1900: supported in SL and Lion; unsupported since ML. ----- Radeon HD 2xxx: some models supported in SL up to High Sierra; unsupported since Mojave. Radeon HD 3xxx: some models supported in SL up to High Sierra; unsupported since Mojave. Radeon HD 4xxx: some models supported in SL up to High Sierra; unsupported since Mojave. Radeon HD 5xxx: many models supported in SL up to High Sierra; unsupported since Mojave. Radeon HD 6xxx: many models supported in SL up to High Sierra; unsupported since Mojave. Radeon HD 7xxx: many models supported from ML to Monterey; unsupported since Ventura. Radeon HD 8xxx: many models supported from ML to Monterey; unsupported since Ventura. ----- R7/R9: many models supported from Yosemite to Monterey; unsupported since Ventura. Polaris 10: Lexa unsupported. Baffin supported from Sierra to Sequoia (Tahoe beta?). Ellesmere supported from Sierra to Sequoia (Tahoe beta?). Careful with Radeon RX550 which exists in both Lexa and Baffin versions (needs to be 640SP and id 1002:67FF). Polaris 20/30: most models supported from Sierra to Sequoia (Tahoe beta?). Vega 10: many models supported from High Sierra to Sequoia (Tahoe beta?). Vega 20: some models supported from Mojave to Sequoia (Tahoe beta?). Navi 10: many models supported from Catalina to Sequoia (Tahoe beta?). Navi 20: unsupported. Navi 21: some models supported from Big Sur to Sequoia (Tahoe beta?). Vavi 22: unsupported. Navi 23: some models supported from Monterey to Sequoia (Tahoe beta?). Navi 24: unsupported. Navi 3x: unsupported. ----- APUs: unsupported. ----- Mojave and later require GCN1.0 cards minimum (i.e. HD 7000/HD 8000/ R7/ R9 Series). An excellent recap of things is available at Dortania's GPU buyer's guide (defunct one here). Not to be missed for detailed guidance on Intel graphics configuration: the WhatEverGreen user manual. An absolute must with complete documentation for Intel iGPUs. NB: Obsolete GPUs for which Apple dropped official support after Lion 10.7.5 (e.g.: GMA950/X3100, GeForce 7x00, ATI X1600) can be supported in ML with MLPF hack (essentially, a hack that runs pseudo ML in 32bit mode with DP1 32/64bit kernel and kexts). Details are available our ML with full QE/CI guides for old unsupported Latitude laptops in our Archives section. The work is based on the original R&D stuff covered in ML on unsupported Macs available at MacRumors.com. Older Intel and nVidia GPUs for which Apple dropped official support after High Sierra 10.13.6 (e.g.: 1st gen Intel HD, SNB HD3000, nVidia Tesla GPUs) can be supported in Mojave/Catalina in OpenGL-only mode by installing drivers from High Sierra and reverting some frameworks. More details in subsequent post below. nVidia Tesla GPUs may be supported in OpenGL-only mode in Big Sur and later with OCLP patcher. See dedicated thread about Big Sur on unsupported Macs at MacRumors.com. Intel HD4000 graphics may be supported in Monterey and later with special patches. nVidia Kepler GPus may be supported in Monterey and later with special patches (official support was dropped from beta 7). Haswell, Broadwell and Skylake iGPUs were dropped in Ventura, however: Skylake HD 5x0 graphics are pretty much fully supported by faking KBL iGPU, using KBL framebuffer layouts, using WEG 1.6.1 or later and KBL SMBIOS Haswell and Broadwell graphics may be fully supported after patching with tools such as OCLP 0.5.1 and later.1 point
-
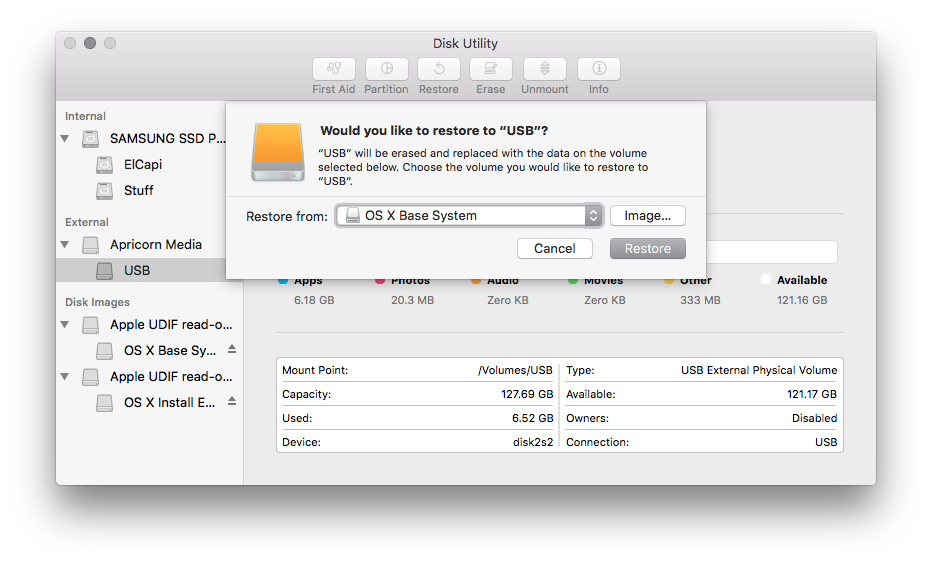
Dell Latitude/Inspiron/Precision/Vostro/XPS - Clover Guide Up to Sierra Only High Sierra Guide below Mojave Guide Catalina Guide Warning: Follow guide at your own risk, I hold no responsibility if you brick your system or destroy all data during the process. If you're creating the installer from a real Mac, make sure you don't accidentally select the real Mac drive when installing Clover loader. It may cause your Mac to not boot again. You've been warned! BIOS: Set to Default, apply, then set SATA Operations to AHCI, set Boot List Option to UEFI Disable Secure Boot, Disable Wake on LAN/WWAN/WLAN, Disable TPM (optional) Enable Legacy Options ROMs for Broadwell system and below Requirements: 1. A downloaded OS X El Capitan / Sierra Application from the Mac App Store 2. USB flash drive (16GB minimum) 3. Clover Configurator (Included in Hack_Tools attached below - might not be the latest) 4. Clover Loader 5. ShowHiddenFiles.app (Included in Hack_Tools attached below) 6. A system running OS X to create the USB Installer 7. A supported Wireless card, Intel wireless are NOT supported Overview 1. Prepare a Bootable USB Drive (8GB minimum) 2. Install OS X El Capitan / Sierra 3. Post Installation 1: Prepare Bootable USB Drive This step extracts the OS X Installer contents, then installs Clover bootloader to the USB stick. 1. Insert the USB drive on a running OS X system 2. Open /Applications/Utilities/Disk Utility 3. Highlight the USB drive in left column 4. Click on the Partition tab 5. Click Current and choose 1 Partition 6. Click Options... 7. Choose GUID Partition Table 8. Under Name: type USB (You can rename it later) 9. Under Format: choose Mac OS Extended (Journaled) 10. Click Apply then Partition 11. Go to Applications, right click on Install OS X El Capitan / Sierra =>Show Package Contents=>Contents=> SharedSupport 12. Mount InstallESD.dmg 13. Launch ShowHiddenFiles and select Show Special Files ( app attached at the end of guide) 14. Mount BaseSystem.dmg (hidden) from OS X Install ESD 15. Use Disk Utility to restore OS X Base System to USB (see image below) 16. After restore is complete, USB is now renamed to OS X Base System. Go ahead and rename it to Install OS X El Capitan 17. Go to Install OS X El Capitan/ Sierra=>System=>Installation and delete the alias Packages 18. Copy Packages from root of OS X Install ESD to Install OS X El Capitan/Sierra=>System=>Installation 19. Copy BaseSystem.dmg and BaseSystem.chunklist (hidden files) from OS X Install ESD to root of Install OS X El Capitan/Sierra 20. Launch ShowHiddenFiles and select Hide Special Files 21. Download Clover 22. Launch Clover package installer 23. Hit Continue, Continue, Change Install Location... 25. Choose Install OS X El Capitan/Sierra 26. Hit Continue, then hit Customize. Select these items: Install for UEFI booting only Install Clover in the ESP UEFI Drivers\Recommended Drivers ApfsDriverLoader AptioMemoryFix AudioDxe DataHubDxe FSInject HFSPlus SMCHelper (leave off if you have VirtualSMC.kext in bootpack) Additional drivers PartitionDxe Themes (Optional) Note: For non UEFI BIOS, see Note1 of post #2 27. Click Install 28. After installation of Clover, the hidden EFI Partition will appear on the Desktop 29. Download the Generic EFI + Bootpack for your model in post #2, replace the contents to the root of the EFI partition, replacing the existing folders ( Boot and Clover folders - not merge) Note: Make sure to check the Update section in Post #4 for updated file if any 30. You are now ready to install OS X El Capitan/Sierra Note: Make a directory in the USB Installer and copy Hack_Tools, Clover package and EFI folder to it for easy access in Step 3 2: Install OS X El Capitan/Sierra 1. Turn on the computer with the USB Installer connected 2. Press F2 to configure the BIOS Sata Operaton -> AHCI Secure Boot -> Disabled Boot List Option -> UEFI. Enable Legacy Option ROMs (Disabled for Skylake and above) Apply and Exit 3. Hit F12 during boot, choose under UEFI Boot: 4. When Clover boot screen appears, choose Install OS X El Capitan/Sierra 5. The system will then boot into the OS X Installer 6. Choose your language and hit -> to continue 7. For a new installation of OS X, you MUST erase and format the destination drive according to the following steps before continuing. *If you are upgrading from Lion, Mountain Lion, Mavericks, or Yosemite and you want to keep your files and apps, skip steps a-i. a. From the menu bar, click Utilities -> Choose Disk Utility b. Highlight your target hard drive for the El Capitan installation in left column. c. Click Erase tab d. Under Scheme: GUID Partition Map e. Under Name: type Macintosh SSD (You can rename it later) f. Under Format: choose Mac OS Extended (Journaled) g. Click Erase h. Click on Partition Tab to add more partition if you prefer i. Close Disk Utility 8. Click Continue, Continue, Agree 9. Select Macintosh SSD, or name of your existing drive, where you want to install El Capitan and click Continue 10. Upon completion, system will restart 11. Press the F12 to choose boot device 12. Choose under UEFI Boot: 13. When Clover boot screen appears, choose Macintosh SSD or name of your existing drive The system will boot into the new drive, and complete the installation: 14. Launch the terminal and enter the following command diskutil list Note: If you see the following, then follow steps in Post #3 Under Core Storage before proceeding /dev/disk1 (internal, virtual): 3: Post-Installation Install Clover loader to Macintosh SSD 1. Launch Clover package installer 2. Hit Continue, Continue, Change Install Location... 3. Choose Macintosh SSD 4. Hit Continue, then hit Customize. Select these items: Install for UEFI booting only Install Clover in the ESP UEFI Drivers\Recommended Drivers ApfsDriverLoader AptioMemoryFix AudioDxe DataHubDxe FSInject HFSPlus SMCHelper (leave off if you have VirtualSMC.kext in bootpack) Additional drivers PartitionDxe Themes (Optional) Install Clover Preference Pane (Optional) Note: For non UEFI BIOS, see Note1 of post #2 5. Launch ESP Mounter Pro, select the disk you have OS X installed on (ie. disk0s1) - app in Hack_Tools 6. Copy the EFI folder from the USB installer to EFI partition of Macintosh SSD (replace not merge) 7. Copy kexts from /EFI/Clover/Kexts/Other/CopytoLE to /Library/Extensions of Macintosh SSD Note: Ignore warning/error messages and click OK, then run commands below. 8. Repair permission and rebuild cache. Run command from terminal (or run permission.sh found in Hack_Tools) sudo chmod -Rf 755 /L*/E* sudo chown -Rf 0:0 /L*/E* sudo touch -f /L*/E* sudo chmod -Rf 755 /S*/L*/E* sudo chown -Rf 0:0 /S*/L*/E* sudo touch -f /S*/L*/E* sudo kextcache -Boot -U / 9. Go to System Preferences Enable Clicking for Trackpad Allow apps downloaded from: Anywhere for Security & Privacy (optional) Note: For Sierra and up, run this in terminal instead: sudo spctl --master-disable 10. Generate own SMBios and SSDT.aml (For Haswell and up, you can enable PluginType in Config instead) Launch /EFI/Clover/Config.plist with Clover Configurator (Included in Hack_Tools attached below) On the left, click on SMBIOS Click on the Up/Down arrow on the right Select the model most suited for your system or use same model included in bootpack, generate a new serial Close Clover Config and save the file. Execute ssdtPRGen.sh from terminal (Included in Hack_Tools attached below) Place generated SSDT.aml in /EFI/Clover/ACPI/Patched Please use beta version of ssdPRGen.sh to generate SSDT.aml for newer system 11. Make sure to disable hibernation as it's a prerequisite to get sleep & wake to work properly on a Hackintosh: sudo pmset hibernatemode 0 sudo rm -f /var/vm/sleepimage sudo pmset hibernatefile /dev/null 12. Congratulations! You are done! Hack_Tools.zip When posting for HELP, please include full system specs and attach debug files. If you're not able to start the installer, then attach the Clover folder and include screenshot(s) of the error / KP by booting with verbose + debug 0x100 mode Credits: All apps, kexts and DSDT patches used in creating this guide go to the developers that created them. I take no credit other than putting this guide and bootpacks together.
 1 point
 -
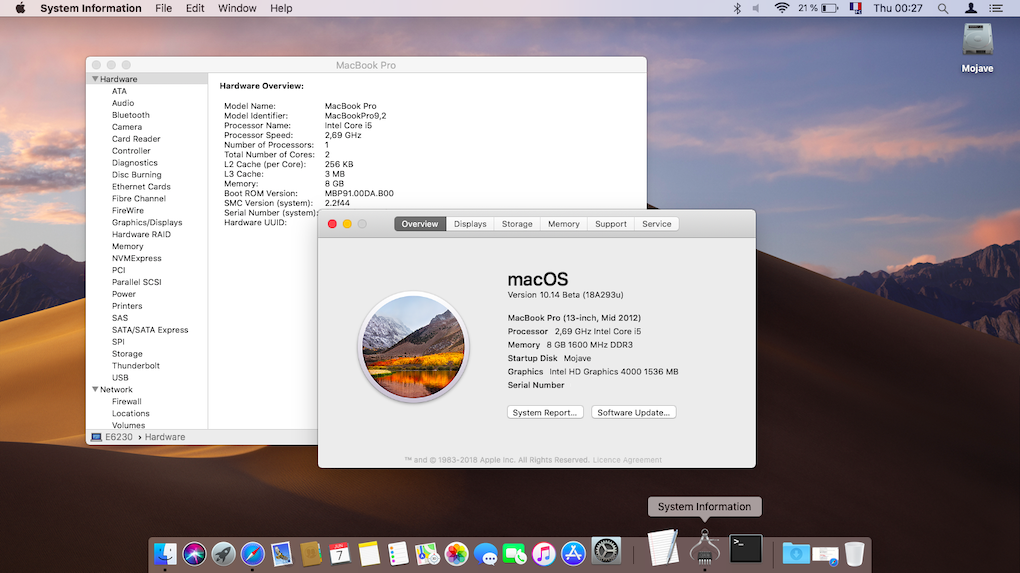
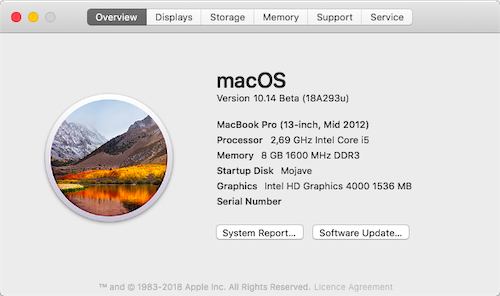
Beta1 installs in the exact same manner as High Sierra. The difference is that 10.14 requires Clover r4517 or higher to install successfully. https://github.com/Dids/clover-builder/releases So far, Ok on my Ivy Bridge/HD4000 Latitude E6230 with same EFI/bootpack as High Sierra 10.13 and Clover r4521. I made a quick and basic, not fully tuned, installation: Apple stated that Mojave will only support GPUs compatible with Metal so HD3000 and older 1st gen Intel HD graphics are effectively dropped (and there are no kexts for these). Support for Intel iGPUs now starts at Ivy Bridge HD4000. So, I won't be trying Mojave on my E6220 nor on my ancient D630 (support for nVidia Tesla architecture dropped too)... We'll see if this gets to evolve in the following beta versions but not much of a hope I guess. APFS conversion seems to be mandatory too. Despite my modification of the minstallconfig.xml file of the 1st reboot temporary installation in which I had set the ConvertToAPFS parameter to false, my target Mojave partition ended up converted! Not a problem in itself on my SSD (and APFS is reportedly Ok on mechanical HDD now) but that means a definitive goodbye to Chameleon/Enoch for the time being. Inescapable eventuality I guess... List of officially supported Mac models is as follows (as per /S/L/CoreServices/PlatformSupport.plist) MacPro6,1 iMac17,1 iMac16,2 iMac16,1 iMac15,1 iMac14,4 iMac14,3 iMac14,2 iMac14,1 iMac13,3 iMac13,2 iMac13,1 Macmini7,1 Macmini6,1 Macmini6,2 MacBookPro12,1 MacBookPro11,5 MacBookPro11,4 MacBookPro11,3 MacBookPro11,2 MacBookPro11,1 MacBookPro10,2 MacBookPro10,1 MacBookPro9,2 MacBookPro9,1 MacBook9,1 MacBook8,1 MacBookAir7,2 MacBookAir7,1 MacBookAir6,2 MacBookAir6,1 MacBookAir5,2 MacBookAir5,1
1 point
-
You're missing the HDAU device for HDMI/DP audio. Try this, replace the DSDT with the attached DSDT/SSDT 3020_HDAU.zip1 point
-
As stated in my above research thread, I've not been able to obtain dual/multiple displays on my Haswell/HD4600 Latitude E6440 (close cousin of the E7440) with my Dell E-Port docking stations/port replicators (PR02X/PR03X) since Sierra 10.12.3. It did work with earlier Sierra versions and still does under El Capitan / Yosemite / Mavericks. VGA is not normally supported under Haswell graphics but, since you have HD4400 built in your i5-4300u, you may find it works OOB directly off the laptop. Binary patch that fixes final stage boot glitch (what you call the "scattered apple") for High Sierra is well known and readily available... In: IOGraphicsFamily Find: 0100007522 Replace by: 010000EB221 point
-
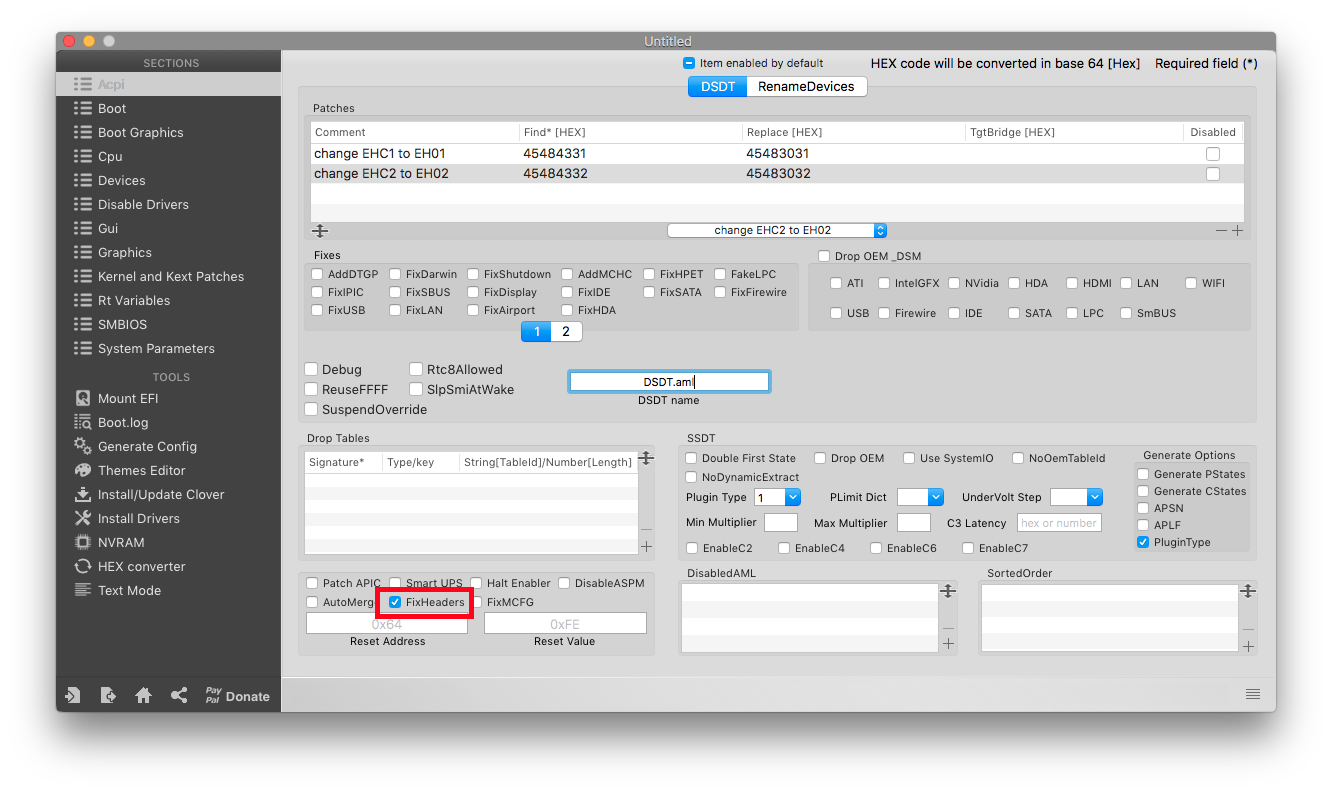
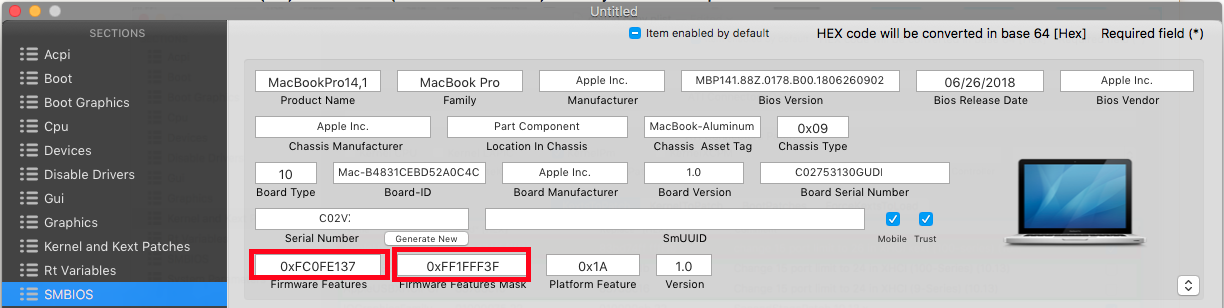
High Sierra Clover Guide Warning: Follow guide at your own risk, I hold no responsibility if you brick your system or destroy all data during the process. If you're creating the installer from a real Mac, make sure you don't accidentally select the real Mac drive when installing Clover loader. It may cause your Mac to not boot again. You've been warned! New Installation Note: By default, upgrading or new Install of HS on an SSD drive, it'll automatically convert to APFS format. If you want to use APFS format, skip step 4 (1) Create the USB installer via Terminal with "createinstallmedia" (a minimum of 16GB UFD is needed or an external USB drive) sudo /Applications/Install\ macOS\ High\ Sierra.app/Contents/Resources/createinstallmedia --volume /Volumes/"target_USB" --applicationpath /Applications/Install\ macOS\ High\ Sierra.app --nointeraction Note: target_USB = name of the USB drive you're writing to (2) Install Clover with following config, add appropriate Sierra bootpacks Only + Generic EFI from post #2 above ( See note1 below for updating bootpack for HS if there isn't one for your model in post #2) UEFI: Install for UEFI booting only Install Clover in the ESP UEFI Drivers\Recommended Drivers ApfsDriverLoader AptioMemoryFix AudioDxe DataHubDxe FSInject HFSPlus SMCHelper (leave off if you have VirtualSMC.kext in bootpack) Additional drivers PartitionDxe Themes (Optional) Install Clover Preference Pane (Optional - only available on installed disk, not installer) Legacy: Install Clover in the ESP Boot Sectors Install boot0af in MBR Clover for BIOS (Legacy) booting CloverEFI 64-bits SATA BIOS Drivers, 64 bit\Recommended Drivers ApfsDriverLoader AudioDxe FSInject HFSPlus SMCHelper XhciDxe Themes (Optional) Install Clover Preference Pane (Optional - only available on installed disk, not installer) (3) Boot with the USB installer, start Disk Utility and initialize your SSD as an APFS drive. Close Disk Utility, select Install MacOS. If you DO NOT want APFS, then select HFS+ format instead. Then Close Disk Utility and follow step 4, otherwise continue to Step 5 (4) Open the terminal (on the menu bar click Utility>Terminal), and launch this command /Volumes/"Image Volume"/"install macOS High Sierra.app"/Contents/Resources/startosinstall --volume /Volumes/"HighSierra" --agreetolicense --converttoapfs NO Note: HighSierra = name of the drive you're targeting (5) System will auto reboot after files has been copied (6) Boot with USB installer, select "Boot macOS Install from HighSierra". Installation will continue installing and reboot (Might have to do this rebooting a couple of times) (7) Boot with USB installer, finish the customization (8) Follow post install steps from Post # 1 NOTE1: Updating the Sierra Bootpack to be use for High Sierra unless there's a High Sierra bootpack already 1) Edit config.plist from Sierra Bootpack (I recommend using Clover Configurator 4.59 or newer) and activate FixHeaders option under Acpi: 2) Update USB port limit for High Sierra where applicable, if current Sierra Bootpack doesn't have it, then you don't need this. Either disable 10.12 (Red) and add 10.13 (Green - 9 or 100 Series) or modify 10.12 to 10.13 port limit Update: New USB port Limit patch for 10.13.4(5) and 10.13.6 credits to PMHeart 3) Under SMBIOS, update the definition so that Firmware Features and Firmware Feature Mask is now populated 4) [Recommended] Update the Sierra kexts under /EFI/CLOVER/kexts/Other/ Common links for new kexts: https://github.com/vit9696/Lilu/releases https://github.com/vit9696/Lilu/blob/master/KnownPlugins.md https://bitbucket.org/RehabMan/ Upgrading to High Sierra and keeping HFS+ format If you want to keep HFS+ format, run this command instead of launching the "Install MacOS High Sierra.app" /Applications/Install\ macOS\ High\ Sierra.app/Contents/Resources/startosinstall --agreetolicense --converttoapfs NO If you want to install or upgrade to a different partition/drive /Applications/Install\ macOS\ High\ Sierra.app/Contents/Resources/startosinstall --volume /Volumes/"targetdrive" --agreetolicense --converttoapfs NO Note: Repair permission and rebuild cache if you lost audio after upgrade. You must upgrade Clover, Config.plist and kexts as noted in NOTE1: Updating the Sierra Bootpack to be use for High Sierra When posting for HELP, please include full system specs and attach debug files. If you're not able to start the installer, then attach the Clover folder and include screenshot(s) of the error / KP by booting with verbose + debug 0x100 mode
1 point
-
Updates Deprecated1 point
-
Troubleshooting Clover rebooting early If you encounter any of the bullet below and rebooted, make sure that your 1 DIMM be on slot A. OsxAptioFixDrv: Starting overrides for System\Library\CoreServices\boot.efi Using reloc block: yes, hibernate wake: no +++++++++++++++++++++++++++++++++++++++++++++++ OsxAptioFixDrv: Starting overrides for System\Library\CoreServices\boot.efi Using reloc block: yes, hibernate wake: no Error allocating 0x#### pages at 0x####... alloc type 2 Error loading kernel cache (0x9) Boot failed, sleeping for 10 seconds before exiting... OsxAptioFixDrv: Starting overrides for System\Library\CoreServices\boot.efi Using reloc block: yes, hibernate wake: no Error allocating 0x#### pages at 0x####... alloc type 2 Could not allocate runtime area Boot failed, sleeping for 10 seconds before exiting... Core Storage 1) From terminal, enter diskutil list. Note the virtual drive in red. >diskutil list /dev/disk0 (internal, physical): #: TYPE NAME SIZE IDENTIFIER 0: GUID_partition_scheme *256.1 GB disk0 1: EFI EFI 209.7 MB disk0s1 2: Apple_CoreStorage Macintosh SSD 63.5 GB disk0s2 3: Apple_Boot Recovery HD 650.0 MB disk0s3 /dev/disk1 (internal, virtual): #: TYPE NAME SIZE IDENTIFIER 0: Apple_HFS Macintosh SSD +63.1 GB disk1 Logical Volume on disk0s2 75DADC16-4B7F-4C7D-9660-10A1C2A9FC02 Unencrypted 2) From terminal, run diskutil cs revert /dev/disk1 3) Reboot with USB Installer and select the Installed drive 4) Continue with 3. POST-INSTALLATION Credits to peluko iMessage and FaceTime https://github.com/camielverdult/Ramblings-of-a-hackintosher-High-Sierra/blob/master/iMessage.md1 point
-
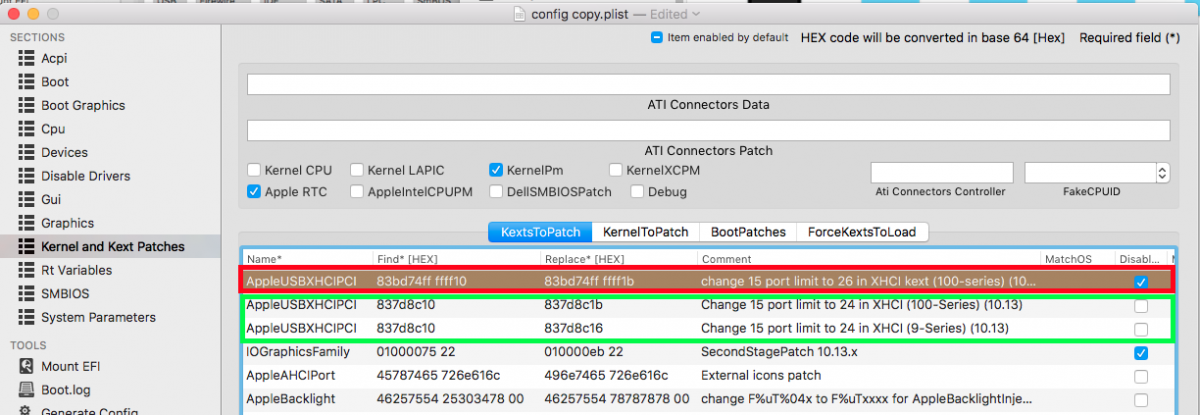
Clover Bootpacks I'll be adding more bootpacks when I have them confirmed working by members of this forum... Don't forget to check the Update section below (post #4) for updated files and information!!! Note: Sierra bootpacks already have the updated files listed in post #4 Note: Bootpack (EFI) consists of combining the Generic EFI + the model you're downloading!!! Instruction: 1) Download the Generic EFI folder. Generic EFI Folder EFI_v5119.zip 2) Download model below and add the contents into the Generic /EFI/Clover <- folder Latitude UEFI Only - GUID Scheme - Kabylake (OS X 10.12.6 and Up)- (See Note2 below) Mojave 7480_Mojave.zip For Optimus models, add to /EFI/Clover/ACPI/Patched DisableDiscreteGraphics.zip Sierra / High Sierra 5480_HD620_v1.6.4_HS.zip 5480_HD630-Optimus_HS.zip (BIOS 1.9.3) - Skylake (OS X 10.11.4 and Up)- (See Note2 below) El Capitan E7x70.zip - latest Sierra / High Sierra bootpack here Sierra 5480_BIOSv1.5.2.zip E5470_1.17.3_HS.zip High Sierra E5470_1.18.6_HS.zip - Broadwell - (See Note2 below) El Capitan E7450_update.zip - latest Sierra /High Sierra bootpack here E5450_HD5500.zip E5550.zip Sierra E5550_A15.zip E5550_A15_Disable_GT820M.zip E5450_HD5500_A15.zip 3450_A13.zip High Sierra E5450_HS_A19.zip - Haswell El Capitan E7440.zip E6540.zip E5540.zip E5450_HD4400.zip 3550.zip 3540.zip 3440.zip 3340.zip Sierra E7440_A20.zip E6540_Optimus_A17.zip E6540_HD4600_Only.zip E6440_A14.zip - based off Hervé's work E5540_Sierra.zip E5440_A13.zip 3550_HD4400_A12.zip High Sierra E7440_HS.zip E6440_A14_HS E5440_A21_Disable-Nvidia.zip Mojave E6440_HD4600_Only_Mojave.zip - IvyBridge El Capitan E6230.zip - 1366x768 E6430.zip - 1600x900 and above E5530.zip - Rename Config/DSDT depending on display resolution Sierra E6530_HD4000_Only.zip 6430u_1366x768.zip - BIOS A06 See here for 6430u HiRes (1600x900) file E6430_A12.zip - check Readme.txt inside bootpack E5530_A12.zip E6330_A11.zip - check Readme.txt inside bootpack E6230_A11.zip E6230_HD3000.zip -> this has SandyBridge CPU High Sierra E6230_A11 Legacy - GUID Scheme - See Note1 below - SandyBridge El Capitan E6420.zip - 1600x900 E6x20_NVS.zip E6220.zip - 1366x768 E5420.zip Sierra E6220_A13.zip E5520_A14.zip - check Readme.txt inside bootpack E5420.zip - check Readme.txt inside bootpack E6420_HD3000_A23.zip- check Readme.txt inside ACPI/Patched folder E6420_Optimus_A23.zip - check Readme.txt inside ACPI/Patched folder E6520_Optimus_A19.zip - check Readme.txt inside ACPI/Patched folder High Sierra E6520_Disabled-NVS_HS.zip E6220_A13_HS.zip Inspiron UEFI Only - GUID Scheme - Broadwell - (See Note2 below) El Capitan 5458.zip Inspiron_5548.zip 5558_HD5500_Only.zip 5558_HD5500_DisableNvidia.zip Sierra 3543_A08.zip 5548_HD5500_Only.zip 5548_m270-Disabed_A07.zip 5558_920M-Disabled_A14.zip High Sierra 5558_920M-Disabled_A14_HS.zip - Haswell El Capitan 5558_HD4400.zip 3542.zip Sierra 3542_A12.zip High Sierra 5558_HD4400_HS.zip Precision UEFI Only - GUID Scheme - Skylake (OS X 10.11.4 and Up)- (See Note2 below) El Capitan 5510_HD530_Disabled-Nvidia.zip Sierra 5510_HD530_1.2.25.zip 7510_HD530_1.12.4.zip - (See more info here) Vostro UEFI Only - GUID Scheme - Kabylake Sierra / High Sierra Vostro_3468_Biosv01.07.00_HS.zip Vostro_3468_2.3.0_HS.zip XPS UEFI Only - GUID Scheme - Haswell Sierra / High Sierra XPS 12 9Q33_A07.zip Note1: For Exx20 (SandyBridge models), use Legacy - GUID Scheme. Not UEFI Install Clover with the following settings in 1: Prepare Bootable USB Drive step 26 above: Legacy: Install Clover in the ESP Boot Sectors Install boot0af in MBR Clover for BIOS (Legacy) booting CloverEFI 64-bits SATA BIOS Drivers, 64 bit\Recommended Drivers ApfsDriverLoader AudioDxe FSInject HFSPlus SMCHelper XhciDxe Themes (Optional) Install Clover Preference Pane (Optional - only available on installed disk, not installer) Note2: Systems with Broadwell / Skylake / Kabylake CPU such as Latitude E7450 and Inspiron 5548, you'll need to set the DVMT prealloc to 96MB in order to bypass KP and to enable full graphics with full QE/CI. For more info, see here. /!\ New Development: If you don't want to mod the BIOS as it might be difficult for some models, you could skip this step by adding 2 new kexts to /EFI/Clover/kexts/Other Lilu.kext & Whatevergreen Notes3: To prevent artifacts with HD 4000, the following models should not exceed BIOS A11. Downgrade to A02/A03 and then upgrade to A11 if it has exceeded: E6x30, E5x30 Latitude 6430U should stay at A06 Fix can be found here, no longer need to use old BIOS1 point

This leaderboard is set to London/GMT+01:00