
Leaderboard


Popular Content
Showing content with the highest reputation on 09/12/19 in all areas
-
So here goes the T3500 Pack: I took a different approach to minimize effort and only use ssdt, no more DSDT, try attached EFI Folders. ( I added HDEF to DSDT but it did not help and voodoo seems to work better without, as HDA does not load) Only using //Patched: SSDT_LPC.aml to get "pci8086,3a18" loaded for PM/AppleLPC.kext. EFI Folder Voodoo: Sound works, sleep/wake works. EFI Folder ALC : Sound shows icons and values in sysprefs (and AppleHDA is loaded, see pic), but does not actually play sound. (I tried to resolve sound but apparently it is not that simple - at least I couldn't. Lots of info on ALC / AD1984A / Mojave being a problem.) Sleep/wake works too. Hardware is T3500 w W3680 cpu, GB Aorus AMD RX570, ASMedia Sata3 Card w/ 2 SSDs, a TP-Link wifi card , and 24 Gig Ram. I will continue to play with the settings in the plist checkboxes to minimize as much as possible. If you find there are useless settings (or important ones missing) in the config.plist please share your knowledge here. Give it a try...(EFI is from clover r4911/Mojave 10.14.6) Good luck T3500 pack.zip1 point
-
You can also inject it in Config file using Clover Configurator. You'll need to enable FixHPET, FixMutex and FixDarwin if you don't have these in your DSDT. Inject with layout ID = 13 or 11 if that doesn't work1 point
-
If HDEF (or whatever other audio device name) is not defined by default in your DSDT, maybe it is in an SSDT. You can dump all raw BIOS tables by pressing F4 at Clover main menu and then check things out. All extracted tables will be saved in EFI/CLOVER/ACPI/origin folder. But you probably already know that...1 point
-
Hi dm4n, sure I can do that, but first I have to get Audio sorted as I am trying to move away from voodoohda and use Lilu/AppleAlc and Mojave. The T3500 has AD1984A codec but I have the issue that with AppleALC the devices are seen but still no sound is played from them. (Headphones and Lineout, clover Inject 11/13/44) (I`d like to figure this out because then sleep appears to work well, which is buggy with voodoo) The codec has been added to ALC recently but there seems to be some problem with injection in the latest versions, and I have found no solution to it yet. I have no HDEF in my DSDT, so if somebody has a tip on how to add this in I`d like to try. Maybe Hervé has a hint, as AD1984A seems to be common in similar machines like the Optiplex series: 780/760 has AD1984A 755 has AD1984 T3500 has AD1984A would this make sense ? Device (HDEF) { Name (_ADR, 0x001B0000) Method (_DSM, 4, NotSerialized) { Store (Package (0x08) { "built-in", Buffer (One) { 0x00 }, "layout-id", Buffer (0x04) { 0x1C, 0x00, 0x00, 0x00 }, "PinConfigurations", Buffer (Zero) {}, "hda-gfx", Buffer (0x0A) { "onboard-1" } }, Local0) DTGP (Arg0, Arg1, Arg2, Arg3, RefOf (Local0)) Return (Local0) } } For the BIOS reset Problem I think it could be: CMOS Battery Clover not at 4911 (I use this) Mojave not at .6 version SMBIOS not updated for MP5,1 for the newer BIOS definition (use Cloverconfigurator)1 point
-
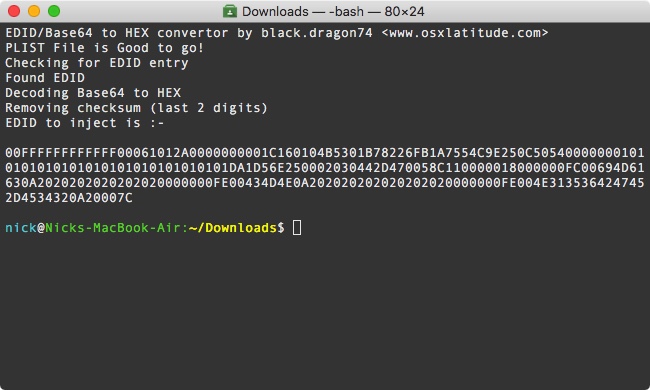
Hello friends, Many of you have noticed that after upgrade to high sierra whenever you machine sleeps, be it a display sleep or a system sleep, the screen turns out fully white with garbled lines, or it might turn black with just the cursor moving. If you try and press few keys you will find out that the machine works but the display doesn't. If you want to know a little background info, read on, else skip to fix. On my ASUS R541UJ this bugged me a lot. I tried hell lot of things like, re patching DSDT, trying with all 15 ig-platform-id (for Kabylake), still, the issue persisted. I also have an ASUS A555LA (which I am trying to make a perfect MacBook Air). So, in my process of making my A555LA a perfect MacBook I added a ALS (ambient light sensor device) and then, changed vendor-id along with product-id of the laptop's display to that of Apple's display i.e. PID: 0x9cf2 VID: 0x610 for MacBook Air's display.. Whatever I do on my A555LA, I replicate the same on my 2 other ASUS laptops. So, I did the same on my R541UJ (the one affected by this annoying bug) And to my surprise, that issue was fixed! Then, I disabled the ALS device in my custom SSDT (I generally make a dynamic configurable SSDT that works for all my machines, See here) and that issue didn't come back. So, I finally came to the conclusion that it was due to incorrect vendor-id and product-id of my display in IODisplayEDID or EDID. Enough talking, let's see how you can fix this in a few simple steps. How to fix: In order to fix this, as you might already know from above, we need to change our display's product and vendor id to that of Apple's display. There are 3 ways for this, Injecting custom EDID using clover, Using a display override, Using a custom override kext (DispalyMergeNub). I love CLOVER so will be covering that part of the fix in this guide. Also, injecting EDID with clover is preferred as it will also work when booting recovery partition. (Not the same with Display Overrides and DisplayMergeNub) Update your CLOVER to latest version (nothing to do with this fix but is a good idea to have you boot loader up to date) Download Darwin Dumper from here Download FixEDID app from here Download my script attached to this post. Open Darwin dumper and uncheck everything except EDID. Then, select run from the left pane. It will dump your EDID and then it will open a folder where it dumped the files. In the folder you will find an EDID folder. Upon opening it you will see 3 files namely, EDID.bin, EDID.hex, EDID.txt (All three files are your EDID dump except in different formats). We need the one in BIN format for FixEDID.app Copy EDID.bin from DarwinDump*/EDID to your Desktop (Dump* is the darwinDumper output folder) Open FixEDID.app and select open EDID binary file. Choose the EDID.bin file you copied to desktop. If you look below "Open EDID binary file" button, you will see a drop down menu saying "Apple iMac Display 16:10" Select it and choose "Apple MacBook Air Display 16:9" (Note: You may try experimenting with different models, I personally use "Apple MacBook Air Display 16:9" on my A555LA and "Apple MacBook Pro Display 16:10" on my R541UJ) Make sure display class is set to "AppleBacklightDisplay" for we are overriding our internal LVDS display. (AppleDisplay is used for external displays like that on HDMI or DP) Click on Make button (Note: You won't see any sort of confirmation but the app has done it's work) Close FixEDID and come back to your desktop. You will see a host of new files there. (3 files to be precise) For this guide, you just need DisplayVendorID-xxx folder. Open it any then you will find a file named "DisplayProductID-xxxx" Copy this file to the Desktop. Now we need to extract EDID that is in base64 format and then convert it to HEX format as required by CLOVER. Worry not, I got you covered. Now is the time to run my script. Assuming my downloaded script is in Downloads folder, open terminal and type: # Change working directory cd ~/Downloads # Make script executable chmod a+x get_edid.sh # Run and get EDID to inject ./get_edid.sh ~/Desktop/DisplayProductID* ` This script wil give you EDID you need to inject using CLOVER, like: Copy that EDID and paste it in your config.plist under Graphics > EDID > Custom (You can use clover configurator as that will save you from manual PLIST editing which is not recommended for novice users) Also, set Boolean Inject to True (YES) under config.plist > Graphics > EDID. See below screenshots for reference: Any Plist Editor(Xcode): Clover Configurator: Reboot and Voilà! You won't face that dreaded issue ever again until you remove custom EDID. LOL. You can verify if the EDID is being injected by opening terminal and typing: ioreg -l | grep "IODisplayEDID" ` The output should match the output of get_edid.sh Problem Reporting: See How to generate proper problem reporting files Note: This issue mostly seems to effect machines running High Sierra on Kabylake hardware (maybe Skylake too?). I have personally tested this on Sierra (with and without skylake spoofing) turns out that Sierra is not affected by this. Note: Upon booting up with custom EDID in place you will see that your colors are not such bright and crisp. YMMV. (Coz our's isn't a Apple branded display ). To fix that, open system preferences > Display. Select "Color" tab and choose "Apple RGB Display" Hope this helped someone! Regards get_edid.zip
 1 point


This leaderboard is set to London/GMT+01:00