
Leon
-
Posts
1235 -
Joined
-
Last visited
-
Days Won
58
Content Type
Profiles
Articles, News and Tips
Forums
Everything posted by Leon
-
Can you post the patched section of your CellPhoneHelper.kext for f3507g here so i can update.
-
i dident... i asked if you had managed
-
Have you managed to get a signal strength bar with this card? i got mine today.. seems to work pretty good OOB
-
@Herve, have you tested using those DP kexts on real mavericks ?
-
Honestly i dont know.. been wondering the same myself.. if you find out do let me know
-
This is a really old guide.. made for SL, i doubt it still works.. but hey.. give it a try
-
Hi, Due to hes amazing dedication - Its my pleasure to announce that pokenguyen have joined our Crew. Welcome on board mate. //Leon
-
Hey, We have dedicated this and the coming two weeks to "performance" week - what that means in terms for you is that we are doing changes on the site to optimize it - make your experience faster and more fluent. To name a few: We are now using a PRO version of Cloudflare CDN Optimizing the servers to respond quicker Optimizing IP:Board to deliver content faster Should you notice something that isn't working on the site please contact me on PM. //Leon
-
Hi, We have one of these machines now and is working forward adding it to EDP - anyone with a good setup on their machine please contact me on skype for a chat.. my ID is: Lbollerup or mail me at [email protected]
-

The Perfect Mini PCIe WiFi and Bluetooth Combo card for Notebooks
Leon replied to Leon's topic in The Archive
Thanx mate, we added the fix to EDP - But rumour have it our local genius Dinesh is soon coming out with something even better Stay tuned -
Hi, This guide will show you howto get the BCM4352 card working in Ubuntu/debian. Pre-guide stuff: 1. Dont install the STA driver, that one wont work Step 1) Install required packages: apt-get install fakeroot dkms Process: 64 bits: cd mkdir b43b1-6.30.223.141 wget http://www.broadcom.com/docs/linux_sta/hybrid-v35_64-nodebug-pcoem-6_30_223_141.tar.gz tar xvzf hybrid-v35_64-nodebug-pcoem-6_30_223_141.tar.gz -C b43b1-6.30.223.141 32bits: cd mkdir b43b1-6.30.223.141 http://www.broadcom.com/docs/linux_sta/hybrid-v35-nodebug-pcoem-6_30_223_141.tar.gz tar xvzf hybrid-v35-nodebug-pcoem-6_30_223_141.tar.gz -C b43b1-6.30.223.141 For 64 & 32 bits: cd b43b1-6.30.223.141 touch dkms.conf pico dkms.conf o gedit dkms.conf Paste this (without lines) : ---------------------------------------------- PACKAGE_NAME="b43b1" PACKAGE_VERSION="6.30.223.141" CLEAN="make clean" MAKE="make" BUILT_MODULE_NAME="wl" BUILT_MODULE_LOCATION="./" DEST_MODULE_LOCATION="/updates" ---------------------------------------------- save and exit cd .. sudo mv b43b1-6.30.223.141 /usr/src/b43b1-6.30.223.141 cd /usr/src/b43b1-6.30.223.141 sudo dkms add -m b43b1 -v 6.30.223.141 sudo dkms build -m b43b1 -v 6.30.223.141 sudo rmmod wl sudo dkms install -m b43b1 -v 6.30.223.141 sudo modprobe wl Reboot computer Add module wl in /etc/modules to load it at boot time if it doesn't work at reboot. Enjoy
-
Hi James, You are more than welcome - actually.. the biggest donation you can ever give.. is to help others like you have gotten help here.. share the knowledge .. and again.. welcome to OSXL. //Leon
-
Hi, So, this is a bit outside of the OSX religion of things - but got my hands on a Samsung chromebook series 3, cute little machine, reminds me alot about a cheap Macbook air .. but with a weird and messed up OS on it. ChromeOS is great and all.. but if you want to tinker a bit more then its time to look for different alternatives - and there certainly is a few out there. I decided to take Ubuntu LTS (currently 12.04) out for a spin.. wich.. lets just say.. wasent as easy as i hoped. Anyway, here is my notes on the subject, i hope this helps to get somebody else going. Requirements: * A Samsung chromebook series 3 * ChomeOS booted in dev mode Prepare for dev. mode: BACKUP ANY IMPORTANT DATA Turn of the machine Hold ESC+RELOAD buttons and press once on the power button (This will bring up a warning about going to boot mode, press CTRL+D to go into dev. mode.. notice all data will be removed) Once inside chromeos, open a terminal by pressing: CTRL+ALT+F2 Login as chronos Install the dev. firmware by running: sudo chromeos-firmwareupdate mode=todev We are now in 100% correct dev. mode and the real fun can start. Download and installations We will be using chrubuntu for installation, you can find more info about it here: http://chromeos-cr48.blogspot.se/2013/05/chrubuntu-one-script-to-rule-them-all_31.html For my setup i wanted the Unity and LTS, so i use the following command to download and install Ubuntu. >> curl -L -O http://goo.gl/s9ryd; sudo bash s9ryd ubuntu-desktop lts .. ubuntu will now be downloaded and installed, the machine will automatic reboot after installation. The default username is "user" with password "user" Fixes: ---------------------------------------------- Flash player Get Chromium from the Software Center then run this mkdir /tmp/chrome sudo mount /dev/mmcblk0p3 /tmp/chrome -o ro sudo cp /tmp/chrome/opt/google/chrome/pepper/libÂpepflashplayer.so /usr/lib/ echo "CHROMIUM_FLAGS=\"--enable-logging --enable-smooth-scrolling --log-level=1 --scroll-pixels=30 --ppapi-flash-path=/usr/lib/libpepflashpÂlayer.so --ppapi-flash-version=\"$(egrep "^VERSION=" /tmp/chrome/opt/google/chrome/pepper/pepÂper-flash.info|sed -e 's/^VERSION=//' -e 's/\"//g')\"\"" | sudo tee -a /etc/chromium-browser/default sudo umount /tmp/chrome rm -rf /tmp/chrome Touchpad Fix mkdir ~/backup sudo mv /usr/share/X11/xorg.conf.d/* ~/backup/ cd /usr/share/X11/xorg.conf.d/ sudo wget http://craigerrington.com/chrome/x_alarm_chrubuntu.zip sudo unzip x_alarm_chrubuntu.zip sudo rm x_alarm_chrubuntu.zip Keyboard layout sudo gedit /usr/share/X11/xorg.conf.d/10-keyboard.cÂonf edit the "gb" to whatever keyboard layout you use. For me it's "us" PPA FIXES sudo add-apt-repository ppa:hrw/my-own-packages sudo apt-get update let update manager run updates SOUND FIX In terminal, run alsamixer
-
You should consider joining our dev team.. we are cooking up next gen "fun" .. and could use good skills as your own.
-
Hey Axel, Awesome work - would you mind if we added it to EDP ? //Leon
-
anyway we want to
-
Get me one and i'll hack it up
-
great .. now thats clarified by mr. Frenchy we can get back to the whole x-mas thing again..
-
Hey mate, I co-founded this place and not even i know.. in terms.. dosent matter for squad Merry x-mas and all that
-
Compatability Charts missing something important.
Leon replied to immortalsoule's topic in The Archive
The question you are asking why we dont show more info about cpus is that not that many laptops have replacable CPUs, secondly.. it would be a bit of a nightmare for our web team to cover "everything scenario" .. When you read these guides and try products like EDP, you have to see them as a "best case scenario" .. what works for hundreds of others.. might or might not work for you.. but they are still a good start. Should you have any problems - just setup a thread in the right place and we'll try and help you out -
*confused* ... any suggestion to what ?
-
Hi, Some of you might have noticed a more responsive and faster site this morning - and you're quite right, your eyes aren't deceiving you. As of last night, we have changed over from MySQL to MariaDB. You can read more about MariaDB here: https://mariadb.com/blog/history-mariadb ... and you can read more about the performance here: http://slashdot.org/topic/bi/mariadb-vs-mysql-a-comparison/ What's your experience with SQL? Got any tips to share?
-
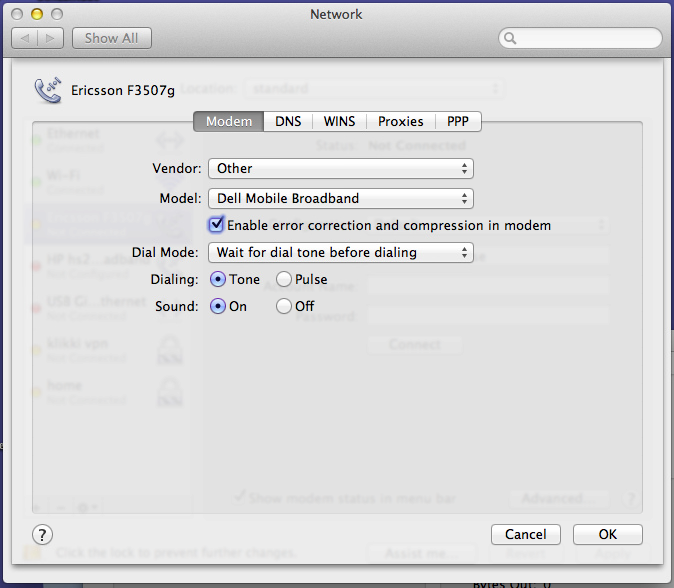
Having access to the internet is for most of us alfa-omega, its become a part of our daily day. This is where mobile internet / 3g comes into play - today we'll have a look at the mini-pcie Ericsson f3507g card, this card is also known as Dell Wireless 5530. Requirements: A laptop that is prepared for WWAN (eg. sim card place) The card above This modem script: mobile-broadband.zip Steps to success: Before the below steps, make sure that you have a working simcard without pin code and the f3507g inserted correctly Download the modem script from above Extract the model script to /Library/Modem Scripts/ Open Network in System Preferences Select the WWAN card in the left and click Advanced Now we need to make sure that we are using the right modem script, ajust your settings so it looks like this: ... For some cards it works better to use "generic" and 3g.. like this .. NOTICE 1: You need to make sure that you are using the correct APN. Once you have ajusted it, click OK - you will now be returned to the Network screen - add a check in "Show modem status in menu bar" and finally click Apply. Thats it, you should be ready to connect - please post any questions / issues. //Leon

-
Hi, Actually.. your model is more like this one. http://www.insanelymac.com/forum/topic/284096-intel-hd-graphics-0x00468086-qeci-on-lenovo-x201/page-2 I suggest you : Setup a thread for your model here: https://osxlatitude.com/index.php?/forum/124-models-under-research-for-edp/ Use a combination of our work and link above Work with us to make it work and bring in your model in EDP
-
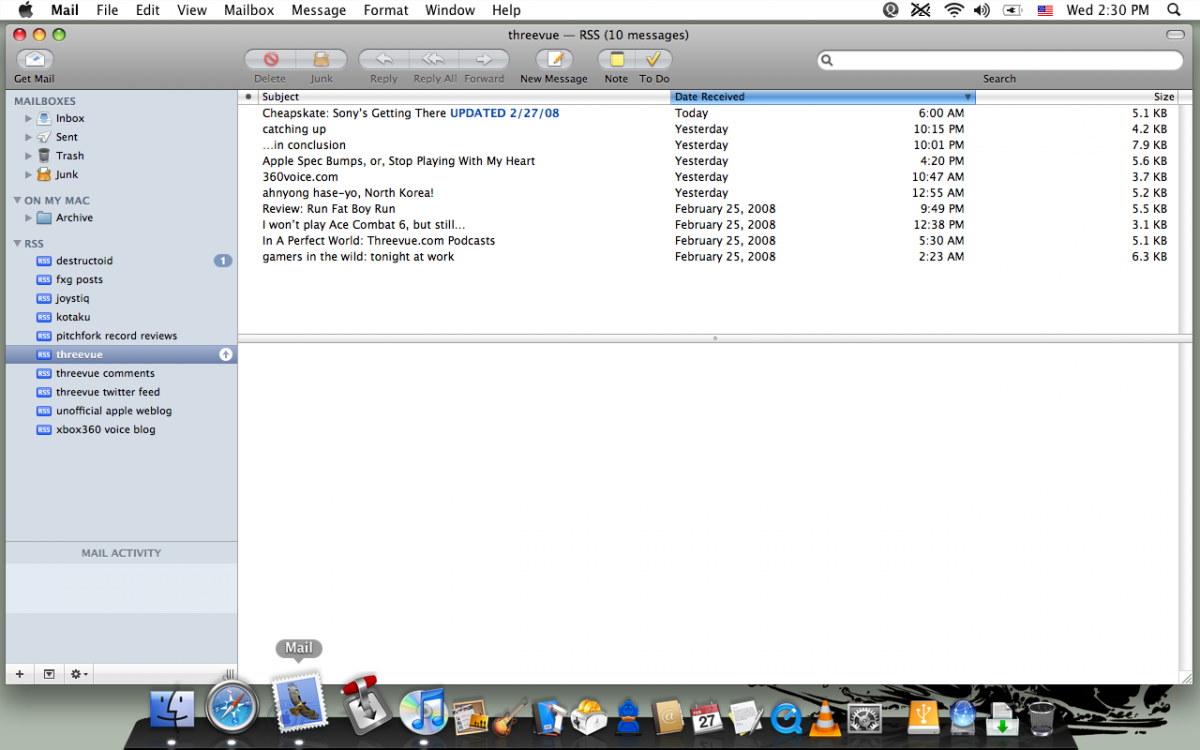
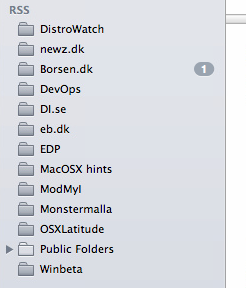
Hi, Apple have made losts of changes to OSX over the last couple of years.. mostly for the better - however, one feature/change that i miss badly in the RSS functionality in mailapp - mainly because i "live" inside my mail app during work hours. How it looked in former versions Anyway, lets see what we can do about it. Goal: Get RSS feeds back into OSX Mailapp Requirements: A machine running OSX ML or newer A configured mailapp with atleast one imap or pop3 email An account at https://blogtrottr.com All your RSS feed urls at hand How this works ? We are going to use blogtrottr (or similar services) to read the RSS feeds and send them via email - once we recieve them in mailapp we are gonna sort them into folders For my example i decided to create a dedicated mail account so it wont interfere with my normal email. Step 1) - Setup blogtrottr Login to your account at blogtrottr and click on "Subscribe to a new feed" - now enter the URL for the rss feed and click "Feed me" Now click on "My Subscriptions", click on the RSS you just added change the subject field to something like this: [sHORT_NAME_OF_RSS] - {item_title} ... (We are going use to the [] to filter on in mailapp) .. eg... [OSXL] - {item_title} .. click "save changes" Step 2) - Configure mailapp Asumimg that you have added the mail account for it allready Open mailapp Right click on inbox icon for the mail account and click "New mailbox" and give it a name according to the RSS feed In the topmenu click "Mail" -> "Preferences" In the pref. window click "Rules" Click "Add rule" Give it a good description like "RSS - Osxlatitude" In the second drop down that saud "Any recipient" change that to "Subject" In the input field after "contains" type the [] that you added in blogtrottr earlier.. eg. [osxl] Now choose what folder to move it to (hint: the folder you just created) Click OK Thats it, now blogtrottr will fetch new RSS, send them as a mail and your mail client will filter new mails with the correct folder.. In my mail client it looks at bit like this: Enjoy! //Leon