Search the Community
Showing results for tags 'QE/CI'.
Found 9 results
-
I installed the El Capitan on a Dell N5010 with Clover. The problem is that I have a low resolution (also runs very laggy) and the video memory shows only 3mb. Some says that with Clover bootloader you can achieve QE/CI on the Mobility Radeon by setting "LoadVBios=Yes" but seems that didn't do trick. Is there anyway to fix this problem ? Card Name : ATI Mobility Radeon HD 5650 (1 GB RAM)
-
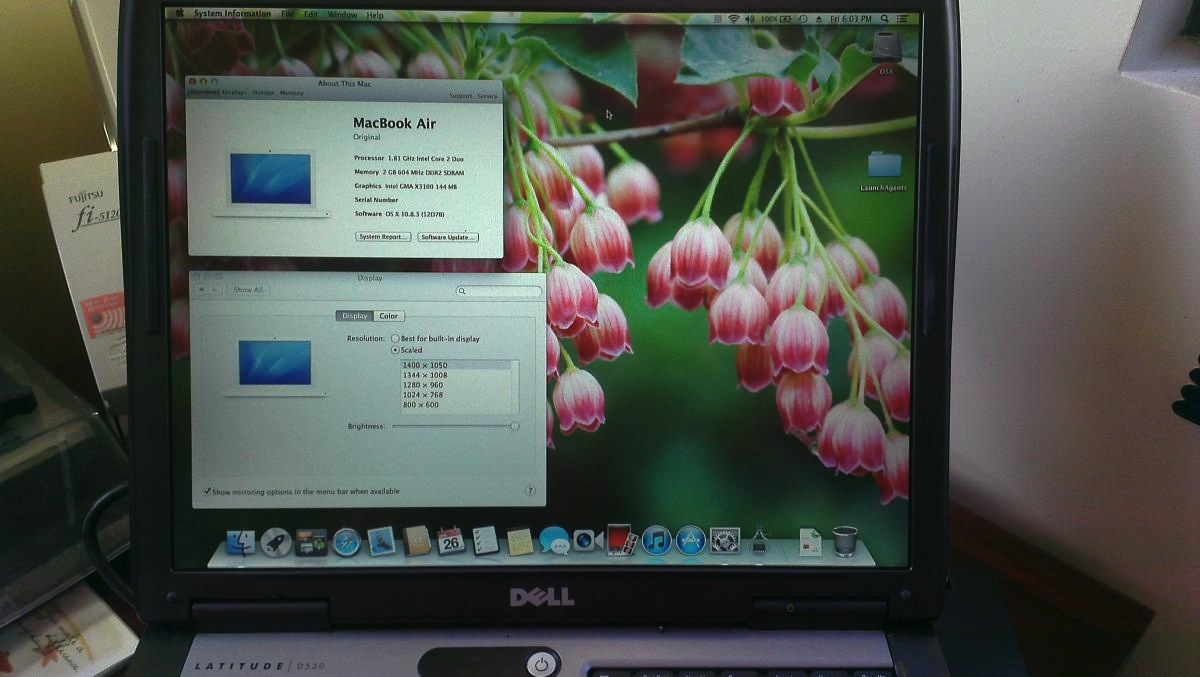
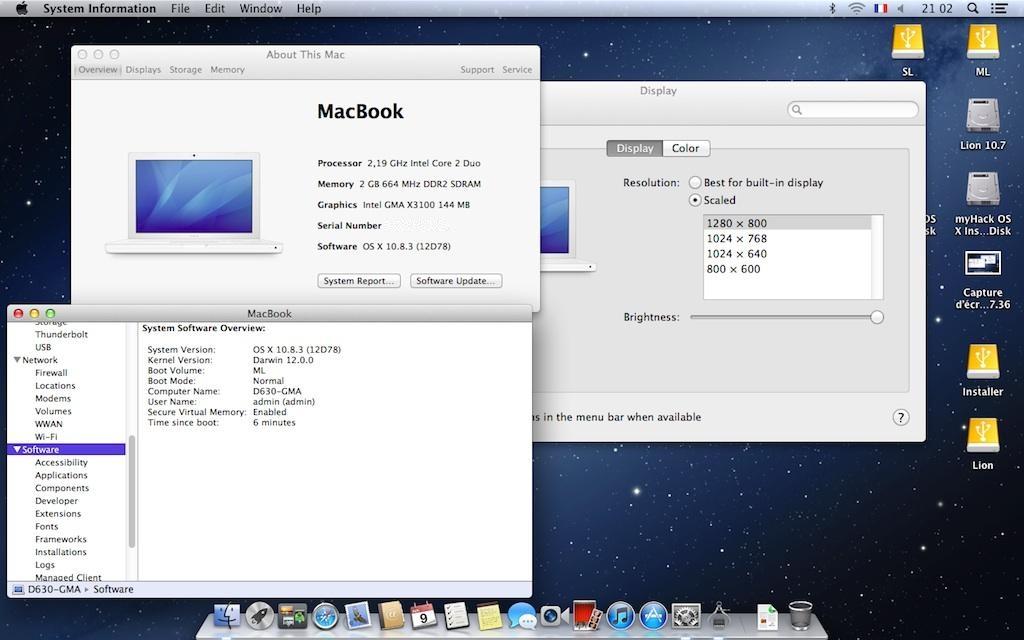
I take no credit for this guide. Hervé and the folks at MacRumors did all the heavy lifting. All I did was do some testing and tweaking to get all their hard work and research working on the Dell Latitude D530. What follows is a result of everyone's efforts... This guide applies to the D530 1400x1050 models. This guide was made with purchased copy of ML 10.8.0. It was not tested with purchased copies of ML 10.8.1, 10.8.2 or 10.8.3. The attached bootpack was made out of the D630 nVidia ML bootpack and the DSDT file was just replaced with a modified DSDT file taken from the D630 X3100 HiRes boot pack. Extra_D530_ML.zip This guide assumes you're using a blank HDD, partitioned and formated GUID or MBR partitioned HDD. Also, have an external USB mouse or keyboard available. At some point during these steps, the built-in trackpad or keyboard may not work and you might need to plug in external devices to proceed to the next step. Phase 1: initial ML installation in mainstream 64bit kernel mode with unsupported graphics make the usual myHack USB installer (ML 10.8.0), using the attached bootpack. boot myHack installer and install ML 10.8.0, pointing to the /Extra folder of the installer media when prompted for the boot pack (do not choose generic). reboot into ML and complete 1st boot setup. you're now in ML 10.8.0 with default graphics at 1024x768 and without graphics acceleration. If you have not already done so, remove your myHack USB installer and put it aside. install combo update 10.8.3 (your wireless may not be supported at that stage, so use Ethernet port or install appropriate Wifi kext). the combo update might fail. This is normal. Before rebooting, run myHack and choose myFix -> Quick reboot into ML 10.8.3, still with default graphics and without acceleration. Phase 2: MLPostFactor download MLPostFactor off the Net create a new small partition on your HDD (8 to 16GB) or insert and erase your myHack USB installer (or any other available external media). following MLPF instructions to the letter, run MLPostFactor and create an ML installer on the freshly created spare HDD partition or freshly erased USB key. Select the "ML 10.8.0->10.8.2" case and run the app. If you've purchased and downloaded ML 10.8.3, select that version instead. upon completion, create a folder called "Extra" at the root of that installer media and copy DSDT table + SMBIOS & Cham boot plist files there. be prepared with a USB mouse and keyboard ready. The MLPostFactor that you just created may not have the appropriate kexts for the D530 trackpad or built-in keyboard. reboot off your initial ML disk/partition, interrupt the boot process at the Chameleon delay bar and select this newly created ML installer partition/disk with options & flag: DSDT=/Extra/<dsdt filename> arch=i386 -f once installer is loaded, do not actually proceed with any installation (it would not be bootable). Go to "Utilities" in the menu bar and select MLPostFactor. when MLPostFactor app kicks in, click "Continue" until you're offered to select a destination volume. in the list available under the HDD icon, select your previously-made ML 10.8.3 installation, check the "10.8.3" case and click "Install MLPostFactor". upon completion, click "Quit MLPostFactor", quit installation program and reboot ML 10.8.3 with flag and boot option: "-f arch=i386". You will now have full QE/CI ! you may notice that not all of your devices such as trackpad, battery meter, wireless, etc. may be present or working. launch myHack and run myFix. Choose the quick version. open up Chameleon wizard and go to the boot plist. Check "Ignore Boot Cache (-f)" case and "32-bit (i386)" case. They're required from now on. Reboot and everything should be working, including full QE/CI! Sleep should also work, but if not launch terminal and type "sudo pmset hibernate mode 0" That's it, enjoy ML on your previously unsupported D530 X3100.

-
Last update: 03 Jan 2024 This guide applies to the Core2Duo D430 models. This guide was initially made with a MyHack-based installation of ML 10.8.0 + subsequent updates to ML 10.8.3/10.8.4/10.8.5. The bootpack was made out of the D630 nVidia ML bootpack where the DSDT table was replaced by the table from D430 Dual Core Lion bootpack, appropriate kexts removed and/or added and Chameleon plists replaced. EDIT - 20Aug 2014: ------------------------- Bootpack edited following report of missing Broadcom LAN kext. Pack is now fully loaded with all necessary kexts, modules and plists and no post-install EDP is really required for hardware fine tuning. Includes tuned Kozlek's FakeSMC + SMBIOS for native CPU SpeedStep. Extra D430 ML.zip This guide assumes you're using a blank HDD, partitioned and formated GUID. No tests done on MBR partitioned HDD, so don't ask about it, try it for yourself and report back if appropriate. Read the MacRumors guide thoroughly and follow it to the letter as far as creating the installer is concerned. Remember that it is not our hack and we do not support it. http://forums.macrumors.com/showthread.php?t=1325709 You need a legit copy of ML, i.e. the Install Mountain Lion.app application, otherwise forget it. The tool requires you to copy it to your Applications folder. It won't work if all you have is the InstallESD.dmg image. In June 2021, Apple finally made Mountain Lion freely available. A link to download the application package is available here. Phase 1: initial ML installation in mainstream 64bit kernel mode with unsupported graphics make the usual myHack USB installer for ML 10.8, using the attached LoRes or HiRes bootpack. myHack v3.3.1 is recommended. It's available here. boot the myHack USB installer and install ML 10.8, pointing to the /Extra folder of the installer media when prompted for the bootpack (do not choose generic). reboot into ML through your USB installer and complete 1st boot setup. you're now in ML 10.8 with default graphics at 1024x768 and without graphics acceleration. If you have not already done so, remove your myHack USB installer and put it aside. install recommended version of Chameleon (r2468) or Enoch (r2839) bootloader on your disk. They're available here. install latest update or combo update for ML 10.8.5 and all security updates for 10.8.5 (your wireless may not be supported at that stage, so use Ethernet port or install appropriate Wifi kext). reboot into latest version of ML 10.8.5, still with default graphics and without acceleration. Phase 2: MLPostFactor download MLPostFactor from here (original links posted in 2013 at MacRumors are dead since 2015). create a new small partition on your HDD (8 to 16GB) or insert and erase your myHack USB installer (or any other available external media). following MLPF instructions to the letter, run MLPostFactor and create an ML installer on the freshly created spare HDD partition or freshly erased USB key. Select the appropriate ML version that meets your installation and run the app, knowing that version 10.8.4 is to be selected for ML 10.8.5. upon completion, create a folder called Extra at the root of that installer media and copy DSDT table + SMBIOS & Chameleon boot plist files there. if you have a Bluetooth module, turn off your wireless services with the side switch (or laptop will look for a BT keyboard at next step and you'd need to hook up a USB keyboard). reboot off your initial ML disk/partition, interrupt the boot process at the Chameleon delay bar and select this newly created ML installer partition/disk with options & flag DSDT=/Extra/DSDT.aml arch=i386 -f. once installer is loaded, do not actually proceed with any installation (it would not be bootable). Go to Utilities in the menu bar and select MLPostFactor. when MLPostFactor app kicks in, click Continue until you're offered to select a destination volume. in the list available under the HDD icon, select your previously-made ML 10.8 installation, check the relevant 10.8.x case (select 10.8.4 for ML 10.8.5) and click Install MLPostFactor. upon completion, click Quit MLPostFactor, quit installation program and reboot ML 10.8 with flag and boot option -f arch=i386. If you switched off wireless services, turn the switch back on before the reboot. You will now have full QE/CI ! open up the Chameleon boot plist file in /Extra folder with TextEditor and add boot arg arch=i386 to ensure your system boots in 32bit kernel mode. If you have Chameleon Wizard app, use that to open up the boot plist and tick the 32-bit (i386) option, then save the file. open up Terminal and type sudo kextcache -system-prelinked-kernel -a i386 to rebuild the 32bit-mode cache; this will remove the need to boot with -f flag. For ML 10.8.5, edit file /System/Library/CoreServices/SystemVersion.plist to replace version number from 10.8.4 to 10.8.5. That's it, enjoy ML on your previously unsupported D620 GMA950. Remember that this hack is quite aggressive in the way it reverts to DP1 files and older graphics drivers (GMA950 kexts, OpenGL libraries), so you may find that things do not work. Again, don't ask for support here, go to the authors at MacRumors.
-
Hello , I have a HD4000 and Radeon 7670m on my Samsung Laptop. I would like to activate the hd4000. I add a Chameleon IntelCapriFB=4 and the HD4000 is activated whith 1024mo VRAM and kext loaded (AppleIntelFrameBufferCapri) but no QE/CI . In addition the kexts : IntelSNBGraphicsFB.kext and ApplGraphicsPowerManagement.kext are not load Thanks in advance !! Laptop : NP350E7C-S07FR 6 GO RAM HD4000 and Radeon 7670m OSx 10.9 : Bootloader Chameleon v2.2svn r2286 SMBIOS : MacBookPro 9.1
-
 Dear all experts, For several weeks now I’ve been trying to setup a Samsung NP900X4D-A01ES with dual boot Win7 and ML 10.8.5. I started as a total newbie, with no previous programming backgroung, and I have learnt a lot through the many posts I have read. Finally I managed to install and run ML 10.8.5 with reasonable success. I got wifi working (I bought an USB realtek wifi dongle) BUT no QE/CI support for the HD4000, no power management, no processor optimization, no Fn keys, no sleep/hibernate, no battery indicator, etc….. I soon realized the importance of optimising my system and began to investigate on solving the graphics acceleration issue. Being a noob, you can’t imagine the amount of hours I have spent in this process with no success (except for what I have learnt). It has become an obsession to finally conclude that my lack of in depth knowledge is blocking me to make any step forward. So… I am forced to request the help of the experts here, to whom I am already very grateful for what I have learnt from you. This is what I have worked up to now. As you know the bios of the NP900 series does not allow to set the graphics memory size so I tested every way and every configuration as shown below. 1- I have tried using the key HD4000PlatformId=[0 to 11] with no luck. 2- Then I tried with injecting the bootloader using the key “device-properties†in org.chameleon.Boot.plist with the EFI string I extracted with the help of gfxutil. No luck. 3- Then I though that the only solution was to patch the dsdt.aml directly. So I extracted my dsdt and ssdt files and used DSDT Editor to add the _DSM method under IGPU device. I have tested “AAPL,ig-platform-id†with every combination from 01660000 to 0166000B (except for those with 0162000y and y=5,6,7). No luck either. (by the way, I replaced GFX0 with IGPU and also added the DTGP method at the beginning of the dsdt file. There seems to be no difference in using GFX0 or IGPU). 4- Then checked the dsdt.aml file include in the EDP bootpack for NP900X4C and I realized that the line “AAPL00,DualLink†was not included in my dsdt. I copied it and retried again testing with different values for “AAPL,ig-platform-idâ€. No luck at all; always black screen except for values ending 0A and 0B (screen with clock stopped). However this time I used screen sharing and I could see that ALWAYS, no matter the value of “AAPL,ig-platform-idâ€: a) the OS boots perfectly, no matter what you see in the local screen. AppleIntelHD4000Graphics.kext and AppleIntelFramebufferCapri.kext are loaded, c) System info reports an HD4000; sometimes with a total VRAM=384 Mb, others with VRAM=512 Mb. It depends on the value “AAPL,ig-platform-idâ€. d) System info reports no display attached So… what else can I do? I have read that “in the case of people getting no internal display on some id and ONLY internal display on others, they need to hack an id connector table that contains both the ones displays get detected on.†Well… I’ve been digging in the web but I still don’t know how to do this. Will you pls help? I am attaching my system config files just in case you may need to have a look at them. Any idea that can help me on how to proceed will be very very much appreciated. Thank’s in advance, Matt. EXTRA_files.zip DSDT,SSDT - ORIGINAL.zip IORegistry files (from IORegistry Explorer).zip DSDT - SSDT ACPI (from AIDA64).rar EDIDViewer Output.rar
 -
Last update: 03 Jan 2024 This guide applies to LoRes WXGA (1280x800) and possibly HiRes WXUGA (1920x1200) models. This guide was initially made with a MyHack-based installation of ML 10.8.0 + subsequent updates to ML 10.8.3/10.8.4/10.8.5. The bootpack was made out of the D630 nVidia ML bootpack where the DSDT table was just replaced by the table from D830 GMA X3100 Lion bootpack (LoRes). If you have a HiRes model, just replace the DSDT with HiRes version to try it out. Extra_D830_LoRes_ML.zip This guide assumes you're using a blank HDD, partitioned and formated GUID. No tests done on MBR partitioned HDD, so don't ask about it, try it for yourself and report back if appropriate. Read the MacRumors guide thoroughly and follow it to the letter as far as creating the installer is concerned. Remember that it is not our hack and we do not support it. http://forums.macrumors.com/showthread.php?t=1325709 You need a legit copy of ML, i.e. the Install Mountain Lion.app application, otherwise forget it. The tool requires you to copy it to your Applications folder. It won't work if all you have is the InstallESD.dmg image. In June 2021, Apple finally made Mountain Lion freely available. A link to download the application package is available here. Phase 1: initial ML installation in mainstream 64bit kernel mode with unsupported graphics make the usual myHack USB installer for ML 10.8, using the attached LoRes or HiRes bootpack. myHack v3.3.1 recommended. It's available here. boot the myHack USB installer and install ML 10.8, pointing to the /Extra folder of the installer media when prompted for the boot pack (do not choose generic). reboot into ML and complete 1st boot setup. you're now in ML 10.8 with default graphics at 1024x768 and without graphics acceleration. If you have not already done so, remove your myHack USB installer and put it aside. install recommended version of Chameleon (r2468) or Enoch (r2839) bootloader on your disk. They're available here. install latest update or combo update for ML 10.8.5 and all security updates for 10.8.5 (your wireless may not be supported at that stage, so use Ethernet port or install appropriate Wifi kext). reboot into latest version of ML 10.8.5, still with default graphics and without acceleration. Phase 2: MLPostFactor download MLPostFactor from here (original links posted in 2013 at MacRumors are dead since 2015). create a new small partition on your HDD (8 to 16GB) or insert and erase your myHack USB installer (or any other available external media). following MLPF instructions to the letter, run MLPostFactor and create an ML installer on the freshly created spare HDD partition or freshly erased USB key. Select the appropriate ML version that meets your installation and run the app, knowing that version 10.8.4 is to be selected for ML 10.8.5. upon completion, create a folder called Extra at the root of that installer media and copy DSDT table + SMBIOS & Chameleon boot plist files there. if you have a Bluetooth module, turn off your wireless services with the side switch (or laptop will look for a BT keyboard at next step and you'd need to hook up a USB keyboard). reboot off your initial ML disk/partition, interrupt the boot process at the Chameleon delay bar and select this newly created ML installer partition/disk with options & flag DSDT=/Extra/DSDT.aml arch=i386 -f. once installer is loaded, do not actually proceed with any installation (it would not be bootable). Go to Utilities in the menu bar and select MLPostFactor. when MLPostFactor app kicks in, click Continue until you're offered to select a destination volume. in the list available under the HDD icon, select your previously-made ML 10.8 installation, check the relevant 10.8.x case (select 10.8.4 for ML 10.8.5) and click Install MLPostFactor. upon completion, click Quit MLPostFactor, quit installation program and reboot ML 10.8 with flag and boot option -f arch=i386. If you switched off wireless services, turn the switch back on before the reboot. You will now have full QE/CI ! open up the Chameleon boot plist file in /Extra folder with TextEditor and add boot arg arch=i386 to ensure your system boots in 32bit kernel mode. If you have Chameleon Wizard app, use that to open up the boot plist and tick the 32-bit (i386) option, then save the file. open up Terminal and type sudo kextcache -system-prelinked-kernel -a i386 to rebuild the 32bit-mode cache; this will remove the need to boot with -f flag. For ML 10.8.5, edit file /System/Library/CoreServices/SystemVersion.plist to replace version number from 10.8.4 to 10.8.5. That's it, enjoy ML on your previously unsupported D830 X3100. Remember that this hack is quite aggressive in the way it reverts to DP1 files and older graphics drivers (GMA kexts, OpenGL libraries), so you may find that things do not work. Again, no support for MLPF here. NB: Details of issues related to ML vanilla files that are re-instated by 10.8.5 security updates are kept in the D430 MLPF guide. They should no longer apply since ML went out of support and no further updates published.
-
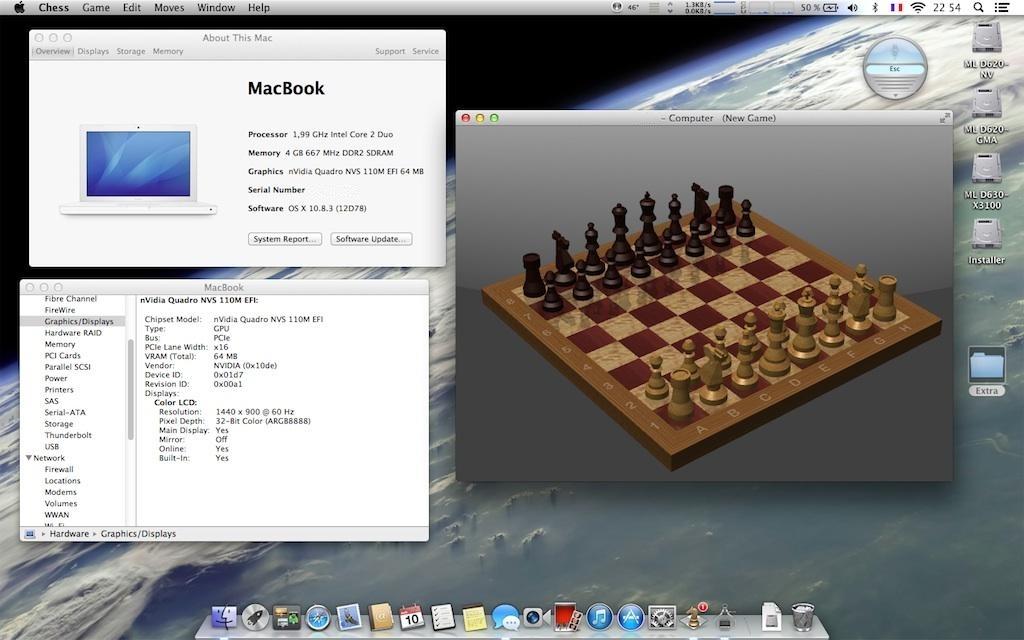
Last update: 03 Jan 2024 This guide applies to Core2Duo D620 nVidia models. This guide was initially made with a MyHack-based installation of ML 10.8.0 + subsequent updates to ML 10.8.3/10.8.4/10.8.5. The bootpack was made out of the D630 nVidia ML bootpack where the DSDT table was replaced by the table from the D620 nVidia Lion bootpack, appropriate kexts removed and/or added and plists replaced. Extra D620n ML.zip This guide assumes you're using a blank HDD, partitioned and formated GUID. No tests done on MBR partitioned HDD, so don't ask about it, try it for yourself and report back if appropriate. Read the MacRumors guide thoroughly and follow it to the letter as far as creating the installer is concerned. Remember that it is not our hack and we do not support it. http://forums.macrumors.com/showthread.php?t=1325709 You need a legit copy of ML, i.e. the Install Mountain Lion.app application, otherwise forget it. The tool requires you to copy it to your Applications folder. It won't work if all you have is the InstallESD.dmg image. In June 2021, Apple finally made Mountain Lion freely available. A link to download the application package is available here. Phase 1: initial ML installation in mainstream 64bit kernel mode with unsupported graphics make the usual myHack USB installer for ML 10.8, using the attached bootpack. myHack v3.3.1 is recommended. It's available here. boot the myHack USB installer and install ML 10.8, pointing to the /Extra folder of the installer media when prompted for the boot pack (do not choose generic). reboot into ML with "-x" flag (or ML won't boot) through your USB installer and complete 1st boot setup. you're now in ML 10.8 with default graphics at 1024x768 and without graphics acceleration. If you have not already done so, remove your myHack USB installer and put it aside. install recommended version of Chameleon (r2468) or Enoch (r2839) bootloader on your disk. They're available here. install latest update or combo update for ML 10.8.5 and all security updates for 10.8.5 (your wireless may not be supported at that stage, so use Ethernet port). at that stage, ML 10.8 is unbootable, no matter what, so don't reboot yet! Phase 2: MLPostFactor download MLPostFactor from here (original links posted in 2013 at MacRumors are dead since 2015). create a new small partition on your HDD (8 to 16GB) or insert and erase your myHack USB installer (or any other available external media). following MLPF instructions to the letter, run MLPostFactor and create an ML installer on the freshly created spare HDD partition or freshly erased USB key. Select the appropriate ML version that meets your installation and run the app, knowing that version 10.8.4 is to be selected for ML 10.8.5. upon completion, create a folder called Extra at the root of that installer media and copy DSDT table + SMBIOS & Chameleon boot plist files there. if you have a Bluetooth module, turn off your wireless services with the side switch (or laptop will look for a BT keyboard at next step and you'd need to hook up a USB keyboard). reboot off your initial ML disk/partition, interrupt the boot process at the Chameleon delay bar and select this newly created ML installer partition/disk with options & flag DSDT=/Extra/DSDT.aml arch=i386 -f. once installer is loaded, do not actually proceed with any installation (it would not be bootable). Go to Utilities in the menu bar and select MLPostFactor. when MLPostFactor app kicks in, click Continue until you're offered to select a destination volume. in the list available under the HDD icon, select your previously-made ML 10.8 installation, check the relevant 10.8.x case (select 10.8.4 for ML 10.8.5) and click Install MLPostFactor. upon completion, click Quit MLPostFactor, quit installation program and reboot ML 10.8 with flag and boot option -f arch=i386. If you switched off wireless services, turn the switch back on before the reboot. You will now have full QE/CI ! open up the Chameleon boot plist file in /Extra folder with TextEditor and add boot arg arch=i386 to ensure your system boots in 32bit kernel mode. If you have Chameleon Wizard app, use that to open up the boot plist and tick the 32-bit (i386) option, then save the file. open up Terminal and type sudo kextcache -system-prelinked-kernel -a i386 to rebuild the 32bit-mode cache; this will remove the need to boot with -f flag. For ML 10.8.5, edit file /System/Library/CoreServices/SystemVersion.plist to replace version number from 10.8.4 to 10.8.5. That's it, enjoy ML on your previously unsupported D620 nVidia. Remember that this hack is quite aggressive in the way it reverts to DP1 files and older graphics drivers (nVidia NV40 kexts, OpenGL libraries), so you may find that things do not work. Again, no support for MLPF here. NB: Details of issues related to ML vanilla files that are re-instated by 10.8.5 security updates are kept in the D430 MLPF guide. They should no longer apply since ML went out of support and no further updates published.
-
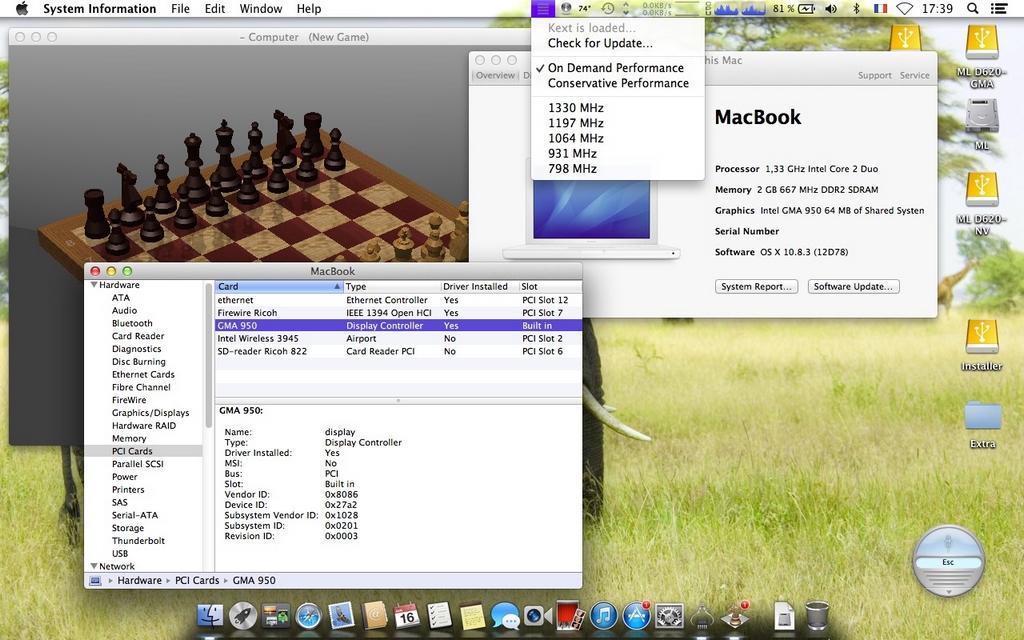
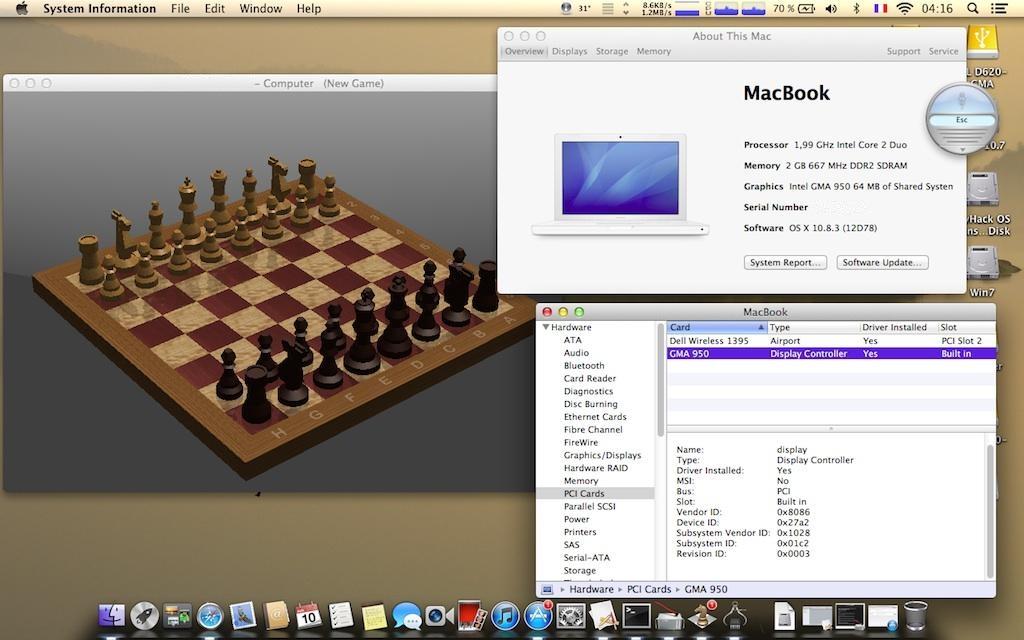
Last update: 03 Jan 2024 This guide applies to Core2Duo LoRes WXGA (1280x800) and HiRes WXGA+ (1440x900) models. This guide was initially made with a MyHack-based installation of ML 10.8.0 + subsequent updates to ML 10.8.3/10.8.4/10.8.5. The bootpacks were made out of the D630 nVidia ML bootpack where the DSDT table was replaced by the table from D620 GMA950 Lion bootpacks (LoRes or HiRes), appropriate kexts removed and/or added and plists replaced. Extra_D620i_LoRes_ML.zip Extra_D620i_HiRes_ML.zip This guide assumes you're using a blank HDD, partitioned and formated GUID. No tests done on MBR partitioned HDD, so don't ask about it, try it for yourself and report back if appropriate. Read the MacRumors guide thoroughly and follow it to the letter as far as creating the installer is concerned. Remember that it is not our hack and we do not support it. http://forums.macrumors.com/showthread.php?t=1325709 You need a legit copy of ML, i.e. the Install Mountain Lion.app application, otherwise forget it. The tool requires you to copy it to your Applications folder. It won't work if all you have is the InstallESD.dmg image. In June 2021, Apple finally made Mountain Lion freely available. A link to download the application package is available here. Phase 1: initial ML installation in mainstream 64bit kernel mode with unsupported graphics make the usual myHack USB installer for ML 10.8, using the attached LoRes or HiRes bootpack. myHack v3.3.1 is recommended. It's available here. boot the myHack USB installer and install ML 10.8, pointing to the /Extra folder of the installer media when prompted for the bootpack (do not choose generic). reboot into ML through your USB installer and complete 1st boot setup. you're now in ML 10.8 with default graphics at 1024x768 and without graphics acceleration. If you have not already done so, remove your myHack USB installer and put it aside. install recommended version of Chameleon (r2468) or Enoch (r2839) bootloader on your disk. They're available here. install latest update or combo update for ML 10.8.5 and all security updates for 10.8.5 (your wireless may not be supported at that stage, so use Ethernet port or install appropriate Wifi kext). reboot into latest version of ML 10.8.5, still with default graphics and without acceleration. Phase 2: MLPostFactor download MLPostFactor from here (original links posted in 2013 at MacRumors are dead since 2015). create a new small partition on your HDD (8 to 16GB) or insert and erase your myHack USB installer (or any other available external media). following MLPF instructions to the letter, run MLPostFactor and create an ML installer on the freshly created spare HDD partition or freshly erased USB key. Select the appropriate ML version that meets your installation and run the app, knowing that version 10.8.4 is to be selected for ML 10.8.5. upon completion, create a folder called Extra at the root of that installer media and copy DSDT table + SMBIOS & Chameleon boot plist files there. if you have a Bluetooth module, turn off your wireless services with the side switch (or laptop will look for a BT keyboard at next step and you'd need to hook up a USB keyboard). reboot off your initial ML disk/partition, interrupt the boot process at the Chameleon delay bar and select this newly created ML installer partition/disk with options & flag DSDT=/Extra/DSDT.aml arch=i386 -f. once installer is loaded, do not actually proceed with any installation (it would not be bootable). Go to Utilities in the menu bar and select MLPostFactor. when MLPostFactor app kicks in, click Continue until you're offered to select a destination volume. in the list available under the HDD icon, select your previously-made ML 10.8 installation, check the relevant 10.8.x case (select 10.8.4 for ML 10.8.5) and click Install MLPostFactor. upon completion, click Quit MLPostFactor, quit installation program and reboot ML 10.8 with flag and boot option -f arch=i386. If you switched off wireless services, turn the switch back on before the reboot. You will now have full QE/CI ! open up the Chameleon boot plist file in /Extra folder with TextEditor and add boot arg arch=i386 to ensure your system boots in 32bit kernel mode. If you have Chameleon Wizard app, use that to open up the boot plist and tick the 32-bit (i386) option, then save the file. open up Terminal and type sudo kextcache -system-prelinked-kernel -a i386 to rebuild the 32bit-mode cache; this will remove the need to boot with -f flag. For ML 10.8.5, edit file /System/Library/CoreServices/SystemVersion.plist to replace version number from 10.8.4 to 10.8.5. That's it, enjoy ML on your previously unsupported D620 GMA950. Remember that this hack is quite aggressive in the way it reverts to DP1 files and older graphics drivers (GMA950 kexts, OpenGL libraries), so you may find that things do not work. Again, no support for MLPF here. NB: Details of issues related to ML vanilla files that are re-instated by 10.8.5 security updates are kept in the D430 MLPF guide. They should no longer apply since ML went out of support and no further updates published.
-
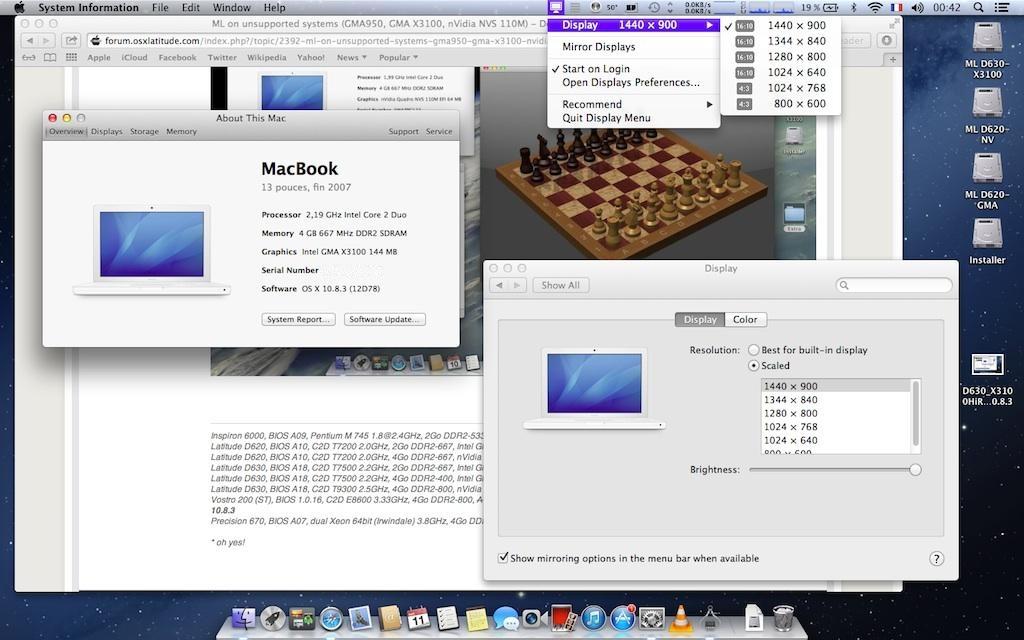
- 1
-

-
- mountain lion
- d620
- (and 2 more)
-
Last update: 03 Jan 2024 This guide applies to LoRes WXGA (1280x800) and HiRes WXGA+ (1440x900) models. This guide was initially made with a MyHack-based installation of ML 10.8.0 + subsequent updates to ML 10.8.3/10.8.4/10.8.5. The bootpacks were made out of the D630 nVidia ML bootpack where the DSDT table was just replaced by the table from D630 GMA X3100 Lion bootpacks (LoRes or HiRes). Extra_D630_LoRes_ML.zip Extra_D630_HiRes_ML.zip This guide assumes you're using a blank HDD, partitioned and formated GUID. No tests done on MBR partitioned HDD, so don't ask about it, try it for yourself and report back if appropriate. Read the MacRumors guide thoroughly and follow it to the letter as far as creating the installer is concerned. Remember that it is not our hack and we do not support it. http://forums.macrumors.com/showthread.php?t=1325709 You need a legit copy of ML, i.e. the Install Mountain Lion.app application, otherwise forget it. The tool requires you to copy it to your Applications folder. It won't work if all you have is the InstallESD.dmg image. In June 2021, Apple finally made Mountain Lion freely available. A link to download the application package is available here. Phase 1: initial ML installation in mainstream 64bit kernel mode with unsupported graphics make the usual myHack USB installer for ML 10.8, using the attached LoRes or HiRes bootpack. myHack v3.3.1 is recommended. It's available here. boot the myHack USB installer and install ML 10.8, pointing to the /Extra folder of the installer media when prompted for the bootpack (do not choose generic). reboot into ML through your USB installer and complete 1st boot setup. you're now in ML 10.8 with default graphics at 1024x768 and without graphics acceleration. If you have not already done so, remove your myHack USB installer and put it aside. install recommended version of Chameleon (r2468) or Enoch (r2839) bootloader on your disk. They're available here. install latest update or combo update for ML 10.8 (your wireless may not be supported at that stage, so use Ethernet port or install appropriate Wifi kext). reboot into latest version of ML, still with default graphics and without acceleration. Phase 2: MLPostFactor download MLPostFactor from here (original links posted in 2013 at MacRumors are dead since 2015). create a new small partition on your HDD (8 to 16GB) or insert and erase your myHack USB installer (or any other available external media). following MLPF instructions to the letter, run MLPostFactor and create an ML installer on the freshly created spare HDD partition or freshly erased USB key. Select the appropriate ML version that meets your installation and run the app, knowing that version 10.8.4 is to be selected for ML 10.8.5. upon completion, create a folder called Extra at the root of that installer media and copy DSDT table + SMBIOS & Chameleon boot plist files there. if you have a Bluetooth module, turn off your wireless services with the side switch (or laptop will look for a BT keyboard at next step and you'd need to hook up a USB keyboard). reboot off your initial ML disk/partition, interrupt the boot process at the Chameleon delay bar and select this newly created ML installer partition/disk with options & flag DSDT=/Extra/DSDT.aml arch=i386 -f. once installer is loaded, do not actually proceed with any installation (it would not be bootable). Go to Utilities in the menu bar and select MLPostFactor. when MLPostFactor app kicks in, click Continue until you're offered to select a destination volume. in the list available under the HDD icon, select your previously-made ML 10.8 installation, check the relevant 10.8.x case (select 10.8.4 for ML 10.8.5) and click Install MLPostFactor. upon completion, click Quit MLPostFactor, quit installation program and reboot ML 10.8 with flag and boot option -f arch=i386. If you switched off wireless services, turn the switch back on before the reboot. You will now have full QE/CI ! open up the Chameleon boot plist file in /Extra folder with TextEditor and add boot arg arch=i386 to ensure your system boots in 32bit kernel mode. If you have Chameleon Wizard app, use that to open up the boot plist and tick the 32-bit (i386) option, then save the file. open up Terminal and type sudo kextcache -system-prelinked-kernel -a i386 to rebuild the 32bit-mode cache; this will remove the need to boot with -f flag. For ML 10.8.5, edit file /System/Library/CoreServices/SystemVersion.plist to replace version number from 10.8.4 to 10.8.5. That's it, enjoy ML on your previously unsupported D630 X3100. Remember that this hack is quite aggressive in the way it reverts to DP1 files and older graphics drivers (GMA kexts, OpenGL libraries), so you may find that things do not work. Again, don't ask for support here, go to the authors at MacRumors. NB: Details of issues related to ML vanilla files that are re-instated by 10.8.5 security updates are kept in the D430 MLPF guide. They should no longer apply since ML went out of support and no further updates published.