Search the Community
Showing results for tags 'd620'.
Found 12 results
-
Hello I'm very new to the hackintosh scene and I have been trying for weeks to get os x lion on my latitude d620. If I use a generic extra the computer will boot.. if i select the extras included on this site during the myhack installation process I end up with a system hang at the apple logo. I bypassed this with verbose mode but I have no drivers for my sound, wifi and ethernet. I someone can direct me to kext files or a way to install these that would be pretty great thanks
-
Hi, in first i have to say, that i am newbie. I want to install OSX Snow Leopard on Latitude D620 CPU: CoreDuo T2300E 1,66GHz, 1GB RAM, GPU is Intel GMA 945, Screen resolution 1280x800, HDD 60GB. I tried to follow install instructions in documentation and forum tips I have a retail Mac OS X Install DVD.dmg Because i don't have acces to MAC i also downloaded MAC OSX 10.6.2 for VMware In VMware i installed myHack_v3.1.2 (thanks Hervé) and created install USB drive - There i had problem myHack didn't ask me to choose instalation dmg (detected automaticly?) and at the end i was unable to choose MBR patch and my own Extra folder - myHack just didn't ask. Screen from myHack http://postimg.org/image/tm40qqgkd/ So i opened the created USB drive and replaced manualy folder Extra with downloaded from OSXLatitude.com for D620 (Dont know if it was right step) I have modified BIOS settings via article i found on this forum When i start booting i get this error http://postimg.org/image/dzqx2h2ad/ I would be glad if anyone help me and sorry for my english (i am not native speaker ), thanks Mathew
-
Hey folks, I am currently trying to install OS X Lion 10.7 on a Dell Latitude D620. I have followed the instructions under the EDP documentation to a T using the myhack method. All goes well with myhack, I have created a proper bootable USB and everything goes smoothly HOWEVER Once OS X Installer boots up and I click "continue" on the language selection screen, All I get is an Error message: Mac OS X 10.7 Cannot be installed on this computer Restore from backup / Restart I have formatted the hard drive to Mac OS journaled, Tried both MBR and GUID options I have tried running the installer in verbose and safe mode. I am out of ideas....anyone?
-
Hello All, I just recently started playing with OSX 10.6 Snow Leopard on my Dell Latitude D620 and have configured everything fairly easily following the instructions (except if you are creating a USB install stick use myHack 3.1.2 instead, as 3.3.1 has a bug with creating 10.6). I ran EDP after installation to fix some of the battery/sound issues and used software update to get to 10.6.8, everything is working pretty good. The only thing that isn't working is the Smartcard Reader, I've looked over the forum and haven't found anything about how to get it working. The Smartcard reader appears to be an internal O2Micro USB smartcard reader. I've looked to see if any OSX drivers were ever written for O2Micro readers but I haven't found any yet. So does anyone have any ideas on how to get the smartcard reader to work?
-
 Hi there. I'm trying to install on the Intel model (not Nvidia), Mountain Lion from myHack 3.31 and I boot with -v, and the installer freezes (by freezes I mean I can't press a key to display those weird characters) saying: ACPI_SMC_PlatformPlugin::registerLPCDriver - WARNING - LPC device initialization failed: C-state power management not initialized. I can't see an option to enable something like that in my BIOS, so I'm absolutely clueless at what to do. Would anybody be able to help me out please? Many thanks in advance, Nick
 -
Having a working Mountain Lion 10.8.4 on my d620, i wonder if i can straight update to 10.8.5. Obviously I've used MLPostFactor, any advice ?
-

Core duo processor detected as Core 2 Duo- Latitude D620
Edwin Moquete posted a topic in The Archive
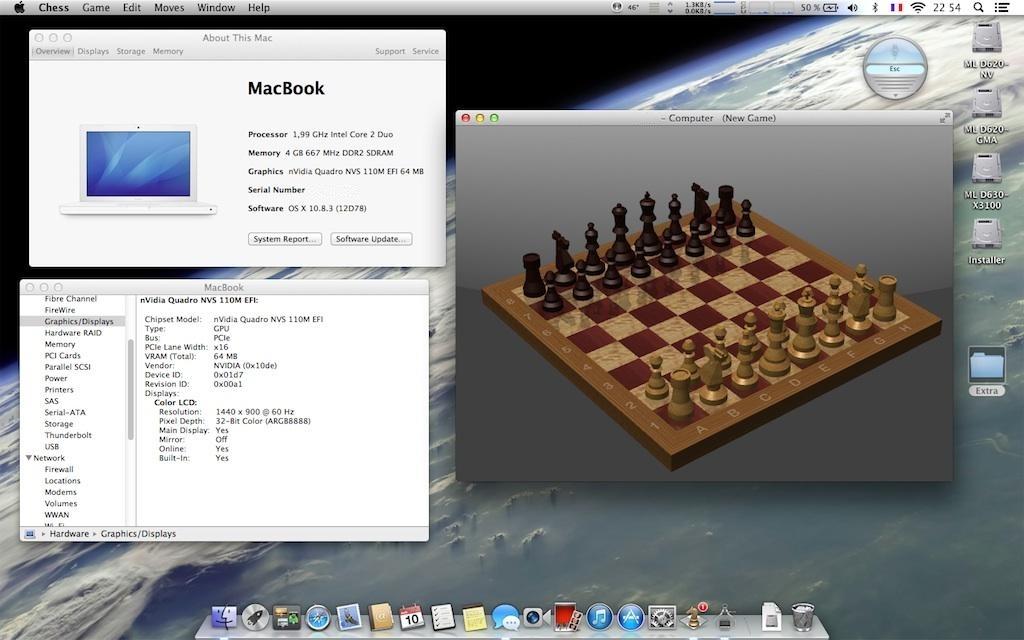
Hi I have fully working Snow Leopard 10.6.8 on my Dell Latitude D620, in About this mac and System profiler the processor is detected as a 1.66 GHz Core 2 Duo, But i have a Core Duo. This is not important, but i want to know why it happen and if is possible, fix it. I've configured my build using EDP. I also tried extracting my own dsdt and don't work. I reiterate, isn't important, but if anyone have an answer i will be happy. Sorry for my bad english. -
Ok, so I have a Dell Latitude D620 with the nvidia graphics card and I got a copy of Mac Lion from app store Then downloaded the myHack tool. Installed the Lion to the 16 GB flash drive and installed the extras using the myHacks tool. Then I made sure my Bios is all good by looking at the other forum and everything checks out. Booted to USB and it loads the loader fine. When I press enter to continue the boot. it does its loading stuff but when all done it brings me to a black screen and my USB light went off. I been on this for hours.. Any help please would be appreciated. Thanks!
-
My system has been getting finicky; freezes during startup (fsck) and shutdown sometimes... nothing to do but hard shutdown and try again, which has always worked. (So far.) But after running disk utilitiy, the verify permissions came back with a ton of errors. Should I repair them all or will this mess up my install? Just being prudent, and I'm new at this so be kind. Thanks for your input, too.
-
Last update: 03 Jan 2024 This guide applies to Core2Duo D620 nVidia models. This guide was initially made with a MyHack-based installation of ML 10.8.0 + subsequent updates to ML 10.8.3/10.8.4/10.8.5. The bootpack was made out of the D630 nVidia ML bootpack where the DSDT table was replaced by the table from the D620 nVidia Lion bootpack, appropriate kexts removed and/or added and plists replaced. Extra D620n ML.zip This guide assumes you're using a blank HDD, partitioned and formated GUID. No tests done on MBR partitioned HDD, so don't ask about it, try it for yourself and report back if appropriate. Read the MacRumors guide thoroughly and follow it to the letter as far as creating the installer is concerned. Remember that it is not our hack and we do not support it. http://forums.macrumors.com/showthread.php?t=1325709 You need a legit copy of ML, i.e. the Install Mountain Lion.app application, otherwise forget it. The tool requires you to copy it to your Applications folder. It won't work if all you have is the InstallESD.dmg image. In June 2021, Apple finally made Mountain Lion freely available. A link to download the application package is available here. Phase 1: initial ML installation in mainstream 64bit kernel mode with unsupported graphics make the usual myHack USB installer for ML 10.8, using the attached bootpack. myHack v3.3.1 is recommended. It's available here. boot the myHack USB installer and install ML 10.8, pointing to the /Extra folder of the installer media when prompted for the boot pack (do not choose generic). reboot into ML with "-x" flag (or ML won't boot) through your USB installer and complete 1st boot setup. you're now in ML 10.8 with default graphics at 1024x768 and without graphics acceleration. If you have not already done so, remove your myHack USB installer and put it aside. install recommended version of Chameleon (r2468) or Enoch (r2839) bootloader on your disk. They're available here. install latest update or combo update for ML 10.8.5 and all security updates for 10.8.5 (your wireless may not be supported at that stage, so use Ethernet port). at that stage, ML 10.8 is unbootable, no matter what, so don't reboot yet! Phase 2: MLPostFactor download MLPostFactor from here (original links posted in 2013 at MacRumors are dead since 2015). create a new small partition on your HDD (8 to 16GB) or insert and erase your myHack USB installer (or any other available external media). following MLPF instructions to the letter, run MLPostFactor and create an ML installer on the freshly created spare HDD partition or freshly erased USB key. Select the appropriate ML version that meets your installation and run the app, knowing that version 10.8.4 is to be selected for ML 10.8.5. upon completion, create a folder called Extra at the root of that installer media and copy DSDT table + SMBIOS & Chameleon boot plist files there. if you have a Bluetooth module, turn off your wireless services with the side switch (or laptop will look for a BT keyboard at next step and you'd need to hook up a USB keyboard). reboot off your initial ML disk/partition, interrupt the boot process at the Chameleon delay bar and select this newly created ML installer partition/disk with options & flag DSDT=/Extra/DSDT.aml arch=i386 -f. once installer is loaded, do not actually proceed with any installation (it would not be bootable). Go to Utilities in the menu bar and select MLPostFactor. when MLPostFactor app kicks in, click Continue until you're offered to select a destination volume. in the list available under the HDD icon, select your previously-made ML 10.8 installation, check the relevant 10.8.x case (select 10.8.4 for ML 10.8.5) and click Install MLPostFactor. upon completion, click Quit MLPostFactor, quit installation program and reboot ML 10.8 with flag and boot option -f arch=i386. If you switched off wireless services, turn the switch back on before the reboot. You will now have full QE/CI ! open up the Chameleon boot plist file in /Extra folder with TextEditor and add boot arg arch=i386 to ensure your system boots in 32bit kernel mode. If you have Chameleon Wizard app, use that to open up the boot plist and tick the 32-bit (i386) option, then save the file. open up Terminal and type sudo kextcache -system-prelinked-kernel -a i386 to rebuild the 32bit-mode cache; this will remove the need to boot with -f flag. For ML 10.8.5, edit file /System/Library/CoreServices/SystemVersion.plist to replace version number from 10.8.4 to 10.8.5. That's it, enjoy ML on your previously unsupported D620 nVidia. Remember that this hack is quite aggressive in the way it reverts to DP1 files and older graphics drivers (nVidia NV40 kexts, OpenGL libraries), so you may find that things do not work. Again, no support for MLPF here. NB: Details of issues related to ML vanilla files that are re-instated by 10.8.5 security updates are kept in the D430 MLPF guide. They should no longer apply since ML went out of support and no further updates published.

-
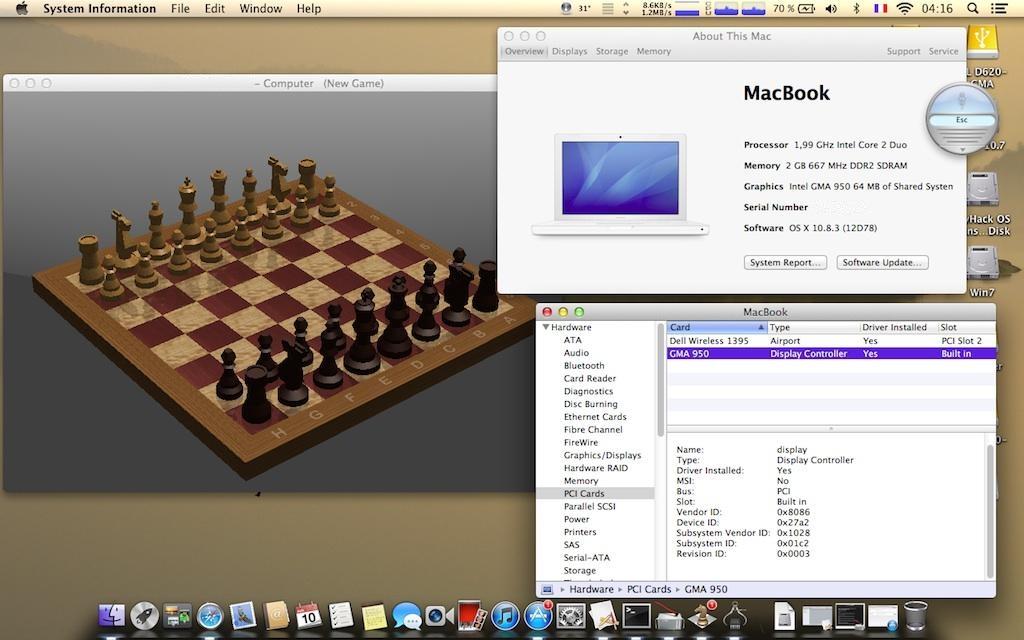
Last update: 03 Jan 2024 This guide applies to Core2Duo LoRes WXGA (1280x800) and HiRes WXGA+ (1440x900) models. This guide was initially made with a MyHack-based installation of ML 10.8.0 + subsequent updates to ML 10.8.3/10.8.4/10.8.5. The bootpacks were made out of the D630 nVidia ML bootpack where the DSDT table was replaced by the table from D620 GMA950 Lion bootpacks (LoRes or HiRes), appropriate kexts removed and/or added and plists replaced. Extra_D620i_LoRes_ML.zip Extra_D620i_HiRes_ML.zip This guide assumes you're using a blank HDD, partitioned and formated GUID. No tests done on MBR partitioned HDD, so don't ask about it, try it for yourself and report back if appropriate. Read the MacRumors guide thoroughly and follow it to the letter as far as creating the installer is concerned. Remember that it is not our hack and we do not support it. http://forums.macrumors.com/showthread.php?t=1325709 You need a legit copy of ML, i.e. the Install Mountain Lion.app application, otherwise forget it. The tool requires you to copy it to your Applications folder. It won't work if all you have is the InstallESD.dmg image. In June 2021, Apple finally made Mountain Lion freely available. A link to download the application package is available here. Phase 1: initial ML installation in mainstream 64bit kernel mode with unsupported graphics make the usual myHack USB installer for ML 10.8, using the attached LoRes or HiRes bootpack. myHack v3.3.1 is recommended. It's available here. boot the myHack USB installer and install ML 10.8, pointing to the /Extra folder of the installer media when prompted for the bootpack (do not choose generic). reboot into ML through your USB installer and complete 1st boot setup. you're now in ML 10.8 with default graphics at 1024x768 and without graphics acceleration. If you have not already done so, remove your myHack USB installer and put it aside. install recommended version of Chameleon (r2468) or Enoch (r2839) bootloader on your disk. They're available here. install latest update or combo update for ML 10.8.5 and all security updates for 10.8.5 (your wireless may not be supported at that stage, so use Ethernet port or install appropriate Wifi kext). reboot into latest version of ML 10.8.5, still with default graphics and without acceleration. Phase 2: MLPostFactor download MLPostFactor from here (original links posted in 2013 at MacRumors are dead since 2015). create a new small partition on your HDD (8 to 16GB) or insert and erase your myHack USB installer (or any other available external media). following MLPF instructions to the letter, run MLPostFactor and create an ML installer on the freshly created spare HDD partition or freshly erased USB key. Select the appropriate ML version that meets your installation and run the app, knowing that version 10.8.4 is to be selected for ML 10.8.5. upon completion, create a folder called Extra at the root of that installer media and copy DSDT table + SMBIOS & Chameleon boot plist files there. if you have a Bluetooth module, turn off your wireless services with the side switch (or laptop will look for a BT keyboard at next step and you'd need to hook up a USB keyboard). reboot off your initial ML disk/partition, interrupt the boot process at the Chameleon delay bar and select this newly created ML installer partition/disk with options & flag DSDT=/Extra/DSDT.aml arch=i386 -f. once installer is loaded, do not actually proceed with any installation (it would not be bootable). Go to Utilities in the menu bar and select MLPostFactor. when MLPostFactor app kicks in, click Continue until you're offered to select a destination volume. in the list available under the HDD icon, select your previously-made ML 10.8 installation, check the relevant 10.8.x case (select 10.8.4 for ML 10.8.5) and click Install MLPostFactor. upon completion, click Quit MLPostFactor, quit installation program and reboot ML 10.8 with flag and boot option -f arch=i386. If you switched off wireless services, turn the switch back on before the reboot. You will now have full QE/CI ! open up the Chameleon boot plist file in /Extra folder with TextEditor and add boot arg arch=i386 to ensure your system boots in 32bit kernel mode. If you have Chameleon Wizard app, use that to open up the boot plist and tick the 32-bit (i386) option, then save the file. open up Terminal and type sudo kextcache -system-prelinked-kernel -a i386 to rebuild the 32bit-mode cache; this will remove the need to boot with -f flag. For ML 10.8.5, edit file /System/Library/CoreServices/SystemVersion.plist to replace version number from 10.8.4 to 10.8.5. That's it, enjoy ML on your previously unsupported D620 GMA950. Remember that this hack is quite aggressive in the way it reverts to DP1 files and older graphics drivers (GMA950 kexts, OpenGL libraries), so you may find that things do not work. Again, no support for MLPF here. NB: Details of issues related to ML vanilla files that are re-instated by 10.8.5 security updates are kept in the D430 MLPF guide. They should no longer apply since ML went out of support and no further updates published.
-
- 1
-

-
- mountain lion
- d620
- (and 2 more)
-
After trials and tribulations reported here: https://osxlatitude.com/index.php?/topic/2149-inspiron-e1705-gma-950-goes-black-before-os-install-screen/ my Inspiron e1705 seems to be running grand on 10.6.8 as a Latitude D620 - except that my wired ethernet doesn't work. Any suggestions? Installing the AppleBCM440XEthernet.kext file from a prior iFail install (using Kext Utility) allows ethernet to at least show up in System Preferences > Network, but it won't work either manually or by DHCP. At the moment I'm successfully using an Edimax EW-7811Un wifi dongle, but I'd like to get wired ethernet working right. OT, but I was so pleased that the MyHack+EDP install let SLEEP work, that I've even ordered a Dell 1505 wifi card to replace the wifi dongle for this beast. Many thanks! Update: after a two-week wait for the 1505 card to arrive from Hong Kong, I've given up on my quest to make wired ethernet work, because I got nowhere with it and the 1505 card works perfectly as airport.