Hervé
-
Posts
10077 -
Joined
-
Last visited
-
Days Won
569
Content Type
Profiles
Articles, News and Tips
Forums
Everything posted by Hervé
-
The -wegnoegpu boot arg "disables" the dGPU but it's unlikely to do anything as far as applying/removing power to the device at ACPI level is concerned. You would need to post your DSDT (assuming dGPU is handled in it) or your entire set of raw/extracted ACPI tables to verify how it's natively configured. NB: In your OC config, you drop SSDT tables CpuPm and Cpu0Ist. This is wrong for a Haswell platform such as yours, this only applies to Sandy Bridge and Ivy Bridge platforms. Disable/remove these drops.
-
There is no access to those Google Drive links you keep posting...
-
Remove the OCLP patch, reboot and re-apply the minimum patches. Read the documentation before proceeding. At worst, re-install macOS from scratch.
-
You can boot with boot arg -igfxvesa and that’ll disable all graphics support to run with a basic unaccelerated mode.
-
I guess it depends entirely how you apply the OCLP patches. This is a Hackintosh, not a Mac so you must not apply all those patches that apply to Mac hardware. Only select the patches relevant to Haswell graphics (eg: for MBP11,x models) and disable SiP.
-
Perfectly normal: no support for Haswell graphics in Ventura; you have to apply the OCLP patches.
-

HP Elitebook 840 G3/Ventura/OpenCore: Ethernet does not work.
Hervé replied to Lost-Entrepreneur439's topic in HP Systems
An Ioreg extract would be most useful… -
Lenovo ThinkPad X390: Seeking help to install Sonoma beta
Hervé replied to pawan2joy's topic in The Archive
You may install Sonoma the exact same way you followed for Ventura. Just update your bootloader to the latest version, same with your add-on kexts (especially Lilu & Plugins) and make sure to use the relevant Lilu/Whatevergreen beta boot args. -
Are you still running with OpenCore?
-
Try and add the USB HID patch in your OC config. You'll find the details of the path in my Latitude E7270 guide and/or through a forum search.
-
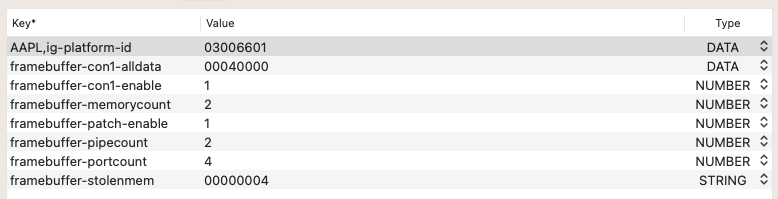
The graphics properties you inject are totally incorrect. Where did you get these from? If you wish to inject a connector's "alldata", know that it's a 12 bytes value, not just 4 like you've entered (presumably for DP type which is the native type of con1). Remove this. Injecting a stolenmem value is not required for HD4000 and it would be wrong to inject a different one; don't do this. Here, you inject the same value as natively defined in the framebuffer, it's therefore entirely useless. Remove this. Injecting memorycount, pipecount and portcount is unnecessary for HD4000 framebuffer 0x01660003. Here, you inject the same values as natively defined in the framebuffer, it's therefore entirely useless. Remove these. Generally speaking, injecting properties carrying the exact same values as natively defined in a framebuffer is something entirely useless (though harmless). The framebuffer native settings are as follows: ID: 01660003, STOLEN: 64 MB, FBMEM: 16 MB, VRAM: 1536 MB, Flags: 0x00000000 TOTAL STOLEN: 16 MB, TOTAL CURSOR: 1 MB, MAX STOLEN: 32 MB, MAX OVERALL: 33 MB (34619392 bytes) Camellia: CamelliaUnsupported (255), Freq: 1808 Hz, FreqMax: 1808 Hz Mobile: 1, PipeCount: 2, PortCount: 4, FBMemoryCount: 2 [5] busId: 0x03, pipe: 0, type: 0x00000002, flags: 0x00000030 - ConnectorLVDS [2] busId: 0x05, pipe: 0, type: 0x00000400, flags: 0x00000407 - ConnectorDP [3] busId: 0x04, pipe: 0, type: 0x00000400, flags: 0x00000081 - ConnectorDP [4] busId: 0x06, pipe: 0, type: 0x00000400, flags: 0x00000081 - ConnectorDP 05030000 02000000 30000000 02050000 00040000 07040000 03040000 00040000 81000000 04060000 00040000 81000000 All you really ought to do is: inject con1's type as HDMI because that's where HDMI output port gets attached in macOS for those E6x30 laptops. This is required for HDMI audio. set fbmem to 8MB because default value (16MB) causes the corruption you experience. So remove all those incorrect properties you currently inject and limit your settings to the following: AAPL,ig-layout-id 03006601 DATA // Optional because it's the default layout framebuffer-patch-enable 1 NUMBER framebuffer-fbmem 00008000 DATA framebuffer-con1-enable 1 NUMBER framebufffer-con1-type 00080000 DATA See the following for references: whatevergreen user manual my E6230 guide our HD4000 patching guide Finally: Get rid of those Realtek and Atheros Ethernet kexts you inject. Those do not apply to the Latitude E6x30 laptops which are fitted with an Intel LAN card, so inject the correct Intel driver instead. You'll find it in all those E6x30 packs available on the forum. Intel wireless card may work, depending on the model you have . Check ITLWM repo, I see that you inject one of their kext. Can't say more, you've not posted your system's hardware specs. You're missing the CPU power management SSDT (sometimes named SSDT-PM.aml). Given that you have an Ivy Bridge laptop, you need to generate this SSDT for your CPU with good old Pike R Alpha's generator script. You correctly drop CpuPm + Cpu0Ist SSDTs in your config but you won't obtain any CPU power management without the CPU-specific SSDT-Pm table. This may also impact Sleep & Wake. Can't say more, you've not posted your systems's hardware specs... Latitude E6x30 laptops are fitted with IDT 92HD93 audio. You need to inject AppleALC layout 12 (i.e. 0x0C) to get audio working, the values you inject being wrong and contradictory: As stated in the Dortania OpenCore guidance, 1st thing 1st: get to know your hardware...

-
Released July 11th, 2023. Build 23A5286i. Beta3 update, to coïncide with the release of the 1st public beta.
-
We have existing guides for Latitude 5x80 and other Skylake E7x70in our Guides section. Did you check them out? I also recommend you read the information posted in our Technical Information/R&D section so that your familiarise yourself with capabilities, limitations and constraints of your hardware with regards to running macOS.
-
I experienced the same with Big Sur when using OpenCore on my E6230. See my guide. I never managed to identify the root cause. Switching to Clover with what was, in essence, an identical setup sorted the issue. I never went back to OpenCore on that laptop.
-
No USB touchPad listed in SysInfo, sorry. Probably PCIe then... Why don't you post and IOReg extract taken from macOS?
-
What's Catalina v15? Didn't you mean 10.15 instead? We have existing guides for the E6x30 series, don't hesitate to consult them and use the provided packs. This will include support for USB ports and touchpad. As for the wireless card, it depends entirely on the model which you omitted to specify. If you search the forum using the provided Search facility and browse the relevant information sections, you'll find answers to most if not all of your questions. Natively, E6430 can run macOS up to Big Sur; beyond that, you need OCLP patches.
-
Not at all. Identify the type of touchscreen you have. If it's USB and you've mapped your ports properly, it should appear in SysInfo->Hardware->USB. You may then apply the USB HID patch in your config. See my Latitude E7270 guide for reference. NB: As per our published rules -which I invite you to read-, please use the Reply box to post replies (it's available at the bottom of each page!) rather that Quotes. Thank you.
-
Wake up from sleep when USB Plugged in or Unplugged
Hervé replied to unklbee's topic in Intel-based Systems
I'd say it's highly likely that your BIOS is set for wake on USB. -
You can simply add this as a property against the IO location in your config file if you feel this kind of info is essential for you even though it's entirely useless and purely cosmetic.
-
Is the touchscreen USB-based? If so, the USB HID patch may bring it to life.
-
Released July 5th, 2023. Build 23A5286g. Again, no OTA update offered when running with MBP15,2 SMBIOS and had to reboot temporarily with iMac19,1 SMBIOS. But completely smooth update otherwise. Notable change: startup progress bar has shifted down from right under the Apple logo to the bottom of the screen.
-
HP laptop, so bear in mind the lapic KP too...
-
Typical Lion KP, it's a classic... On most Hackintosh systems, Lion required to revert AppleACPIPlatform kext to an older version from Snow Leopard. From memory, you'll be Ok with v1.3.6.
-
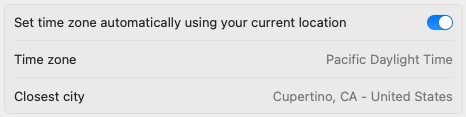
Released June 21st, 2023. Build 23A5276g. Could not obtain this 2nd beta through System Update; it just would not show (SMBIOS MBP15,2). I could only download the full installer, initiated the fresh installation from Sonoma which took ages to end up in a boot loop at reboot. Changed SMBIOS to iMac19,1 and was able to obtain update through the PrefPane. Update took longer than usual in my opinion but was successful and I was able to reboot with MBP15,2 SMBIOS upon completion. Time zone setting bug remains present (could it be linked to lack of built-in Broadcom wireless?) and, overall, this 2nd beta looks pretty much the same as the 1st one. Timezone still stuck on Pacific Daylight with no apparent possibility to set it manually. I had to disable automatic time zone using current location, then manually type my country's capital in the "Closest City" field to be able to obtain my real time zone; When I enabled automatic time zone again, my adjusted time zone remained as I had set it. Nice bug.
-
For laptops, the buck stops at 10th gen Comet Lake and Ice Lake platforms. No support (no drivers) for Intel integrated graphics (iGPU) beyond 10th gen CML and ICL. Latitude 5320 is 11th gen Tiger Lake which makes it unsuitable as a Hackintosh due to unsupported graphics. There are no tricks or workaround to this lack of support. This has been stated here: https://osxlatitude.com/forums/topic/2998-platforms-compatibility-requirements-for-os-xmacos/ https://osxlatitude.com/forums/topic/8238-supportedunsupported-gpus-graphics-cards