Hervé
-
Posts
10069 -
Joined
-
Last visited
-
Days Won
569
Content Type
Profiles
Articles, News and Tips
Forums
Everything posted by Hervé
-
Nothing to worry about,everything is perfectly normal. The messages you see refer to add-on kexts which are not signed (meaning approved/validated) by Apple. Most add-on Hackintosh kexts are like that. The messages indicate that the kexts load nevertheless so all is well.
-
That's nothing to do with USB3.0 ports. Don't confuse things. Afaik, you can keep your boot mode as it is.
-
You do not have proper CPU SpeedStep without SSDT-based adequate power management SSDT. Instead, what you see is LFM and HFM, i.e. only the lowest and highest nominal frequencies with no intermediate speeds and no Turbo boost at all. You need to generate and use the CPU-specific SSDT in order to enjoy native CPU SpeedStep, i.e. intermediate speeds between LFM and HFM + Turbo boost between HFM and max Turbo speed.
-
USB3.0 ports are XHCI type whilst USB2.0 ports are EHCI type. Apply the DSDT adjustment to XHCx device as/if necessary and USB ports should work OOB. They do on my E6230. All details here. You may also follow JakeLo's guide for this model family.
-
Erm... you would have had to specify it somewhere in your bootloader configuration to get macOs running. If you did not, it's highly unlikely that you have proper graphics support.
-
Best CPU for your mobo is probably Core2Duo E8600 3.33GHz FSB1333 unless there is support for Core2Quad. It'll depend on the chipset and BIOS. I'll let you do you own homework on that one... http://www.cpu-upgrade.com/mb-Intel_(chipsets)/G43_Express.html
-
Install Display Menu app (available for free on AppStore) to check if you can switch from mirrored displays to separate/independent displays. Your IOReg shows: FB@0: ​no attached display FB@1: connector-type = 00 04 00 00 (DP) port = 0x5 boot display = true FB@2​: ​connector-type = 00 04 00 00 (DP) port = 0x6 FB@3: ​no attached display Which framebuffer layout-id are you using? Once you've identified it, you can try to identify the framebuffer table in the Skylake framebuffer kext and investigate a potential binary patch.
-
Systems specs please? You may need to binary mod/patch your FrameBuffer to get all your output ports supported. You can refer to our existing literature meantime.
-
Download a fresh copy of Sierra installation app and start all over with USB installer creation. If you boot with -f flag, kexts placed in /L/E will be ignored. You therefore need to load add-on kexts from /E/E with boot option KernelBooter_kexts=Yes. It's mentioned in the guide.
-
Please pay attention...
-
Finally tried the kext on the D630 (ALPS V2 ?)... With R4, all seems Ok but one has to hardly touch the TrackPad to control the mouse; a little difficult to use. With R5, no such requirement for an extremely light finger touch but UP and DOWN mouse movements are inverted. LEFT and RIGHT Ok. Trackstick not functional. ALPS version could not be identified as shown in the log: Dec 20 22:41:47 localhost kernel[0]: VoodooPS2Trackpad: Identify TouchPad command returned incorrect byte 2 (of 3): 0x00 Dec 20 22:41:47 localhost kernel[0]: ApplePS2Controller: Timed out on mouse input stream. Dec 20 22:41:47 --- last message repeated 1 time --- Dec 20 22:41:47 localhost kernel[0]: VoodooPS2TouchPad Version 2.8.15 loaded... Dec 20 22:41:47 localhost kernel[0]: VoodooPS2Mouse Version 2.8.15 loaded... Dec 20 22:41:47 localhost kernel[0]: No interval found for . Using 8000000 Dec 20 22:41:47 localhost kernel[0]: ApplePS2Controller: Timed out on mouse input stream. Dec 20 22:41:47 --- last message repeated 1 time --- Dec 20 22:41:47 localhost kernel[0]: ALPS: Touchpad driver started Versions R6Bx do not work at all on that model.
-
Post a zipped copy of your saved SysProfiler + saved output of IORegistryExplorer. As for the kext, Bronxteck gave you a recommendation which you chose to ignore. You can't cache the kext and inject it at startup at the same time so remove the kext from EFI/Clover/kexts/10.11, copy it to /L/E, repair permissions to /L/E and rebuild your cache. Use the original version you 1st used since that got you going once.
-
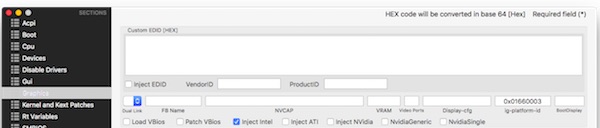
By now, you should know that no Intel wireless cards are supported in OS X. Replace it by a supported card or USB dongle. Consult the non-exhaustive list of supported models in the R&D forum section. Reload BIOS settings, then set HDD mode to AHCI and check that LAN/Ethernet is enabled. You may disable wireless until you change your card. You graphics card is not initialising so you need to inject the correct Capri framebuffer and enable InjectIntel in Clover configuration. You can use CloverConfigurator to that effect. For mobile HD4000, it should be FB #3, i.e. layout-id 0x01660003. Alternatively, you may choose to patch your DSDT to inject the Capri-specific information under GFX0 (iGPU) device located at address 0x00020000. If your screen res is higher than 1600x900, you need to set DualLink to 1. Method (_DSM, 4, NotSerialized) // _DSM: Device-Specific Method { If (LEqual (Arg2, Zero)) { Return (Buffer (One) { 0x03 }) } Return (Package () { "AAPL,ig-platform-id", Buffer (0x04) { 0x03, 0x00, 0x66, 0x01 }, "hda-gfx", Buffer (0x0A) { "onboard-1" } }) } Since your system is Ivy Bridge, you also need to enable Asus AICPUPM patch in Kernel & Kext Patches tab. You'll find the LAN kext through a Google search. It's widely available, especially at InsanelyMac. For audio, identify your codec with DPCIManager app once you're up & running.

-
After all this time, couldn't you at least post your Bluetooth controller id? No-one is going to guess for you!
-
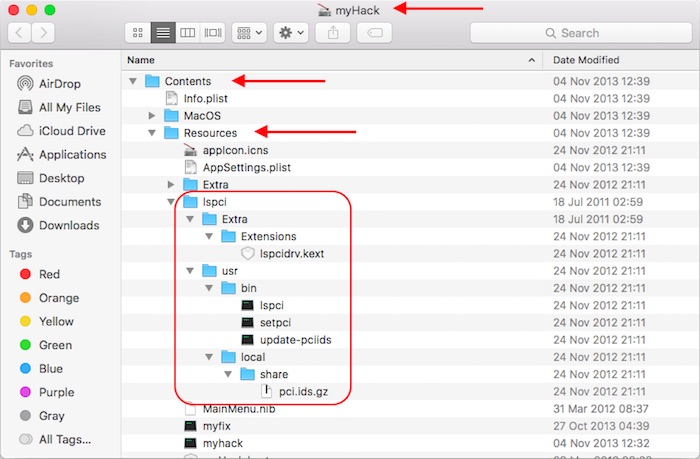
For those who want to use the good old command line utility rather than use DPCIManager, you can download myHack and, inside the extracted app package, you'll find the complete lspci package under Contents/Resources folder. Install the lspci utility it as follows: copy the lspci + setpci + update-pciids programs to /usr/bin copy the share folder to /usr/local copy the lspcidrv kext to /L/E repair permissions to /L/E with Terminal commands: sudo chmod -Rf 755 /L*/E* sudo chown -Rf 0:0 /L*/E* sudo touch -f /L*/E* sudo kextcache -system-prelinked-kernel or sudo kextcache -Boot -U / update your local PCI database with Terminal command: sudo update-pciids ` You'll then be able to list your PCI attached components with Terminal command: lspci -nn ` Example: E6230:~ admin$ lspci -nn pcilib: 0000:00:1f.3 64-bit device address ignored. pcilib: 0000:00:1b.0 64-bit device address ignored. pcilib: 0000:00:16.0 64-bit device address ignored. pcilib: 0000:00:14.0 64-bit device address ignored. pcilib: 0000:00:02.0 64-bit device address ignored. pcilib: 0000:00:02.0 64-bit device address ignored. 00:00.0 Host bridge [0600]: Intel Corporation 3rd Gen Core processor DRAM Controller [8086:0154] (rev 09) 00:02.0 VGA compatible controller [0300]: Intel Corporation 3rd Gen Core processor Graphics Controller [8086:0166] (rev 09) 00:14.0 USB controller [0c03]: Intel Corporation 7 Series/C210 Series Chipset Family USB xHCI Host Controller [8086:1e31] (rev 04) 00:16.0 Communication controller [0780]: Intel Corporation 7 Series/C210 Series Chipset Family MEI Controller #1 [8086:1e3a] (rev 04) 00:19.0 Ethernet controller [0200]: Intel Corporation 82579LM Gigabit Network Connection [8086:1502] (rev 04) 00:1a.0 USB controller [0c03]: Intel Corporation 7 Series/C210 Series Chipset Family USB Enhanced Host Controller #2 [8086:1e2d] (rev 04) 00:1b.0 Audio device [0403]: Intel Corporation 7 Series/C210 Series Chipset Family High Definition Audio Controller [8086:1e20] (rev 04) 00:1c.0 PCI bridge [0604]: Intel Corporation 7 Series/C210 Series Chipset Family PCI Express Root Port 1 [8086:1e10] (rev c4) 00:1c.1 PCI bridge [0604]: Intel Corporation 7 Series/C210 Series Chipset Family PCI Express Root Port 2 [8086:1e12] (rev c4) 00:1c.2 PCI bridge [0604]: Intel Corporation 7 Series/C210 Series Chipset Family PCI Express Root Port 3 [8086:1e14] (rev c4) 00:1c.3 PCI bridge [0604]: Intel Corporation 7 Series/C210 Series Chipset Family PCI Express Root Port 4 [8086:1e16] (rev c4) 00:1c.5 PCI bridge [0604]: Intel Corporation 7 Series/C210 Series Chipset Family PCI Express Root Port 6 [8086:1e1a] (rev c4) 00:1d.0 USB controller [0c03]: Intel Corporation 7 Series/C210 Series Chipset Family USB Enhanced Host Controller #1 [8086:1e26] (rev 04) 00:1f.0 ISA bridge [0601]: Intel Corporation QM77 Express Chipset LPC Controller [8086:1e55] (rev 04) 00:1f.2 SATA controller [0106]: Intel Corporation 7 Series Chipset Family 6-port SATA Controller [AHCI mode] [8086:1e03] (rev 04) 00:1f.3 SMBus [0c05]: Intel Corporation 7 Series/C210 Series Chipset Family SMBus Controller [8086:1e22] (rev 04) 02:00.0 Network controller [0280]: Qualcomm Atheros AR928X Wireless Network Adapter (PCI-Express) [168c:002a] (rev 01) 0b:00.0 SD Host controller [0805]: O2 Micro, Inc. OZ600FJ0/OZ900FJ0/OZ600FJS SD/MMC Card Reader Controller [1217:8221] (rev 05) E6230:~ admin$ lspci.zip
- 1 reply
-
- 2
-

-
Or one can check his syslog/dmesg... In Sierra, one may use: log show | grep ALPS
-
Your desktop computer being fitted with a Pentium E5700, it's a no go for Sierra. You need a SSE4-capable CPU to install and run Sierra. Until you swap out your CPU by a Sierra-compatible model (e.g. Core2Duo E8xxx), you're limited to El Capitan. Your nVidia GeForce G210 remains supported all the way to Sierra. It's a long time since I installed anything on a desktop but I guess the same principles used on laptops should apply. You'll have to start by patching your DSDT and rename your USB2.0 controllers from EHCx to EH0x + create or use a USBInjector kext in order to retain fully functional USB ports. After that, you can follow the process detailed in any of my laptop guides to create your own USB installer. Regarding your kexts, I don't see why you would ned to retain NullCPUPM as long as you use a correctly tuned FakeSMC. You should be able to enjoy native CPU SpeedStep. Patched_10.7_AppleRTC is obviously obsolete in Mav/Yos/EC/Sierra so replace it with the correct version if you still need it (probably not since it's of no effect in Mavericks). Pre-patched copies are available here. If you wish to retain lspci facility, you'll also have to manually install the package that myHack used to install transparently. You can extract the necessary files from the myHack app (they're in the Resources folder) and copy them to the destination folders shown in myHack's tree structure. Once done, update your local database through Terminal command sudo update-pciids. Details are available here. Most people don't bother with lspci these days and just use tool DPCIManager.
-
 Yes, you can copy the existing SSDT for the i5-3320M and paste ("drop") it in your own installation. Or you can follow the final statement of the 1st guide you referred to and generate your own The latter would have been quicker than the time it took you to pop the question.
 -
Not under OS X...
-
Dell Precision T1600 + GTX 750Ti = Graphics Issues - Help!
Hervé replied to ssprod's topic in The Archive
If the Intel is 82579LM, it's the same as fitted to E6x20/E6x30 models. The AppleIntelE1000e kext should therefore work. If the Ethernet is not showing in DPCIManager, there's a good chance it's disabled in BIOS... -
On E5x30/E6x30, BIOS must not exceed a given version beyond which graphics artefacts is systematic. If BIOS does exceed the maximum recommended versions, downgrading to the desired version requires to first downgrade to the lowest possible version before subsequently upgrading to the desired one. Eg: E6230 with say BIOS A16. Maximum BIOS version for OS X is A11. To downgrade to A11 and have fully supported graphics, it's necessary to 1st downgrade to say A02 version then upgrade to A11. A direct downgrade from A16 to A11 does not fix graphics defects. It appears that Jake recommended not to exceed BIOS A06 for the Latitude 6430u. As such, downgrade to A02, then upgrade to A06. This may sound like a silly remark, but in case the 6430u did actually boot to OS X desktop, try [Fn-Insert] several times in case the backlight was set to dark...
-
Dell Precision T1600 + GTX 750Ti = Graphics Issues - Help!
Hervé replied to ssprod's topic in The Archive
As usual, please post your hardware specs (PCI ids) in order to identify your LAN card and the likely kext to drive it. Manufacturer's support web site is usually a good starting point... -
Help with El Capitan, Clover changing SIP setting in config.plist
Hervé replied to jfmac's topic in The Archive
You'll also be able to boot without cache, provided you inject mandatory kexts such as FakeSMC from /E/E through boot option KernelBooter_kexts=Yes. -
Try to manually inject the various values of the Capri Framebuffer until you find out the correct one. It's usually 3 or 4 on laptops with HD4000 graphics. With Enoch, you can inject these values via boot parameter IntelCapriFB=xx, where xx is in the range 0 to 11. If you use Clover, you can adjust this in the Config.plist through the Clover Configurator.
-
You need to follow the guide a little better: you did not check CoreStorage presence and you clearly have a logical drive in place.