Hervé
-
Posts
10079 -
Joined
-
Last visited
-
Days Won
569
Content Type
Profiles
Articles, News and Tips
Forums
Everything posted by Hervé
-
I guess you meant IvyBridge CPU i7-3630QM... Using Clover Configurator tool, try and modify your Clover config.plist as follows: In Graphics tab try layout-id 0x01660003 as opposed to 0x01660004 set DualLink to 1 In Kernel and Kext Patches tab uncheck KernellPm, it's not applicable to IvyBridge platform. You only need AsusAICPUPM for CPU power management. change 8319D411 to 8A19D411 in the 1st entry for AppleHDA patching, still replacing it by 00000000. 8319D411 is not present in the Sierra version of AppleHDA. for IOGraphicsFamily patch (to avoid boot screen glitches), the binary mod should be to replace 0100007525 by 010000EB25 (the replacement you have is for older OS X versions such as Yosemite). You'll have to create your own CPU-specific SSDT with the generator script you've strangely placed in EFI/CLOVER/APCI/patched folder. Normally, the script downloads to home directory from which you can run it. It's the resulting CPU power management-related SSDT that goes alongside the patched DSDT.
-
It's obviously similar specs to the regular E6x30 Series. Afaik, the E6430s is an ultra-portable version (i.e. a little smaller) of the E6430. Why don't you post the /Extra folder you've used? With Chameleon or Enoch, I recommend you stick to legacy BIOS mode. VGA won't work (no support for it under HD4000 graphics) but HDMI will with the usual Capri FrameBuffer patch. HD4000 should work OOB as long as you inject the correct Capri FB #3/layout-id 0x01660003. This is usually done through DSDT patching of the iGPU device defined at address 0x00020000. BIOS would normally display the exact type of audio chip fitted to the laptop. Look up in System Information page. On the E6x30 Series, it's usually IDT 92HD93 for which the AppleHDA patch details are fully known and available. You can easily double check the codec with DPCIManager app. Audio will be listed as Intel HDA (8086:1e20) with IDT 92HD93 codec (111d:76df). You'd normally inject audio layout-id 12, again through DSDT patching. If your laptop runs the latest BIOS version, you'll probably have to revert to an older one to avoid graphics corruption with HD4000 like on the other E6x30 models. You do not need Windows for that, just make a bootable USB disk with UnetBootin from which you'll simply run the BIOS exec downloaded off Dell Web site. The downgrade process normally requires to 1st revert to the oldest possible version like A01/A02/A03 before upgrading to the last known version with which graphics are Ok (often A11 or A12). If you can post your extracted/raw DSDT, we can certainly patch it for you.
-
Specs? Installation method? Boot pack used?
-
What is expected from you is that you make the summary of your system's hardware specs. Eg: BIOS: 1.3.5 Chipset: Intel 110 Skylake PCH-H (100 Series/C230) CPU: Intel quad-core Skylake i5-6500 @3.2GHz (Turbo boost to 3.6GHz) Graphics: Intel HD 530 (Skylake-S GT2, 8086:1912) RAM: 8GB DDR3-1600 Storage: SATA III 128GB SSD Audio: Intel HDA based on Realtek ALC255 codec (10EC:0255) LAN: RealTek RTL8168/8111 Gigabit Ethernet (10EC:8168) Wireless: ? Bluetooth: ? SD card reader: ? USB: 4 x USB2.0/ 4 x USB3.0 ports
-
Please specify: system's hardware specs bootloader used bootloader parameters (post compressed EFI folder if Clover and compressed Extra folder if Enoch)
-
Add-on kexts are better placed in /Library/Extensions from where they can be cached, as opposed to EFI/CLOVER/kexts/10.12 (or EFI/CLOVER/kexts/other) from where they are injected at boot time. For patched AppleHDA (IDT 92HD90), you may want to opt for Clover on-the-fly Sierra patches which are OS X updates resilient. Find: 8419D411 Replace by: 00000000 Find: 8A19D411 Replace by: 00000000 Find: 8B19D411 Replace by: E7761D11 Your Clover config actually includes on-the-fly patches for AppleHDA whilst, at the same time, you use a pre-patched kext to replace the vanilla one. You should be using either/or but not both. On-the-fly patches will clearly have no effect on a pre-patched kext. For 2nd/final stage boot glitch fix, you've also kept an obsolete on-the-fly patch for IOGraphicsFamily. For Sierra, the patch should be: Find : 0100007525 Replace : 01000EB25 I think your Clover Config.plist is Jake's version from his Latitude/Inspiron/Precision El Capitan Clover guide.
-
Yes. And don't forget to check your DSDT HDEF device.
-
IDT92HD90 is same audio codec as fitted to the Latitude E6x20 Series. As such, you should be able to re-use the same AppleHDA patch as used on those. You can grab the IDT definition kext + patched AppleHDA kext as posted in the pack of my E6220 Sierra guide with no AppleHDA patches in the Clover config.plist. Check the DSDT too for HDEF device patch. If you prefer to use Clover on-the-fly patches rather than pre-patched AppleHDA kext, the Sierra patch includes the following mods: Find: 8419D411 Replace by: 00000000 Find: 8A19D411 Replace by: 00000000 Find: Replace by: 8B19D411 Replace by: E7761D11
-
Everything seems pretty accurate to me. What do you think would be incorrect? If you want a tuned FakeSMC, you may grab the kext included in the pack of my E6230 guide.
-
Not here but check the wiki at IM.
-
Well, yes that can happen but in the case of the GT610, it was 1st supported in ML 10.8.2 and all the way to Yosemite afaik. I have one in my Vostro200 but that's a retired system for OS X since the HDD died several years ago and I never bothered to replace it. If it's no longer working, it's highly unlikely to be supported again though one should never say never...
-
Why don't you use the DSDT of an existing guide/pack? That specific Sonix webcam model is not supported, no; others are but just not this one. No DSDT patching for USB devices... https://osxlatitude.com/index.php?/topic/6503-dell-latitude-e6320-with-i5-2520m-hd3000-and-1366x768-lcd-mavericks/&do=findComment&comment=41999 'kinda unfair, I know, especially as the following Sonix models work OOB: 0c45:648b (E6230) 0c45:649d (E6440)
-
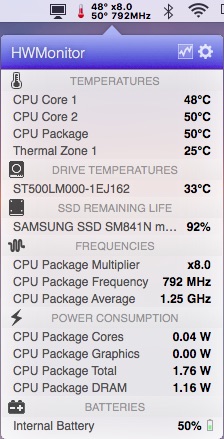
You can ignore the SSDT warning, it happens with many IvyBridge platforms (I get the same on my E6230). If you've installed FakeSMC with all its PlugIns, you can use HWMonitor app to monitor CPU T° + SpeedStep.

-

Moving from Chameleon/Mavericks to Clover/Sierra on Dell XPS 210
Hervé replied to sbhachu's topic in The Archive
Install HWMonitor app if you want to verify CPU SpeedStepping. Kozlek publishes a new version with each new FakeSMC build. Look up his repo(s) through Google search. -
TouchPad PrefPane works fine on my Dell E Series laptops... Make sure to adjust your settings then use the provided script to retain them at reboot. What is it that you find "unstable"?
-
With erroneous Arg lines removed. DSDT.aml.zip For the rest, you'll have to provide/list your full system's hardware specifications.
-
D620: Lion Mostly Working But No Sound or PC Card Slot?
Hervé replied to cc333's topic in The Archive
No, that's not possible. If you absolutely need PC Cards support, then 10.6.6 will be your limit. -
[SOLVED] E6230 - Does not sleep on lid close (Sierra)
Hervé replied to ryanswj's topic in The Archive
Fn-F1 shuts down my E6230 under Sierra. Last time I encountered a similar behaviour, it was on the E6440 and I fixed it with a mod of the CPU-specific generated SSDT. https://osxlatitude.com/index.php?/topic/7387-dell-latitude-e6440-with-i5-4300m-hd4600-and-1600x900-lcd-mavericksyosemite/page-2&do=findComment&comment=47969 https://osxlatitude.com/index.php?/topic/7387-dell-latitude-e6440-with-i5-4300m-hd4600-and-1600x900-lcd-mavericksyosemite/page-2&do=findComment&comment=48339 https://osxlatitude.com/index.php?/topic/7387-dell-latitude-e6440-with-i5-4300m-hd4600-and-1600x900-lcd-mavericksyosemite/page-2&do=findComment&comment=48426 Closing the lid or clicking Apple menu->Sleep does put laptop to sleep however. Make sure you've set hibernation mode to 0 (i.e. disable hibernation and set system for plain old sleep) through Terminal commands: sudo pmset hibernatemode 0 sudo pmset hibernatefile /dev/null sudo rm -f /var/vm/sleepimage ` Il the laptop does not seem to detect lid closure/opening, check that the sensor is properly connected to the motherboard. I had a similar issue on my E6220 when I 1st got it and the lid sensor was disconnected. You'll have to open up the laptop to check it out. If memory serves me right, the sensor is located in the left corner, near the SD card reader. Do check the hardware maintenance manual available off Dell's web site, it's got all instructions to dismantle and refit the laptop. -
Please use Google to seek what you need. For instance, with a 3mins search: http://consumer.huawei.com/br/support/downloads/detail/index.htm?id=55243 Then, you'll have to verify that your specific module can be supported under OS X...
-
Dell XPS L502X - Yosemite (10.10.5) w/Clover, need help on a few items
Hervé replied to JDLopez's topic in The Archive
I played a little with Mavericks on a HP EliteBook 8560W a couple of years ago. It was fitted with the same JMicron SD card reader as in your XPS L502X and I found no working solution for it at the time. https://osxlatitude.com/index.php?/topic/6536-hp-elitebook-8560w-with-i7-2630qm-nvidia-quadro-1000m-and-1920x1080-lcd-mavericks/ Since then, we've become aware of the DSDT patch where a _DSM Method can be added the SD card reader device in order to declare compatibility with Apple's own card reader (Broadcom 14e4:16bc). If you can identify your SD card reader in IOReg, you could try the patch. If it still does not work, consider it a dead-end. -
'seems like you've got yourself into a configuration where you did not install Enoch with default settings and, instead, got yourself into a complicated configuration. My guide just never mentions the hidden EFI partition and quite explicitely state to copy the /Extra folder at the root of the OS X partition. The guide also states to install Enoch without any further form of details, i.e. use the default settings. Please try and follow the instructions detailed in the guides and don't go look for options that are not even mentioned.
-
Chameleon/Enoch only loads the o.c.B.plist and Themes from /Extra. Are you sure you followed the guide and used the posted files?
-
Should look something like this: <?xml version="1.0" encoding="UTF-8"?><!DOCTYPE plist PUBLIC "-//Apple//DTD PLIST 1.0//EN" "http://www.apple.com/DTDs/PropertyList-1.0.dtd"> <plist version="1.0"> <dict> <key>CsrActiveConfig</key> <string>3</string> <key>DropSSDT</key> <string>Yes</string> <key>EthernetBuiltIn</key> <string>Yes</string> <key>Graphics Mode</key> <string>1366x768x32</string> <key>GraphicsEnabler</key> <string>Yes</string> <key>Kernel Flags</key> <string>kext-dev-mode=1 darkwake=0</string> <key>PrivateData</key> <string>No</string> <key>Quiet Boot</key> <string>Yes</string> <key>SystemType</key> <string>2</string> <key>Theme</key> <string>Default</string> <key>UseKernelCache</key> <string>Yes</string> </dict> </plist>
-
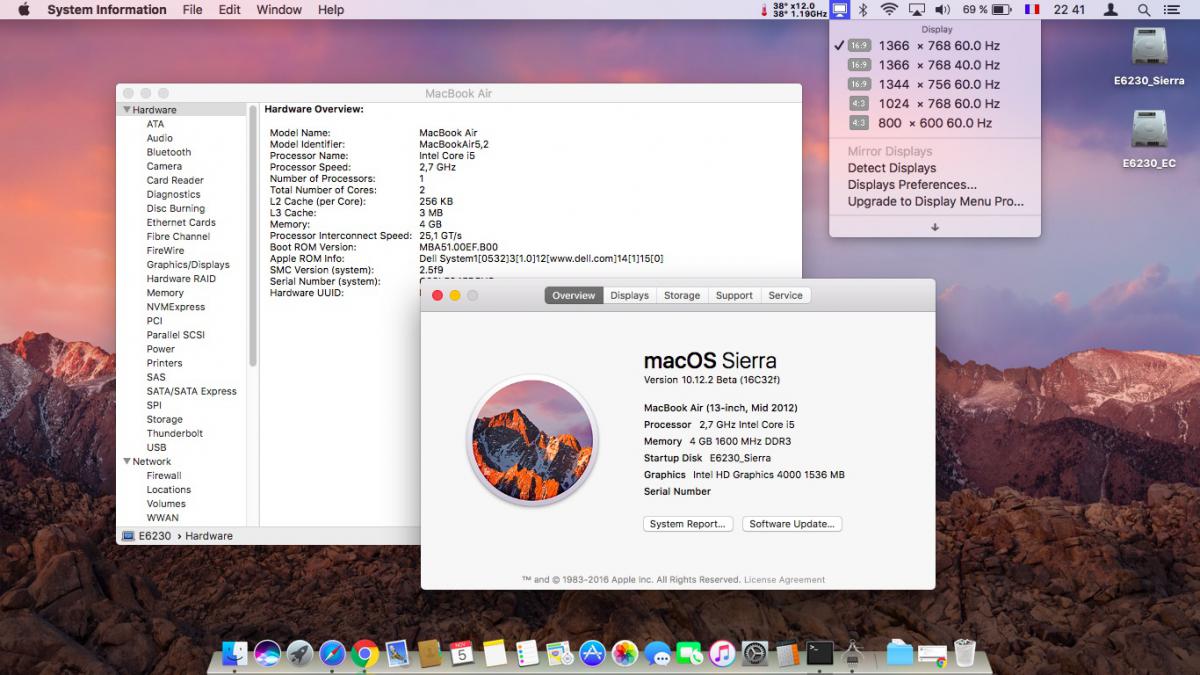
Last update: 09 Feb 2017 Target macOS release: Sierra 10.12.x This is an Enoch-based installation using the well-known/well-documented vanilla manual method detailed below: Working: full QE/CI with HD4000 graphics (with DSDT patch for Capri FB #3) HDMI output OOB DVI + DP output OOB through port replicator E-Port K07A002 full audio, including jack microphone input and headset output (with patched AppleHDA kext) HDMI audio (with patched AppleIntelFrameBufferCapri kext) built-in Gigabit Ethernet (with AppleIntelE1000e kext v3.1.0) DW380 bluetooth (with Broadcom BT transport kext patch or Rehabman's BrcmFirmwareRepo + BrcmPatchRAM2 kexts) native speedstep (with tuned Kozlek's FakeSMC (SMC keys=2.5f9/SMC compatible=smc-huronriver) and MBA5,2 SMBIOS profile) Turbo boost to x34 3.4GHz (getting CPU multipliers x12/13/14/15/16/17/18/19/20/21/22/23/25/26/27 + Turbo multipliers x28/29/30/31/32/33/34 according to Pike R Alpha's AppleIntelInfo output) sleep & wake (with DSDT patch for EHCx/XHC/HDEF/GLAN _PRW; sleeps Ok on Energy Savings settings/Fn-F1/Apple menu option/power button/lid closure; wakes Ok through lid opening/power button wireless with any compatible card battery management and monitoring (with ACPIBatteryManager kext v1.60.5/1.70.0) SD card reader (with DSDT patch for compatibility with Apple's default reader) integrated webcam OOB keyboard backlight control OOB (for backlit models) left combo eSATA+USB2.0 + right USB3.0 ports OOB Express card slot OOB Not Working: VGA output unsupported Not tested: SmartCard reader fingerprint scanner 1) 10.12 USB installer creation Double click on InstallESD.dmg found in Install macOS Sierra.app/Contents/SharedSupport to mount the dmg image Then mount BaseSystem.dmg (hidden file) open /Volumes/OS\ X\ Install\ ESD/BaseSystem.dmg Use Disk Utility to restore the contents of BaseSystem.dmg on a USB key (or HDD partition) formatted Mac OS extended (journaled). Remove link for Packages in folder System/Installation of your USB key rm /Volumes/OS\ X\ Base\ System\ 1/System/Installation/Packages Copy folder Packages located in InstallESD.dmg to folder System/Installation of your USB key cp -R /Volumes/OS\ X\ Install\ ESD/Packages /Volumes/OS\ X\ Base\ System\ 1/System/Installation Copy the 2 hidden files (BaseSystem.dmg & Basesystem.chunklist) of InstallESD.dmg to the root of your USB key cp /Volumes/OS\ X\ Install\ ESD/BaseSystem.* /Volumes/OS\ X\ Base\ System\ 1 Install Enoch r2839 r2848 (latest at time of update ) on the USB installer with all default settings attachment=11914:Enoch-rev.2839.pkg.zip Enoch-rev.2848.pkg.zip Copy the above Enoch r2839 r2848 installer package to the root of the USB installer Copy the following (unzipped/extracted) E6230 bootpack to the root of the USB installer E6230_i5-3340M_HD4000_Sierra_Pack.zip E6230_i5-3340M_HD4000_Sierra_Pack_#2.zip E6230_i5-3340M_HD4000_Sierra-Pack_#3.zip If your E6230 is fitted with a different CPU that the i5-3340M, delete the SSDT.aml table from the bootpack; you'll generate the suitable one later. Create a folder called Kernels under /System/Library (normally, it won't exist at that stage) Copy the appropriate Sierra kernel to /System/Library/Kernels. Copies of the kernels are available here 2) 10.12 installation Boot the 10.12 USB installer (it may take a little time to kick in) with -f -v boot flags At macOS installer main screen, open up Disk Utility in Utilities menu If applicable, partition your target disk in GPT/GUID scheme Create your target 10.12 partition and format it as OS X Extended (Journaled) Close Disk Utility and proceed with macOS 10.12 installation as usual 3) Post-installation fine-tuning Reboot the 10.12 USB installer (it may take a little time to kick in) At macOS installer main screen, open up Terminal in Utilities menu Verify CoreStorage installation disk mode diskutil list If CoreStorage activated for Fusion drive (i.e. presence of a logical disk), revert to legacy mode diskutil corestorage revert <device> (for example: /dev/disk1) Identify your freshly made 10.12 partition name df Copy the Extra folder from the USB installer to your identified 10.12 disk partition cp -R /Extra /Volumes/<your fresly made 10.12 partition name> (for example: cp -R /Extra /Volumes/OSX_disk) Reboot the 10.12 USB installer, press a key at delay bar (or F8) to interrupt boor process and select your freshly made 10.12 disk partition. You'll then be booting Sierra for the 1st time Complete the 1st boot installation finalisation Once at the 10.12 desktop, run the Enoch r2839 r2848 package from your USB installer to install Enoch on your HDD; it should be installed on the 1st partition of the disk Eject the 10.12 USB installer and put it aside Disable hibernation (can be done later, but should be done): open up Terminal and type the following commands sudo pmset hibernatemode 0 sudo pmset hibernatefile /dev/null sudo rm -f /var/vm/sleepimage Copy the appropriate Sierra patched AICPUPM kext to /System/Library/Extensions. Copies of the kext are available here copy all kexts except NullCPUPowerManagement from /Extra/Extensions to /Library/Extensions (ignore and acknowledge the permissions-related error messages) copy patched AppleHDA from /Extra/Extensions/Copy_to_SLE to /System/Library/Extensions (ignore and acknowledge the permissions-related error messages) repair kexts permissions and rebuild cache (if you end up with "Error 77..." message, repeat the touch + kextcache commands) sudo chmod -Rf 755 /S*/L*/E* sudo chown -Rf 0:0 /S*/L*/E* sudo chmod -Rf 755 /L*/E* sudo chown -Rf 0:0 /L*/E* sudo touch -f /S*/L*/E* sudo touch -f /L*/E* sudo kextcache -Boot -U / Edit /Extra/kernel.plist and set KernelBooter_kexts parameter to No <key>KernelBooter_kexts</key> <string>No</string> If your E6230 is fitted with a different CPU than the i5-3340M, download Pike R Alpha's SSDT generator tool and generate your own CPU-specific SSDT. Copy the resulting SSDT.aml file to /Extra folder (it's normally prompted by the tool). Reboot your finalised Sierra installation Please note that: Loading injected kexts from /E/E with boot option KernelBooter_kexts=Yes is slower than loading cached kexts placed in /S/L/E or /L/E. After any kexts modification, whether to /S/L/E or to /L/E, repair permissions and rebuild cache as detailed above. At each Sierra version update: type option KernelBooter_kexts=Yes at 1st reboot to boot with NullCPUPM from /E/E or you'll encounter CPU PM-related KP once new Sierra version installation has completed, replace vanilla AICPUPM in /S/L/E by the corresponding patched version, repair kexts permissions and rebuild cache In Sierra, the AppleHDA binary patch for codec IDT 92HD93 consists of: replace 8419D411 by 00000000 (2 x instances if you manually patch the kext) replace 8A19D411 by 00000000 (2 x instances if you manually patch the kext) replace 8B19D411 by DF761D11 (2 x instances if you manually patch the kext) Other E6230 laptops fitted with a different CPU will require a different (and suitable) SSDT table than provided in the above pack (can be looked up on the web or created with Pike R Alpha's SSDT generator tool). In such cases and in order to avoid CPU power management-related kernel panics (KP), NullCPUPowerManagement kext (available in folder RemovedExtensions of bootpack) is required until the CPU-specific SSDT is generated. The kext just needs to be added to /Library/Extensions followed by permissions repair/cache rebuild. - - - - - - - - - - Edit #1: 06 Feb 2017 Updated pack #2 with revised DSDT and kexts: PNLF device _UID value changed from 0x0E to 0x0A to provide vanilla brightness control. IntelBacklight kext removed as a result Added PCIID_XHCIMux kext to support USB3.0/USB2.0 port multiplexing Added Shiki kext to fix iTunes green video issue on HD4000 iGPU Added EAPDFix kext to better support headphones hot-plugging Added IOAHCISerialATAPI_injector dummy kext (can also be injected to FakeSMC) to fix DVDPlayer launch error Newer ACPIBatteryManager kext v1.70.2 Newer patched Capri FB kext v10.22.29 Added CodecCommander to kexts destined to SLE to better support headphones hot-plugging Added optional Broadcom BT firmware patching kexts to kexts destined to SLE A choice of SMBIOS profiles and associated tuned FakeSMC: MBA5,2 or MBP9,2 New Enoch version r2848 that fixes a Sierra bug when injecting kexts from /E/E (previously required -f flag to boot without cache) - - - - - - - - - - Edit #2: 09 Feb 2017 Updated pack #3 with Shiki kext removed as it can trigger KP when booting USB installer. To be installed as post-installation tuning if necessary. Shiki.kext.zip Replaced Enoch older version r2839 with latest r2848 that fixes a bug for kexts injection with KernelBooter_kexts boot parameter - - - - - - - - - - Edit #3: 21 Jan 2018 Latest Security Update may cause KP on reboot if an older Shiki kext (like v1.8.9) is installed. Make sure to update the kext to latest version. https://github.com/vit9696/Shiki/releases
-
The Themes folder inside /Extra in all likelihood. You can grab it from the pack posted here.