
Leaderboard


Popular Content
Showing content with the highest reputation since 05/07/23 in Posts
-
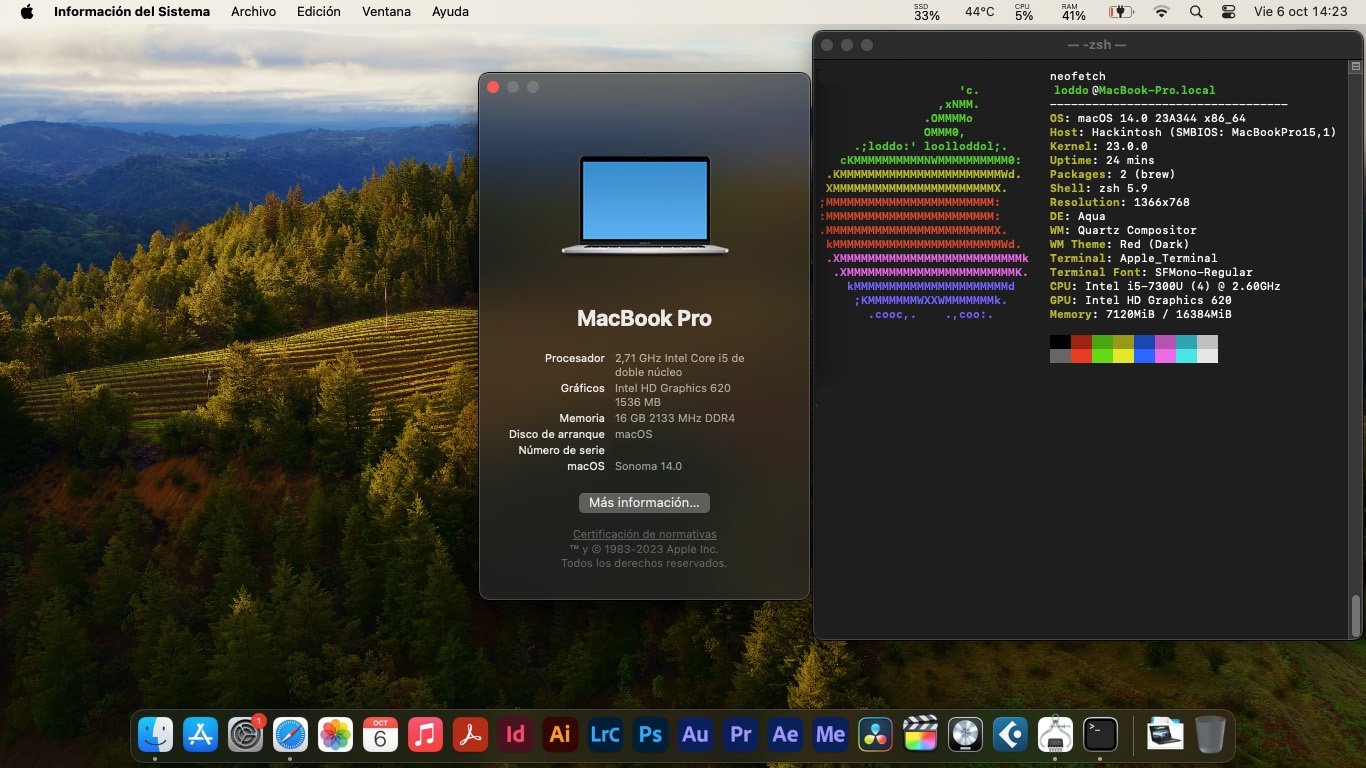
Laptop Specs: Intel Core i5 7300U RAM: 16 GB 2133 MHz DDR4 Graphics: Intel HD Graphics 620 SSD: 1Tb (macOS) SMBIOS: MacbookPro 15,1 Working: Graphic acceleration Brightness control Keyboard brightness control Wifi and Bluetooth: Intel Bluetooth and intel AirportItlwm All USB-C and USB3 (type-A) ports Video over USB-C Audio, incl. integrated microphone Sleep Ethernet HDMI output Touchpad Integrated camera Card reader MacBook Pro 15,1.ioreg WARNING: Generate your own SMBIOS EFI zip part 1: EFI_Sonoma_7280 2.zip to extract add to de file format .001 (EFI_Sonoma_7280_2.zip.001) EFI zip part 2: EFI_Sonoma_7280 2.zip to extract add to the file format .002 (EFI_Sonoma_7280_2.zip.002) I couldn't upload the full EFI here because the file is too large but you can download it here: https://mega.nz/file/xlhjlTjb#zCu_C5_k1pR6zqOXnVERUHdJjqHSA_JxYpvTOke5yn4 Enjoy! EFI_Sonoma_7280_1.zip
 3 points
 -
Revised wireless kexts for Sonoma 14.4, the previous ones not providing wifi service beyond Sonoma 14.3. OCLP 1.4.1 or later required too. Wifi_kexts_Sonoma_14.4.zip2 points
-
Just replace the SSDT in the E7470 with E7270 from my Ventura guide2 points
-
List of dropped platforms extends to Intel 7th gen. Kaby Lake this year, yet KBL graphics drivers are retained to support ABL graphics (2018 MacBook Air8,1). This is good omen for Kaby Lake platforms of course but especially for Skylake platforms that are able to re-use the same tricks used for Ventura, i.e. fake a KBL iGPU id and call on a KBL framebuffer. At least in this 1st beta version.... Bad news on the wireless front: IO80211FamilyLegacy kext is gone and, with it, native support for Broadcom cards based on BCM4350 and BCM4360 chipsets which includes DW1820A and all those Apple BCM94360xxx that we could use up to Ventura. We'll see if this can somehow be addressed through a patch of some sort. Interestingly enough, support for Broadcom Bluetooth appears to remain untouched, at least as far as the BT module of the Apple BCM94360CS2 card is concerned. Meantime, I called on an old TP-Link TL-WN725N v3 Wireless N Nano USB adapter that I had lying around. It's crap (802.11n 150Mbps) but will do for the moment. It's based on Realtek chipset RTL8188EUS (PCI id 0bda:8179). Other than that, nothing to report after just a brief spell with Sonoma 1st beta. Installation on my Skylake Latitude E7270 was pretty much painless: from Ventura, I updated Clover to r5151 (just in case), updated my add-on kexts to latest versions (Lilu & PlugIns mostly) and, in my Ventura Clover config, changed SMBIOS to MBP15,2 (necessary) and added boot arg -lilubetaall (also necessary). I then rebooted Ventura and launched the Sonoma installation package. Upon completion, I found that LAN, audio and external video outputs worked better if I used the combined boot args -lilubeta -wegbeta -alcbeta instead of single boot arg -lilubetaall. NB: Sonoma boots/works the same way if, instead of SMBIOS MBP15,2, I boot it with SMBIOS MBP13,1/MBP14,1 and add -no_compat_check boot arg. Avoid MBP15,1 on Skylake laptops, it prevents external video outputs for instance. Working: graphics acceleration with same KBL settings as in Ventura brightness control HDMI output mini-DP output touchscreen audio (incl. DP/HDMI audio) LAN Apple (Broadcom) BCM94360CS2 Bluetooth but a bit erratic at times (on startup and after wake) touchPad USB ports sleep wake but troublesome if hibernation is disabled so it's best to leave things untouched for the moment SD card reader Not working: Apple (Broadcom) BCM94360CS2 wireless
2 points
-
There's so much non-sense (not to say worse) said and written all over the Hackintosh forums again with this forthcoming new release, I sometimes long for the death of Hackintosh so that it all stops once and for all. Sonoma 1st beta is hardly out that, once again, the weeping divas (who should all have accompanied Silvio Berlusconi's last concubine at his funeral to show their expertise on the matter) are at it! Among them, we find those whose life is being torn apart by Apple because they've lost Wifi with (unreleased) Sonoma, those who cry foul at Apple's renewed attacks against Hackintoshers, those who predict millions of business loss for Apple and those who just speak out of their arse (latter probably being a good summary of all the others)! This time, it's all about Broadcom wireless cards... So what's the situation? Well, it's very simple: Apple has completed its migration to Apple Silicon, the last Intel model (MacPro7,1) has been dropped. So, all those who write about "when Apple complete their migration" need a serious awakening. It's done boys, it's done! And exactly as expected... The last (Intel) Mac platforms that used Broadcom cards based on BCM4350 or BCM4360 are dropped. As such, Apple no longer intends to provide drivers, just as they do for dropped GPUs. It should come to no surprise to anyone, it's the way Apple has worked for the last... 11 years (remember Mountain Lion in 2012 ?) not to say more (14 years, if we consider the way PPC platforms were dropped in 2009 with the release of Snow Leopard). I've seen here and there so-called Hackintosh experts/gurus writing they believe Apple dropped the Broadcom legacy cards because the platforms supported by Sonoma don't even have Broadcom wireless inside, then that they have Broadcom wireless therefore support for older cards will return. That's a good example of what I mean about people talking out of their arse. Let's recap a few things here: Sonoma 1st beta officially drops 7th gen. Kaby Lake platforms (on top of older ones of course) but, for the moment, retains KBL graphics drivers. Why? Simple: because it's required to support Amber Lake UHD617 graphics of MBA8,1. Sonoma 1st beta drops Broadcom legacy 802.11ac wireless chipsets that Ventura still supported through IO80211FamilyLegacy kext: 14e4:43ba, 14e4:43a3 and 14e4:43a0, i.e. BCM43602, BCM4350 and BCM4360. Big Sur had already dropped support for the last 802.11bgn cards that Apple had retained up to Catalina. Supporting those older 802.11ac chipsets through a kext bearing the name "legacy" since macOS Monterey should have been quite an obvious hint in itself as far as what the future held... Sonoma 1st beta supports only the following Broadcom chipsets: 14e4:43dc, 14e4:4464, 14e4:4488, 14e4:4425, 14e4:4433 and 14e4:4434, i.e. BCM4355 (802.11ac), BCM4364 (802.11ac), BCM4377b (802.11ac), BCM4378 (802.11ax), BCM4387 (802.11ax) and BCM4388 (802.11ax). Afaik, all those are provided as specific SOCs to Apple by Broadcom, i.e. chips to be soldered on Apple motherboards and not available on add-on mini-PCIe/M.2 cards. https://wikidevi.wi-cat.ru/Broadcom With regards to the wireless chipsets fitted to Intel Mac platforms supported by Sonoma, it's as follows: 2018 Mac mini8,1 -> BCM4364 (pci14e4,4464) 2018/2019 MacBookAir8,x -> BCM4355 (pci14e4,43dc) 2020 MacBookAir9,1 -> BCM4377b (pci14e4,4488) 2018/2019 MacBookPro15,x -> BCM4364 (pci14e4,4464) 2019/2020 MacBookPro16,x -> BCM4364 (pci14e4,4464) 2019 iMac19,x -> BCM4364 (pci14e4,4464) 2020 iMac20,x -> BCM4364 (pci14e4,4464) 2017 iMacPro1,1 -> BCM4355 (pci14e4,43dc) 2019 MacPro7,1 -> BCM4364 (pci14e4,4464) Let's hope the weeping divas and would-be experts/gurus can put 2 and 2 together...2 points
-
AppleALC.kext.zip use this with layout 33 and uninstall previus version alcplugfix, remove codec commander kext, add bootargs alc-verbs=1 reboot and install this version ALCPlugFix-installer-ALC295.zip cd to folder and: sh install.sh work on all dell with alc2951 point
-
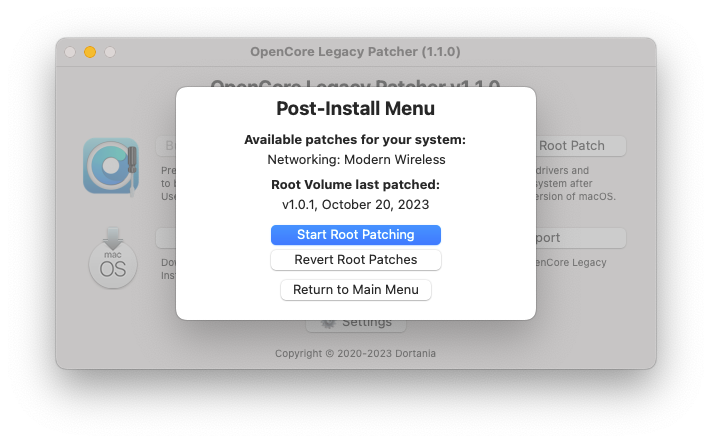
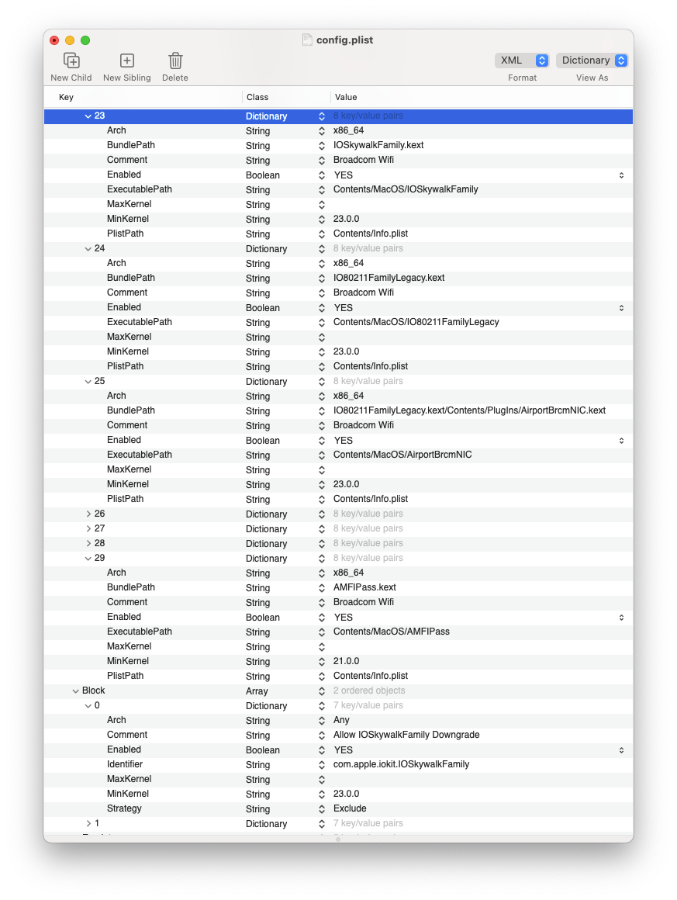
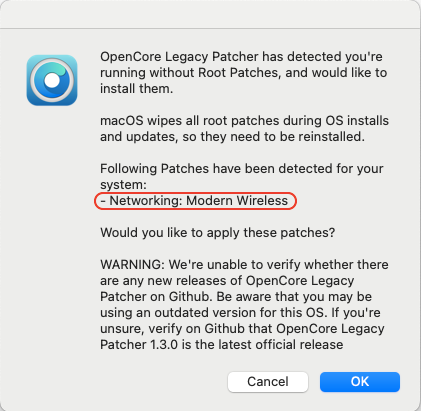
Wifi in Sonoma: Patching for legacy Broadcom wireless cards Sonoma has dropped support for our beloved legacy Broadcom wireless devices (DW1560, DW1820A, DW1830). If you opt for a legacy BCM4352, BCM4360 or BCM43602 wireless card, you'll need to apply OCLP root patches and boot with OpenCore in order to bypass vanilla IOSkywalkFamily kext and inject replacement IOSkywalkFamily+ IO80211FamilyLegacy kexts. Assuming you have a working Broadcom wireless config prior to upgrading to Sonoma. the following steps are added: 1) Download latest OCLP (v1.1.0 at time of writing) 2) Download the necessary kexts (attached below) 3) Configure the following in your Config file a) System Integrity Protection is set to 0x803 csr-active-config | data | 03080000 b) Reset NVRAM or add csr-active-config to Delete to ensure the new variable is set c) Secure Boot Model is set to Disabled d) Following kexts are blocked: i) com.apple.iokit.IOSkywalkFamily Set the Strategy of the blocked kext to "Exclude" a) Set MinKernel to 23.0.0 to ensure patches only apply on Sonoma e) Following kexts are injected in these order: i) IOSkywalk.kext a) Set MinKernel to 23.0.0 to ensure patches only apply on Sonoma ii) IO80211FamilyLegacy.kext a) Set MinKernel to 23.0.0 to ensure patches only apply on Sonoma iii) IO80211FamilyLegacy.kext has a plugin, AirPortBrcmNIC.kext, ensure this is injected as well a) Set MinKernel to 23.0.0 to ensure patches only apply on Sonoma iv) AMFIPass.kext f) add to bootarg i) -amfipassbeta 4) Once these are injected, you can run OpenCore-Patcher's Post-Install option and root patch. Systen will reboot after patching is done. On reboot, Wireless support should be restored assuming your machine was configured correctly to the above." Necessary Kexts Kexts.zip References: https://osxlatitude.com/forums/topic/19456-oclp-patcher-support-for-legacy-broadcom-wireless-cards-in-sonoma https://www.insanelymac.com/forum/topic/357087-macos-sonoma-wireless-issues-discussion/?do=findComment&comment=2812059 https://github.com/dortania/OpenCore-Legacy-Patcher/blob/e21efa975c0cf228cb36e81a974bc6b4c27c7807/payloads/Config/config.plist#L1695-L1710 https://dortania.github.io/OpenCore-Legacy-Patcher/
1 point
-
Hello, I am the owner of an HP 250 G6 laptop with I5-7200U 12GB HD i620 (graphics) with Big Sur installed but now I am looking for an EFI for my laptop but I cannot find one even though it is Kaby Lake. Is there anyone who has it here? Thanks and regards. PS: I put my EFI here. EFI BIG SUR1 point
-
Unfortunately I no longer have this PC in my hands. I generated new ACPI files for compatibility with the new Bios, but Ventura and Sonoma I was unable to install them for users I followed. I hope to get this PC back soon so I can fix this problem.1 point
-
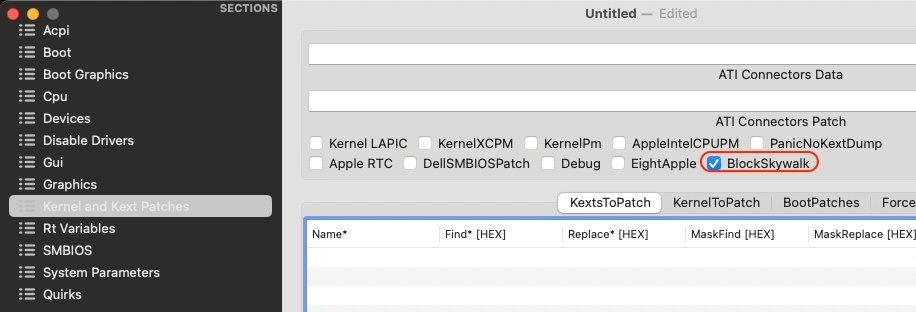
Further to my communication of July 2023 and Jake Lo's post above, I can confirm that Clover r5157 now supports blocking of vanilla kext IOSkywalkFamily kext which is required to support and use "legacy" wireless cards in Sonoma, i.e. cards that worked perfectly, natively or not, up to Ventura. This is basically equivalent to the kext exclusion available in OpenCore but limited to IOSkywalkFamily kext. The blocking is available as kext patch called BlockSkywalk and is integrated to latest versions of CloverConfigurator too. Process with Clover is therefore as follows: update or install Clover r5157 (versions r5155 and r5156 are supposed to provide the patch too but I found that it was not working and resulted in a freeze at startup) apply/enable Kernel & Kexts patch BlockSkywalk in your Clover config either add boot arg -amfi_get_out_of_way=1 in your config or add AMFIPass kext provided above by Jake to your kexts/14 or kexts/Other Clover folder and add boot arg -amfipassbeta boot arg in your Clover config add kexts IOSkywalk (renamed copy of older version of IOSkywakFamily kext) and IO80211FamilyLegacy kexts provided above by Jake to your kexts/14 or kexts/Other Clover folder you can keep SIP disabled with CsrActiveConfig set to 0xFEF, I found there was no need to change to, say, 0x803 install and run OCLP Patcher and apply Networking: modern wireless or Networking legacy wireless (depending on the card) root patch which should be automatically offered reboot and enjoy recovered wireless services out of your PCIe wireless card Clover_r5157.pkg.zip Clover Configurator.zip Example with the Apple BCM94360CS2 card fitted with an adapter board to the M.2 WLAN slot of my Dell Latitude E7270: or (as text): <key>BlockSkywalk</key> <true/>
1 point
-
MyHack v3.3.1 carrying bugs for Snow Leopard installations; use older version v3.1.2 instead. myHack_v3.1.2.zip myHack-3.3.1.dmg.zip NB: Those versions can only be run on OS X versions up to Mavericks. They cannot be run on Yosemite and later.1 point
-
Hi Thank you Baio77 for your EFI. It works with Big Sure but without wifi. Is there any chance to share the newest EFI with drivers for Sonoma OSX, please? I have ThinkPad x1 Yoga 5th gen 20UC-SOYBOA and is not easy to find anything for this model prebuilt on the internet. Thank you for your help.1 point
-
try updating the OC version and kexts You can also try disabling SMCProcessor.kext in the Config file1 point
-
Renaming this thread as, even if there were an issue, it would in no way be a "Dell bug" ! Not seeing the basic specs of your selected Mac model under the "MacBook Pro" line (like size, year and TB ports) is likely to be linked to your bootloader settings. Do check them out. Nothing to do with laptop's BIOS for sure. Can't say more, you've not bothered to post any details of your Hackintosh setup whatsoever. This being said, it's such a minor matter, I wouldn't waste much time on it...1 point
-
REMINDER: As stated here, Sonoma drops all official support for Broadcom "legacy" wireless cards previously natively supported up to Ventura, the only hardware remaining natively supported being based on Apple proprietary Broadcom SOCs that aren't available to PCs/Hackintosh platforms. The only way to obtain wireless services on older Broadcom or Atheros cards is to patch Sonoma with OCLP patcher and apply all necessary/relevant properties & kext injections. Details available here. Intel cards are not impacted by this and require same 3rd party arrangement as before (ITLWM). As a result, this inventory will no longer be updated past Ventura which effectively froze the situation.1 point
-
Last macOS version to officially and natively support Haswell platforms and HD4600 graphics is Monterey. You may install and run Ventura orSonoma on your Haswell HP Probook 640 G1 laptop but not without OCLP patching to regain graphics acceleration for the deprecated iGPU. If you begin with a traditional macOS installation (which will be without graphics acceleration), make sure to use theSMBIOS of a supported model. You may look at our articles about Ventura & Sonoma to that effect. After initial installation, you may then apply OCLP patching for graphics acceleration and wireless/bluetooth (for which OCLP is totally mandatory). https://dortania.github.io/OpenCore-Legacy-Patcher/1 point
-
I already posted a guide and file in my guide above but haven't tested the Intel wireless.1 point
-
Ok, I understand better now... 'was not aware of those very specific MacBookPro updates. I don't believe trying to add the PCI id 10de:0407 to whatever kext is required at all. Your GeForce 8600M GT carries the same id as the nVidia GPU of the MacBookPro3,1. If you look into the Info.plist file of the NV50Hal kext, you should notice the presence of support for 0x040010de with mask 0xfff0ffff. That covers your GPU. I guess you probably need to inject the nVidia properties of your nVidia card into Tiger, either through your bootloader or through a DSDT patch or through an injector kext (like NVInject) if you still manage to find one after all those years. Those would basically inject those necessary properties like NVDA,Parent, ports description, etc. You'll find plenty of examples on Hackintosh forums or here in the Dortania documentation.1 point
-
Hmm. Afaik, Tiger lacks the required drivers for nVidia Tesla G8x/G9x. Support was introduced in Leopard 10.5 in which you'll find the necessary NV50 & associated GeForce kexts/drivers. So, no support for the GeForce 8600M of that Inspiron 1520 in 10.4.11. https://dortania.github.io/GPU-Buyers-Guide/legacy-gpus/legacy-nvidia.html#geforce-8-8xxx-series But I'm probably in the wrong given that, according to what I read, MBP3,1 with GeForce 8600M did indeed ship with Tiger 10.4.9. nVidia drivers in Tiger 10.4.11 (as seen in Pacifist with 10.4.11 combo update (Intel) dmg): nVidia drivers in Leopard 10.5.8 (as seen in Pacifist with 10.5.8 combo update dmg): If you lookup in SysProfiler/SysInfo->Software->Extensions of Leopard 10.5.8 (or later), you'll see the nVidia drivers that get loaded. You can then compare with what loads in Tiger. Given the years that have passed since Tiger, you're very unlikely to obtain support for this ancien release and, at OSXL, we only ever supported systems running Snow Leopard or later. This being said, you may find this MBP3,1 IOReg extract useful in troubleshooting your machine; but it was taken in Leopard 10.5.8, not Tiger... MacBookPro3_1-ioreg.zip
1 point
-
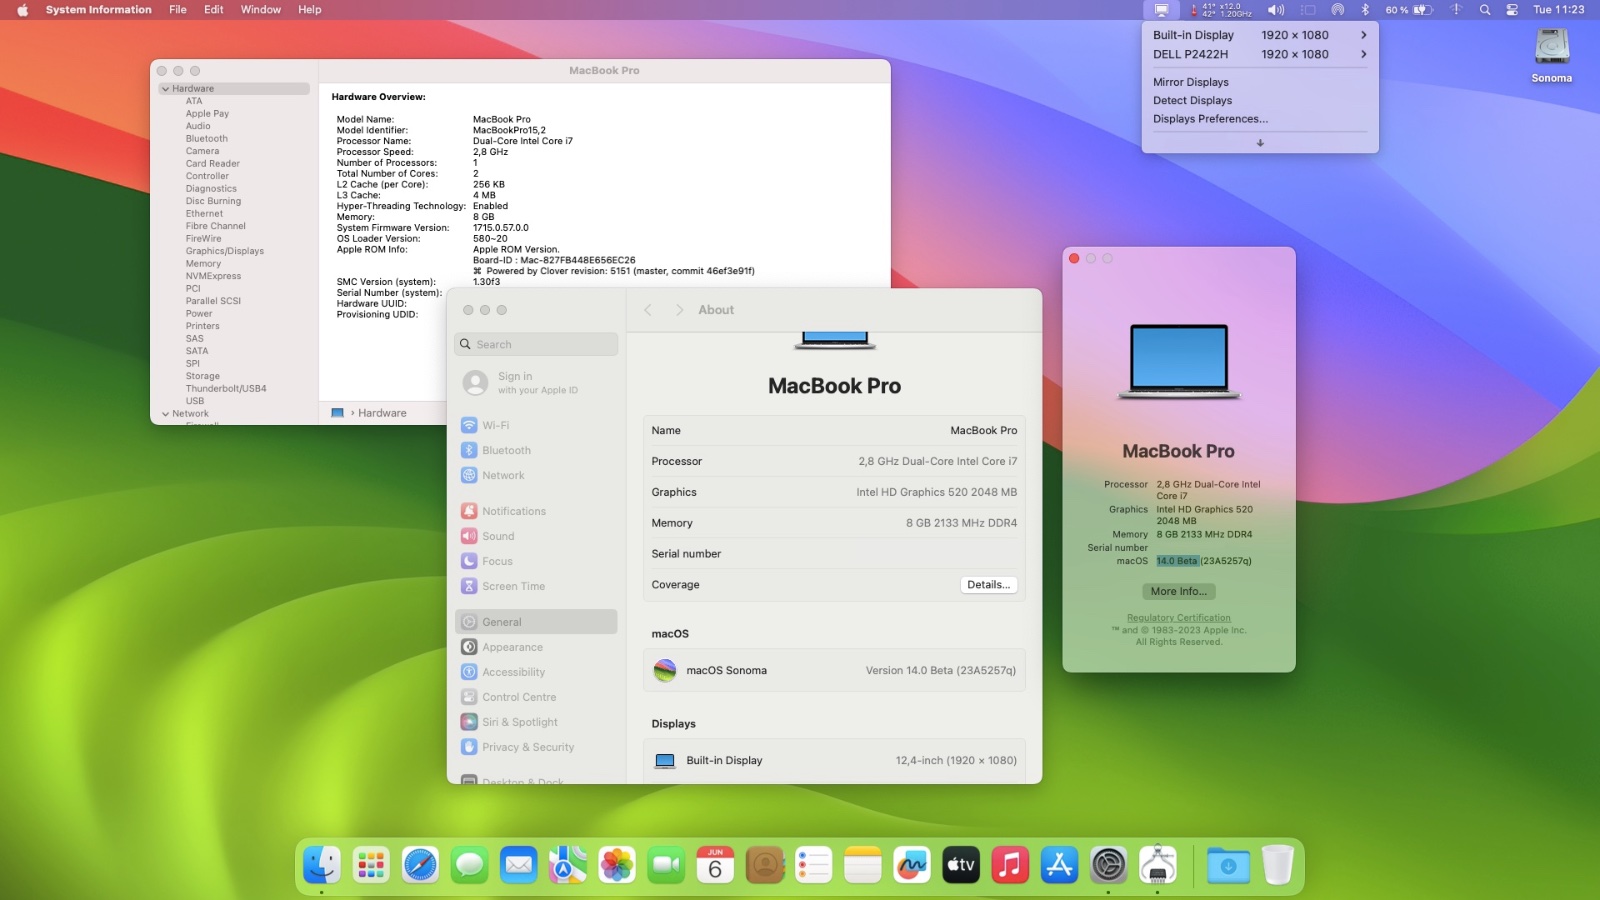
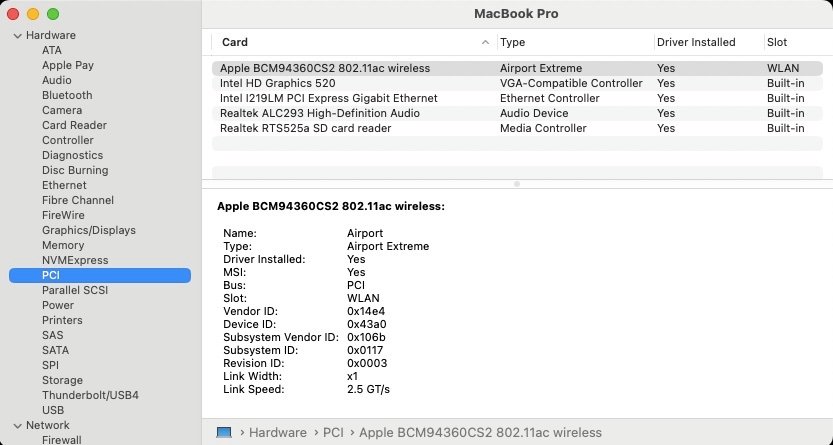
Target macOS release: Sonoma 14.x This is a Clover-based installation using the well-known/well documented vanilla method detailed below: Working: full QE/CI with HD520 graphics (with KBL layout 0x59160000, KBL faked id 0x5916, MBP15,2 SMBIOS and Whatevergreen kext v1.6.6 or later) HDMI output OOB but built-in LCD goes off on 1st cable connection. With WEG boot arg igfxonln=1, LCD picture is recovered after closing then re-opening the LID and HDMI is on at 1st boot & after wake mDP output OOB touchscreen with USB HID fix (patch of IOHIDFamily to fake single-user mode) due to Apple dropping support for old USB hardware full audio, including jack microphone input and headset output (with AppleALC kext & layout-id 11) HDMI audio (with KBL con1 connector-type patch) built-in Gigabit Ethernet (with IntelMausiEthernet kext) full CPU power management, including Turbo boost to 3.4GHz (with PlugIn type settings) sleep: Ok through Apple menu->Sleep, lid closure, power button, Fn-Insert and energy savings settings with hibernation mode set to 0 (sleep to RAM) and /var/vm/sleepimage file deleted. wake: Ok through lid opening and power button wireless & bluetooth with any compatible card/USB dongle (see footer note) battery management and monitoring (with ACPIBatteryManager kext) SD card reader (with 1Revenger1's RealtekCardReader kext) integrated webcam OOB keyboard backlight control OOB (for backlit models) audio volume control through Fn-F1/Fn-F2/Fn-F3 brightness control through Fn-F11/Fn-F12 touchpad basic features, incl. buttons (with Rehabman's VoodooPS2Controller kext) but not recognised in PrefPane USB3.0 ports (with Hackintool's generated USBPorts kext) Not Working: N/A Not tested: SmartCard reader macOS Sonoma not natively supporting platforms older than Amber Lake/Coffee Lake/UHD6x0, it cannot be natively installed and cannot natively run on the Skylake/HD520 Latitude E7270 as used to be the case for earlier versions of the OS up to Monterey. This can however be easily achieved by implementing the following settings which allow keeping a full vanilla installation without calling on add-on patches that would install older kexts, frameworks or other necessary files: use of Kaby Lake framebuffer 0x59160000 (0x591B0000 may also be used but requires further graphics connectors patching) fake Kaby Lake HD620 iGPU id 0x5916 use Coffee Lake platform SMBIOS MacBookPro15,2 use Whatevergreen v1.6.6/v1.6.7 minimum 1) 14.x USB installer creation Using a USB key of 16GB minimum, create a Sonoma USB installer through the following Terminal command: sudo <path>/Install\ macOS\ Sonoma.app/Contents/Resources/createinstallmedia --volume /Volumes/<USB key> where: <path> = location of Sonoma installation package (eg: /Applications if freshly downloaded) <USB key> = name of formatted USB volume (eg: USB_16GB) The process will take several minutes. Once completed: install Clover bootloader on the USB installer with the following customised settings: Clover for UEFI booting only Install Clover in the ESP UEFI Drivers Recommended drivers FSInject SMCHelper Human Interface Devices (optional) Ps2MouseDxe UsbMouseDxe FileSystem Drivers ApfsDriverLoader Memory fix drivers OpenRuntime Additional Drivers (optional) NvmExpressDxe PartitionDxe Themes (optional) BootLoaderChooser (optional) CloverConfigPlistValidator (optional) Install Clover Preference Pane (optional) you may use Clover version r5157 or later as attached below (version r5148 minimum but no support for legacy wireless cards before r5157) Clover_r5157.pkg.zip once Clover is installed, launch Clover Configurator app and mount the freshly created EFI partition of the USB installer (attached version supports BlockSkywalk kext patch) Clover Configurator.zip add the (unzipped) HFSPlus driver attached below to the EFI/CLOVER/drivers/UEFI folder HFSPlus.efi.zip open this EFI partition and transfer/copy the files & folders from the Latitude E7270 Sonoma Clover pack below to the EFI/CLOVER folder Clover_Pack_E7270_Sonoma.zip Clover_Pack_E7270_Sonoma_#2.zip Clover_Pack_E7270_Sonoma_#3.zip Clover_Pack_E7270_Sonoma_#4.zip 2) 14.x installation boot the Sonoma USB installer at the Clover main menu, select the "Install macOS Sonoma" partition (but don't press [ENTER]) press [SPACE], select -v verbose option in the menu, then choose to boot with the selected options proceed with installation, creating & formatting the target Sonoma installation through Disk Utility as/if required on 1st reboot, boot off the USB installer and select the freshly created "macOS install from <target Sonoma partition>" repeat this until this partition is no longer offered and only the target Sonoma partition is left to boot Reboot the target Sonoma partition via your USB installer 3) Post-installation tuning Once the target Sonoma partition has booted, complete the 1st boot configuration tuning Once at the desktop, install Clover bootloader on the Sonoma partition/disk with the customised settings listed above Once Clover is installed, launch Clover Configurator app and mount the freshly created EFI partition of the Sonoma partition/disk Open this EFI partition and transfer the files & folders from the above Latitude E7270 Sonoma Clover pack to the EFI/Clover folder You may then reboot and verify that Sonoma boots off your disk through Clover For wifi & Bluetooth, you may use any compatible add-on USB dongle. If you opt for a legacy BCM5350, BCM4360 or BCM43602 wireless card, you'll need to apply OCLP root patches and ensure you boot with Clover r5157 or later (or with OpenCore of course) in order to bypass vanilla IOSkywalkFamily kext and inject replacement IOSkywalkFamily+ IO80211FamilyLegacy kexts. The Clover config attached to the revised bootpack available above already contains the enabled BlockSkywalk kext patch to that effect and the replacement kexts to inject are provided in the kexts folder. Upon launching the OCLP patcher, you should be immediately asked to apply the relevant wireless root patches. See this thread for full details of the process. Edit: 17 Jan 2024 Replaced older Clover version r5153 with version r5157 that supports BlockSkywalk kext patch (required to support legacy wireless cards officially dropped in Sonoma) Revised bootpack with: modified SSDT-GPRW patched ACPI table to fix intermittent loss of Bluetooth on wake. modified Clover config to enable BlockSkywalk kext patch and add -amfi_get_out_of_my_way=1 boot arg added replacement IOSkywalkFamily + older IO80211FamilyLegacy kexts to kexts/Other folder for injection (required to support legacy wireless cards officially dropped in Sonoma) Edit: 10 Mar 2024 Revised bootpack #3 with new versions for wireless kexts required for Sonoma 14.4. Edit: 6 Apr 2024 Revised bootpack #4 with cleanup of SSDT tables.
1 point
-
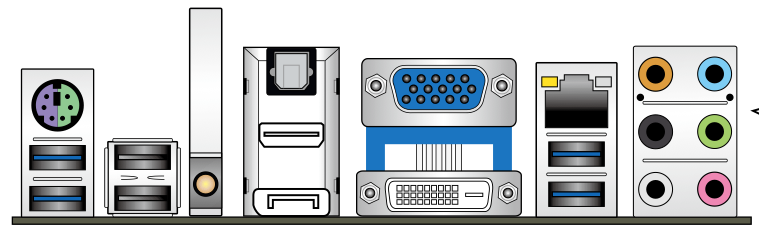
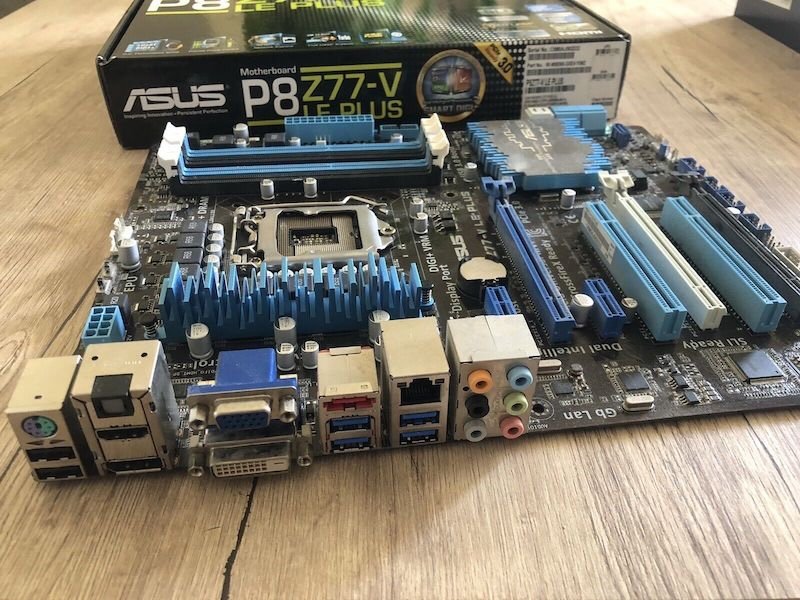
On checking the specs and the documentation, it appears Asus P8Z77-V motherboard is fitted with VGA/DVI/DP/HDMI video outputs: As such, you may purchase a DVI-to-VGA or DP-to-VGA adapter for your purpose. Rest assured that it will work, provided you buy an active adapter, not a passive one.
1 point
-
Ivy Bridge HD4000 has no support for VGA in OS X/macOS. It's been like that since Mountain Lion 10.8.2 so that shows you how far it goes. See here. nVidia GeForce GTX 950 is Maxwell so no support beyond macOS High Sierra and, even in macOS versions that could support the card, there was no native support and you needed the nVidia Web Driver. That died long ago when Mojave was introduced. "Fixing VRAM" does not mean much. If Big Sur only displayed "HD 4000 5MB", it meant you had no graphics acceleration. It's the only reason why you may have obtained video output on your VGA screen because you were running in unaccelerated, poor performing, VESA mode but Hackintosh was in limping mode and most probably very very slow with many graphics defects. Once you got graphics acceleration working, no VGA output, no. Since you now run Big Sur with HD4000 graphics, your only options for physical outputs are DVI, DP or HDMI and you can totally forget about VGA. If you really want VGA output, you only have 2 options: switch your GTX 950 card for a supported model: AMD or nVidia Kepler. See here. I get triple VGA/DVI/HDMI output out of my Asus GeForce GT730 (Kepler 2.0 GK208 chip) or my Yeston AMD Radeon RX560 (Polaris21/Baffin chip) on my old Core2Duo Dell Vostro 200 ST. if you have another (built-in) HDMI or a DVI or DP output port, use an adapter (has to be active (i.e. with a small chip) to convert digital signal to analog). That's fully supported.1 point
-
It's based on Broadcom BCM4352, so, apply the necessary patch. It's never been natively supported. https://osxlatitude.com/forums/topic/11138-inventory-of-supportedunsupported-wireless-cards-2-sierra-ventura https://github.com/khronokernel/IO80211-Patches1 point
-
@ZainAnjum - Your EFI is really messy. Try this and give us feedback: Dell 7490 Ventura Intel OC 0.9.41 point
-
FYI, it's a Latitude 7490, not an E7490. E Series stopped at Skylake E7x70.1 point
-
OCLP v0.6.8 now provides support for Broadcom legacy wireless cards that Sonoma officially dropped. Good news for all of us relying on BCM4350/BCM4360xx cards for Wireless and Bluetooth services. Not tried it yet but process is understood to be as follows with OpenCore (cf. dedicated Sonoma beta threads at Insanelymac.com): add boot-arg amfi=0x80 (or amfi_get_out_of_my_way=1) disable SIP with csr-active-config set to 0x803 (0x0FEF is Ok too) block vanilla kext IOSkywalkFamily kext in the config file disable SecureBoot if applicable inject older kexts IOSkywalkFamily + IO80211FamilyLegacy kexts (in that specific order) once booted with those settings, apply OCLP root patching and reboot Broadcom wireless cards that were previously supported in Ventura are then expected to be operational again Not sure this works with Clover given the lack of system's kext blocking facility afaik. Will try to test asap with OpenCore on my E7270. Edit: This is fully supported with Clover r5157 and later.1 point
-
There will be no need to enable TRIM in recent macOS versions such as Big Sur, Monterey or Ventura. It'll be enabled by default.1 point
-
As long as it's the same motherboard model (even with a different CPU if it's soldered provided you're not using a CPU-specific power management SSDT but the PlugIn method), all should work upon straight replacement and without any need to re-install macOS at all. Just make sure the replacement motherboard has same or latest BIOS version and adequate/same BIOS settings as the old one.1 point
-
Remove the OCLP patch, reboot and re-apply the minimum patches. Read the documentation before proceeding. At worst, re-install macOS from scratch.1 point
-
I guess it depends entirely how you apply the OCLP patches. This is a Hackintosh, not a Mac so you must not apply all those patches that apply to Mac hardware. Only select the patches relevant to Haswell graphics (eg: for MBP11,x models) and disable SiP.1 point
-
@Baio77 it start, Brightness does not work, Trackpad very lag/slowly. Please see my attached IOReg below. @Hervé Yes, it is my screen's EDID. My Hack works well with/without it. IOReg20230530.zip1 point
-
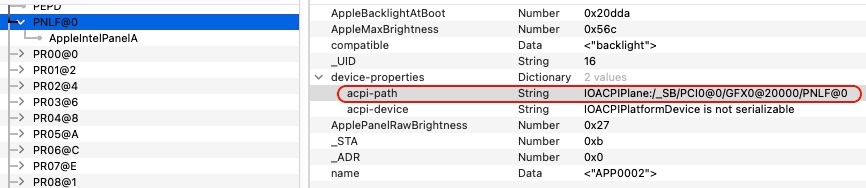
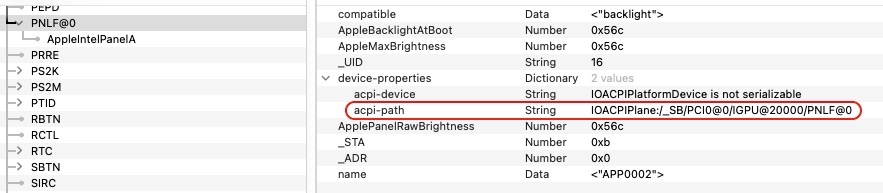
@vanquybn woaw, what a set of patched ACPI tables! Are you sure you need all of those? Anyway, I'm tempted to say your issue could be related to conflicting ACPI info for your CML UHD630 iGPU. In IOReg, we can clearly see it registers against ACPI device "IGPU" but you inject at least 2 tables that keep referring to ACPI device called "GFX0". If you look at your PNLF device in IOReg, you'll see that its ACPI path refers to "IOACPIPlane:/_SB/PCI0@0/GFX0@20000/PNLF@0": Now, You're gonna say "so does my IGPU device in IOReg": I do things quite differently on my Hackintosh laptops and: rename iGPU device "GFX0" to "IGPU" in my Clover configs; I think you should do the same in your OC config. use a SSDT-PNLF patched table that refers to PCI0.IGPU and PCI0.IGPU.PNLF, not to GFX0 in any way. I think you should do the same in your SSDT-PNLF & SSDT-GFX0 patched tables. Bu I must say that I don't quite understand why you use the latter; it injects stuff you got in your OC config and it probably causes conflicts too. Here's my E7270 IGPU and PNLF IOReg data in comparison: At present, iGPU device appears under the name of IGPU but that's probably just renamed by WhateverGreen. I would suggest you apply the above 2 suggestions and disable that SSDT-GFX0 table of yours. Where did you obtain your OC EFI folder from? Or did you make it yourself?
1 point
-
1. Download the appropriate version from the Releases and extract the zip file. Let’s assume that you downloaded “ALCPlugFix-Swift-RELEASE-1.5.zip” to download folder, and extracted the zip file in the same place (by double-clicking). You would have a new folder “ALCPlugFix-Swift-RELEASE-1.5” created. Right-Mouse-Click on the new folder icon -> Services -> New Terminal at Folder. A new terminal window would be opened at the current folder path: /Users/YOURNAME/Downloads/ALCPlugFix-Swift-RELEASE-1.5 (You can type “pwd” to verify it) 2. Copy the edited sample.plist file (in this case: ALC295-DELL7400.plist) to somewhere safe. I placed it in “Monterey HD\users\shared”, where Monterey HD is the name for my macOS drive. You may have a different name. 3. At the terminal (opened in step 1), type: ./install.sh Follow the instruction. When it asked for .plist file, drag “ALC295-DELL7400.plist” icon to the terminal, from the location you stored in step 2 above (in my case, it is from “Monterey HD\users\shared\”). You may encounter message like "ALCPlugFix is from unknown source” (1st time install) , just ignore it. After install is completed, go to folder: /usr/local/bin (this is where ALCPlugFix is installed). Right-Mouse-Click on ALCPlugFix icon -> Open, then Open again to allow it to run. This would give it the permission to run. Add "alcverbs=1 alcid=77" to the boot args. Reboot.1 point
-
Where are you with your current config ? Are you sure you have the best possible settings in place?1 point
-
NB: This is a revival of the article I had initially published at InsanelyMac to answer recurring questions that had been raised in the Opencore thread that lives there. Posted October 2, 2021 The Dortania documentation refers to the DVMT pre-allocated memory or "stolen memory" when they mention "memory reserved for the iGPU". Years ago, @Firewolf described in details the relationship between stolen memory and DVMT pre-allocated memory on his blog: https://www.firewolf.science/2015/04/guide-intel-hd-graphics-5500-on-os-x-yosemite-10-10-3/ There's a more recent thread from him here: https://www.insanelymac.com/forum/topic/345377-surface-pro-patch-the-framebuffer-properly-to-get-rid-of-the-dvmt-assertion-patch/ It can be difficult to understand and differentiate DVMT pre-allocated memory, stolen memory, framebuffer memory, cursor memory, framebuffer size, cursor bytes, etc. And all of these have got nothing to do with VRAM of course... Some of us are familiar with the information provided by @Pike R Alpha many moons ago, the WhateverGreen User Manual or the Hackintool app though none of those clearly define what the various memory instances are. Several years ago, @Rehabman also attempted to explain this and his writings somehow collided with most people's comprehension of things. For instance, when @Pike, WhateverGreen or Hackintool refer to stolenmem and fbmem, @Rehabman spoke of framebuffer memory size and cursor bytes. In the case of the Haswell Azul framebuffer layouts, @Rehabman also spoke of the DVMT pre-alloc requirements when the others speak of stolenmem. Inevitably, this can lead to confusion... Definitions: See wikipedia and Google searches. VRAM = Video RAM. Common definition is that it stores the pixels and other graphics data rendered on a computer screen. DVMT = Dynamic Video Memory Technology. A technology used by Intel to dynamically allocate system memory to use as video memory to handle graphics. DVMT pre-allocated memory is the minimum amount, in multiples of 32MB, that will be allocated to the iGPU for handling graphics. By far and large, manufacturers set this to 32MB by default in BIOS (or certainly used to). Framebuffer = a memory buffer held in RAM and containing a bitmap of a video frame, i.e. all the data related to the pixels of an image to be displayed on screen (eg: colours, resolution, etc.). Stolen memory = basically, this is the same as the DVMT pre-allocated memory. As far as Apple's framebuffer drivers/kexts are concerned: framebuffer size (aka stolenmem for WhateverGreen*) = the size, in bytes, of a framebuffer layout (it may change according to image characteristics), as defined in the driver/kext. cursor bytes (aka fbmem for WhateverGreen*) = the size, in bytes, of a framebuffer layout's overlay used for handling mouse cursor (without modifying the framebuffer's data), as defined in the driver/kext. framebuffer VRAM (aka unifiedmem for WhateverGreen) = the max. amount, in bytes, of VRAM allocated by a framebuffer layout, as defined in the driver/kext (since Haswell and Yosemite, this usually is 1536MB). * As stated above, I believe that Whatevergreen only got it right for Haswell Azul framebuffer layouts with which stolenmem, fbmem and cursormem match their target. Thereafter, I'm of the opinion that WhateverGreen used incorrect names where stolenmem means the actual framebuffer size and fbmem means the actual cursor bytes (size), as stated by @Rehabman. Mac OS X/OS X/macOS graphics framebuffers: Let's start by looking at a few examples as illustrated in the WhateverGreen User Manual. 1) Haswell Azul mobile framebuffer 0x0a260006 (used for HD4200/HD4400/HD4600 iGPUs on laptops): ID: 0A260006, STOLEN: 32 MB, FBMEM: 19 MB, VRAM: 1536 MB, Flags: 0x0000000F TOTAL STOLEN: 52 MB, TOTAL CURSOR: 1 MB (1572864 bytes), MAX STOLEN: 116 MB, MAX OVERALL: 117 MB (123219968 bytes) Camellia: CamelliaDisabled (0), Freq: 2777 Hz, FreqMax: 2777 Hz Mobile: 1, PipeCount: 3, PortCount: 3, FBMemoryCount: 3 [0] busId: 0x00, pipe: 8, type: 0x00000002, flags: 0x00000030 - ConnectorLVDS [1] busId: 0x05, pipe: 9, type: 0x00000400, flags: 0x00000087 - ConnectorDP [2] busId: 0x04, pipe: 9, type: 0x00000400, flags: 0x00000087 - ConnectorDP 00000800 02000000 30000000 01050900 00040000 87000000 02040900 00040000 87000000 If we look inside the binary code of the Haswell Azul framebuffer kext, we'll find: 0600260A 01030303 00000002 00003001 00006000 00000060 D90A0000 D90A0000 00000000 00000000 00000800 02000000 30000000 01050900 00040000 87000000 02040900 00040000 87000000 FF000000 01000000 40000000 0F000000 01010000 04000000 00000000 0E000000 00000000 which translates to: 0600260A -> layout id (AAPL,ig-platform-id) 01 -> mobile type (framebuffer-mobile) 03 -> 3 x pipes (framebuffer-pipecount) 03 -> 3 x ports (framebuffer-portcount) 03 -> 3 x memories (framebuffer-memorycount) 00000002 -> 32MB stolen mem (framebuffer-stolenmem) // Rehabman's DVMT-prealloc requirement 00003001 -> 19MB FB mem (framebuffer-fbmem) // Rehabman's framebuffer size 00006000 -> 6MB Cursor mem (framebuffer-cursormem) // Rehabman's cursor bytes 00000060 -> 1536MB VRAM (framebuffer-unifiedmem) D90A0000 -> Backlight freq 2777MHz D90A0000 -> Max. backlight freq 2777MHz 00000000 00000000 00000800 02000000 30000000 -> port #1/FB@0: index 00, busid 00, pipe 0800, type 02000000=LVDS/eDP (framebuffer-con0-type), flags 30020000 01050900 00040000 87000000 -> port #2/FB@1: index 01, busid 05, pipe 0900, type 00040000=DP (framebuffer-con1-type), flags 87000000 02040900 00040000 87000000 -> port #3/FB@2: index 02, busid 04, pipe 0900, type 00040000=DP (framebuffer-con2-type), flags 87000000 FF000000 01000000 40000000 0F000000 01010000 04000000 00000000 0E000000 00000000 2) Broadwell BDW mobile framebuffer 0x1626006 (used for HD5300/HD5500/HD5600 iGPUs on laptops): ID: 16260006, STOLEN: 34 MB, FBMEM: 21 MB, VRAM: 1536 MB, Flags: 0x00000B0B TOTAL STOLEN: 56 MB, TOTAL CURSOR: 1 MB (1572864 bytes), MAX STOLEN: 124 MB, MAX OVERALL: 125 MB (131608576 bytes) Camellia: CamelliaDisabled (0), Freq: 2777 Hz, FreqMax: 2777 Hz Mobile: 1, PipeCount: 3, PortCount: 3, FBMemoryCount: 3 [0] busId: 0x00, pipe: 8, type: 0x00000002, flags: 0x00000230 - ConnectorLVDS [1] busId: 0x05, pipe: 11, type: 0x00000400, flags: 0x00000507 - ConnectorDP [2] busId: 0x04, pipe: 11, type: 0x00000400, flags: 0x00000507 - ConnectorDP 00000800 02000000 30020000 01050B00 00040000 07050000 02040B00 00040000 07050000 If we look inside the binary code of the Broadwell BDW framebuffer kext, we'll find: 06002616 01030303 00002002 00005001 00000060 D90A0000 D90A0000 00000000 00000000 00000000 00000800 02000000 30020000 01050B00 00040000 07050000 02040B00 00040000 07050000 FF000000 01000000 40000000 0B0B0000 01010500 00000000 05000000 00000000 04000000 00000000 00000000 00000000 00000000 00000000 C8000000 which translates to: 06002616 -> layout id (AAPL,ig-platform-id) 01 -> mobile type (framebuffer-mobile) 03 -> 3 x pipes (framebuffer-pipecount) 03 -> 3 x ports (framebuffer-portcount) 03 -> 3 x memories (framebuffer-memorycount) 00002002 -> 34MB stolen mem (framebuffer-stolenmem) // Rehabman's framebuffer size 00005001 -> 21MB FB mem (framebuffer-fbmem) // Rehabman's cursor bytes 00000060 -> 1536MB VRAM (framebuffer-unifiedmem) D90A0000 -> Backlight freq 2777MHz D90A0000 -> Max. backlight freq 2777MHz 00000000 00000000 00000000 00000800 02000000 30020000 -> port #1/FB@0: index 00, busid 00, pipe 0800, type 02000000=LVDS/eDP (framebuffer-con0-type), flags 30020000 01050B00 00040000 07050000 -> port #2/FB@1: index 01, busid 05, pipe 0B00, type 00040000=DP (framebuffer-con1-type), flags 07050000 02040B00 00040000 07050000 -> port #3/FB@2: index 02, busid 04, pipe 0B00, type 00040000=DP (framebuffer-con2-type), flags 07050000 FF000000 01000000 40000000 0B0B0000 01010500 00000000 05000000 00000000 04000000 00000000 00000000 00000000 00000000 00000000 C8000000 3) Skylake SKL mobile framebuffer 0x19160000 (used for HD520/HD530/HD540 iGPU on laptops): ID: 19160000, STOLEN: 34 MB, FBMEM: 21 MB, VRAM: 1536 MB, Flags: 0x0000090F TOTAL STOLEN: 56 MB, TOTAL CURSOR: 1 MB (1572864 bytes), MAX STOLEN: 124 MB, MAX OVERALL: 125 MB (131608576 bytes) Model name: Intel HD Graphics SKL CRB Camellia: CamelliaDisabled (0), Freq: 1388 Hz, FreqMax: 1388 Hz Mobile: 1, PipeCount: 3, PortCount: 3, FBMemoryCount: 3 [0] busId: 0x00, pipe: 8, type: 0x00000002, flags: 0x00000098 - ConnectorLVDS [1] busId: 0x05, pipe: 9, type: 0x00000400, flags: 0x00000187 - ConnectorDP [2] busId: 0x04, pipe: 10, type: 0x00000400, flags: 0x00000187 - ConnectorDP 00000800 02000000 98000000 01050900 00040000 87010000 02040A00 00040000 87010000 We can't look at the binary code of the Skylake SKL framebuffer because Apple changed the way things are coded inside but it basically translates as follows: 00001619 -> layout id (AAPL,ig-platform-id) 01 -> mobile type (framebuffer-mobile) 03 -> 3 x pipes (framebuffer-pipecount) 03 -> 3 x ports (framebuffer-portcount) 03 -> 3 x memories (framebuffer-memorycount) 00002002 -> 34MB stolen mem (framebuffer-stolenmem) // Rehabman's framebuffer size 00005001 -> 21MB FB mem (framebuffer-fbmem) // Rehabman's cursor bytes 00000060 -> 1536MB VRAM (framebuffer-unifiedmem) 6C050000 -> Backlight freq 1388MHz 6C050000 -> Max. backlight freq 1388MHz 00000800 02000000 98000000 -> port #1/FB@0: index 00, busid 00, pipe 0800, type 02000000=LVDS/eDP (framebuffer-con0-type), flags 98000000 01050900 00040000 87010000 -> port #2/FB@1: index 01, busid 05, pipe 0900, type 00040000=DP (framebuffer-con1-type), flags 87010000 02040a00 00040000 87010000 -> port #3/FB@2: index 02, busid 04, pipe 0a00, type 00040000=DP (framebuffer-con2-type), flags 87010000 With the exception of the Haswell Azul framebuffer, we can see that Broadwell BDW and Skylake SKL framebuffers define framebuffer size (WEG's stolenmem) and cursor bytes (WEG's fbmem) characteristics and no DVMT pre-allocated memory (i.e. proper stolen memory). This extends to Kaby Lake KBL framebuffers and later. In my opinion, it's fair to say that @Rehabman's description and wording are the most appropriate/best ones when the WEG view of things got somehow misled by following through on the Haswell framebuffer decoding. To me, there was some mixup, leading to confusion and the said confusion has remained ever since... Confusion... why? Because of several things: 1) the observation that the Haswell Azul framebuffers used on Hacks (0x0D220003 for desktops and 0x0A260006 for laptops) defined: a DVMT pre-allocated memory (= Stolen memory) size of 32MB a framebuffer size of 19MB a cursor bytes of 0MB (desktops) and 6MB (laptops; required to be increased to 9MB to fix a minor graphics glitch on some systems) 2) the observation that the Broadwell BDW framebuffers used on Hacks (0x16220007 for desktops and 0x16160006 for laptops) defined: no DVMT pre-allocated memory requirement at all framebuffer sizes of 38MB and 34MB respectively cursor bytes of 38MB and 21MB respectively 3) the observation that the sum of framebuffer size + cursor bytes must be lower than the size of the DVMT pre-allocated memory, failing which a KP occurs at graphics initialisation during startup/boot. 4) In the case of the Haswell Azul framebuffers: DVMT pre-allocated memory requirement is set at 32MB framebuffer size + cursor bytes = 19+0 | 19+6 (or 19+9) = 19MB | 25MB (or 28MB) which is lower than DVMT pre-allocated memory 32MB -> All is Ok by default. 5) In the case of the Broadwell BDW framebuffers: framebuffer size + cursor bytes for desktops = 38+38 = 76MB which is greater than the usual/default 32MB DVMT pre-allocated memory of most desktops, unless adjusted in BIOS framebuffer size + cursor bytes for laptops = 34+21 = 55MB which is greater than the usual/default 32MB DVMT pre-allocated memory of most laptops, unless adjusted in BIOS -> Not Ok by default, Kernel Panic (KP) encountered. 6) And the story is the same with subsequent Skylake, Kaby Lake, etc. framebuffers. Solution: 2 x solutions were engineered to address the issue of KP at graphics initialisation. increase the DVMT pre-allocated memory set in BIOS. Could be complicated and tricky for PCs that do not offer this in BIOS Setup but made easy with Grub Shell if DVMT pre-allocated memory can be identified in BIOS. This method is usually required to gain 4K output. patch the Broadwell, Skylake, Kaby Lake, etc. framebuffer layouts to reduce framebuffer size and cursor bytes so that the sum of them totals less than the usual default DVMT pre-allocated memory of 32MB. This solution does not usually support 4K output. Although some people do opt for the 1st solution, most people just adopt the 2nd one. How were the framebuffer patches derived? If we look at the framebuffer patches that are commonly and generally used, we can observe that they set: WEG's framebuffer-stolenmem property , i.e. framebuffer size to 0x01300000 = 19MB (DATA type set to 00003001) WEG's framebuffer-fbmem property, i.e. cursor bytes to 0x00900000 = 9MB (DATA type set to 00009000) i.e. the values typically used on laptops with Haswell iGPUs, this simply because 19+9=28MB which is < 32MB. This is where it all appears to come from. Is this correct? By far and large, it is. But the need to apply such framebuffer patches depends entirely on the host PC's default DVMT pre-allocated memory. On desktop and laptop PCs where DVMT pre-allocated memory can be adjusted in BIOS setup, the patches are unnecessary as long as the DVMT value that is set exceeds the total of the framebuffer size + cursor bytes of the selected/target graphics framebuffer. Typically, a value of 64MB or 96MB takes care of things perfectly, including 4K. Of course, those PCs manufactured with default DVMT pre-allocated memory set to 64MB or more are unlikely to encounter any issue at all. The framebuffer patches are also unnecessary if the default DVMT pre-allocated memory is increased either though BIOS binmod (difficult and risky) or through Grub shell mod (easy and quickly reversible). This is well illustrated on @Firewolf's blog, linked above (there are other places too such as @Jake Lo's FAQ item here). To give an example, on some Dell laptops (eg. Broadwell Latitude E7x50 or Skylake Latitude E7x70), DVMT pre-allocated memory can be increased by booting a Grub shell and entering the following command: setup_var 0x432 0x3 This sets DVMT pre-allocated memory parameter located at offset 0x432 to 96MB (0x1 for 32MB, 0x2 for 64MB, 0x3 for 96MB, etc.), the default setting for the laptop in this example being 32MB. This setting will remain valid/in place until BIOS is reset to default settings. It's required to obtain 4K output out of DP/HDMI. Of course, different computers will have different locations/offsets for DVMT pre-allocated memory. What should I do then? As stated above, the framebuffer patches apply to most if not all cases. But not for 4K output. Those who feel adventurous or who are computing-literate may opt for the BIOS adjustment alternative. In all cases, the 1st thing to do is to look at the default framebuffer size and cursor bytes settings of the targeted graphics framebuffer, then decide if the sum of them both fits or not in 32MB or any other value set in BIOS for DVMT pre-allocated memory. Can I use different values? Absolutely! As long as the golden rule is respected: framebuffer size + cursor bytes < DVMT pre-alloc mem or, in WEG's conventions, stolenmem + fbmem < DVMT pre-alloc mem. To give a practical example, I experimented on my Skylake/HD520 Dell Latitude E7270 Hackintosh laptop: default DVMT pre-allocated memory value set in BIOS: 32MB target SKL framebuffer layout: 0x19160000 default framebuffer size: 34MB default cursor bytes: 21MB sum of framebuffer size + cursor bytes: 55MB (i.e. > 32MB) Booting with default DVMT pre-alloc mem + no framebuffer patches -> KP/freeze Booting with default DVMT pre-alloc mem + framebuffer size 20MB + cursor bytes 12MB -> KP Booting with default DVMT pre-alloc mem + framebuffer size 19MB + cursor bytes 9MB -> Ok, full graphics acceleration, no 4K output Booting with default DVMT pre-alloc mem + framebuffer size 20MB + cursor bytes 10MB -> Ok, full graphics acceleration, no 4K output Booting with DVMT pre-alloc mem set to 64MB (Grub shell) + no framebuffer patches -> Ok, full graphics acceleration + 4K output Booting with DVMT pre-alloc mem set to 96MB (Grub shell) + no framebuffer patches -> Ok, full graphics acceleration + 4K output1 point
-
@Hervé I've finally have managed to get full GA working with 0x05001C59 and external monitor using type-c to HDMI port. However, Built-in display is blank - I am still able to change brightness with fn keys and sys info show the builtin display is detecting resolution at 28" (1600x1200). Still not having any luck with the connector type... 15" Surface Book 2 15” PixelSense™ Display Screen: 15” PixelSense™ Display Resolution: 3240 x 2160, (260 PPI) 10 point multi-touch G5 Aspect ratio: 3:2 Contrast ratio: 1600:1 SB15 04.ioregopencore-2022-11-01-021006.txt.zip1 point
-
Yes, you should upgrade the kexts as well. Give this a try 7490_OC085_Ventura.zip1 point
-
Bananz0 test this EFI in USB if start ioreg https://drive.google.com/drive/folders/1Ub16WgZeBOPzYL1fIfJjGeZUV_qUUrUz?usp=sharing1 point
-
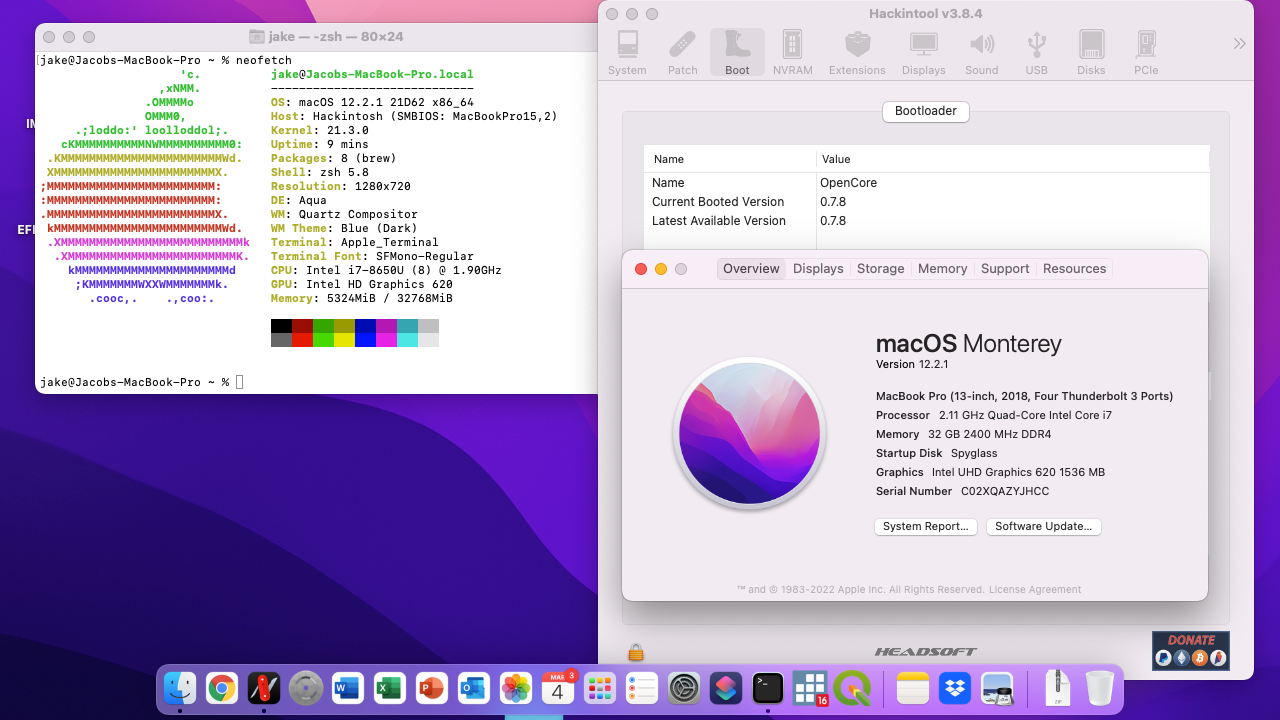
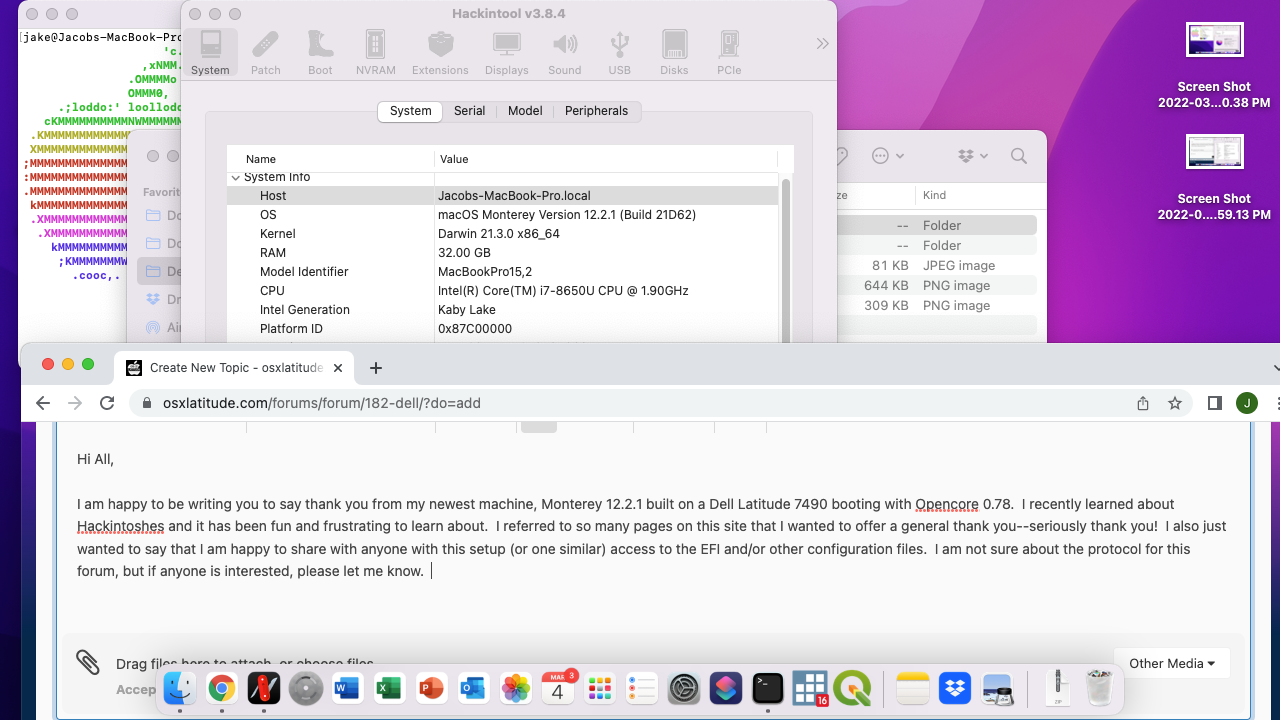
Hi All, I am happy to be writing you to say thank you from my newest machine, Monterey 12.2.1 built on a Dell Latitude 7490 booting with Opencore 0.78. I recently learned about Hackintoshes and it has been fun and frustrating to learn about. I referred to so many pages on this site that I wanted to offer a general thank you--seriously thank you! I also just wanted to say that I am happy to share with anyone with this setup (or one similar) access to the EFI and/or other configuration files. I am not sure about the protocol for this forum, but if anyone is interested, please let me know. In the meantime, best of luck! With sincere thanks, Jake
1 point
-
Hi after reading this Forum and others, I am happy with my Dell 7040 this is my EFI Folder for my Optiplex 7040 with Monterey 12.1 Beta 4, OC 0.7.6 i5 6500, IntelHD 530, 1 Monitor to DP and 1 on HDMI Optiplex_7040.zip1 point
-
Ok! I have come to the end practically everything works except the WIFI card not compatible to be replaced. Thanks to Hervè for the precious help. I leave attached my EFI which could be useful to someone. M4400-highsierra.zip
1 point
-
Dell Latitude E5550: Intel Broadwell i3-5010U @2.10GHz Intel HD5500 graphics 8GB DDR3L RAM Intel I218V LAN Intel AC 7265 Wireless OpenCore 0.7.3 and Clover r5138 with up-to-date kexts at time of writing. Updated: Dell Latitude E5550.zip Working: Full graphics acceleration HDMI output Wifi and Bluetooth LAN Audio (speakers, headphones & HDMI) Sleep with lid off and > Sleep Brightness control Multimedia button Keyboard and touchpad (ALPS) SD card reader USB2.0 & USB3.0 ports (USB remapping required macOS installation because my laptop doesn't have camera so I've not remapped yet) Battery Indicator and charger Not working: VGA output (unsupported)
1 point
-
credit to : @r33int at github thanks you I just add nv_disable=1 at the line 771 at config.plist I tested it on Catalina 10.15.4 and Big Sur [@screen shoot] but I dont check another stuff working up yet wifi used intwl kext & heliport 1.0.0 ,hackintoll,but please master@Jake Lo please fixed the battery its like drainy the [EFI\APPLE,BOOT,OC] file both working for installed and booting up Catalina & big Sur by create installmedia both zip file [EFI\APPLE,BOOT,OC] OC.zip Archive.zip
1 point
-
Following BIOS update to v1.16.0, I revisited the patched DSDT since it was (finally) also causing a reset to me. I dumped all tables from BIOS and came to realise I had applied the brightness keys patch to a Clover pre-patched DSDT! I therefore re-applied the patch to the raw DSDT. My 7490 now boots Catalina without reset and brightness keys are fully operational. I've also updated the patch code above to return those Clover pre-patched lines to full vanilla code (XOSI returned to _OSI and XSID returned to OSID). Patched_DSDT_Lat7490_BIOS-1.16.0.aml.zip I invite Latitude 7490 users to test this revised patched DSDT and feedback to me by PM so that I can update the bootpacks accordingly. In case of issues (system reset), select BIOS.aml DSDT table in Options->ACPI patching->Dsdt name at Clover main boot menu to load the raw DSDT at macOS startup.1 point
-
Hi Everyone, I thought I would post details of my successful High Sierra build. Thanks goes to Syonagar for posting about his build using the same motherboard and uploading the Clover folder. System Specs: Core i5 4570 Gigabyte H81m-DS2 Klevv SSD Neo N510+ 480gb Primary Samsung SSD 850 EVO 500gb Backup while getting everything working. Toshiba HDW120 2 TB HDD for storage. WD Blue 500gb 7,200rpm storage Sapphire Radeon RX570 8gb Works OOTB 16gb Corsair Vengeance LP 1600mhz DDR3 (2 X 8G DIMMS) Firewire card 2k 34" monitor USB installer creation. I created a USB installer on my aging 08 MBP using creatinstallmedia in terminal using the following command sudo /Applications/Install\ macOS\ High\ Sierra.app/Contents/Resources/createinstallmedia --volume /Volumes/MyVolume Clover installed using default for UEFI. UEFI Drivers: ApfsDriverLoader.efi AudioDxe.efi FSInject.efi OsxAptioFixDrv.efi PartitionDxe.efi SMCHelper.efi VBoxHF.efi Kexts: Lilu.kext RealtekRTL811.kext For my lan SMCProcessor.kext SMCSuperIO.kext VirtualSMC.kext WhateverGreen.kext OS installed to Klevv SSD (file system APFS) without issues during installation and first boot. RX570 recognised out of the box and runs at up to 2k 144hz. After install and initial setup: System backed up to Samsung SSD using Carbon Copy Cloner. This was incase I screwed up the primary install. Post install: Install Clover on SSD EFI partition. Replace the new Clover folder with Syonagar's Clover folder for Catalina. Reboot Reboot without install USB was successful. First issue was no audio through the HDMI. This was solved buy adding AppleALC.kext and removing VoodooHDA.Kext but this meant I had no onboard audio. At the time I wasn't fuss as I use HDMI audio through my monitor. Clover folder update with the following. UEFI Drivers: ApfsDriverLoader.efi AudioDxe.efi DataHubDxe.efi Fat.efi FSInject.efi NTFS.efi OsxAptioFix3Drv.efi SMCHelper.efi VBoxExt2.efi VBoxExt4.efi VBoxHfs.efi VirtualSmc.efi Kexts: Installed into other folder AppleALC.kext This was so I could have audio via HDMI. Because I removed VoodooHDA.kext I had no onboard audio and AppleALC.kext required a fix to enable onboard audio. Lilu.kext RealtekRTL8111.Kext For Lan SMCProcessor.kext SMCSuperIO.kext VirtualSMC.kext Whatevergreen.Kext Reboot HDMI audio working. Working EFI folder backed up to Samsung EFI partition as well as a zip file on the a separate HDD. Onboard audio fix using Clover Configurator. I found the fix at another site but it is also show by Shaon at I have used ID 13. I now have working onboard audio through the front panel as well as rear output. I have to check to see if this has enabled the line in and mic in as well. A complete list of supported codecs can be found at https://github.com/acidanthera/AppleALC/wiki/Supported-codecs Backup EFI folder. Next Issue was the firewire card causing the system to reboot on shutdown. The card did work without issue in a system using an Asus B85M-G board that I had installed HS and Mojave on. This board started acting flakey which is why I purchase the H81m-DS2. I was fortunate enough to find it brand new at a local retailer. After some trial and error, including testing on a 1st gen i7 with Mavericks installs to confirm the card still worked, I cleaned out the EFI partition and reinstalled clover. I installed the firewire card and then updated all drivers and kexts manually using those that I have listed and selected fix shutdown in Clover Configurator under ACPI-Fixes. Reboot to confirm system still works. Connect portable HDD via Firewire. Firewire works Shutdown to confirm system shuts down. Success. Lastly I enabled trim which appears to have made the boot time increase by about 15-20 seconds. I have searched online and it appears to be common. I have also searched to see if trim enabled is needed with APFS and have read mixed opinions. Any thoughts? Installed Security Update 2020-003 10.13.6 as well as iTunes 12.8.2, iTunes Device Support Update and Safari 13.1.1 Backup system and EFI. I have installed Adobe Production Premium CS5.5 because I am capturing old VHS tapes and the player has firewire out. Premiere Pro works but does tend to crash when I quit as does Photoshop. Unfortunately Di Vinci Resolve doesn't support firewire. Currently search for a solution but I may use the i7 Mavericks system if it becomes a problem because it's only a short term unpaid project and I already own the software. Cheers, Chris1 point
-
Nawcom disappeared from the Hackintosh scene long ago but tribute can still be paid to him and his great tools. It sure is dated today but it did the business back in the days and greatly so. These may still be useful for those novices who want to setup a Hackintosh on a platform capable to run Snow Leopard but have no access to a Mac or an existing Hack. Snow Leopard remains the Mac OS X version from which many platforms can upgrade to subsequent OS X/macOS versions as long as their profile (SMBIOS) meets the requirements. Provided one has the Snow Leopard retail DVD or a USB key with retail SL restored to it, Nawcom's modCD or modUSB can be very useful to setup a temporary basic SL installation to work from. It does not have to be fully tuned up... Nawcom's tools are hard to find on the Net today, so here are copies it. I hope (and think) Nawcom would not mind... OSX86_ModCD-032311-151021.zip -> rename from .zip to .iso and burn the image to a CD/DVD (can be done from Windows or Linux) OSX86_ModUSB.pkg.zip -> unzip this Mac app and run from OS X to create a bootable USB installer (cannot be used in Windows/Linux) For those who wish to know more about the tools, here's a recap written by the man himself back in 2010: Nawcom_tuto.pdf.zip1 point
-
Last update: 5 Aug 2018 Following tuning work on forum member's systems, here are full packs for Mavericks and High Sierra that supports full CPU SpeedStep and full GPU power management under MacBookPro5,4 and MacBookPro7,1 SMBIOS. Work platforms was fitted with P8700 CPU @2.53GHz and and QX9300 CPUs @2.53GHz, both FSB 1066MHz. FakeSMC was tuned to appropriate MacBookPro SMC keys and AGPM for nVidia Quadro FX 770M (10de:065c) or FX 1700M (10de:065a). CPU SpeedStep was observed from LFM 800MHz to HFM 2.53GHz. GPU throttling was observed at the following 4 x Core/Memory frequencies: 168/100, 235/300, 400/300, 625/799MHz. CPU and GPU T° were nicely contained around 50°C as a result. M4400 nVidia Quadro FX 770M/1700M (all res) M4400_FX770M_10.9.5_Pack(Chameleon).zip M4400_HighSierra_Clover-Enoch_pack.zip NB: Mavericks pack was validated on a myHack v3.3.1 installation. Later version of OS X will require usual manual installations. Pack for Yosemite should be the same as Mavericks but I prefer to wait until this is confirmed in the field before uploading one. El Capitan and later should require the usual adjustments for USB ports (DSDT EHCx renaming, USB injector).1 point
-
Note: This bootpack should also be compatible with any supported 4th Gen Intel CPU on H81 Intel Chipset Motherboard. Hi all, Just built my first budget desktop hackintosh and pleased to share the bootpack. Specification Gigabyte H81M DS2 4th Gen 3.5 GHz i3-4330 8 GB DDR3 1600 MHz Memory AMD Radeon RX560 (Supported natively by Mac OS Ventura) Intel Graphics HD 4600 (Working natively up to Mac OS Monterey but unusable. See notes below. Not tested yet on Mac OS Ventura) AMD Radeon 7750 1GB (Supported natively up to Mac OS Monterey) (See other post here : https://osxlatitude.com/forums/topic/11048-amd-radeon-hd-7750-supported-by-mac-os-mojave-catalina/) OpenCore Bootpack The OpenCore bootpack can be downloaded from the following link:- macOS Ventura 13.0 (OpenCore 0.8.5):- OpenCore-13.0-0.8.5.zip Looks like OpenCore can still boot Ventura using Mac Mini 18 smbios. However, supported GPU need to be used e.g. AMD RX 560 in my current case. Updated all kexts to latest versions macOS Monterey 12.6 (OpenCore 0.8.4):- OpenCore-12.6-0.8.4.zip Updated all kexts to latest versions macOS Monterey 12.4 (OpenCore 0.8.1):- OpenCore-12.4-0.8.1.zip Updated all kexts to latest versions macOS Monterey 12.3.1 (OpenCore 0.8.0):- OpenCore-12.3.1-0.8.0.zip Updated all kexts to latest versions macOS Monterey 12.2.1 (OpenCore 0.7.8):- OpenCore-12.2.1-0.7.8.zip Updated all kexts to latest versions macOS Monterey 12.1 (OpenCore 0.7.6):- OpenCore-12.1-0.7.6.zip Updated all kexts to latest versions macOS Monterey 12.0.1 (OpenCore 0.7.4):- OpenCore-12.0.1-0.7.4.zip macOS Monterey 12 Beta 9(OpenCore 0.7.4):- OpenCore-11.6-0.7.4.zip Updated OpenCore and all kexts to latest versions Changed SMBIOS to iMac Late 2015 for installer to work macOS Monterey 12 Beta (21A5248p) (OpenCore 0.7.0):- OpenCore-12-Beta-0.7.0.zip Updated all kexts to latest versions Changed SMBIOS to Mac Mini Late 2014 as Intel 4th Gen Haswell iMacs no longer supported macOS Big Sur 11.6 (OpenCore 0.7.4):- OpenCore-11.6-0.7.4.zip Updated opencore & all kexts to latest versions macOS Big Sur 11.3 & 11.3.1 (OpenCore 0.6.9):- OpenCore-11.3-0.6.9.zip So far everything should work Updated all kexts to latest versions macOS Big Sur 11.0.1 (OpenCore 0.6.4):- OpenCore-11.0.1-0.6.4.zip Updated all kexts to latest versions This bootpack is able to boot Mac OS Big Sur Beta 10. However, it is still getting issue where installer will exit prematurely after starting. If anyone managed to resolve this issue do give me a buzz. Found the cause of installer exiting prematurely after start. Its a hard disk issue. Also had issue similar issue when installing windows on the same hard disk. So far everything should works except sleep. integrated graphics need to be disabled in bios in order for sleep to work (i.e. no desktop freeze after wake). macOS Big Sur 11.0.1 (OpenCore 0.6.3):- OpenCore-11.0.1.zip macOS Big Sur Beta 10 (OpenCore 0.6.3):- OpenCore-11.0-Beta10.zip macOS Big Sur Beta 4 (20A5343i) (OpenCore 0.6.0):- OpenCore-11.0-Beta-20A5343i.zip So far everything works except sleep. System freezes after wake. This bootpack is based on latest OC and lilu & friends kext release based on OC 0.6.0 macOS Big Sur Beta 2 (20A4300b) (OpenCore 0.6.0):- OpenCore-11.0-Beta -20A4300b.zip So far everything works except sleep. System freezes after wake. This bootpack allow both updating of existing beta 1 to beta 2 and installing new hard drive by running the installer app from an existing Mac OS system. USB installer created from createmediainstall still cannot be booted. Resolved. As @Jake Lo advise, with latest lilu we can omit "-lilubetaall vsmcgen=1 booter-fileset-kernel booter-fileset-basesystem" stuff. Make sure to reset nvram on first OC boot and boot the usb installer on reboot. However, looks like "booter-fileset-kernel & booter-fileset-basesystem" need to be remove when booting usb only and 1st stage installation. 2nd stage looks like it still need those to boot. macOS Big Sur Beta 1 (20A4299v) (OpenCore 0.6.0) :- OpenCore-11.0-Beta-20A4299v.zip USB installer still cannot be booted using clover or opencore. Big Sur need to be cloned from existing real mac disk image. So far everything works except for sleep. Downloaded the real mac disk image and followed installation guide from here: https://www.olarila.com/topic/8977-guide-installrestore-bigsur-with-opencore/. Initial bootpack for OpenCore obtained from here: https://www.reddit.com/r/hackintosh/comments/fuf6z7/open_core_056_catalina_10154_gaz87mxd3h_i74770/. Updated network card kext from my clover bootpack and updated OpenCore to version 0.6.0. (Note: These bootpacks can also be used to boot macOS Catalina) Clover Bootpack The Clover bootpack can be downloaded from the following link:- Mac OS Monterey 12.1 (Clover v5142) CLOVER-12.1.zip Updated all kexts to latest versions too Mac OS Monterey 12.0.1 (Clover v5141) CLOVER-12.0.1.zip Mac OS Monterey 12 Beta 10 (Clover v5140) CLOVER-11.6.zip Working for Beta 10 with preferred Mac Mini Late 2014 smbios Mac OS Monterey 12 Beta (21A5248p) (Clover v5135) CLOVER-11.3.1.zip Working for Beta 1 to Beta 7 with Mac Mini Late 2014 smbios Working for Beta 8 but need to change smbios to iMac Late 2015 Not Working for Beta 9 at the moment. Getting boot loop. Mac OS Big Sur 11.6 (Clover v5140) CLOVER-11.6.zip Updated clover & all kexts to latest versions Mac OS Big Sur 11.3.1 (Clover v5135) CLOVER-11.3.1.zip So far everything should work Updated all kexts to latest version. Mac OS Catalina 10.15.7 (Clover v5126) CLOVER-10.5.7.zip Updated Clover and kexts to latest versions. Clover is already using the Quirks features which are normally required for Intel 4th Haswell desktops. Clover bootpack is able to boot Mac OS Big Sur 11.0.1 after it has been installed. Still not able to boot installer. Mac OS Catalina 10.15.4 (Clover v5116) :- CLOVER10.15.4.zip Updated Clover, Lilu.kext, VirtualSMC.kexts & Whatevergreen.kext to latest versions. Mac OS Catalina 10.15.1 (Clover v5070) :- CLOVER-10.15.1.zip Whatevergreen.kext updated to 1.3.4 to resolve blank screen after boot. Mac OS Catalina 10.15 (Clover v5070) :- CLOVER-10.15.zip Mac OS Mojave 10.14.4 (Clover v4910) :- CLOVER-10.14.4.zip Mac OS Sierra 10.12.6 / Mac OS High Sierra 10.13 (Clover v4241) :- CLOVER.zip So far, everything works including sleep with power nap! So far this motherboard is very compatible with Mac OS and patched DSDT / SSDT is not required. Credits goes to Jake Lo, Bronx Teck & Herve Notes on Integrated HD4600 GPU Although the integrated HD4600 GPU can be enabled by simply injecting intel from clover, the GPU cannot be utilized since my motherboard does not have a HDMI output! Using dedicated GPU such as RX 560 while the integrated HD4600 GPU is enabled may cause video playback in chrome to be jibrish and iTunes video playback to freeze the desktop. The integrated GPU need to be disabled from bios to resolve this. Let me know if the clover bootpack works for you. Cheers! OpenCore-13.0-0.8.5.zip1 point
-
Hello everybody, these are my kexts to run Mac OS X 10.8 Mountain Lion on a Dell Precision M4400 with Nvidia Quadro FX 770M. What works: - Nvidia Card - Sound & Mic - Trackpad & Keyboard - Ethernet, Bluetooth & Wlan - Firewire - SDHC Not working: - Sleep - Shutdown Not tested: Webcam, Smartcard Reader Instructions: - Install the kexts from the "SLE" folder into System/Library/Extensions with Kext Wizard - Move the "Extra" to /(ML Volume) - Run the myHack Application -> "Run myFix" -> "/(ML Volume)" -> "Full" and wait a couple of minutes. - Boot with ML Enjoy ... Now with Kexts -.- M4400.zip1 point
-
Some quick facts about the Dell Latitude D530: 1. It was the last Dell model to have the 4:3 aspect ratio (square) screen. 2. It supports the T9500 Core 2 Duo, 2.6 GHz, 6Mb Cache, 800 MHz FSB CPU. 3. It accepts 4 Gigabytes of DDR2 667 MHz Ram and has built in X3100 graphics. 4. As a result (for me) it handles and runs Windows 7 Ultimate effortlessly. Here is how I was able to get up and running with Snow Leopard 10.6.7 in only 45 minutes. 1. Follow the instructions outlined within this forum on mounting and then burning a retail Snow Leopard 10.6.0 or 10.6.3 to an 8 Gigabytes USB stick or external drive. For me I was able to come across a 10.6.3 DMG image file where I used Disk Utility on another Mac to restore my DMG image file to a USB thumb drive. 2. Now having and then creating the proper CD Rom boot disk to get the Snow Leopard installation going is the key. The absolute best that I have found is Empire EFI from Prasys’ Blog version 1.085. If it weren’t for this boot disk (thanks to Prasys and others who have contributed I wouldn’t be writing you all now with my success on my Dell D530. 3. Once you have created your Empire EFI boot disk, use it to boot your Dell D530 and then select your Snow Leopard USB stick to begin the install. Note: It really doesn’t matter if you select ACHI SATA mode in the D530 A10 bios or not. I personally kept it at ATA as that was the mode that I installed Windows 7 and Windows XP on my additional hard drives and caddies so I don’t have to go back and forth in the bios while swapping out my Windows and OS X drives. 4. After Snow Leopard finishes installing, leave the Empire EFI boot disk in your CD Rom drive as you’ll be using it to boot into your actual Snow Leopard 10.6.0 or 10.6.3 install. Upon doing so, answer all pertinent questions regarding setting up your user account and a password if you choose along with any key required to connect to your wireless network etc. 5. Once you are up and running and have your wireless connection working, immediately go and download the 10.6.7 Combo Update from the Apple website and install it. 6. After the 10.6.7 Combo Update finishes, leave the Empire EFI boot disk in your CD Rom drive and boot into your Snow Leopard 10.6.7 install. (This boot CD really is a dream come true!) 7. You can then launch the Software Updates module within System Preferences and/or from the Dock and choose everything available except the 10.6.8 Update. I repeat, please uncheck the 10.6.8 Update and selected everything else, such as updates to iTtunes, AirPort etc. After all updates finish, and if you are required to boot, once again use the Empire EFI boot disk to do so. 8. The only thing left to quickly do is install sound support and if you like the driver for the D530 built in Ethernet port, which is the BCM 5755M with a device ID of 1673. Use the Kext Wizard to install VoodooHDA.kext (I personally like version 2.72 better than the latest 2.73) and if you like use the AppleBCM5751Ethernet.kext (version 2.1.0d21) for Ethernet support. These two Kext files get installed into the System/Library/Extensions directory also know and referred to as (S/L/E). 9. Ensure that you then repair the permissions and rebuilt the cache of the S/L/E directory, which is done within the Kext Wizard program. Then reboot your machine with the Empire EFI boot disk to enjoy sound and additional network support. 10. The above is a quick rundown of quickly getting Snow Leopard onto and updated to 10.6.7 on a Dell Latitude D530. My reference to doing it all within 45 minutes is based off of having your USB stick (Snow Leopard install disk) already created along with the Empire EFI CD Rom boot disk. I also had the 10.6.7 Combo Update (1.06 Gigabytes in size) already downloaded and saved ahead of time. 11. Once again special thanks to Prasys for the Empire EFI boot disk as well as all here at OS X Latitude. Long live the Dell Latitude D530, the very last 4:3 aspect ratio screen and powerful solid notebook. I will be following up on this post and will have a question or two for the advanced forum moderators regarding how to get the 10.6.8 update fully functioning. I believe the only bug is my wireless card in my D530, which is the 1505 Draft 802.11n (using the BCM 4328 chip) All is fine if I disable this wireless card in bios with 10.6.8 fully functioning and stable. However, even though I am using 3 Kext files from 10.6.7 in S/L/E - AppleACPIPlatform version 1.35 - IO80211Family version 3.14 - IOPCIFamily version 2.6, I get no Airport wireless functionality and the usual no USB and CD Rom detecting along with a very sluggish system when I re-enable my wireless card in the bios. - Darren PS: To give a little back to this site I have used both EDP 1.91 and 1.92 on my D530 which works flawlessly along with their included boot loaders for 10.6.7 and 10.6.8 (with my wireless disabled in bios) Hence I will not give up until I have 10.6.8 working with wireless and consider me your official D530 feedback provider. Currently using T7700 Core 2 Duo (4M Cache, 2.40 GHz, 800 MHz FSB) with Mushkin Enhanced 4GB (2 x 2GB) DDR2 667 (PC2 5300).1 point


.thumb.jpg.b5184797738b717f566a95ca17564c89.jpg)


This leaderboard is set to London/GMT+01:00