Search the Community
Showing results for tags 'e5440'.
Found 12 results
-
I updated from Mojave to Catalina using a guide from this site Everything went well and I accidentally activated FIlevault but i don't seem to see any issues so far except for random kernel panics i've tried updating all the kexts and drivers but i cant seem to be able to fix it They usually happen when the laptop wakes up from sleep or after its been powered on for a while Can you please help me fix it Here is my EFI folder, it's too big to upload here so i uploaded to my google drive I managed to grab the kernel panic error
-
I installed MacOS Mojave 10.14 on my laptop recently, everything works fine except for these things: closing and opening lid does nothing Bluetooth sometimes work sleep doesn't work, its either it wakes up or there is a black screen Fn keys need to be remapped static audio when i inject headphones Im new to the hackintosh stuff, Can anyone please help me fix it if its possible I have attached my EFI folder EFI.zip
-
Hi, Finally I finished the installation of 10.14.6 on my Dell E5440. Everything works just fine, but HDMI will not work. Every time I plug it in, it causes a grey screen on my laptop monitor. Also on boot up. I attached my EFI Folder, maybe someone can help me. I searched a bit and read something about Azul Framebuffer Kext. Thank you for helping. Greedings, Hugo EFI EFI.zip
-
Hi @Jake Lo On reboot, the Bluetooth device needs to be removed and reconnected to get it to work again. Is there something that can be fixed here?
-
Hi All, I am new here and after struggling for over 16 hours, I finally managed to install MAC OS 10.14.6 on my Dell E5540. A big THANK You to all the members in the forum who helped me get this far. Bluetooth, WiFi, Sound, and Display working!! I am stuck with the last piece, my HDMI port is not working. Connecting HDMI cable makes the laptop display go black and my monitor doesn't detect any signal. From this point, there is no way to recover the display and I need to do a force reboot. I would like to use a monitor in my setup as the laptop display is not that great. Can someone please help me in layman terms? Sorry for my lack of knowledge on this matter. Appreciate help on this.
-
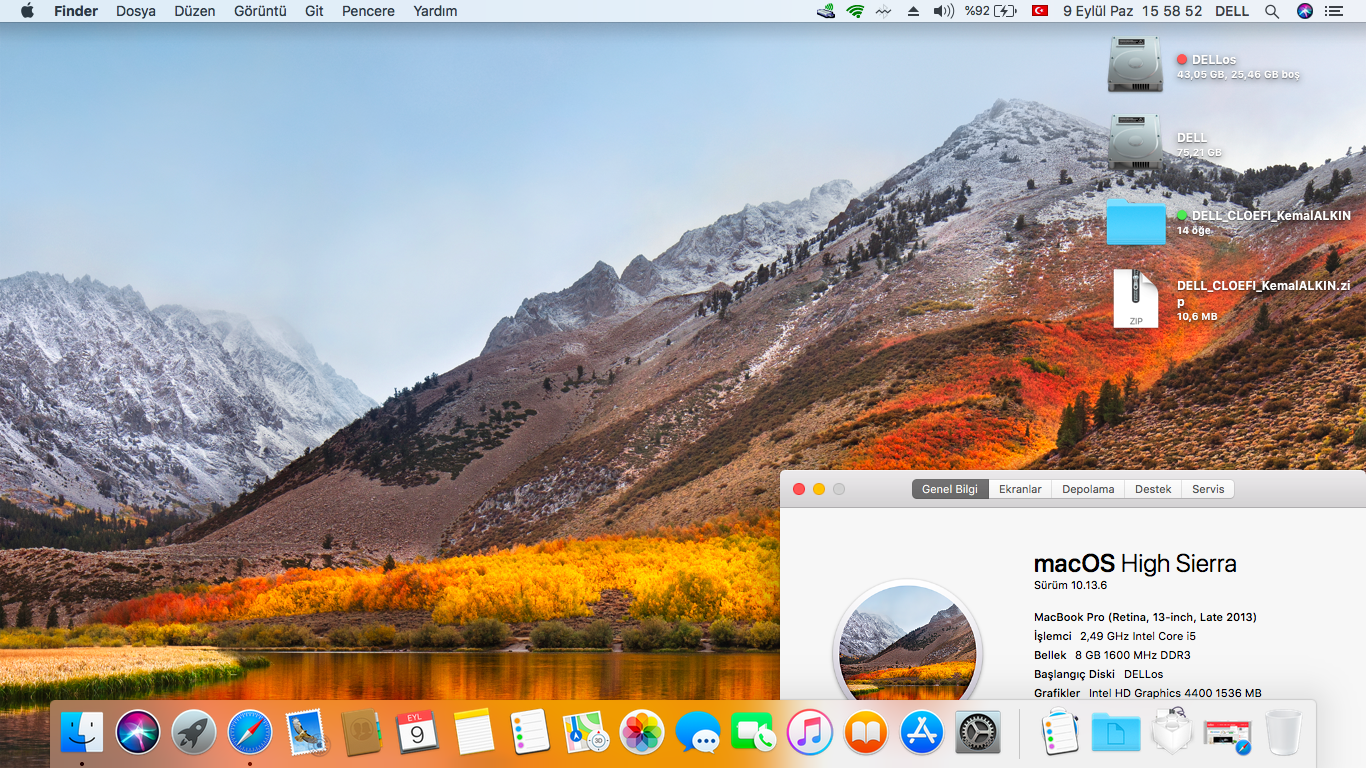
[SUCCESS] DELL LATITUDE E5440 macOS Mojave 10.14 (Updated) Download: - - > > "DELL"_"CLO"EFI"_"Kemal"ALKIN".zip" < < - -

-
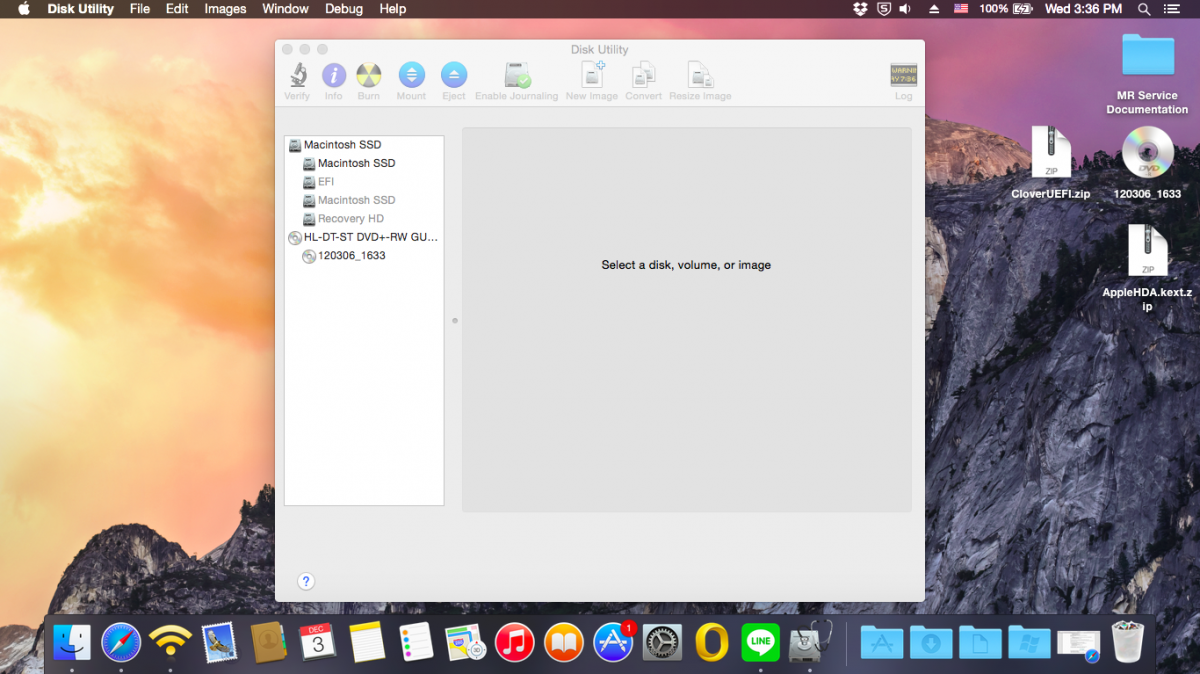
 This is a guide on how to install Yosemite on a Dell Latitude E5440 (2014 version) with Intel HD 4400 Graphics, i5 Processor and Clover UEFI as bootloader. Special thanks to Herve, JakeLo, serotizm, and nguyenmac which provided a very useful guide and which this guide takes a lot of info from: Requirements: - Yosemite App downloaded to /Applications directory on your mac - CloverUEFI.zip files located on attachments below - AppleHDA.kext.zip located on attachments below USB Installer Preparation: 1. Prepare a USB with 8GB or more, format by Disk Utility: - Partition Layout: 2 Partitions - 1st Partition: Name CLOVER, Format: MS-DOS (FAT), Size: >300MB - 2nd Partition: Name MacUSB, Format: Mac OS Extended (Journaled), Size: >7GB - Options: Master Boot Record - Download the CloverUEFI.zip files and copy the whole directory into the CLOVER partition in your USB. 2. Create Yosemite Installer partition (need a Mac), - Download Yosemite Install app from AppStore. - Enable Hidden Files to be shown by opening up a terminal and running the following command: defaults write com.apple.finder AppleShowAllFiles YES - Hold 'alt' on your keyboard, then right click on the Finder icon in the dock and click Relaunch. - Right click to Yosemite Install app > Show Package Contents > Contents > Shared Support and open InstallESD.dmg - Open OS X Install ESD partition, open BaseSystem.dmg (hidden file) - Use Disk Utility to clone OS X Base System to MacUSB partition. - Rename the newly created/restored "OS X Base System" partition in your USB to "Install OS X Yosemite" - Go to System/Installation of "Install OS X Yosemite" and delete the alias “Packagesâ€, then go to “OS X Install ESD†partition, copy the “Packages†folder to System/Installation of "Install OS X Yosemite" - Copy BaseSystem.dmg and BaseSystem.chunklist (hidden files) from "OS X Install ESD" to "Install OS X Yosemite" (on your USB) You can hide the hidden files again in your mac by running the following command from a terminal window and relaunching Finder: defaults write com.apple.finder AppleShowAllFiles NO BIOS Preparation - Enable UEFI Boot Option - Set SATA to AHCI - Disable Legacy Boot Option - Disable "Wake on LAN" - Make sure Data Execution Prevention is enabled - Plug your USB to the laptop Yosemite Installation - Upon turning the laptop on, press F12 to enter the one-time boot up menu - Choose to boot from your USB - Once Clover Boot Menu appears, choose "Boot OS X from Install OS X Yosemite" and press enter. Already the config.plist supplied on the zip file is configured with the boot-arguments that worked for me. - Press spacebar if a nagging screen about Mouse/keyboard appears. Install screen will appear, use Disk Utility to format your drive as GPT, create a Mac OS X Extended (Journaled) partition and install Yosemite to your formatted partition. - Restart once the installation finishes - Boot from your USB again. - Once in the Clover Boot Menu, PRESS F4, and then select to boot from the partition you created and installed OS X on the previous steps. - If all is good and the force is strong with you, it should boot up. Now you can create your account and configure the settings. Post Installation For this part we will install the Clover Bootloader on the hard drive where Yosemite is installed, and since the USB you used worked to boot up, its best to use these same files for the permanent bootloader. - Open a Terminal window a run the following command: diskutil list and then take note of the IDENTIFIER of the EFI partition from the main hard drive where Yosemite is installed, and run the following command: newfs_msdos -v EFI -F 32 /dev/rIDENTIFIER using the IDENTIFIER from your EFI Partition. Don't forget the "r" before your IDENTIFIER - Make sure Disk Utility is closed - Open a Terminal Window and run the following command: defaults write com.apple.DiskUtility DUDebugMenuEnabled 1 - Open Disk Utility - You will now see a "Debug" menu in the top menu option - Enable the "Show every Partition" option - Now on the list of partitions you will see an "EFI" Partition under your main hard drive. Right click on it and choose to mount it. - Go to the EFI partition we just mounted and copy all the contents of your CLOVER partition to the root of the EFI partition. - Remove your USB and reboot. - You should now be able to see the Clover Menu without having the USB on your computer. Before selecting to boot up from your partition, PRESS F4 (only this time is needed...), and select your partition and press ENTER. - Yosemite should boot up now. Hope this helps!! Best Regards, jorgexgb AppleHDA.kext.zip CloverUEFI.zip
-
I've managed to install El Capitan on my Latitude E5440. The only thing I've gotten to work so far is the ethernet. I tried looking at tutorials to get the Intel HD 4400 graphics to work but nothing was successful, only thing I did was make it display the name of my graphics in the about this mac window. And I've also tried pretty much every tutorial on this site for the E5440 and still nothing is working. Please help me.
-
So I have OS X Yosemite fully installed with clover but is it possible to boot windows with it, or shall I just use VMware fusion. Another question is that is it possible to boot straight into os x without it showing me the clover gui (I mean with clover installed but without having to show me the clover page when I switch on os x) Also my clover GUI is weird first time I installed it, it had a Yosemite background with square tiles. now it just has a blue background with disk like looking options. Another thing is because I am on Yosemite, can I update it to elcaptin My Laptop: Dell Latitude E5440
-
Hello, I have successfully dual installed Yosemite and Windows 10 on latitude E5440. Bluetooth, Key Board, Mouse working fine. Trackpad - Not working. I can live with that. Wifi - Not working (As all Intel wifi are not compatible with OSX). Has anyone tried any of the USB Wifi adapters for E5440? How do they work? Can someone suggest me good USB Wifi adapters for my Hackintosh. Thanks in advance!
-
Hi, New dell here but in need for some hints about running Maverick on the following specs. Myhack installation is ok but afterwards also no usb/audio and fails on graphics because -x works Clover has the same issues so possible some hints toward the right files would be awesome. specs: CPU: I5-4310u with intel hd 4400 8GB ram Dell E5440: 00:00.0 Host bridge: Intel Corporation Haswell-ULT DRAM Controller (rev 0b) 00:02.0 VGA compatible controller: Intel Corporation Haswell-ULT Integrated Graphics Controller (rev 0b) 00:03.0 Audio device: Intel Corporation Haswell-ULT HD Audio Controller (rev 0b) 00:14.0 USB controller: Intel Corporation Lynx Point-LP USB xHCI HC (rev 04) 00:16.0 Communication controller: Intel Corporation Lynx Point-LP HECI #0 (rev 04) 00:19.0 Ethernet controller: Intel Corporation Ethernet Connection I218-LM (rev 04) 00:1b.0 Audio device: Intel Corporation Lynx Point-LP HD Audio Controller (rev 04) 00:1c.0 PCI bridge: Intel Corporation Lynx Point-LP PCI Express Root Port 1 (rev e4) 00:1c.3 PCI bridge: Intel Corporation Lynx Point-LP PCI Express Root Port 4 (rev e4) 00:1c.4 PCI bridge: Intel Corporation Lynx Point-LP PCI Express Root Port 5 (rev e4) 00:1d.0 USB controller: Intel Corporation Lynx Point-LP USB EHCI #1 (rev 04) 00:1f.0 ISA bridge: Intel Corporation Lynx Point-LP LPC Controller (rev 04) 00:1f.2 SATA controller: Intel Corporation Lynx Point-LP SATA Controller 1 [AHCI mode] (rev 04) 00:1f.3 SMBus: Intel Corporation Lynx Point-LP SMBus Controller (rev 04) 01:00.0 SD Host controller: O2 Micro, Inc. SD/MMC Card Reader Controller (rev 01) 02:00.0 PCI bridge: Wilocity Ltd. Wil6200 PCI Express Root Port (rev 04) 03:00.0 PCI bridge: Wilocity Ltd. Wil6200 PCI Express Port (rev 04) 03:02.0 PCI bridge: Wilocity Ltd. Wil6200 Wireless PCI Express Port (rev 14) 03:03.0 PCI bridge: Wilocity Ltd. Wil6200 Wireless PCI Express Port (rev 14) 04:00.0 Network controller: Qualcomm Atheros AR9462 Wireless Network Adapter (rev 01) lspci -nn pcilib: 0000:00:02.0 64-bit device address ignored. 00:00.0 Host bridge [0600]: Intel Corporation Unknown device [8086:0a04] (rev 0b) 00:02.0 VGA compatible controller [0300]: Intel Corporation Unknown device [8086:0a16] (rev 0b) 00:03.0 Audio device [0403]: Intel Corporation Unknown device [8086:0a0c] (rev 0b) 00:16.0 Communication controller [0780]: Intel Corporation Unknown device [8086:9c3a] (rev 04) 00:19.0 Ethernet controller [0200]: Intel Corporation Unknown device [8086:155a] (rev 04) 00:1b.0 Audio device [0403]: Intel Corporation Unknown device [8086:9c20] (rev 04) 00:1c.0 PCI bridge [0604]: Intel Corporation Unknown device [8086:9c10] (rev e4) 00:1c.3 PCI bridge [0604]: Intel Corporation Unknown device [8086:9c16] (rev e4) 00:1c.4 PCI bridge [0604]: Intel Corporation Unknown device [8086:9c18] (rev e4) 00:1d.0 USB controller [0c03]: Intel Corporation Unknown device [8086:9c26] (rev 04) 00:1f.0 ISA bridge [0601]: Intel Corporation Unknown device [8086:9c43] (rev 04) 00:1f.2 SATA controller [0106]: Intel Corporation Unknown device [8086:9c03] (rev 04) 00:1f.3 SMBus [0c05]: Intel Corporation Unknown device [8086:9c22] (rev 04) 01:00.0 SD Host controller [0805]: O2 Micro, Inc. Unknown device [1217:8520] (rev 01) 02:00.0 PCI bridge [0604]: Unknown device [1ae9:0101] (rev 04) 03:00.0 PCI bridge [0604]: Unknown device [1ae9:0201] (rev 04) 03:02.0 PCI bridge [0604]: Unknown device [1ae9:0201] (rev 04) 03:03.0 PCI bridge [0604]: Unknown device [1ae9:0201] (rev 04) 04:00.0 Network controller [0280]: Atheros Communications Inc. AR9462 Wireless Network Adapter [168c:0034] (rev 01) *Update Started over with a clean myhack: resulted in reboot loop/no error visible. Added bootpack found here to myhack: resulted in reboot Added different SSDT.aml found here to bootpack/extra: result = ok and without any boot options (loaded the extra folder when the installer asked for this) \==> this step gave me from here a succesvol instal followed by a working hackintosh (see below for the list of kext's) Not working: Wifi/bluetooth: sadly no go unless some genius fixes this. Audio: looking for a fix. speedstepping? sleep Clover: how to transform chameleon config to Clover config (work in progress) In attachment my dsdt dump for those who can look into it. *kexts currently in use in /Extra/Extensions AppleACPIPlatform.kext EAPDFix.kext AppleHDA.kext FakeSMC.kext AppleIntelCPUPowerManagement.kext GenericUSBXHCI.kext AppleIntelE1000e.kext IOAHCIFamily.kext AppleSmartBatteryManager.kext VoodooPS2Controller.kext DisableTurboBoostBattery.kext lspcidrv.kext System DSDT.txt
-
Hi! Now i'm thinking about upgrading my cpu from a dual core (E7400) to a quad core (Q9550). 2 more core-s, 4 times more cache and the same (775) socket. But it can cost more than 130 usd, what (maxbe the max amount of money what i can spend for it) is a bit much, but if the system runs without fail with it i'll spend it without questions. There are an other option. There is a Xeon cpu (E5440) which is equivalent with the Q9550, but for maybe the half of the price. My question is about the choice and the experience: Anybody using, or have experience about one of this cpu in the hackintosh system? I'm running 10.9.2 on my machine, and i most using it for 3D work and rendering. Which one can be worth it or which one is working with the a mac? Can i use the Xeon processor or i have to buy the original Q9550? (I installed my system with myhack installer) Thanks! System: (Intel Core 2 Duo E7400 - 2,8 Ghz 1066 Mhz) Gigabyte GA-G41M Combo ATI Radeon HD 4670 1GB 8 GB 1066 Mhz DDR3 RAM (2x4GB)