Hervé
-
Posts
10077 -
Joined
-
Last visited
-
Days Won
569
Content Type
Profiles
Articles, News and Tips
Forums
Everything posted by Hervé
-

[Solved] MC7710 on mojave 10.14 can't connect
Hervé replied to antizo's topic in Modems/WWAN modules
Sorry, 'never heard of it. -
Setting kexts injection to "Detect" is fine. The question is: do you know what this does/do you know how kext injecton works? Hence the need to know where you placed FakeSMC... Did you install any kexts in /L/E?
-
[Solved] MC7710 on mojave 10.14 can't connect
Hervé replied to antizo's topic in Modems/WWAN modules
So the main change was the uninstallation of the SierraWireless drivers. The WWAN icon may simply refer to a different piece of previously registered hardware from when you had the SierraWireless drivers installed. It may be like when you choose show the Bluetooth icon in the menu bar and then remove or disable the Bluetooth hardware: the icon stays there but is unusable. Try and uncheck the box used to display the icon, then recheck it afterwards. -
Ok but do you inject or cache kexts (latter recommended)? Where is FakeSMC?
-
That difference in "About this Mac" is just language related and is totally irrelevant to your DRM predicament. If you switched to English you'd have the "graphics" word in the report. The DRM/green screen issue was normally solved by Shiki kext, which is now integrated in WEG Lilu PlugIn, so all should be ok on that front.
-
[Solved] MC7710 on mojave 10.14 can't connect
Hervé replied to antizo's topic in Modems/WWAN modules
That "Key" field is just like a title, so if that's the only thing you modified, it's not possible that it made a change in terms of operations; you must have changed something else. In addition if you opted to modify the vendor id of your dedicated entry from 0x1199 (i.e. 4505 in decimal) to 0x(0)199 (i.e. 409 in decimal), then your dedicated entry no longer applies to your hardware (its ids obviously will not change!) and another profile is being used instead... -
Dell Latitude E6530 Mojave(10.14.4) did not detect Trackpad
Hervé replied to npyadav1's topic in The Archive
Really? I found no particular issue on that front but maybe I have a more masculin touch on the TrackPad! You can always try to adjust the Info.plist parameters (tresholds, ZLimit, etc.) of the VoodooPS2TrackPad PlugIn of the kext. You may also compare them with Rehabman's kext and see if there is an obvious difference somewhere. Do not forget you can also adjust some settings through the... TrackPad PrefPane of course! -
Not the best choice of DW1820A unfortunately. You probably won't get wireless working with that one...
-
May be your ought to have a much closer look at the properties you're injecting...
-
Mojave on the Precision m6700 - Need some help with sleep and Nvidia GPU
Hervé replied to katana9x99's topic in The Archive
Sleep is not only affected by hibernation mode, it also heavily relies on fully working CPU power management; you don't have that at the moment. Proceed as follows: generate your CPU-specific power management SSDT with Pike R Alpha's well-known generator script (you can Google for it) and place the resulting ssdt.aml file in Clover's ACPI/patched folder. using Clover Configurator app, drop SSDT CpuPm + SSDT Cpu0Ist tables. using Clover Configurator app, select an appropriate quad-core i7 IvyBridge MacBookPro9,x/10,x SMBIOS instead of that incorrect desktop iMac14,2 you currently use and, of course, remove that NullCPUPowerManagement kext you've added to your Clover kexts folder since that completely kills off CPU power management and will prevent Sleep. -
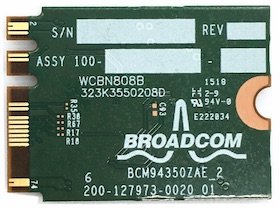
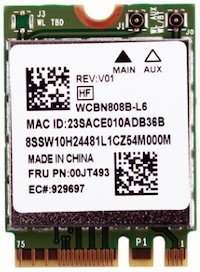
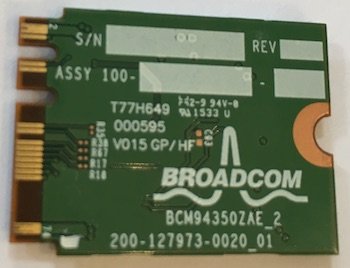
Lite-On WCBN808B: According to Wikidevi, DW1820A are manufactured by Lite-On with part # WCBN808B. I was not able to verify this for certain and could not find any specific info for a Lite-On WCBN808B card but this number is printed at the back of my Dell DW1820A 0VW3T3 cards. I also found a Lenovo card (FRU 00JT493) carrying that WCBN808B reference on its front label. That card is definitely based on BCM4350 chipset. Afaik, it's not been tested yet but I'll try to get one too. Untested So, as it turns out so far, WCBN808B reference is printed on: Dell's CN-0VW3T3 Dell's CN-096JNT Dell's CN-08PKF4 Lenovo's 00JT493 It is not printed on: Foxconn's T77H649

-
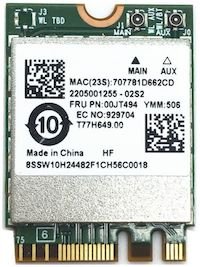
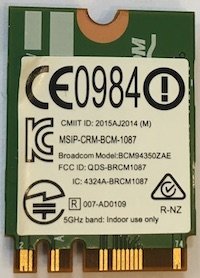
Last Update: 6th Jan 2020 Foxconn T77H649.00: Ok Foxconn T77H649.00 appears mostly offered with Lenovo laptops and carries Lenovo FRU (i.e. part #) 00JT494. The cards carries the usual Broadcom PCI id 14e4:43a3 and subsystem id 17aa:075a. - - - - - - - - - - Edit: 06 Jan 2020 This Foxconn T77H649 works perfectly with ASPM disabled through bootloader property injection under the associated device address: Key = pci-aspm-default | Value = 0 | Type = NUMBER ASPM disabling appears mandatory with this card to avoid CPU overloading and system freeze after a few minutes.
-
Dell Latitude E6530 Mojave(10.14.4) did not detect Trackpad
Hervé replied to npyadav1's topic in The Archive
It will if you install or inject Dr Hurt's VoodooPS2Cntroller R6 compiled by Bronxteck. Look it up on p1 of Dr Hurt's PS2 controller kext thread in R&D->Kexts section. -
Your kexts set is incorrect: you're injecting AppleALC (for audio) and that's all you need. Get rid of those VoodooHDA + patched AppleHDA kexts you're trying to inject too. Re: USB, I did not see any ACPI folder in that Clover folder of yours so it's difficult to know if you are injecting a patched DSDT + a CPUPM SSDT for your CPU. If your USB ports are not all working, proceed as follows: Download latest Clover Configurator app Edit your config.plist with CC Properly inject MBP9,2 SMBIOs (right now it's an empty shell) In ACPI section, addd renaming of EHC01/EHC02 to EH01/EH02
-
For BT, just install Rehabman's BrcmFirmwareRepo + BrcmPatchRAM2 kexts. Nothing else. I've specified the model of Webcam fitted to my 7490 in my guide and yours clearly is a different model.
-
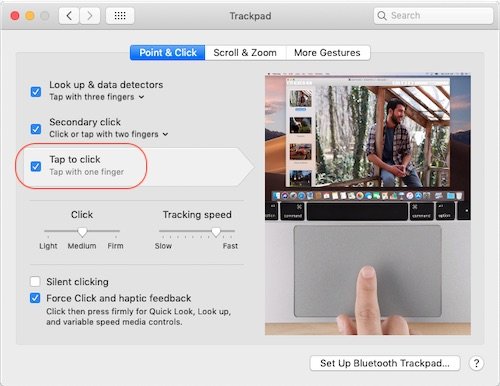
Tap to click option is not enabled by default in the TrackPad PrefPane; you have to set it manually. DW1560 is probably the best alternative if you cannot get a DW1820A 0VW3T3 model. Latitude 7490 only has 2 x antennas cables going to the WLAN slot. Any other M.2 cards based on Broadcom BCM4352 chipset should work too: AzureWave AW-CB162NF, Foxconn T77H543.00, Lite-On WCBN802B.
-
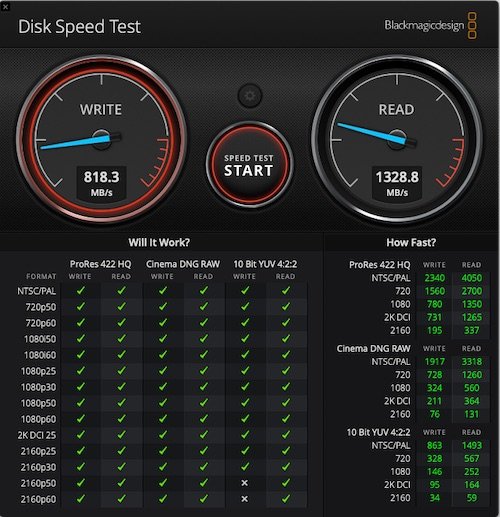
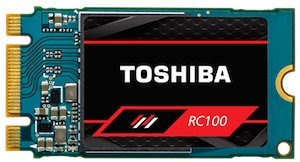
Dell Latitude 7490 (PCIe v3.0 x4 M.2 slot) with Toshiba RC100 M.2 2242 240GB NVME SSD (Gen3.1 x2)
-
E7470 Audio and Bluetooth stopped working on 10.14.4
Hervé replied to revydol's topic in The Archive
If you've opted for recommended kexts caching through /L/E rather than kext injection, yes. -
E7470 Audio and Bluetooth stopped working on 10.14.4
Hervé replied to revydol's topic in The Archive
Make sure you use the latest versions of Lilu + AppleALC + CodecCommander kexts and that your audio is configured as per the recommended settings (layout). -
Why don't you try as per the guide to see if it works better? This being said, I'm starting to have doubts about that specific model of DW1820A that carries subsystem id 1028:0023. There are now several people experiencing issues with that model. I have 2 x DW1820A carrying subsystem id 1028:0021 and these work 100% Ok in my Latitude 7490. I'm yet to test them in my Toshiba. According to wikidevi, there are 3 x different models of DW1820A carrying a same vend/dev id 14e4:43a3 but each carrying a different subsystem id: 1028:0021 -> tested Ok with 2 x different cards 1028:0022 -> not encountered yet, not tested 1028:0023 -> mostly bad feedback (several people reporting 5-10mins Ok, then system freeze). May be worth trying to inject subsystem-id 21000000 DATA to fake 1st model.
-
Must be a USB issue: there's no Bluetooth module listed in your SysProfiler. What's the reason for disabling the renaming of EHCx devices to EH0x devices in your Clover config?
-
I've indeed reproduced the issue; I'm using an external USB mouse most of the time so I did not get that message and never realised the TouchPad does not work during installation; can't say if it's an issue of kexts injection because I've tried to boot my Mojave installation with injected kexts, having deleted all add-on kexts from /L/E and rebuilt the cache, and TouchPad worked Ok. If you can use an external mouse, you'll be Ok.
-
Go to you account icon at top of Web page and select "My Attachments". You'll get the complete list from where you can lookup the largest ones. You can then click on the link to reach the posts that contains them from where you'll be able to edit the post and remove the attachments.
-
Free up your attachment space by removing some of your old and large items. You may also save space by minimising the size if stuff you attach such as Clover config folder by removing all the non-necessary data like the Themes subfolder for instance. Attaching very large raw 4K pictures is also taking up space unnecessarily (and totally useless), so resize them to like 800x600 before attaching them. By following those common sense recommendations, you'll save a lot of space.
-
Are you sure you're injecting kext from EFI/Clover/kexts/other and not caching from /L/E? If FakeSMC is in /L/E, Clover will not inject kexts.