Hervé
-
Posts
10069 -
Joined
-
Last visited
-
Days Won
569
Content Type
Profiles
Articles, News and Tips
Forums
Everything posted by Hervé
-
Re: audio, you'll have that working if you follow the same process as for any Latitude E6x20 laptops. They have same IDT 92HD90 codec. But since you've not bothered to provide any details of your installation, we can't guess whether you'll need patched AppleHDA kext for Enoch or on-the-fly patches for Clover. Anyway, if you search the forum, you'll find what you need. Same for GPU, we don't know whether you use integrated HD3000 or discrete nVidia Quadro 4000M with Optimus disabled.
-
Fans not being detected at OS level is not necessarily an issue; BIOS is perfectly able to control fans according to CPU T° and other elements. This being said, are you using a recent FakeSMC and all its sensors PlugIns?
-
Not a known issue on the E6220. Can you give some examples?
-

Suggest a Latitude E6220 compatible Half Mini-PCIe card
Hervé replied to mademax's topic in The Archive
Please refer to the FAQ section. -
E7440: problems during Sierra installation with Clover 3998
Hervé replied to dctacsi's topic in The Archive
Bottom line is: can you connect to your wireless network now with my posted patched DSDT? -
Inspiron 5548 with AMD Radeon R7 - Help with MacOS Sierra
Hervé replied to JoaoVSouza's topic in The Archive
If LAN is en0, then you should be able to access AppStore. What message do you get? -
Inspiron 5548 with AMD Radeon R7 - Help with MacOS Sierra
Hervé replied to JoaoVSouza's topic in The Archive
Re: AppStore, check that your LAN card has registered as interface en0. In Terminal, type ifconfig to verify this. If it's not en0, delete all network cards from your Network PrefPane and all plist files from /Library/Preferences/SystemConfiguration. Reboot and check your Network PrefPane. If no interfaces are there, manually add the Ethernet. In Terminal, your LAN card should now be registered as en0. -
https://osxlatitude.com/index.php?/topic/8696-is-my-wireless-card-compatible-with-os-x/
-
E7440: problems during Sierra installation with Clover 3998
Hervé replied to dctacsi's topic in The Archive
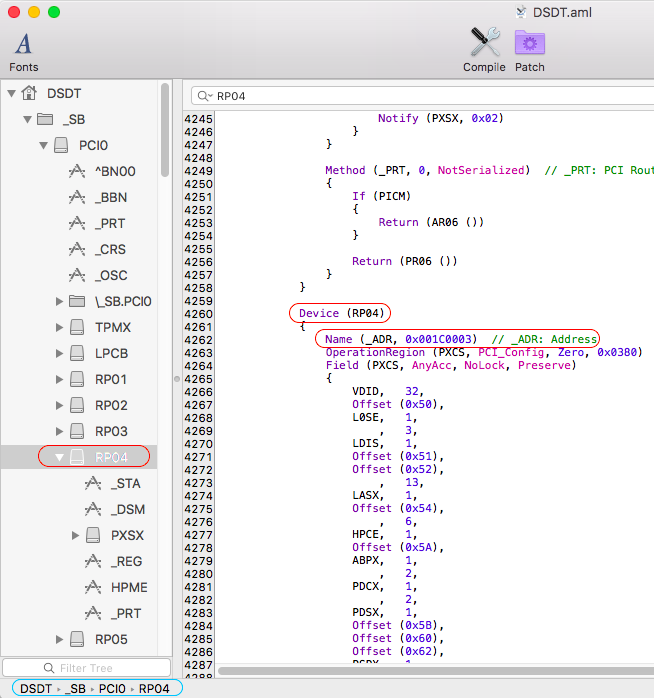
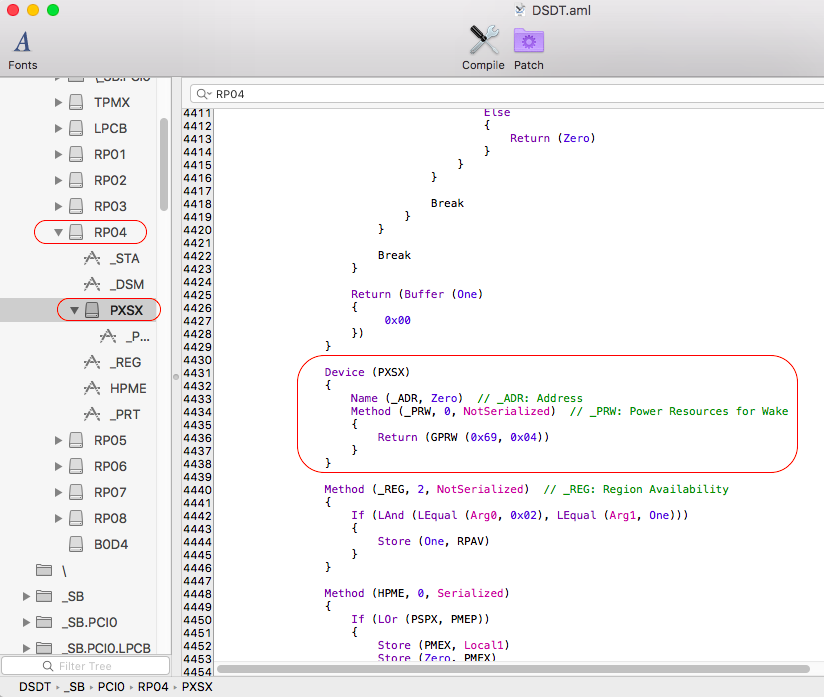
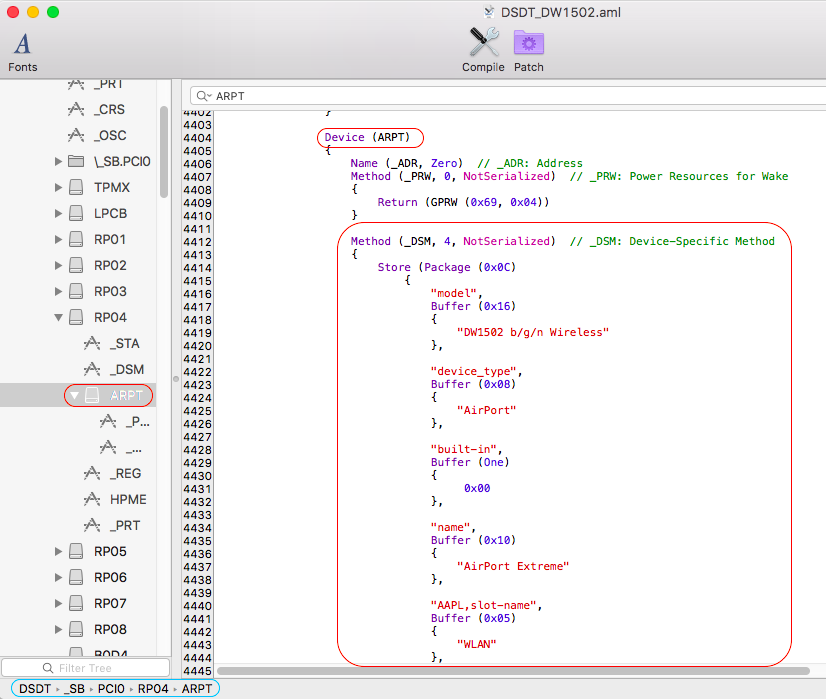
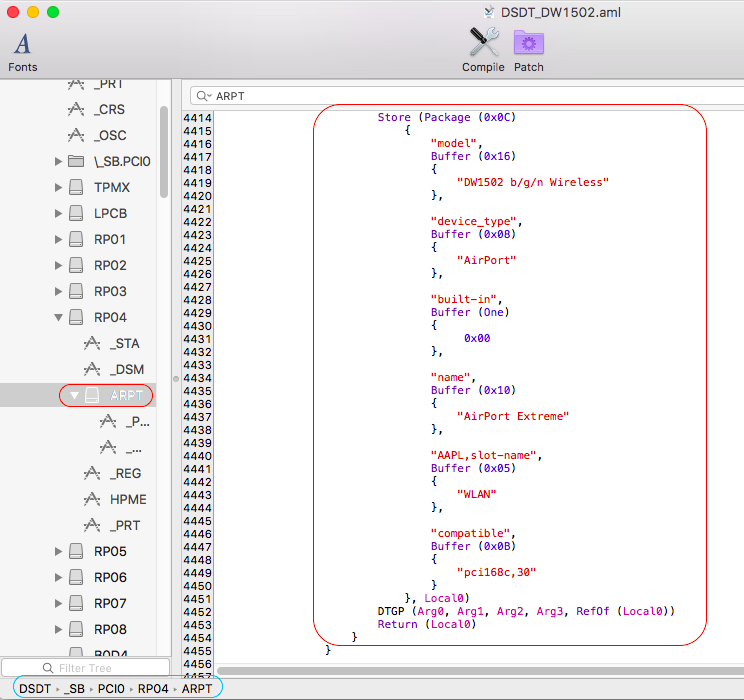
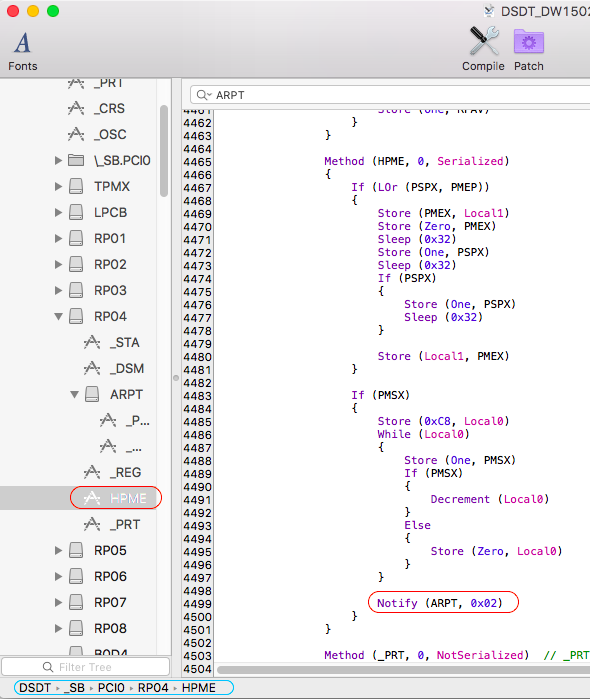
Keep a backup of your previous DSDT somewhere and replace it with the following revised patched version (rename it to DSDT.aml or call it as DSDT_DW1502.aml in the boot loader). DSDT_DW1502.aml.zip Your IOReg shows your DW1502 card with id 168c,2b under device PXSX attached to device RP04@1C,3: In DSDT, we therefore look for that device RP04 at address 0x001C0003 (=1C,3): We find the device PXSX attached to it: Then we apply the published patch.1) we rename device PXSX to ARPT (common Apple wireless device name) and inject the _DSM method that declares compatibility with supported Atheros AR9380 chip 168c,30 (only the "compatible" statement is mandatory, rest is just cosmetic): 2) At compilation, an error message reports that there is a reference to an unknown device PXSX under HPME. We therefore rename this old reference to RP04.PXSX to ARPT: That's it, table now recompiles without error! Your DW1502 should now always work under any version of OS X that natively supports Atheros AR9380 chip.
-
Yup, Ivy Bridge i3 CPUs don't have Turbo boost at all and the i3-3110M runs @2.4GHz and that's it. So you can't disable something not available... To be honest, I never use that Turbo-disabler-on-battery kext. My laptops run at full performance capacity all the time.
-
E7440: problems during Sierra installation with Clover 3998
Hervé replied to dctacsi's topic in The Archive
Please post your DSDT + saved IORegistryExplorer output. Both zipped. -
Maybe because it was compiled with another tool such as DSDTEditor or the file is corrupt.
-
BIOS upper limit for OS X should be around same version as for the E6230, i.e. A11. It could be A12 of course but I don't think you can go much higher... Do a Search on the forum on "E6330 BIOS" and see what you find... Failing that, best way to know is to try until your graphics go bad, then reverse to oldest possible version like A02 and upgrade again to the highest safe version. I'd bet money on A11.
-
[Solved] E5420: display+LAN+audio issues with Yosemite and El Capitan
Hervé replied to amthb0's topic in The Archive
No, you're missing the point totally. You won't be able to boot your installed system unless you copy the /Extra folder and the necessary kexts to your freshly made OS X installation. Reboot your USB installer, go to the main installer screen and run Terminal from Tools menu. Then copy the Extra folder from your USB key to your freshly made OS X volume/partition. diskutil list -> to identify the name of your freshly made OS X volume/partition cp -Rf /Extra /Volumes/<name of identified OS X partition> ` I can only advise you to read my Chameleon/Enoch-based Yosemite/ElCapitan/Sierra guides posted here to familiarise yourself with the actual installation process. Until you fully understand it, you will probably not succeed. This being said, you must have managed to copy something to be able to boot OS X. Maybe you're actually using distros... But if you've not copied the Extra folder, you're missing the DSDT so you'll have to manually set DualLink through Chameleon boot option EnableDualLink=Yes. You may add Injectntel-ig=00000100 but that's probably not necessary with HD3000. If in doubt, type "?" at Chameleon prompt and you'll see some help on the boot flags and options. -
E7440: problems during Sierra installation with Clover 3998
Hervé replied to dctacsi's topic in The Archive
Cards based on AR9285 Atheros chip require either a patch of the Atheros40 kext or a simpler DSDT patch as published in the wireless card inventory thread. It's a simple matter of identifying your wireless device in IOReg through tools like IORegistryExplorer, then apply the patch to that device in DSDT. You can more or less copy/paste the published patch but all you need is the "compatible" statement. -
[Solved] E5420: display+LAN+audio issues with Yosemite and El Capitan
Hervé replied to amthb0's topic in The Archive
Erm... did you copy/install the /Extra folder of your USB installer to your HDD partition? Seems to me that you did not... -
E7440: problems during Sierra installation with Clover 3998
Hervé replied to dctacsi's topic in The Archive
If you did read the thread, you must have noticed you need a patch... -
E7440: problems during Sierra installation with Clover 3998
Hervé replied to dctacsi's topic in The Archive
https://osxlatitude.com/index.php?/topic/8696-is-my-wireless-card-compatible-with-os-x/ -
[Solved] E5420: display+LAN+audio issues with Yosemite and El Capitan
Hervé replied to amthb0's topic in The Archive
No need to activate "Drop SSDT" in the o.c.B.plist; it's not necessary. Same for "Enable DualLink", it's already set in the DSDT (see IGPU section). This being said, can't see why you'd still have graphics issues. But I do wonder how you boot your Yosemite USB installer, namely which Chameleon version are you using and how do you load kexts from /E/E, especially FakeSMC? Please note that the pack is a little outdated and that you should no longer require the patched AppleSDXC kext since a little DSDT patch suffice for the SD card reader. What's the LAN card on a E5420 by the way? -
Are they both on the same BIOS A11? Which i3 CPU are we talking about here? Please post a zipped copy of your EFI/Clover folder.
-
The custom EDID you've injected does not match the 128bytes value extracted. That's a 1st problem. To begin with, leave that blank and just tick the "Inject EDID" box. If you still don't get the screen working, you may then add the correct 128bytes EDID.
-
No and remove the o.c.B setting, it's not needed. All you need is: 1) the IDT definition/dummy kext copied in /L/E from where it'll be cached 2) patched AppleHDA copied in /S/L/E where it overwrites the vanilla kext 3) permissions repaired on /S/L/E + /L/E and cache rebuilt Assuming you run Sierra 10.12.3, please use the following files: AppleHDA_IDT92HD93.kext.zip Patched_AppleHDA_111D-76DF.kext.zip To repair permissions and rebuild your cache, use the usual Terminal commands: sudo chmod -Rf 755 /S*/L*/E* sudo chown -Rf 0:0 /S*/L*/E* sudo chmod -Rf 755 /L*/E* sudo chown -Rf 0:0 /L*/E* sudo touch -f /S*/L*/E* sudo touch -f /L*/E* sudo kextcache -Boot -U / If you get an error message ".... 77", retype the touch + kextcache commands. Ignore the message if it says "... 17". NB: My E6230 guide was not clear enough in the respect of patched AppleHDA, so I've just updated it to that effect.
-
For DP output, connector #2 (port #6) should be kept (as expected). The pipe lower byte just needs to be set to 0x12. The patch is as follows: 0600 260A 0103 0303 0000 0002 0000 3001 0000 6000 0000 0060 D90A 0000 D90A 0000 0000 0000 0000 0000 0000 0800 0200 0000 ; connector index #0/port #0, connector-type LVDS 3000 0000 0105 1200 0008 0000 8700 0000 ; sets connector-type to HDMI 0204 1200 0004 0000 8700 0000 FF00 0000 ; sets port pipe to 0x12 0100 0000 4000 0000 0F00 0000 0101 0000 0400 0000 0000 0000 0E00 0000 0000 0000
-
[SOLVED] Sierra on E5420 - Graphic glitches while booting Sierra from USB
Hervé replied to encoder's topic in The Archive
Ethernet needs to be 1st interface en0, wifi secondary interface en1. You can verify this through Terminal command ifconfig. If you can make them out, check their respective MAC address through the Network PrefPane (displayed in each interface's Hardware tab). The necessary process to set this up properly has been detailed a dozen times so look it up. That'll work for AppStore and FaceTime. For iMessage, that's far more complicated due to Apple's increased security restrictions over the last few years. Google for it and you'll understand. -
Please read-up the FAQ! Then use Google where you should find that a cat lover is your friend... Anyone is expected to make a minimum effort...