Hervé
-
Posts
10079 -
Joined
-
Last visited
-
Days Won
569
Content Type
Profiles
Articles, News and Tips
Forums
Everything posted by Hervé
-

Guide for enabling VGA, DVI, DP and HDMI in Intel HD4000 GPU
Hervé replied to EMlyDinEsH's topic in Graphics
The mobile HiRes framebuffer 0x01660004, used for laptops with built-in LCD with a resolution greater or equal to 1600x900, only carries 1 x LVDS output port by default. It must therefore be patched to support additional video outputs and HDMI audio: In the case of Sierra 10.12, the vanilla framebuffer 0x01660004 is defined as follows: 04006601 01030101 00000002 // 1 x display output port 00000001 00000060 10070000 10070000 00000000 60290400 00000000 00000000 00000000 05030000 02000000 30020000 // LVDS port 00000000 01000000 40000000 00000000 01000000 40000000 00000000 01000000 40000000 00000000 00000000 00000000 and, building on the patch for LoRes FB 0x01660003, it can be patched to this: 04006601 01020402 00000004 // /!\ patch: 4 x display output port 00000001 00000060 10070000 // *** unmodified *** 10070000 00000000 60290400 // *** unmodified *** 00000000 00000000 00000000 // *** unmodified *** 05030000 02000000 30020000 // *** unmodified *** LVDS 02050000 00080000 07040000 // /!\ patch: HDMI (for audio) 03040000 00040000 81000000 // /!\ patch: DP/DVI (untested) 04060000 00040000 81000000 // /!\ patch: DP/DVI (untested) 00000000 00020011 00000000 // /!\ patch The patch is not a mirror copy or copy/paste of the contents of the LoRes FB. In particular, it's critical to leave the LVDS port definition unchanged (code line starting with 05030000...). In a nutshell, the AppleIntelFramebufferCapri patch consists of: Find: 040066010103010100000002 Replace: 040066010102040200000004 + Find: 0503000002000000300200000000000001000000400000000000000001000000400000000000000001000000400000000000000000000000 Replace: 0503000002000000300200000205000000080000070400000304000000040000810000000406000000040000810000000000000000020011 -
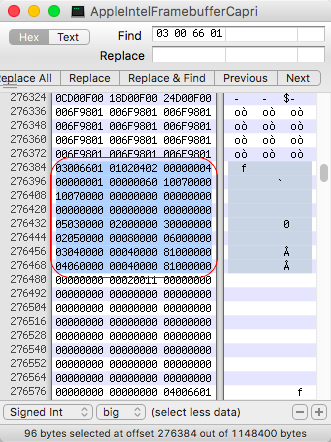
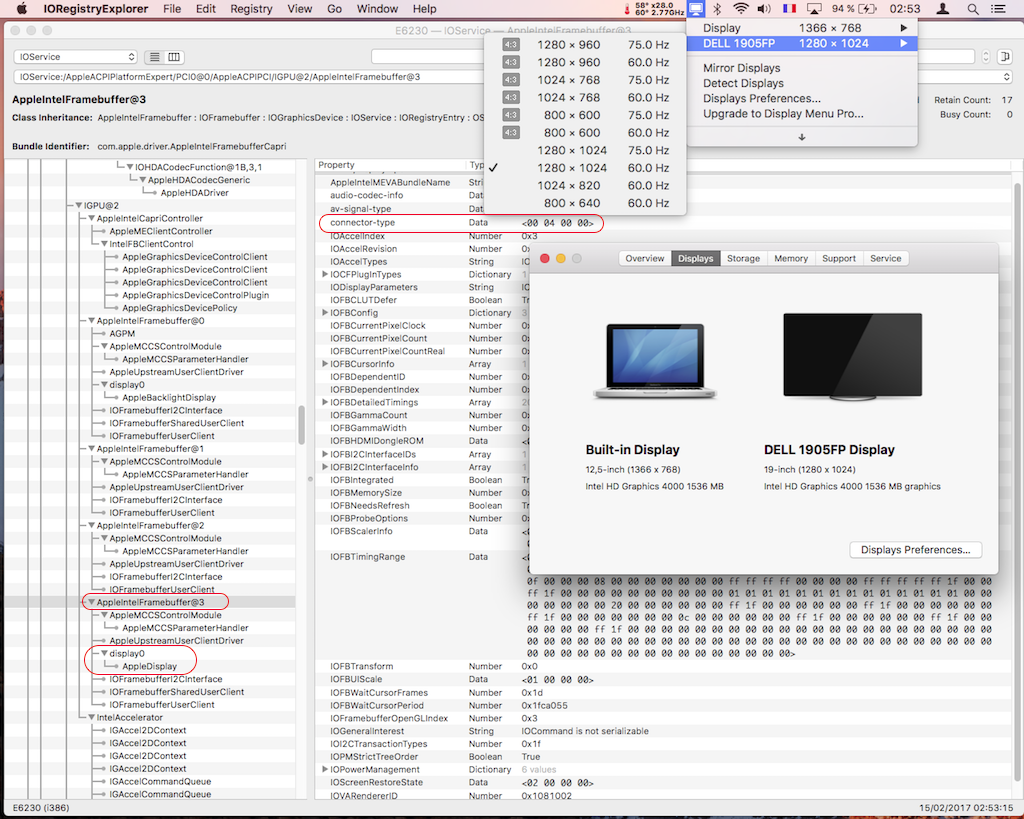
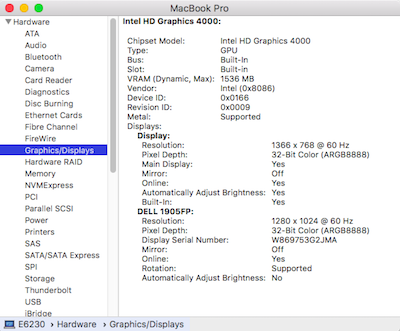
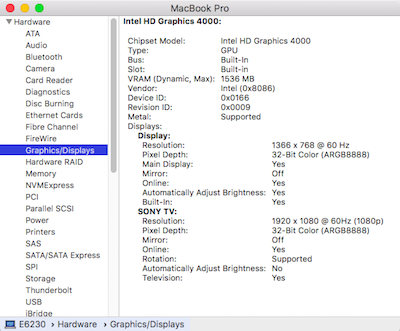
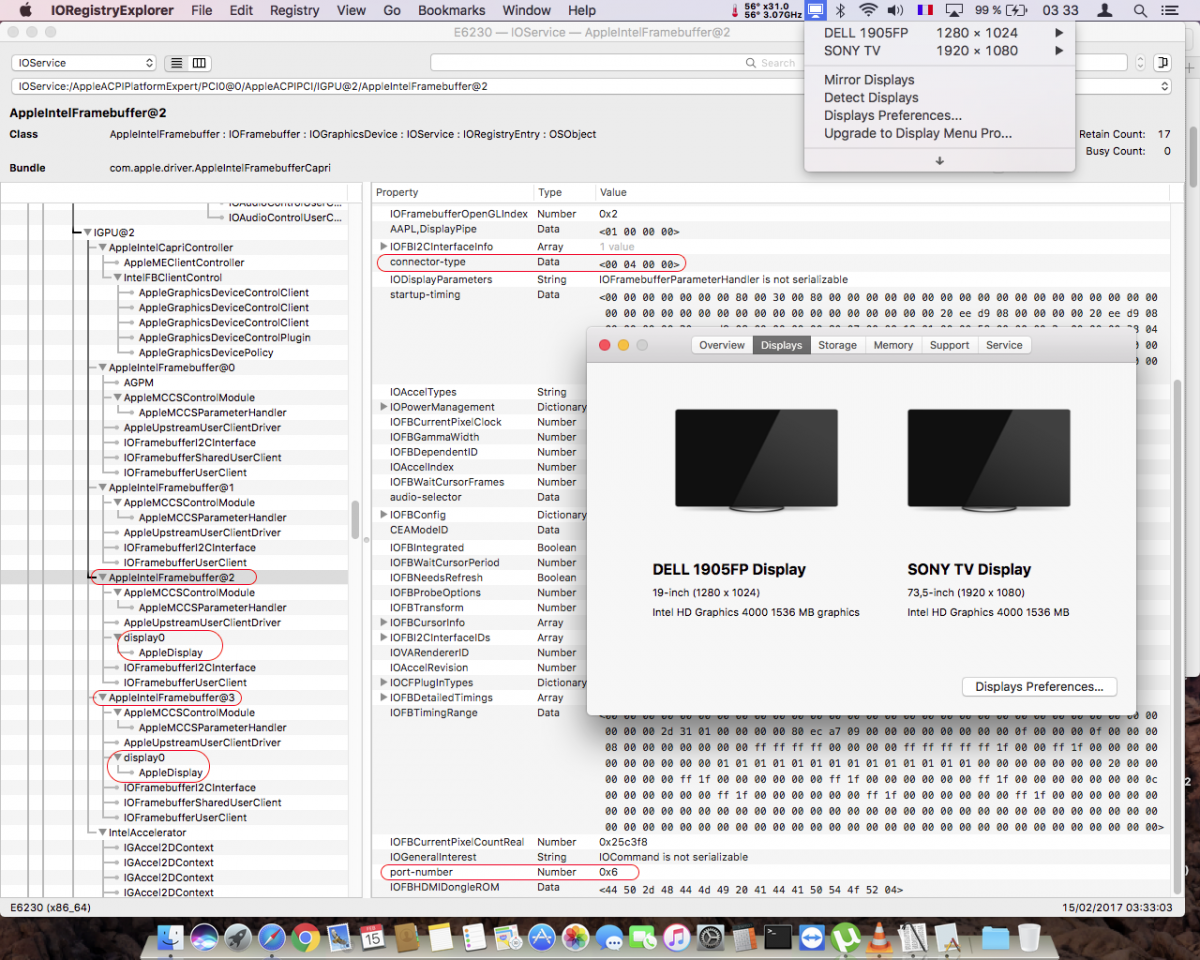
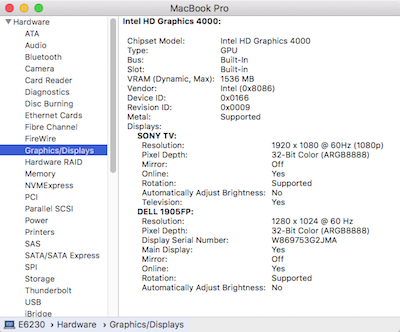
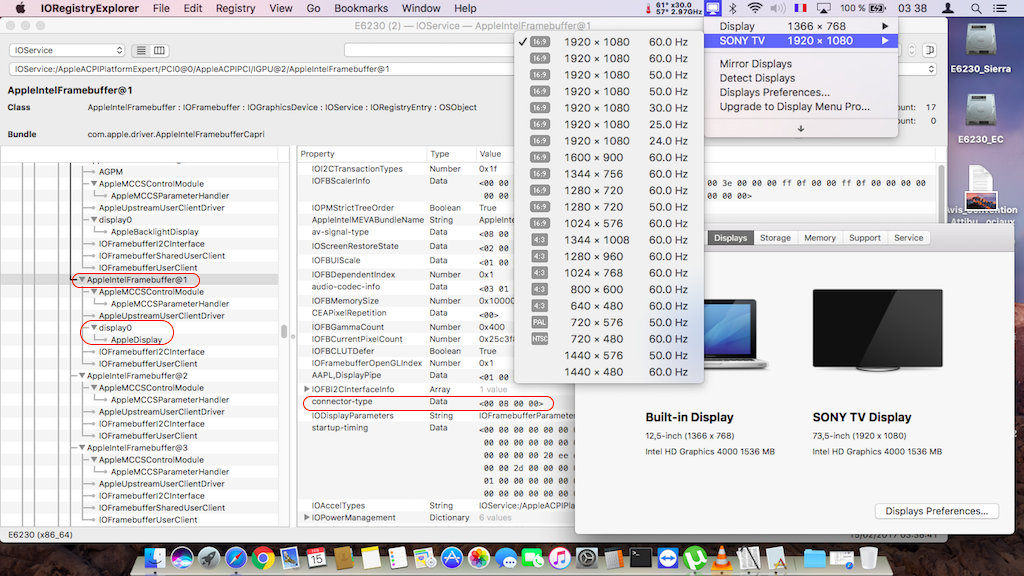
It appears you're confusing things so let's get some facts right to begin with... All E6x30 models, including the E6430s are IvyBridge. The corresponding integrated Intel GPU is HD4000. Under OS X, HD4000 graphics is handled by the Capri framebuffer. The associated kext is AppleIntelFramebufferCapri.kext. As its name actually implies, AppleIntelSNBGraphicsFB is a SaNdyBridge iGPU framebuffer. For SandyBridge, we're talking about Intel HD3000. Whilst VGA output is supported under HD3000 through binary patching of the SNB frame buffer kext, it's regretfully not the case for HD4000 Capri framebuffer kext. So, no VGA output for E6x30 laptops with HD4000 graphics. DP and DVI outputs are supported OOB off Dell's docking station PR03X. HDMI output is normally supported OOB but Capri framebuffer binary patching is usually required to obtain HDMI audio. E6x30 models with LoRes LCD ( E6x30 models with HiRes LCD (1600x900 and higher) use Capri FB #4 (0x01660004) with DualLink enabled HD4000 supports up to 3 x concurrent displays but that can only include a laptop built-in display if it is fitted with an eDP connector. Regretfully, our Dell E6x30 use an LVDS connector for the built-in screen... This being said, to get multiple external displays working, you need to patch your Capri framebuffer accordingly. You may consult the following threads/posts for guidance: https://osxlatitude.com/index.php?/topic/2945-guide-for-enabling-vga-and-hdmi-in-intel-hd4000-gpu/ https://osxlatitude.com/index.php?/topic/9601-e6430-1600x900-intel-hd4000-gpu/page-2&do=findComment&comment=67699 https://osxlatitude.com/index.php?/topic/7914-dell-latitude-e6220-with-i5-2520m-hd3000-and-1366x768-lcd-mavericksyosemiteel-capitansierra/&do=findComment&comment=57882 (HD3000 but good examples of display tracking through IORegistryExplorer ) I use the following CapriFB patch on my LoRes 1366x768 HD4000 Latitude E6230 under Sierra: Basically, I modified the kext layout 0x01006603: from this 03006601 01020402 00000004 // Vanilla: 4 x outputs ports 00000001 00000060 10070000 10070000 00000000 00000000 00000000 00000000 00000000 05030000 02000000 30000000 // Vanilla: LVDS 02050000 00040000 07040000 // Vanilla: DP/DVI 03040000 00040000 81000000 // Vanilla: DP/DVI 04060000 00040000 81000000 // Vanilla: DP/DVI to this 03006601 01020402 00000004 // Vanilla: 4 x outputs ports 00000001 00000060 10070000 10070000 00000000 00000000 00000000 00000000 00000000 05030000 02000000 30000000 // Vanilla: LVDS 02050000 00080000 06000000 // Patched: HDMI 03040000 00040000 81000000 // Vanilla: DP/DVI 04060000 00040000 81000000 // Vanilla: DP/DVI ` By default layout 0x01660003 defines 4 x display outputs. 2 x key elements to understand are: 1) framebuffers (as seen in IOReg) 2) connector-type Framebuffers (as seen in IOReg): 0503 -> Framebuffer #0 (port 0) 0205 -> Framebuffer #1 (port 5) 0304 -> Framebuffer #2 (port 6) 0406 -> Framebuffer #3 (port 7) Connector types: 0200 0000 -> LVDS 0002 0000 -> DVI 0004 0000 -> DP 0008 0000 -> HDMI Note that DVI often works on DP connector-type 0004 0000. When connecting displays to the PR03X, I see the following in IORegistryExplorer (looking where an external display called "display0" appears): HDMI -> Framebuffer #1, connector-type 0008 0000, port 0x5 DP -> Framebuffer #2, connector-type 0400 0000, port 0x6 DVI -> Framebuffer #3, connector-type 0400 0000, port 0x7 Here with HDMI output connected: Here with DVI output connected: Here with DP output connected (DP-to-HDMI adaptor): Here with DP and DVI outputs connected (built-in LCD off): Here with DVI and HDMI outputs connected:

- 2 replies
-
- 1
-

-
- 6430s
- 2 external Monitors
- (and 1 more)
-
HDMI video output is normally supported OOB on the E6x20 Series. Try to temporarily disable the SNB patches on you Clover config.plist. They look Ok but they apply to all instances of the Hex sequences, not just to the series of ports under 01020400 10070000 10070000. If it works Ok, then we'll known whether it's the SNB patches or, say, the DSDT. I could not see anything wrong under the IGPU section of your DSDT.
-
You may want to switch to Clover and activate the "Inject EDID" option...
-
Ok, so your EDID would be: 00,FF,FF,FF,FF,FF,FF,00,36,7F,25,00,00,00,00,00,2D,0C,01,04,A0,2F,1A,00,EA,A8,E0,99,57,4B,92,25, 1C,50,54,00,00,00,01,01,01,01,01,01,01,01,01,01,01,01,01,01,01,01,40,38,80,A0,70,38,4B,40,34,36, 99,05,DC,0C,11,00,00,18,38,31,80,40,71,38,2D,40,6A,6A,FF,00,DC,0C,11,00,00,18,00,00,00,FC,00,4E, 76,69,64,69,61,20,44,65,66,61,75,6C,00,00,00,FC,00,74,20,46,6C,61,74,20,50,61,6E,65,6C,00,00,DB You can try to inject that in DSDT through "AAPL00,override-no-connect" or "AAPL00,override-no-edid" parameter in a DSM attached to your active GPU.
-
Mario, you're sure of that compiled kext? Looks very small...
-
Chasing a Bootpack for a DELL e7440 - For OS X v10.8 ( Mountain Lion )
Hervé replied to random01's topic in The Archive
You'll need 10.8.5 installation app because its kernel has support for the Haswell platform. Previous kernels don't. If you've already purchased or downloaded ML from AppStore in the past through your account, it'll be there again to download and you'll obtain the last version 10.8.5. Failing that, you can still purchase it for about $/€20... http://www.apple.com/shop/product/D6377Z/A/os-x-mountain-lion -
Should e7440 with i3 processor be okay for El Capitan install?
Hervé replied to moonman's topic in The Archive
i3-4005U or i3-4010U I assume? -
Should e7440 with i3 processor be okay for El Capitan install?
Hervé replied to moonman's topic in The Archive
Not a problem. Bear in mind these low-voltage Haswell CPUs are low-specs with no Turbo boost, so they run @1.7GHz and that's it. At 15W, they should be good for the battery but you may find they run at full speed all the time... Re: graphics, it's HD4400 so that'll be same setup as for mobile HD4600. Consider it'll be the same as your E7240, just much slower. -
E7440: problems during Sierra installation with Clover 3998
Hervé replied to dctacsi's topic in The Archive
Lookup the 10.11.6 TouchPad PrefPane in Dr Hurt's PS2Controller thread and run his execution script at login time. -
Last update: 5 Aug 2018 Following tuning work on forum member's systems, here are full packs for Mavericks and High Sierra that supports full CPU SpeedStep and full GPU power management under MacBookPro5,4 and MacBookPro7,1 SMBIOS. Work platforms was fitted with P8700 CPU @2.53GHz and and QX9300 CPUs @2.53GHz, both FSB 1066MHz. FakeSMC was tuned to appropriate MacBookPro SMC keys and AGPM for nVidia Quadro FX 770M (10de:065c) or FX 1700M (10de:065a). CPU SpeedStep was observed from LFM 800MHz to HFM 2.53GHz. GPU throttling was observed at the following 4 x Core/Memory frequencies: 168/100, 235/300, 400/300, 625/799MHz. CPU and GPU T° were nicely contained around 50°C as a result. M4400 nVidia Quadro FX 770M/1700M (all res) M4400_FX770M_10.9.5_Pack(Chameleon).zip M4400_HighSierra_Clover-Enoch_pack.zip NB: Mavericks pack was validated on a myHack v3.3.1 installation. Later version of OS X will require usual manual installations. Pack for Yosemite should be the same as Mavericks but I prefer to wait until this is confirmed in the field before uploading one. El Capitan and later should require the usual adjustments for USB ports (DSDT EHCx renaming, USB injector).
- 1 reply
-
- 1
-
-
CPU speed reporting, CPU SpeedStep and GPU PowerManagement all sorted now.
-
It's not mentioned in Dinesh's HD4000 guide but the HiRes framebuffer 0x01660004 only carries 1 x output port by default (LVDS). It must therefore be patched to support additional video outputs and HDMI audio: In the case of Sierra 10.12, the vanilla framebuffer 0x01660004 is defined as follows: 04006601 01030101 00000002 // 1 x display output port 00000001 00000060 10070000 10070000 00000000 60290400 00000000 00000000 00000000 05030000 02000000 30020000 // LVDS port 00000000 01000000 40000000 00000000 01000000 40000000 00000000 01000000 40000000 00000000 00000000 00000000 and, building on the patch for LoRes FB 0x01660003, it can be patched to this: 04006601 01020402 00000004 // 4 x display output port 00000001 00000060 10070000 10070000 00000000 60290400 00000000 00000000 00000000 05030000 02000000 30020000 // LVDS 02050000 00080000 06000000 // HDMI 03040000 00040000 81000000 // DP/DVI (untested) 04060000 00040000 81000000 // DP/DVI (untested) 00000000 00020011 00000000 The patch is not a mirror copy or copy/paste of the contents of the LoRes FB. In particular, it's critical leave the LVDS port definition unchanged (line 05030000 ...). In a nutshell, the patch consists of: Find: 040066010103010100000002 Replace: 040066010102040200000004 + Find: 0503000002000000300200000000000001000000400000000000000001000000400000000000000001000000400000000000000000000000 Replace: 0503000002000000300200000205000000080000060000000304000000040000810000000406000000040000810000000000000000020011
-
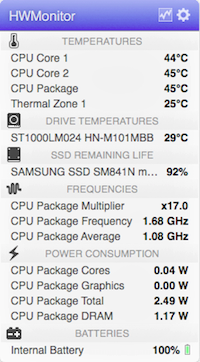
It's probably just cosmetic, nothing to worry about and NullCPUPM will be of no use to that effect. In fact, you should not use that kext at all as full CPU SpeedStep is supported on C2D systems. If you want the proper CPU speed to be reported, ensure you've got: a FakeSMC kext tuned to the target Mac SMBIOS profile you use P States and C States generation enabled in o.c.B plist https://osxlatitude.com/index.php?/topic/2673-performance-tuning-with-fakesmc/ Post your specs and a zipped copy of your /Extra folder. Use HWMonitor to check your true CPU's throttling.
-
Broadwell platforms and beyond require a BIOS patch for DVMT adjustment (video RAM) or BDW framebuffer kext patch. Did you do any of that?
-
https://osxlatitude.com/index.php?/topic/9597-sony-vpcj116fd-pcg-11211l-with-yosemite-on-chameleon/?p=67629 Alternatively... https://www.google.com/?gfe_rd=cr&ei=7tydWJmwCOX-8AfVg7rYAQ&gws_rd=cr&fg=1#q=edid+extraction
-
Never Press Fn-F8, that's for (the VGA output under) Windows. It'll always cause what you've experienced under OS X. You'll only be able to recover through Sleep/Wake or hard reboot. HDMI output is automatic as soon as you plug the cable in. But you may need to 1st patch the Capri framebuffer. Look it in the R&D->Graphics section, there's a guide. I've also included a pre-patched kext in my E6230 Enoch guide, though it's probably not directly applicable to your E6430 (different layout-id due to different LCD res). But all you need to do is copy the patched FB kext to /L/E, repair permissions and rebuild the cache. Increase the patched kext's version and it will take preference over the vanilla kext in /S/L/E. Re: AppleHDA patch, you modify the binary file found under Contents/MacOS in the kext package with a Hex editor app/too such as HexFiend or 0xED for instance. You can also call on perl Terminal commands if you prefer. You can look this up on Google; there is plethora of samples around.
-
Last update: - Target macOS release: Sierra 10.12.x This is an Enoch-based installation using the well-known/well-documented vanilla manual method detailed below: Working: full QE/CI with HD4600 graphics (with DSDT patch for Azul FB #12) HDMI output (with patched AppleIntelFrameBufferAzul kext) full audio, including jack microphone input and headset output (with patched AppleHDA kext) HDMI audio (with patched AppleIntelFrameBufferAzul kext) built-in Gigabit Ethernet (with AppleIntelE1000e kext) native speedstep (with tuned Kozlek's FakeSMC (SMC keys=2.13f9/SMC compatible=smc-huronriver) and MBP11,1 SMBIOS profile) Turbo boost to x33 3.3GHz (getting CPU multipliers x8/17/26 + Turbo multipliers x27/28/29/30/31/32/33) sleep & wake (with DSDT patch for EHCx/XHC/HDEF/GLAN _PRW; sleeps Ok on Energy Savings settings/Apple menu option/power button/lid closure; wakes Ok through lid opening/power button wireless with any compatible card battery management and monitoring (with ACPIBatteryManager kext v1.70.2) SD card reader (with DSDT patch for compatibility with Apple's default reader) integrated webcam OOB keyboard backlight control OOB (for backlit models) All USB3.0 ports (with DSDT EHCx/XHC/Darwin patch + FakePCIID_XHCIMux & USB injector kexts) Express card slot OOB Not Working: VGA output unsupported DVI output no longer available off port replicator through previous Azul FB patches Not tested: SmartCard reader fingerprint scanner 1) 10.12 USB installer creation Double click on InstallESD.dmg found in Install macOS Sierra.app/Contents/SharedSupport to mount the dmg image Then mount BaseSystem.dmg (hidden file) open /Volumes/OS\ X\ Install\ ESD/BaseSystem.dmg Use Disk Utility to restore the contents of BaseSystem.dmg on a USB key (or HDD partition) formatted Mac OS extended (journaled). Remove link for Packages in folder System/Installation of your USB key rm /Volumes/OS\ X\ Base\ System\ 1/System/Installation/Packages Copy folder Packages located in InstallESD.dmg to folder System/Installation of your USB key cp -R /Volumes/OS\ X\ Install\ ESD/Packages /Volumes/OS\ X\ Base\ System\ 1/System/Installation Copy the 2 hidden files (BaseSystem.dmg & Basesystem.chunklist) of InstallESD.dmg to the root of your USB key cp /Volumes/OS\ X\ Install\ ESD/BaseSystem.* /Volumes/OS\ X\ Base\ System\ 1 Install Enoch r2848 (latest at time of writing ) on the USB installer with all default settings Enoch-rev.2848.pkg.zip Copy the above Enoch r2848 installer package to the root of the USB installer Copy the following (unzipped/extracted) E6440 bootpack to the root of the USB installer E6440_i5-4300M_HD4600_Sierra-Pack.zip Create a folder called Kernels under /System/Library (normally, it won't exist at that stage) Copy the appropriate Sierra kernel to /System/Library/Kernels. Copies of the kernels are available here 2) 10.12 installation Boot the 10.12 USB installer (it may take a little time to kick in) with -f -v boot flags At macOS installer main screen, open up Disk Utility in Utilities menu If applicable, partition your target disk in GPT/GUID scheme Create your target 10.12 partition and format it as OS X Extended (Journaled) Close Disk Utility and proceed with macOS 10.12 installation as usual 3) Post-installation fine-tuning Reboot the 10.12 USB installer (it may take a little time to kick in) At macOS installer main screen, open up Terminal in Utilities menu Verify CoreStorage installation disk mode diskutil list If CoreStorage activated for Fusion drive (i.e. presence of a logical disk), revert to legacy mode diskutil corestorage revert <device> (for example: /dev/disk1) Identify your freshly made 10.12 partition name df Copy the Extra folder from the USB installer to your identified 10.12 disk partition cp -R /Extra /Volumes/<your fresly made 10.12 partition name> (for example: cp -R /Extra /Volumes/OSX_disk) Reboot the 10.12 USB installer, press a key at delay bar (or F8) to interrupt boor process and select your freshly made 10.12 disk partition. You'll then be booting Sierra for the 1st time Complete the 1st boot installation finalisation Once at the 10.12 desktop, run the Enoch r2848 package from your USB installer to install Enoch on your HDD; it should be installed on the 1st partition of the disk Eject the 10.12 USB installer and put it aside Disable hibernation (can be done later, but should be done): open up Terminal and type the following commands sudo pmset hibernatemode 0 sudo pmset hibernatefile /dev/null sudo rm -f /var/vm/sleepimage copy all kexts from /Extra/Extensions to /Library/Extensions (ignore and acknowledge the permissions-related error messages) copy patched AppleHDA from /Extra/Extensions/Copy_to_SLE to /System/Library/Extensions (ignore and acknowledge the permissions-related error messages) repair kexts permissions and rebuild cache sudo chmod -Rf 755 /S*/L*/E* sudo chown -Rf 0:0 /S*/L*/E* sudo chmod -Rf 755 /L*/E* sudo chown -Rf 0:0 /L*/E* sudo touch -f /S*/L*/E* sudo touch -f /L*/E* sudo kextcache -Boot -U / Edit /Extra/kernel.plist and set KernelBooter_kexts parameter to No <key>KernelBooter_kexts</key> <string>No</string> If your E6440 is fitted with a different CPU than the i5-5300M, download Pike R Alpha's SSDT generator tool and generate your own CPU-specific SSDT. Copy the resulting SSDT.aml file to /Extra folder (it's normally prompted by the tool). Reboot your finalised Sierra installation Please note that: Loading injected kexts from /E/E with boot option KernelBooter_kexts=Yes is slower than loading cached kexts placed in /S/L/E or /L/E. After any kexts modification, whether to /S/L/E or to /L/E, repair permissions and rebuild cache as detailed above. In Sierra, the AppleHDA binary patch for codec ALC292 consists of: replace 8419D411 by 9202EC10 (2 x instances) replace 8508EC10 by 00000000 (2 x instances) replace 8408EC10 by 00000000 (2 x instances) Other E6440 laptops fitted with a different CPU will require a different (and suitable) SSDT table than provided in the above pack (can be looked up on the web or created with Pike R Alpha's SSDT generator tool).
-
Fn-F3 for reduce brightness FN-Insert to increase it Your Webcam is USB-internal and the trouble you experience is linked to your other USB issues. Basically, you need to rename DSDT EHCx devices to EH0x and use a USB injector. This matter is widely discussed and covered on all forums including this one. Do a Search on the matter.
-
Well, same result as with the iMac10,1 SMBIOS -> no display registers under the nVidia GPU. Did you extract your EDID info?
-
You can adjust the DSDT of a HiRes HD4000 E6430 to your LoRes model by the following simple modification of the _DSM method of the iGPU device located at address 0x00020000: set DualLink from 1 to 0 set layout-id from 0x01660004 to 0x01660003 In ACPI code, this translates to: Before "AAPL00,DualLink", Buffer (0x04) { 0x01, 0x00, 0x00, 0x00 }, "AAPL,ig-platform-id", Buffer (0x04) { 0x04, 0x00, 0x66, 0x01 }, After "AAPL00,DualLink", Buffer (0x04) { 0x00, 0x00, 0x00, 0x00 }, "AAPL,ig-platform-id", Buffer (0x04) { 0x03, 0x00, 0x66, 0x01 }, You can also remove the entry for "AAPL00,DualLink" entirely.
-
Chasing a Bootpack for a DELL e7440 - For OS X v10.8 ( Mountain Lion )
Hervé replied to random01's topic in The Archive
Haswell is only supported in ML 10.8.5. Should be able to install it using same method as for El Capitan. You can consult my E6440 guide for pointers, knowing that the E6440 and E7440 bear many similarities and share hardware components. The difference with my guide is that my E6440 as a CPU with HD4600 whereas you have a little brother with HD4400. You may have to use a different Azul framebuffer. -
Fn-F1 does not properly put E6230 to sleep under Sierra; it seems to actually kick hibernation instead. So the laptop will actually shutdown and a sleep image file will be created. It's probably a side effect of some incompatibility with the generated CPUPM-related SSDT. I had fixed a similar issue on the E6440 under Yosemite. Until we suss this out, proceed as JakeLo recommends: close the lid or use Apple menu option.
-
Oh, you're using iMac10,1 SMBIOS. That's C2D... Could you try the iMac11,1/11,2/11,3 profiles instead; these are Arrandale/1st gen Intel "i" Core platforms.
-
I think your USB installer is not made properly. Or it's your target HDD/SSD that needs to be repartitioned and reformatted. Recommended scheme is GPT/GIUD and format is "OS X Extended (Journaled)".