Hervé
-
Posts
10069 -
Joined
-
Last visited
-
Days Won
569
Content Type
Profiles
Articles, News and Tips
Forums
Everything posted by Hervé
-

E6430: no graphics acceleration under Big Sur (OpenCore)
Hervé replied to r-skyn3t's topic in The Archive
Your OpenCore setup is incorrect in several aspects and this fully explains the issues you experience. 1st of all, do clean up your setup and get rid of unused patched tabes and kexts; this could only lead to potential confusion and trouble. Config: you appear to use 2 x patched tables for EC; that's wrong. Do not use SSDT-EC-USBX, Dortania's documentation clearly states it's for Skylake platforms and later; just use the basic SSDT-EC table. you inject an unnecessary property for your iGPU; HD4000 graphics does not require to patch stolenmem so get rid of that; the rest is Ok. your boot args in NVRAM section are contradictory with other settings of your config: you call on boot arg -igfxnohdmi to disable HDMI, yet you inject the iGPU patch that injects HDMI type to con1 (required for HDMI audio); get rid of this. you call on boot arg -no_compat_check, yet you use MacBookPro11,1 SMBIOS which is fully compatible with Big Sur; get rid of this, it''l prevent all Big Sur updates from being offered. you enable Xcpm kernel quirk alongside CpuPm quirk. Don't. Xcpm does not work or not reliably on these Ivy Bridge laptops. Since your using a generated CPU power management SSDT and CpuPm patch, stick to that only. given the above point, you also need to drop CpuPm + Cpu0Ist BIOS/ACPI tables for proper CPU power management. These drops are not enabled at the moment. Do so. CustomBiosGuid kernel quirk should not be required on an E6x30. Get rid of it. Kexts: There again you should get rid of your unused kexts (especially for USB ports) in order to avoid confusion and potential problems. There are probably a few more minor things but start by correct your setup according to the above list and things should begin to work properly. -
HP Pavilion x360: Synaptics TrackPad and audio not working
Hervé replied to jD_KiD's topic in The Archive
Is this installation a distro? I suspect one when I look at the picture posted at bottom of p1. -
E6430: no graphics acceleration under Big Sur (OpenCore)
Hervé replied to r-skyn3t's topic in The Archive
Post a zipped copy of your Clover or OpenCore EFI with just the ACPI + Kexts folders + the config file. Obviously, you've got something wrong in your setup. -
ExpressCards? Would you mind elaborate on this please?
-
[Solved] E6220: Brightness toggle via Fn keys (UP & DOWN)
Hervé replied to Growtopia Jaw's topic in The Archive
Look up my recent Mojave and Catalina updates in my E6220 guide. They offer an installation free of patched DSDT, in UEFI mode and the posted pack contains all the SSDT tables + ACPI renamings in the Clover config to cater for brightness keys. You'll find the necessary code for Fn-UP/Fn-DOWN operation in the SSDT-Q66 table. -
Latitude 7280: some unresolved problems with Big Sur + OC 0.6.9
Hervé replied to Pixotz's topic in The Archive
So you can apply the suggestions listed above; they appear accurate. -
Not a platform supported by Big Sur. https://osxlatitude.com/forums/topic/8238-supportedunsupported-gpus-graphics-cards High Sierra is the end of the official road; Mojave and Catalina with specific patches to run graphics in non-Metal/OpenGL-only mode. See dosdude1's patchers on the web.
-
Latitude 7280: some unresolved problems with Big Sur + OC 0.6.9
Hervé replied to Pixotz's topic in The Archive
Afaik, the TouchPad is I2C and not fully supported; what you've obtained so far is probably the best you'll get. Check existing threads discussing that matter on the 7280, there are a few. Make sure to generate your USB port mapping to get all ports supported. Remove any XhciPortLimit in your config if applicable. That's cosmetic and I've heard that before but can't say I've experienced this myself. Check that your config does not specify anything for CPU id. Experiment with MBP13,1; it's the usual/recommended SMBIOS for Skylake/HD520 laptops. Assuming your webcam is USB-internal, it'll either work OOB or not at all. 1st thing to check is if it's listed in SysInfo->USB and thereby confirm whether USB ports are all working as expected. If it's listed but does not appear to work in apps like FaceTime, consider it unsupported. -
HP Pavilion x360: Synaptics TrackPad and audio not working
Hervé replied to jD_KiD's topic in The Archive
https://github.com/acidanthera/AppleALC -
Dell Precision M6800: HDMI dummy = K4100M on internal display ?
Hervé replied to draskostar's topic in Precision M Series
'thought you were using Clover but makes no difference. macOS will show the built-in LCD's EDID in IOReg if the screen is available. Of course you may compare what's shown in IOReg under macOS with the info that various tools (for Windows) would show. -
Is your BIOS in UEFI mode or Legacy mode? You install and run macOS in UEFI mode with Clover (or OpenCore) in UEFI mode on the disk (HDD or SSD). However, the USB installer can only be booted with Cover installed on it in legacy mode (with BIOS in UEFI mode). Then, there is the CPU model of course. Guide clearly states to change the CPU PM table if CPU differs from i5-2520M... Please post your specs and add them in signature before anything else.
-
Ha ok, yes I know the tool.
-
Dell Precision M6800: HDMI dummy = K4100M on internal display ?
Hervé replied to draskostar's topic in Precision M Series
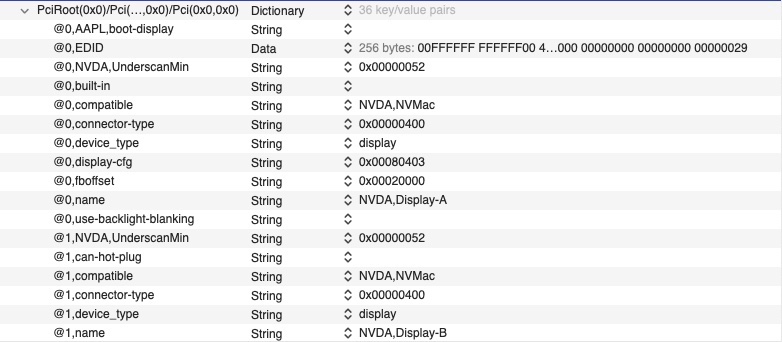
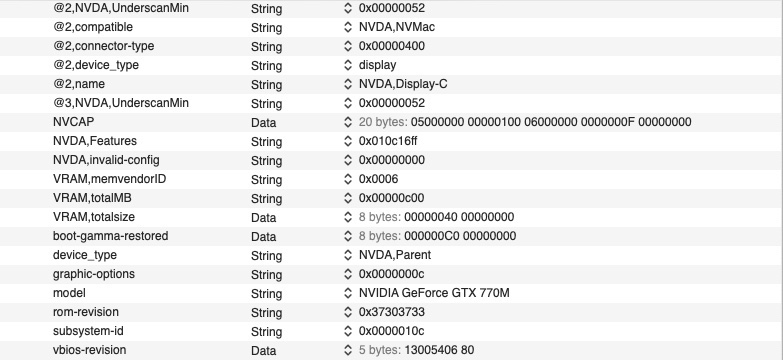
Ok, no display registers other than your TV screen on port #4 (Display-D@3). NVCAP shows the following value: 050000000000ffffffff00000000000e00000000 There are a few things you can try regarding this EFI string and your Clover config: inject it as is. It goes into the Properties [Hex] field in Clover Configurator. I'd save it into a separate config that you call from Clover main menu. You can then post a new IOReg after rebooting with the EFI string applied. I don't recommend this because the string contains an entire set of nVidia properties and they don't really apply to your laptop. you inject the NVCAP it contains after decoding the string. It's the NVCAP that defines the dGPU output ports. If you use old 32bit tools such as EFIStudio, you can decode the EFI string and you'll see it's as follows: nVidia_properties.plist.zip EFIStudio.zip Basically, it injects the following properties: where you can clearly see an injected NVCAP value of: 0500000000000100060000000000000F00000000 Also to be noticed and noted: built-in LCD set to boot display built-in LCD EDID injection
-
@wowww Congrats, well done. Which tools did you use to obtain your EDID info and which one got you the adequate one?
-
I know of 2 x Sonix cameras fitted to the E6230 as indicated in my E6230 guide: one with dev id 0x648b and one with dev id 0x6449. Experience has shown me that not all Sonix cameras of the Latitude E6xxx series are supported. For instance: Sonix camera 0x6433 fitted to the E6x20 series won't work as stated here Sonix camera 0x643f fitted to the E6x30 series works OOB as stated here Sonix camera 0x648b fitted to the E6x30 series works OOB as stated here Sonix camera 0x649d fitted to the E6x40 series works OOB as stated here Afaik, model 0x6449 suffers from the same issue as model 0x6433. Unfortunately, these cameras either work OOB or they don't. There are no drivers or kexts for such USB devices. Yours is being properly detected on its USB-internal port but just isn't supported. It had previously been discussed several years ago, here for instance. There appears to be no problems with the Sunplus Innovation Technologies models on the other hand.
-
Boot without the iGPU id faking, take an IOReg with IOregistryExplorer app, zip to and post it. A question though: how did you install Big Sur? With what?
-
Dell Precision M6800: HDMI dummy = K4100M on internal display ?
Hervé replied to draskostar's topic in Precision M Series
Possibly. You would have to disable Optimus, boot with an external screen connected and take an IOReg that we can then have a look at in order to identify the built-in LCD if it registers against a port. In case you need to get in remotely via VNC, 1st ensure you enable Screen Sharing via Sharing PrefPane. We can have a look at the guy's EFI in order to inject the associated NVCAP in your config. -
I would stay away from this offered setup; the ACPI patching part is frightening and the patched SSDT tables messy...
-
You enter the whole set of hexadecimal obtained as EDID from Windows or whatever you used to extract it. It's the data provided at the bottom of that Nuevo document de texto.txt text file: Raw data 00,FF,FF,FF,FF,FF,FF,00,36,7F,03,90,08,00,00,00,00,01,01,03,80,00,00,FF,2F,00,00,A0,57,49,9B,26, 10,48,4F,00,00,00,01,01,01,01,01,01,01,01,01,01,01,01,01,01,01,01,66,21,56,AA,51,00,1E,30,46,90, 14,00,00,00,00,00,00,18,00,00,00,FC,00,4E,6F,74,65,62,6F,6F,6B,50,61,6E,65,6C,00,00,00,FD,00,3B, 3C,2F,30,09,01,00,00,00,00,00,00,00,00,00,00,10,00,00,00,00,00,00,00,00,00,00,00,00,00,00,00,09 You take all the hexadecimal data, remove the separating commas and enter the complete set of bytes in a single long chain of data: AAPL00,override-no-connect 00FFFFFFFFFFFF0036 ....... 0000000009 DATA
-
Look up the documentation that goes with those Synaptics I2C kexts; usually there are PlugIns for the various brands and you'd need to remove Alps Plugins if you used those for instance. Can't say more, haven't done much experimentation since the Latitude 5490 that I no longer have and I never spent much time on it.
-
Dell Precision M6800: HDMI dummy = K4100M on internal display ?
Hervé replied to draskostar's topic in Precision M Series
Tried Optimus disabled + virtual display device then? -
again... You can inject EDID info through a device property against your iGPU, i.e. alongside what you currently inject (i.e. ig-platform-id and device-id). Look it up in the WhateverGreen User manual. You may also want to connect a VGA monitor if you have that around you and, hopefully, get the macOS desktop or whatever on screen. VGA usually is supported OOB on laptops with HD4400 graphics (they're the lucky ones!) By the way, what do you mean by "I get a black screen with script loaded"?
-
No, I2C is not a brand of Touchpads... https://en.wikipedia.org/wiki/I²C Look up Synaptics I2C kexts... if that exist.
-
No quoting to post replies please; especially if you use Google translator... Just use the Reply box at the bottom of our pages. As a newcomer, I also invite you to read our published rules so that you get familiar with them. Setup is incorrect in a few respects, most of them minor: you use old versions for some of your kexts; update them to the latest versions (eg: Whatevergreen) you've enabled _OSI to XOSI renaming but not the SSDT-XOSI table; these go together... you have some unnecessary kernel quirks enabled (eg: AppleCpuPmCfgLock which is for Sandy/Ivy Bridge) The one thing you must do is update Lilu & WhateverGreen to the latest version. At your next reboot, make sure you Reset NVRAM at the OC Picker. If you still get back screen, you could require to inject your screen's EDID. You can obtain it from Windows with some tools that you can Google for.
-
Anything is possible, but that does not really help, does it? Did you check the info of the TrackPad driver for Latitude 5510 in the support section of Dell's web site? Edit: Ok, here goes... PCI id 0488:121f -> It's a Synaptics Touchpad.