Hervé
-
Posts
10077 -
Joined
-
Last visited
-
Days Won
569
Content Type
Profiles
Articles, News and Tips
Forums
Everything posted by Hervé
-
Your posted IOreg shows that your Comet Lake i5-10210U is fitted with Intel UHD for 10th ten processor iGPU with id 0x9B41. But is it its native id or just the result of the property you injected (please note that injecting any device's native id is totally pointless)? According to the Intel specs which I tried to summarise here, iGPU id 0x9B41 is a 24xEUs iGPU model which can therefore be expected to be supported, but not OOB. As per the WEG user manual, I believe 2 x iGPU properties need to be injected, at minimum: ig-platform-id 0x3EA50009, not 0x3E9B0000 which is for Coffee Lake iGPUs. device-id 0x3E9B and MacBookPro16,1 (or MBP16,3 why not?) SMBIOS alongside.
-
I'in the process of writing here a detailed description of the manner in which brightness keys operate and how the patches apply and work. Hopefully it'll lit everyone's lantern though it'll be technical given that it's low-level ACPI stuff..
-
It's still a recurring topic on the fourm, understandably so, so I thought I'd write a little recap about it. Brightness keys patch has been subject to discussion and queries for many years and much has been written on the matter. Among others, Rehabman did some extensive research work on this several years go and provided substantial information and debugging material to work out fixes. The brightness keys patch for many -if not most- Dell laptops since, at least, Ivy Bridge generations can be applied through DSDT patching or through pure SSDT patching. A DSDT patch for E6230 was 1st mentioned at OSXL by @jpz4085 in our old Dr Hurt's VoodooPS2Controller kext thread; the work derived from Rehabman's research and publications. I found that the patch was fully reusable on other models of the E Series (except E6x20) and I fully detailed the DSDT patch code in my E6230, E7250 or 7490 guides. Unless I'm mistaken (happy to be corrected if required), the SSDT patch was derived from the DSDT patch by @Jake Lo and provided in various threads of his that I can't specifically remember. To successfully apply the required SSDT patch, given that a little tuning may be required depending on the target platform, it's most useful to understand that brightness keys of Dell laptops usually operate at ACPI level and according to the following reversed engineered process: brightness keys operation is handled through BRT6 method. BRT6 method is attached to IGPU device but there can be a 2nd BRT6 method under GFX0 (or whatever other name) if the laptop is fitted with a dGPU too. BRT6 is usually called from EV5 method. EV5 method is usually called from SMEE method on the condition that a call to OSID method returns a value greater or equal to 32 (0x20). OSID method returns the value set in ACOS parameter (integer). ACOS is set to different values according to the nature of the Operating System. It is set to 32 (0x20) for Win Vista, 64 (0x40) for Linux or 128 (0x80) for Win7/8/8.1. Value is under 32 for Windows versions older than Vista. I'll pass on the upstream process _Q66->NEVT->SMIE->SMEE which is of no specific interest in the context of this brightness keys patch description. Sample methods grabbed from Latitude E7270's extracted DSDT: BRT6 Method Method (BRT6, 2, NotSerialized) { If (LEqual (Arg0, One)) // 1st arg=1 for brightness increase { Notify (LCD, 0x86) } If (And (Arg0, 0x02)) // 1st arg=2 for brigthness decrease { Notify (LCD, 0x87) } } EV5 method Method (EV5, 2, NotSerialized) { \_SB.PCI0.IGPU.BRT6 (Arg0, Arg1) // Call to BRT6 with 2 arguments } SMEE method Method (SMEE, 1, NotSerialized) { Store (Arg0, Local0) Store (GENS (0x11, Zero, Zero), Local0) If (LGreaterEqual (\_SB.OSID (), 0x20)) // If OSID returns a value >= 32 { If (And (Local0, 0x04)) { EV5 (One, Zero) // Call to EV5 with 1st arg set to 1 } If (And (Local0, 0x02)) { EV5 (0x02, Zero) // Call to EV5 with 1st arg set to 2 } } If (And (Local0, 0x08)) { Store (GENS (0x1D, Zero, Zero), Local0) EV17 (Local0, Zero) } } OSID method Method (OSID, 0, NotSerialized) { If (LEqual (ACOS, Zero)) // Check if ACOS lower or equal to 0 { Store (One, ACOS) // Initialises ACOS to 1 Store (Zero, ACSE) If (CondRefOf (\_OSI, Local0)) // Engages in tests according to OS identification { If (_OSI (WXP)) { Store (0x10, ACOS) // Sets ACOS to 16 if Win XP } If (_OSI (WLG)) { Store (0x20, ACOS) // Sets ACOS to 32 if Win Vista } If (_OSI (WIN7)) { Store (0x80, ACOS) // Sets ACOS to 128 if Win7 } If (_OSI (WIN8)) { Store (0x80, ACOS) // Sets ACOS to 128 if Win8 Store (One, ACSE) } If (_OSI (WN81)) { Store (0x80, ACOS) // Sets ACOS to 128 if Win8.1 Store (0x02, ACSE) } If (_OSI (LINX)) { Store (0x40, ACOS) // Sets ACOS to 64 if Linux } } Else { If (STRE (_OS, W98S)) { Store (0x02, ACOS) // Sets ACOS to 2 if Win98 } If (STRE (_OS, WINM)) { Store (0x04, ACOS) // Sets ACOS to 4 if Win ME } If (STRE (_OS, NT5S)) { Store (0x08, ACOS) // Sets ACOS to 8 if Win NT } } } Return (ACOS) // Value returned by OSID method } It should also be noted that, brightness keys patching only appears to work with VoodooPS2Controller kext, not with ApplePS2Controller (at least for me and the platforms I tested). To enable brightness control through the brightness keys of Dell laptops, 2 x things must be done: ensure that OSID returns a value greater or equal to 32 (0x20) for "Darwin" OS (i.e. OS X/macOS) ensure the correct key stroke codes are captured in BRT6 method (by default, BRT6 usually only operates for key stroke codes 0x86 and 0x87) 1) DSDT patch method: This is most probably the simplest of the 2 x methods because it involves very basic and very easy patching of the DSDT: 1st part of the patch is to insert a reference to Darwin OS as one of the tests used to set ACOS parameter to, at least, 32 (0x20). 2nd part of the patch is to insert the relevant key stroke codes in BRT6 method as keyboard event notifications. One code for brightness increase and another one for brightness decrease. Rehabman's ACPI debugging tools have allowed to identify various key codes, depending on laptops: brightness increase: key codes 0x10, 0x206, 0x286, 0x366, 0x0406 brightness decrease: key codes 0x20, 0x205, 0x285, 0x365, 0x0405 I have found that key codes 0x0365 and 0x0366 applied to the Latitude E6x20, E6x30, E6x40, E7x50, E7x70 or other 7x90. @Jake Lo found that codes 0x0405 and 0x0406 applied to other models such as the Precision 5510 or 7510. The DSDT patch can then be applied in the trend of the following code: OSID method Before: Method (OSID, 0, NotSerialized) { If (LEqual (ACOS, Zero)) { [...] If (CondRefOf (\_OSI, Local0)) { [...] If (_OSI (WIN7)) { Store (0x80, ACOS) } [...] } [...] } Return (ACOS) } After: Method (OSID, 0, NotSerialized) { If (LEqual (ACOS, Zero)) { [...] If (CondRefOf (\_OSI, Local0)) { [...] If (LOr (_OSI ("Darwin"), _OSI (WIN7))) // Changes test from Win7-only to Darwin or Win7 { Store (0x80, ACOS) // Thereby setting ACOS to 128 for Darwin, i.e. OS X/macOS } [...] } [...] } Return (ACOS) } BRT6 method Before: Method (BRT6, 2, NotSerialized) { If (LEqual (Arg0, One)) { Notify (LCD, 0x86) } If (And (Arg0, 0x02)) { Notify (LCD, 0x87) } } After: Method (BRT6, 2, NotSerialized) { If (LEqual (Arg0, One)) { Notify (LCD, 0x86) Notify (^^LPCB.PS2K, 0x0366) // Add capture of brightness-up key stroke } If (And (Arg0, 0x02)) { Notify (LCD, 0x87) Notify (^^LPCB.PS2K, 0x0365) // Add capture of brightness-down key stroke } } and that's it! 2) SSDT patch method: Over the last few years, DSDT patching has gradually and increasingly become less fashionable within the Hackintosh community in favour of alternatives in the form of dedicated and specific SSDTs, something which is considered far more efficient because: it's based on on-the-fly ACPI objects renaming in bootloaders. it's based on injection of new ACPI code through small and targeted SSDT tables that are meant for that very supplemental purpose (SSDT means Secondary System Description Table). it avoids extracting, fixing, patching, recompiling and replacing the system's original ACPI tables and most notably the DSDT, something that can be quite arduous at times. However, the process involved is a much more complicated because: it requires to have a minimum and non-negligeable skillset in ACPI coding. it requires to analyse the code of the original ACPI tables and often work out sections of code to bypass/replace (no duplicates allowed or code is useless) So, given that this method makes no change to the DSDT, it must: bypass the DSDT's BRT6 method. replace it by a new method that will include the desired keyboard notification codes; this will be done in a dedicated SSDT that can be called SSDT-BRT6. with regards to OSID and the requirement to make it return a value greater or equal to 32, there are 2 x possibilities that can be considered: as per BRT6, bypass the DSDT's OSID method and replace it by a new method that will set ACOS parameter according to "Darwin" OS replace calls to the _OSI method, that performs tests on the type of OS, by an alternative method that simulates Windows for Darwin. This allows to have the contents of the OSID method executed sequentially and set ACOS according to the last test in the list; as it stands, this happens to be the test on Linux which sets ACOS to 64, i.e. a value greater than 32 which is the minimum required. In order to replace the DSDT's BRT6 method by an alternative one, particular caution must be exercised because only the method must be replaced, not the call to it from EV5; so a little creativity is required here... To achieve this, ACPI renaming can be applied in the boot loader config to replace "BRT6,2" (as per contents of the method's definition) by "BRTX,2" rather than replace just "BRT6". This is achieved by configuring the following on-the-fly DSDT patch in the boot loader's config (the exact Hexadecimal string is found by opening the extracted DSDT in a Hex editor): Find (HEX): 4252543602 // Hexadecimal sequence for "BRT6, 2" when opening DSDT with a Hex editor Replace (HEX): 4252545802 // Hexadecimal sequence for "BRTX, 2" as replacement The replacement BRT6 method can then be defined in the dedicated SSDT-BRT6 patched table with the following code: DefinitionBlock ("", "SSDT", 2, "hack", "BRT6", 0x00000000) { External (_SB_.PCI0.IGPU, DeviceObj) // (from opcode) External (_SB_.PCI0.IGPU.LCD_, DeviceObj) // (from opcode) External (_SB_.PCI0.LPCB.PS2K, DeviceObj) // (from opcode) Scope (_SB.PCI0.IGPU) { Method (BRT6, 2, NotSerialized) { If (LEqual (Arg0, One)) { Notify (LCD, 0x86) Notify (^^LPCB.PS2K, 0x0366) // Capture of brightness-up key stroke } If (And (Arg0, 0x02)) { Notify (LCD, 0x87) Notify (^^LPCB.PS2K, 0x0365) // Capture of brightness-down key stroke } } } } As far as the OSID method is concerned, the trick is simply to rename it to XSID, rename _OSI method to XOSI and inject (Rehabman's ?) pre-existing and publicly available SSDT-XOSI that simulates Win7 or greater for Darwin (it basically returns true to the OS tests). This is achieved by configuring the following on-the-fly DSDT patches in the boot loader's config: Find (HEX): 4F534944 // OSID in Hexadecimal Replace (HEX): 58534944 // XSID in Hexadecimal Find (HEX): 5F4F5349 // _OSI in Hexadecimal Replace (HEX): 584F5349 // XOSI in Hexadecimal Contents of the SSDT-XOSI patched table is as per documented by Rehabman: DefinitionBlock ("", "SSDT", 2, "hack", "XOSI", 0x00000000) { Method (XOSI, 1, NotSerialized) { Store (Package (0x0A) { "Windows", "Windows 2001", "Windows 2001 SP2", "Windows 2006", "Windows 2006 SP1", "Windows 2006.1", "Windows 2009", "Windows 2012", "Windows 2013", "Windows 2015" }, Local0) Return (LNotEqual (Ones, Match (Local0, MEQ, Arg0, MTR, Zero, Zero))) } } And that's it too!
-
 Could be your PS2 controller kext; which one are you using?
 -
Calm down please! And no-one has accused you of any sort of misbehaviour, quite the contrary in fact... The method remains the same, only the PS2K notification values change, that's all. Which is why I wrote "this kind of patch"... In fact, you should be able to refine your patch by further experimenting with it in order to establish which of the 3 x values of each set (10/206/286 & 20/205/285) actually apply to your Inspiron model. I'm pretty sure only 1 of the 3 applies and you would actually find that the BRT6 SSDT provided by Jake also works once you apply the appropriate notification values. Getting the correct keystroke codes is the key here, hence why I linked to the original post/thread where it is clearly mentioned. Nothing else to it and certainly nothing dark or nasty behind my post.
-
We have known, detailed and used this kind of brightness keys patch for many years on laptops such as the E6xxx or E7xxx series... But thanks for this particular useful contribution for the Inspiron 5570. https://osxlatitude.com/forums/topic/8285-refined-alps-touchpad-driver/?do=findComment&comment=84779 https://osxlatitude.com/forums/topic/8285-refined-alps-touchpad-driver/?do=findComment&comment=84815 https://osxlatitude.com/forums/topic/12129-latitude-e7250-with-i5-5300u-hd5500-and-1366x768-lcd-high-sierramojavecatalina/?do=findComment&comment=93508
-
Seems OP is using a distro... -> "HackintoshShop.com". @truceFR We don't support distros here, far too much trouble. Please download a genuine Big Sur installation package off Apple/AppStore and follow the numerous guides we've got here for these E6x30 models.
-
Ice Lake computers are only supported from Catalina, so don't waste your time trying to install High Sierra on yours. See our OS X/macOS section if you need further details on general support specs. Don't use any old version of Clover either (r511x/r512x minimum).
-
It's as I thought: you're using the CPU power management SSDT not suitable for your i5-3340M but made for a quad-core i7-3630QM. I suggest you grab the i5-3340M SSDT I had posted in my bootpack, rename it to "SSDT-PM.aml" and replace your current invalid table by it. You should also only use 1 (one) x SSDT "EC" table; you've placed 2 (two) in your ACPI folder.
-
I see you've got SSDT-BRT6.aml installed. Things may depend on the PS2 controller kext you're using.
-
Simple matter of removing all those erroneous lines of "Zero"... DSDT.dsl.zip
-
I would not use some of the contents of my E6230 bootpacks on an E6430 with nVidia GPU. BIOS differnsubstantially so patched DSDT ofE6230 does not really apply. Then, there is the matter of graphics and screen resolution. E6230 is LoRes 1366x768 and therefore uses LoRes Capri frame buffer layout 0x01660003. That's not useable on systems with higher res. So, post your system's specs and a (zipped) copy of the EFI folder you're using. An indication of the bootloader you're using and its version would be very useful too. There's a good chance you've not applied the correct CPU power management settings but that's just a guess.
-
Did you update your OC config to reflect the change of SSDT PNLF table, then reset NVRAM before rebooting?
-
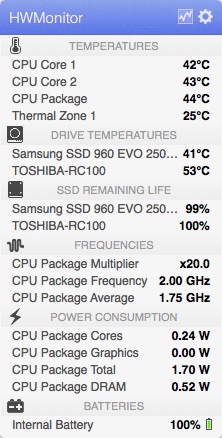
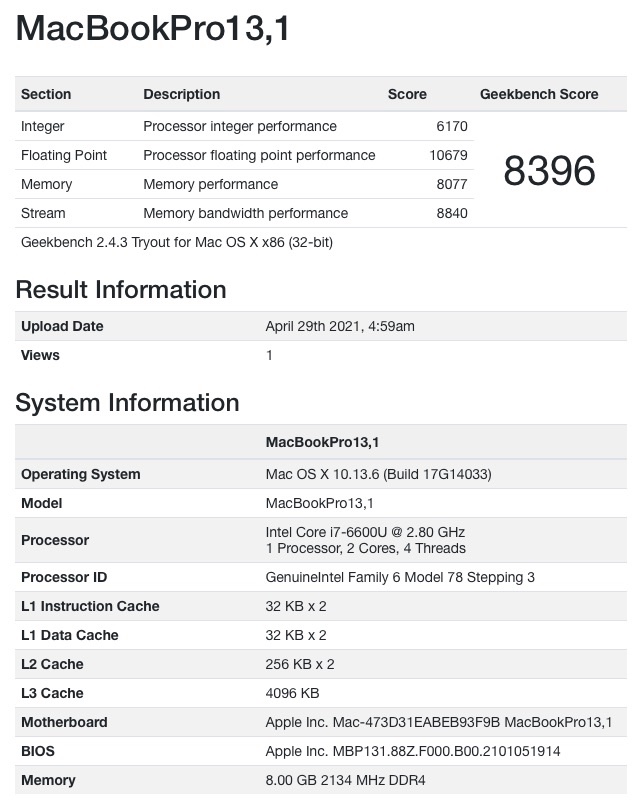
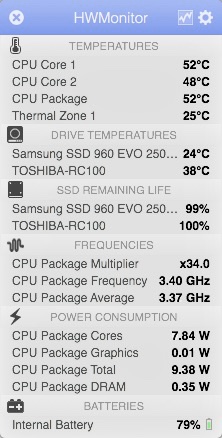
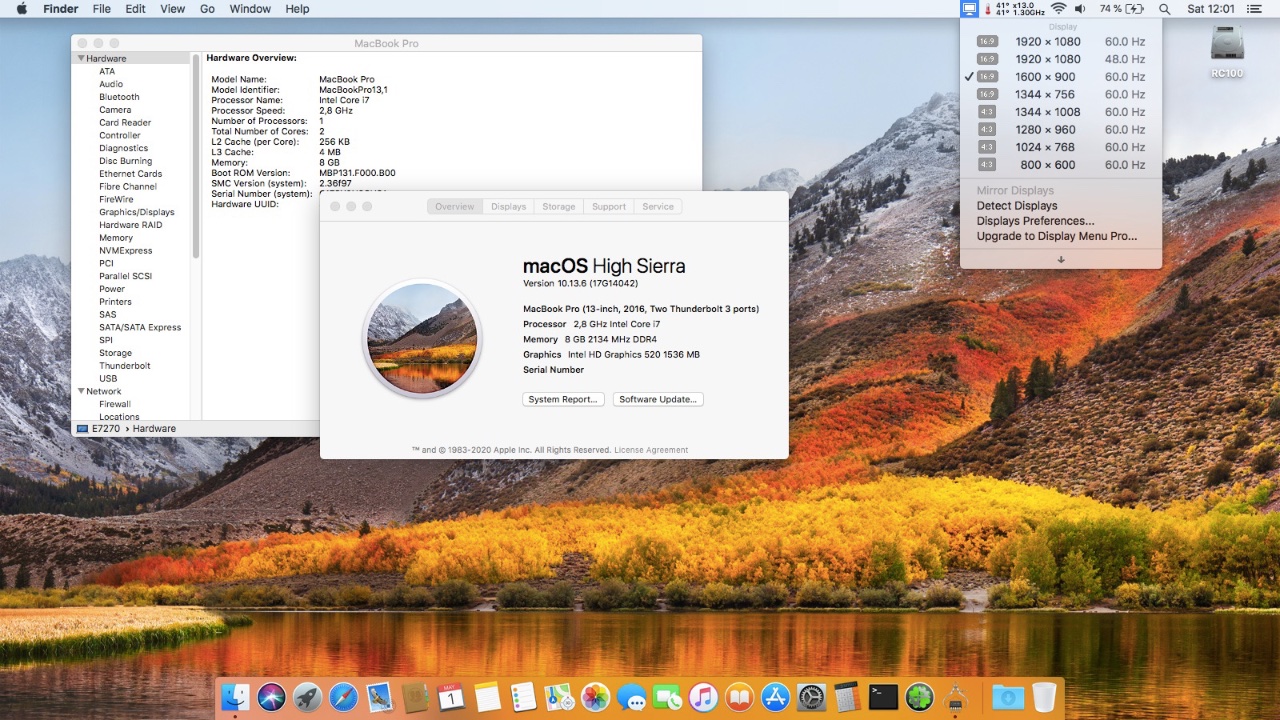
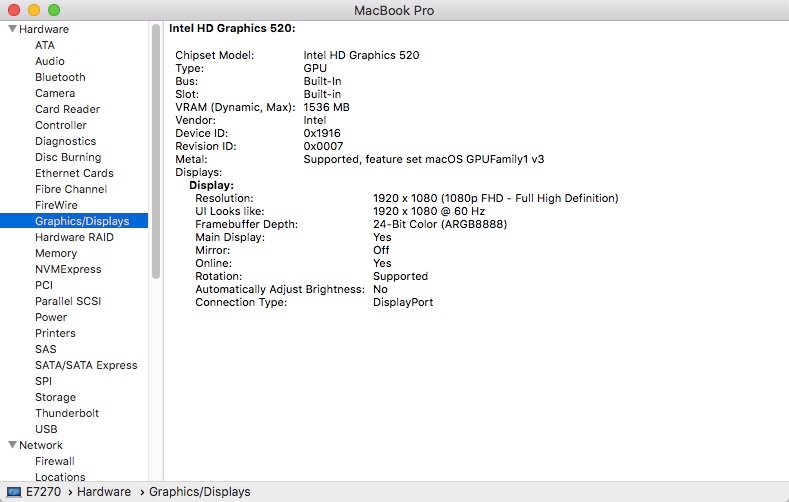
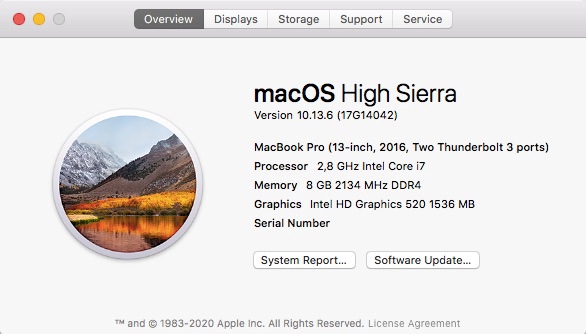
Target macOS release: High Sierra 10.13.x This is a Clover-based installation using the well-known/well-documented vanilla manual method detailed below: Working: full QE/CI with HD520 graphics (with SKL layout 0x19160000) HDMI output OOB but built-in LCD goes off on 1st cable connection. With WEG boot arg igfxonln=1, LCD picture is recovered after closing then re-opening the LID and HDMI is on at 1st boot & after wake mDP output OOB touchscreen OOB full audio, including jack microphone input and headset output (with AppleALC kext & layout-id 11) HDMI audio (with SKL con1 connector-type patch) built-in Gigabit Ethernet (with IntelMausiEthernet kext) full CPU power management, including Turbo boost to 3.4GHz (with PlugIn type settings) sleep: Ok through Apple menu->Sleep, lid closure, power button, Fn-Insert and energy savings settings with hibernation mode set to 0 (sleep to RAM) and /var/vm/sleepimage file deleted. wake: Ok through lid opening and power button wireless & bluetooth with any compatible card/USB dongle battery management and monitoring (with ACPIBatteryManager kext) SD card reader (with Cholonan's Sineteck-rtsx kext) integrated webcam OOB keyboard backlight control OOB (for backlit models) audio volume control through Fn-F1/Fn-F2/Fn-F3 brightness control through Fn-F11/Fn-F12 touchpad basic features, incl. buttons (with Rehabman's VoodooPS2Controller kext) but not recognised in PrefPane USB3.0 ports (with Hackintool's generated USBPorts kext) Not Working: N/A Not tested: SmartCard reader GeekBench v2.4.4 (32bit) gives a near 8400 rating: 1) 10.13 USB installer creation Using a USB key of 8GB minimum, create a High Sierra USB installer through the following Terminal command: sudo <path>/Install\ macOS\ High\ Sierra.app/Contents/Resources/createinstallmedia --volume /Volumes/<USB key> where: <path> = location of High Sierra installation package (eg: /Applications if freshly downloaded) <USB key> = name of formatted USB volume (eg: USB_8GB) The process will take several minutes. Once completed: install Clover bootloader on the USB installer with the following customised settings: Clover for UEFI booting only Install Clover in the ESP UEFI Drivers -> Recommended drivers ApfsDriverLoader / AptioMemoryFix / DataHubDxe / FSInject / HFSPlus / SMCHelper UEFI Drivers -> Human Interface Devices (optional only) PS2MouseDxe / UsbMouseDxe Themes (optional only) Install Clover PrefPane (optional only) you may use version r5035 attached below or any subsequent version available at Dids' Github repo Clover_v2.5k_r5035.pkg.zip once Clover is installed, launch Clover Configurator app and mount the freshly created EFI partition of the USB installer Clover Configurator.zip open this EFI partition and transfer the files & folders from the E7270 High Sierra Clover pack below to the EFI/Clover folder of the EFI partition Clover_Pack_E7270_HiSie.zip 2) 10.13 installation boot the High Sierra USB installer at the Clover main menu, select the "Install macOS High Sierra" partition (but don't press [ENTER]) press [SPACE], select -v verbose option in the menu, then choose to boot with the selected options proceed with installation, creating & formatting the target High Sierra partition/disk through Disk Utility as/if required on 1st reboot, boot off the USB installer and select the freshly created "macOS install from <target High Sierra partition>" repeat this until this partition is no longer offered and only the target High Sierra partition is left to boot 3) Post-Installation tuning once the target High Sierra partition has booted, complete the 1st boot configuration finalisation once at the desktop, install Clover bootloader on the High Sierra partition/disk with the customised settings listed above once Clover is installed, launch Clover Configurator app and mount the freshly created EFI partition of the High Sierra partition/disk open this EFI partition and transfer the files & folders from the above E7270 High Sierra Clover pack to the EFI/Clover folder of the EFI partition you may then reboot and verify that High Sierra boots off your disk through Clover after that reboot, finalise post-installation tuning actions such as disabling hibernation, disabling GateKeper, changing all serial numbers, etc. Please note that: Clover config of the pack contains HDMI-audio SKL framebuffer patch. Clover config of the pack contains disabled settings for DW1820A wireless card. Enable or remove as appropriate. caching add-on kexts from /L/E is faster than injecting them from E/C/k/O. after any kexts modification, whether to /S/L/E or to /L/E, repair permissions and rebuild cache. Edit: 17 Jan 2024 revised bootpack with modified SSDT-GPRW patched ACPI table to fix intermittent loss of Bluetooth on wake.

-
Last update: 06 February 2023 Here are BIOS settings that are known to work on the Latitude E7270 (6th gen Skylake CPU with Intel HD520 graphics) under High Sierra, Mojave, Catalina, Big Sur, Monterey and Ventura beta. These settings were tested and verified with BIOS 1.28.3, 1.29.4, 1.30, 1.31.3, 1.32.4, 1.33.3, 1.34.3, 1.35.3 and 1.36.3. General . Boot Sequence: * Boot List Option = UEFI (-> Boot Sequence list will be set accordingly) . Adanced Boot Options: * Enable Legacy Option ROMs = On (Off may cause issues on wake, including laptop resets) * Enable Attempt Legacy Boot = On (Off may cause issues on wake, including laptop resets) System Configuration . Integrated NIC = Enabled . Parallel Port = Disabled . Serial Port = COM1 . SATA Operation = AHCI . Drives: * SATA-1/-2 = On * M.2 PCie SSD-0 = On . SMART Reporting: * Enable SMART Reporting = On or Off . USB Configuration: * Enable USB Boot Support = On * Enable External USB Port = On . USB PowerShare: * Enable USB PowerShare = On . Audio: * Enable Audio = On * Enable Microphone = On * Enable Internal Speaker = On . Keyboard Illumination: * Any desired value . Keyboard Backlight Timeout on AC: * Any desired value . Keyboard Backlight Timeout on Battery: * Any desired value . Touchscreen: * Touchscreen = On or Off . Unobtrusive Mode: * Enable Unobtrusive Mode = Off . Miscellaneous Devices: * Enable Camera = On * Enable Secure Digital (SD) card = On * Secure Digital (SD) Card Read-Only Mode = Off Video . LCD Brightness = Whatever settings you prefer Security . Admin Password = not set (or whatever) . System Password = not set (or whatever) . Strong Password = Off . Password Configuration = default settings . Password Bypass = Disabled or Reboot Bypass . Password Change: Allow Non-admin Password Changes = on . Non-Admin Setup Changes = Off . UEFI Capsule Firmware Updates = On . TPM 1.2 Security = On or Off . Computrace(R) = Deactivate . CPU XD Support = On . OROM Keyboard Access = Enable . Admin Setup Lockout = Off . Master Password Lockout = Off . SMM Security Mitigation = Off Secure Boot . Secure Boot Enable = Disabled . Expert Key Management: * Enable Custom Mode = Off * Custom Mode Key Management = PK Intel Software Guard Extensions . Intel SGX Enable = Disabled . Enclave Memory Size = N/A Performance . Multi Core Support = Enabled . Intel SpeedStep = Enabled . C-States control = On . Intel TurboBoost = Enabled . HyperThread Control = Enabled Power Management . AC Behavior: * Wake on AC = Off . Auto On Time = Disabled . USB Wake Support: * Enable USB Wake Support = Off (Setting this to On usually causes instant wake on sleep when AC plugged in and Bluetooth issues on wake) . Wireless Radio Control: * Control WLAN radio = Off * Control WWAN radio = Off . Wake on LAN/WLAN = Disabled . Block Sleep = Off . Peak Shift = Off . Dock Support on Battery = On or Off . Advanced Battery Charge Configuration = Off . Primary Battery Charge Configuration = Adaptative (or any other choice) POST Behavior . Adapter Warnings = Enabled . Keypad (Embedded) = Fn Key Only . Mouse/Touchpad = Touchpad/PS-2 Mouse . Numlock Enable = Enabled . Fn Key Emulation = Enabled . Fn Lock Options: * Fn Lock = On * Lock Mode Disable/Standard = On . MEBx Hotkey = Enabled . Fast Boot = Minimal . Extend BIOS POST Time = 0 seconds (or any other choice) . MAC address Pass-Through = Passthrough MAC Address Virtualization Support . Virtualization = Enabled . VT for Direct I/O = Off (otherwise use bootloader option dart=0) . Trusted Execution = Off Wireless . Wireless Switch: * WWAN = On * WLAN/WiGig = On * GPS (on WWAN Module) = On * Bluetooth = On . Wireless Device Enable: * WWAN/GPS = On * WLAN/WiGig = On * Bluetooth = On
-
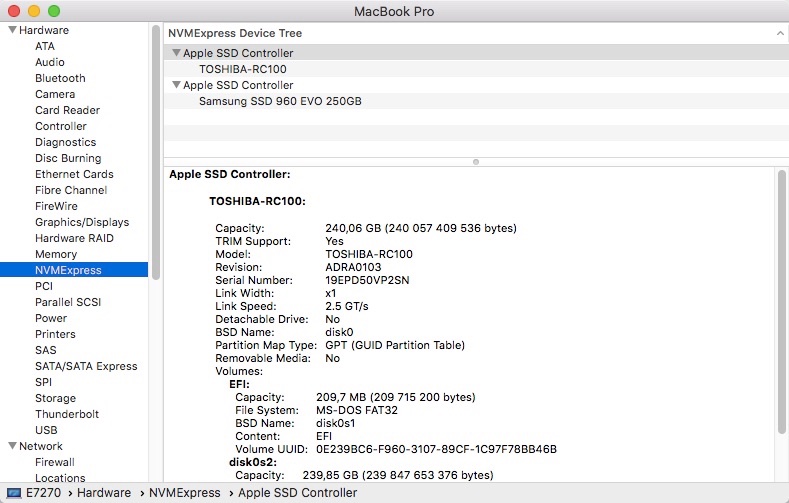
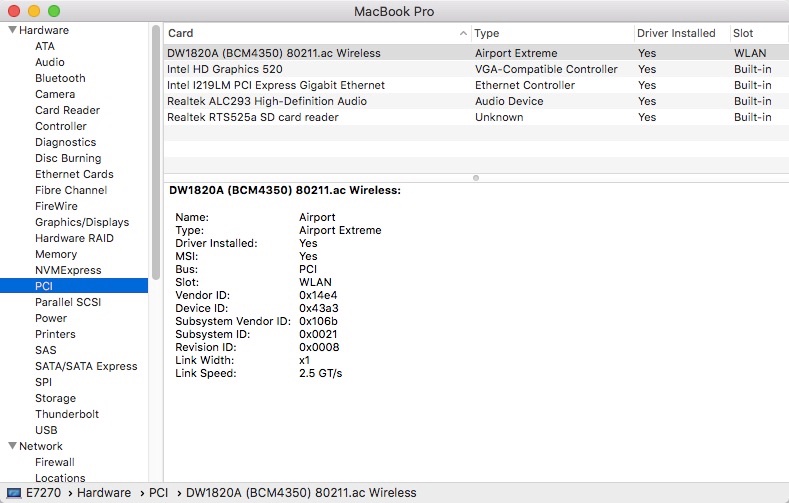
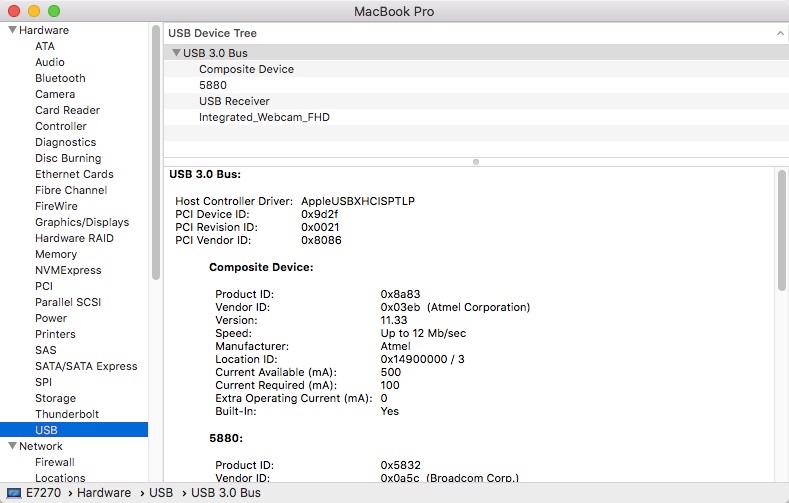
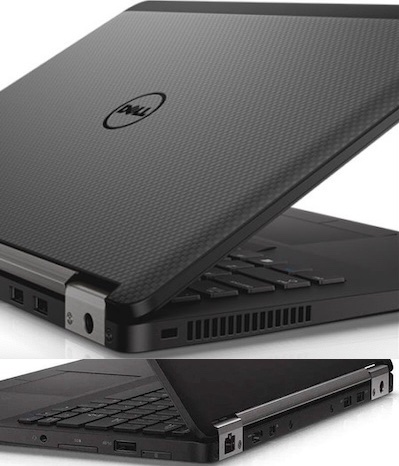
Last update: 06 Feb 2023 Specifications: BIOS 1.28.3 1.29.4 1.30.3 1.31.3 1.32.4 1.33.3 1.34.3 1.35.3 1.36.3 (with SATA disk mode set to AHCI mode) Intel 100 Series chipset (Sunrise Point-LP) Intel dual-core Skylake i7-6600U 2.60GHz CPU (TDP Up 2.8GHz, Turbo boost to 3.2GHz (2 cores) or 3.4GHz (1 core)) Integrated Intel HD520 graphics (300MHz/1050MHz) (PCI ven id 0x8086, dev id 0x1916) Internal-USB Atmel MaxTouch 12.5" 1920x1080 FHD IPS touchscreen (PCI ven id 0x03eb, dev id 0x8a83) 8GB DDR4-2133P RAM Intel I219LM Gigabit Ethernet (PCI ven id 0x8086, dev id 0x156f) Whatever M.2 SATA or (compatible) NVME SSD that may be fitted (I used a 256GB Samsung 960 EVO then a 240GB Toshiba RC100) Whatever M.2 2230 wireless card that may be fitted (I initially replaced my original Intel card by a BCM4350-based DW1820a then an Apple BCM94360CS2) Realtek ALC293 (ALC3235) High Def audio (PCI ven id 0x10ec, dev id 0x0293) Realtek RTS525a SD card reader (PCI ven id 0x10ec, dev id 0x525a) Internal-USB Surplus Innovation Technology HD webcam (PCI ven id 0x1bcf, dev id 0x28bd) Alps Alpine V8 TouchPad (model w/o Touchscreen may have V7 Touchpad) 3 x USB 3.0 ports (1 x with power share) 1 x mini DisplayPort 1 x HDMI v1.4 1 x headset/microphone combo jack port 1 x internal M.2 2280 slot (key M, 2 x PCIe 3.0 lanes) for SATA/NVME SSD 1 x internal M.2 2230 WLAN slot (key A/E) 1 x internal M.2 3042 WWAN slot (key B, 1 x PCIe 3.0 lane) NB: WWAN slot supports M.2 2242 NVME SSDs (eg: Toshiba RC100) which are directly bootable; performance obviously limited due to single PCIe channel. SSD detection can be unreliable at laptop's power-on/reset. Latitude E7270 can boot from SD card. E7270:~ admin$ lspci -nn 00:00.0 Host bridge [0600]: Intel Corporation Xeon E3-1200 v5/E3-1500 v5/6th Gen Core Processor Host Bridge/DRAM Registers [8086:1904] (rev 08) 00:02.0 VGA compatible controller [0300]: Intel Corporation Skylake GT2 [HD Graphics 520] [8086:1916] (rev 07) 00:04.0 Signal processing controller [1180]: Intel Corporation Xeon E3-1200 v5/E3-1500 v5/6th Gen Core Processor Thermal Subsystem [8086:1903] (rev 08) 00:14.0 USB controller [0c03]: Intel Corporation Sunrise Point-LP USB 3.0 xHCI Controller [8086:9d2f] (rev 21) 00:14.2 Signal processing controller [1180]: Intel Corporation Sunrise Point-LP Thermal subsystem [8086:9d31] (rev 21) 00:16.0 Communication controller [0780]: Intel Corporation Sunrise Point-LP CSME HECI #1 [8086:9d3a] (rev 21) 00:16.3 Serial controller [0700]: Intel Corporation Sunrise Point-LP Active Management Technology - SOL [8086:9d3d] (rev 21) 00:17.0 SATA controller [0106]: Intel Corporation Sunrise Point-LP SATA Controller [AHCI mode] [8086:9d03] (rev 21) 00:1c.0 PCI bridge [0604]: Intel Corporation Sunrise Point-LP PCI Express Root Port #3 [8086:9d12] (rev f1) 00:1c.4 PCI bridge [0604]: Intel Corporation Sunrise Point-LP PCI Express Root Port #5 [8086:9d14] (rev f1) 00:1d.0 PCI bridge [0604]: Intel Corporation Sunrise Point-LP PCI Express Root Port #9 [8086:9d18] (rev f1) 00:1d.2 PCI bridge [0604]: Intel Corporation Sunrise Point-LP PCI Express Root Port #11 [8086:9d1a] (rev f1) 00:1f.0 ISA bridge [0601]: Intel Corporation Sunrise Point-LP LPC Controller [8086:9d48] (rev 21) 00:1f.2 Memory controller [0580]: Intel Corporation Sunrise Point-LP PMC [8086:9d21] (rev 21) 00:1f.3 Audio device [0403]: Intel Corporation Sunrise Point-LP HD Audio [8086:9d70] (rev 21) 00:1f.4 SMBus [0c05]: Intel Corporation Sunrise Point-LP SMBus [8086:9d23] (rev 21) 00:1f.6 Ethernet controller [0200]: Intel Corporation Ethernet Connection I219-LM [8086:156f] (rev 21) 01:00.0 Non-Volatile memory controller [0108]: Toshiba Corporation BG3 NVMe SSD Controller [1179:0113] (rev 01) 02:00.0 Network controller [0280]: Broadcom Inc. and subsidiaries BCM4350 802.11ac Wireless Network Adapter [14e4:43a3] (rev 08) 03:00.0 Non-Volatile memory controller [0108]: Samsung Electronics Co Ltd NVMe SSD Controller SM961/PM961/SM963 [144d:a804] 04:00.0 Unassigned class [ff00]: Realtek Semiconductor Co., Ltd. RTS525A PCI Express Card Reader [10ec:525a] (rev 01) E7270:~ admin$ For recommended BIOS settings, see here. For proper 4K output, patching BIOS to set DVMT pre-allocated memory to 64MB or 96MB is mandatory. Boot a USB key with ModGrubShell installed on it as explained here and set variable 0x432 to 0x02 or 0x3: setup_var 0x432 0x3 exit Default value is 0x1 for 32MB (0x2 is 64MB, 0x03 is 96MB). Once the change is applied, no need to inject patched Framebuffer memory settings (fbmem/stolenmem) as properties in your bootloader's config. Bear in mind that this DVMT adjustment can be removed by resetting BIOS to default settings.
-
Ok about the nVidia dGPU. Re: brightness control: Yes, SSDT-PNLF table from Dortania's OpenCore site Yes, keep the GFX0 to IGPU renaming in your OC config (it appears to be in place already) Yes, replace any PNLF table in ACPI folder by the one obtained from Dortania's site; if you open it up with maciASL, it should refer to GFX0, not IGPU.
-
I don't think you should be using that SSDT-PNLFCFL on a Haswell laptop. Given that you rename GFX0 to iGPU in your OC config, I'd have used the regular SSDT-PNLF table, as is, i.e. with references to GFX0. NB: I note that you've not disabled the nVidia dGPU; is that normal?
-
Brightness control restored in 11.3 on my E6230 after removing device PNLF from the patched DSDT (it was a very old patch of mine) and adding SSDT-PNLF table (from Dortania). @draskostar watch out with your ACPI settings with regards to iGPU: if you have renamed GFX0 to IGPU in your patched DSDT rather than through bootloader's ACPI device renaming, you'll also have to rename GFX0 to IGPU in SSDT-PNLF too.
-
iStat Menus v5.32: Sensors not showing up in Big Sur
Hervé replied to philstopford's topic in Third Party apps
That's one of them (Slice's). I use this one (old versions by Rehabman forked off Kozlek's work): https://bitbucket.org/RehabMan/os-x-fakesmc-kozlek/downloads/ -
iStat Menus v5.32: Sensors not showing up in Big Sur
Hervé replied to philstopford's topic in Third Party apps
Maybe VirtualSMC and its sensors are not appropriate for iStats Menus app; you could try to switch to FakeSMC and its sensor PlugIns to compare behaviour. I've just tried v5.32 on my old C2D Vostro200 desktop (all my Hacks run with FakeSMC) and the usual CPU, thermal or other fan and SSD sensors were reported and shown. -
EX0 errors in Edge (except in private browsing mode)
Hervé replied to philstopford's topic in The Archive
Must be a local error on your side; just tried from a Win10 PC with Edge and no issues at all. Whether logged in or not. -
Lost brightness control too on my E6230. I have PNLF device built into the patched DSDT; it was something I had added years and years ago; need to remove that and opt for SSDT-PNLF table as posted on, say, Dortania. This may fix the brightness issue.
-
@Sadhiq please try and use the forum Search facility in the future... Thank you.
-
Latitude 3470: unable to get Ethernet working under Big Sur
Hervé replied to marliwahoo's topic in 3000 Series
@Leonardo.schellenberg Mieze just posted a new version v2.4.2. https://www.insanelymac.com/forum/topic/287161-new-driver-for-realtek-rtl8111/page/63/?tab=comments#comment-2756300