-
Posts
10068 -
Joined
-
Last visited
-
Days Won
569
Content Type
Profiles
Articles, News and Tips
Forums
Everything posted by Hervé
-
myFix takes care of that...
-
You should change the hibernation mode to 0 and remove the sleepimage file if there is one. Use the following Terminal commands: sudo pmset hibernatemode 0 sudo rm -f /var/vm/sleepimage For battery status, replace the AppleSmartBatteryManager kext in /S/L/E by the attached version. Finish with the following Terminal commands to fix permissions and rebuild cache: sudo chmod -R 755 /System/Library/Extensions sudo chown -R 0:0 /System/Library/Extensions sudo touch /System/Library/Extensions sudo kextcache -Boot -U / AppleSmartBatteryManager.kext.zip
-
You can either use Clover or Chameleon. I've detailed both methods.
-
Well, nothing wrong in your /E/E folder, nothing wrong in your Chameleon boot plist, I have no idea where things got screwed! It would appear you need to re-install the OS, yes... Stay away from EDP. You will need the SMBIOS of the MacBookPro5,1 to obtain native CPU + GPU speedstep.
-
Chan you check your hibernation mode with Terminal command sudo pmset -g ?
-
Check your DSDT + Hibernation mode as detailed for the E6440: https://osxlatitude.com/index.php?/topic/7387-dell-latitude-e6440-with-i5-4300m-hd4600-and-1600x900-lcd-mavericksyosemite/
-
Please! We don't support those tools here. You know where to go... We've published some guides for this OS X version on that laptop, I suggest you read and use them.
-
You need to boot with NullCPUPowerManagement kext until such time as you've generated your own CPU-specific SSDT using the generator tool and be able to revert to native CPU power management.
-
https://osxlatitude.com/index.php?/topic/6556-wwan-using-ericsson-f5521gw-hp-hs2340-hspa-dw5550-in-os-x/&do=findComment&comment=47206 No double posts please.
-
I have just come to notice that BIOS A18 and A19 modify the System Number from -595B to -3A5B. Whilst these latest versions neither bring new particular features nor affect behaviour in OS X, they are however incompatible with unlocking passwords provided by the well-known BIOS password generator tool (Dogbert's tool included in EDP) which only supports System Numbers ending in -595B/-D35B/-2A7B. As such, if your D630 BIOS is locked with an Admin password, you're unable to unlock it if BIOS is above version A17. Please note that having a BIOS Admin password set does not prevent BIOS downgrade from Windows using the package available off Dell's support web site or directly from a USB key using the extracted .hdr file.
-
After verification, once updated to BIOS A18/A19, D630 laptops get a -3A5B system number trailer. With previous BIOS versions up to A17, the trailer tag is -595B. The BIOS password generator tool only supports D630 system numbers ending in -595B. In addition, unlocking passwords obtained with -595B don't work in BIOS A18/A19. You must downgrade to BIOS version no higher than A17 to be able to unlock your password. I'm now sticking to that version and I suggest everyone does the same. BIOS versions A18/A19 do not bring any new features anyway.
-
When you boot your USB installer, the shell path variable may not contain the link to /usr/bin where sudo exec is found. You could therefore try: /usr/bin/sudo cp -R ... or /Volumes/D830/usr/bin/sudo cp -R ... For the Chameleon boot plist, you need to use the command cat /Volumes/D830/Extra/org.chameleon.Boot.plist
-
The command seems to go through the tree structure; however, you have a rights issue, hence the error messages so the sudo prefix does most definitely appear required. If still not going anywhere, can you reach the /Extra/Extensions folder of your Mav HDD and list the kexts in there? Could you also use detail the contents of the Chameleon boot plist through the cat command?
-
If you can boot the USB installer and access Terminal, you can still make a copy of your HDD's /Extra to your USB key. From Terminal, use df command to obtain the name of the HDD Mavericks partition, then use command cp -R /Volumes//Extra /Extra_BAK. You may need to add sudo in front of the cp command. You'll then have a folder called Extra_BAK at the root of your USB installer. Zip it and post it here.
-
It just seems op forgot to attach his attachments...
-
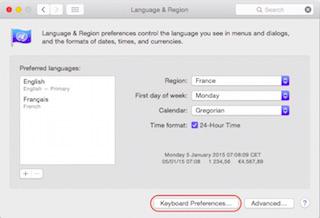
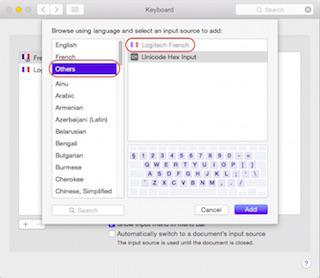
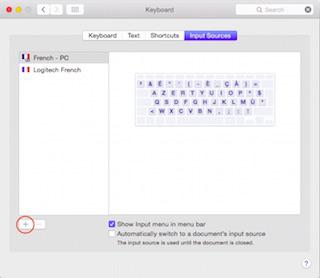
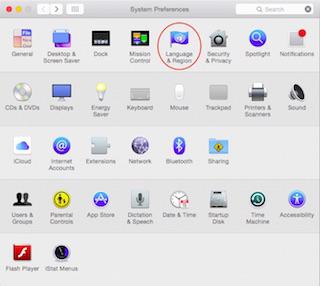
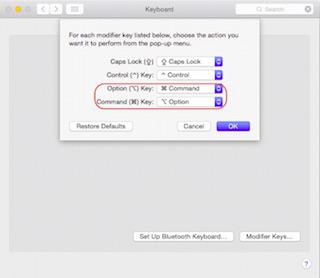
In the Ukulele dmg, there are pre-defined Logitech keyboard layouts. Copy those files for UK layout to /Library/Keyboard Layout and subsequently choose the Logitech layout from the Language & Region preference panel. Go to Keyboard Preferences, then click on + button at bottom left and you'll see the desired layouts listed in Others. Select the layout and click Add. If your Windows key is not Command key, you may want to swap roles with Alt key. Go to the Keyboard prefpane, then to Modifier Keys and swap between Command and Option.
-
Which version of Chameleon do you currently use? Please post your compressed /Extra folder.
-
From Windows? Never tried that. If you don't have a Mac or a hack, I can suggest you try Nawcom's ModCD. It's an ISO image you burn to CD/DVD and it creates a bootable Snow Leopard vanilla installer. You'll need the retail SL (restored) package on another DVD or USB key.
-
Did you install the pack with myHack?
-
Chameleon... Installed with myHack v3.1.2 when you build your Snow Leopard USB installer.
-
Battery removal won't work on the Latitude D Series.
-
Failing that, the tool is available on the Net; you have to do a little search though...
-
I vouch for the /Extra folder packs I've posted. BIOS A09 is probably Ok as is. Make sure you've configured it as per recommended parameters.
-
Warning Apple's Security Update 2015-001 breaks MLPF installations. It installs: i) a new kernel v12.6.0 ii) a new System.kext v12.6.0 The security update can only be "safely" be applied on a MLPF installation if the following actions are undertaken before subsequent reboot: 1) replace new ML kernel v12.6.0 by DP1's v12.0.0 2) replace new System.kext v12.6.0 by DP1's v12.0.0 directly in /S/L/E (do not place it /E/E, it won't work) Unless those replacements are done, the MLPF installation will be unbootable. The following 3 kexts also appear to need roll-back in order to retain Bluetooth services and kextcache: 1) IOBluetoothFamily.kext (back to v4.0.8) 2) IOBluetoothHIDDriver.kext (back to v4.0.8) 3) IOSerialFamily.kext (back to v10.0.5) Whilst you're encouraged to keep a backup, the files are available below: DP1_mach_kernel.zip System.kext.zip IOBluetoothFamily.kext.zip IOBluetoothHIDDriver.kext.zip IOSerialFamily.kext.zip


