Search the Community
Showing results for tags 'yosemite'.
-
hello rufabf, regarding your guide, can you send your dsdt
-
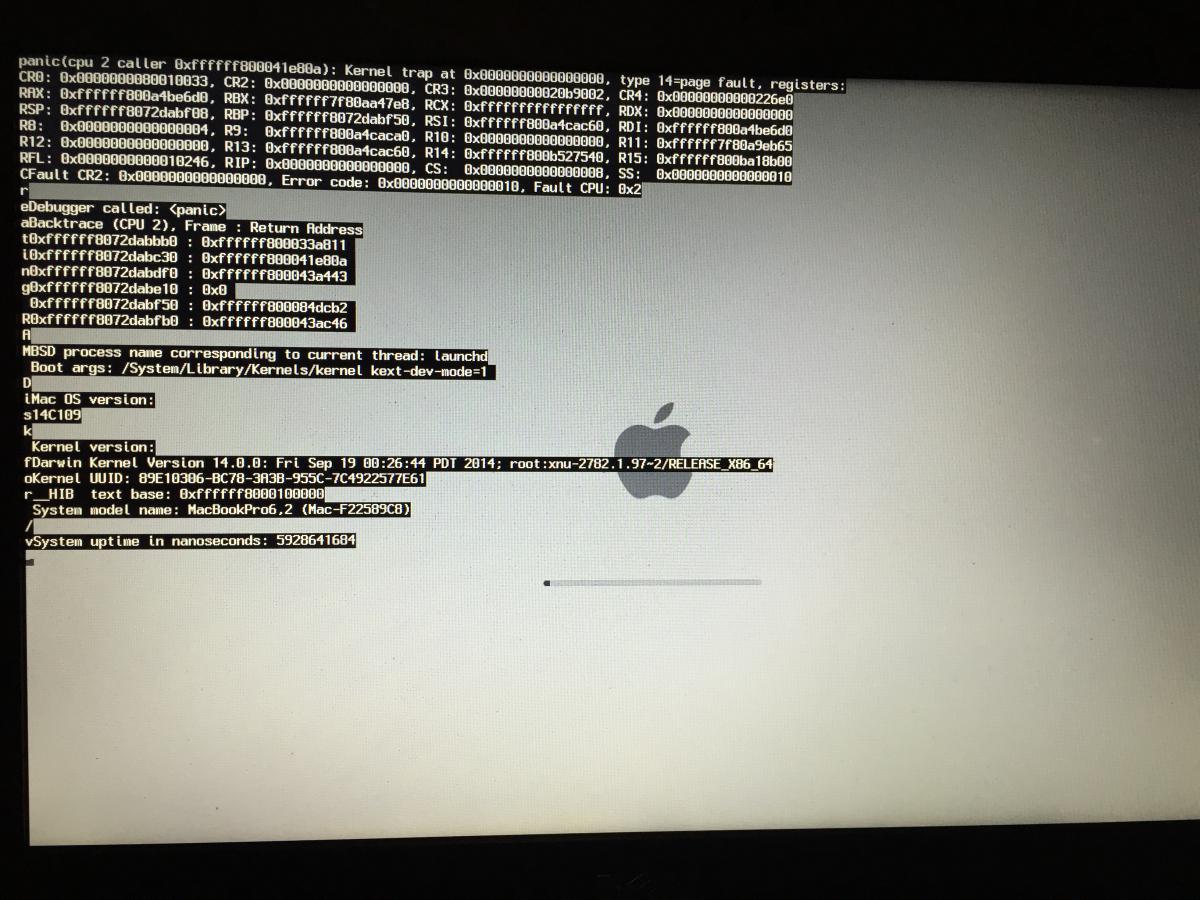
Greetings.. Picked up an E5450 (i7-5600U/HD5500<366x768>) for the purpose of using as a mobile audio multitrack workstation, only to find out that ProTools 11 is only supported to the end of Yosemite. I've searched the forum base as well as the bootPacks, and it seems like things only get started with this series at El Capitan. I tried booting, but KP'd rendering the image shown in the attached picture. Am I barking up an impossible tree? Thank you. 5450 KP.zip
-
Hey folks - I was wondering if anybody got a working App Store Yosemite 10.10 build to install using myhack on the E6500 and if so if they can post instructions? or using unifail for that matter? Anyone know what version of myhack supports it (or does any version support 10.10 as of right now)? I just got 10.9.5 to install and I am hoping to just be able to switch to 10.10 ....But that all depends on what the fine folks on this site which i rely on so much so can do !!!
-
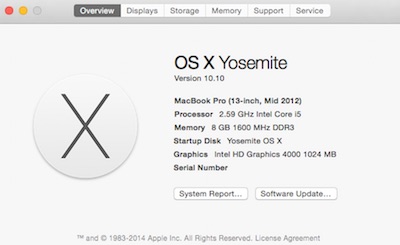
Hi everybody. I have a problem with Skype for several months now and I can't find a solution anywhere. When I start Skype, the message appears saying that Skype quit unexpectedly, and it gives me three choices: Ignore, Report and Reopen. When I click Reopen, again, it says Skype quit unexpectedly and pops out the gigantic report. I am pretty sure that this problem occurred after I've installed some third party software for call recording, I think it was call Onde call recorder. I have uninstalled it but without results. I've tried every suggestion I could find online - I've deleted files from the Library and Application support, I've scanned my Mac with several antivirus and Malware software and tried to reinstall Skype numerous times. I have also contacted Skype and their employee tried to fix the problem but it was unsuccessful. Unfortunately, nothing helped. If anyone had a similar problem and fixed it, I would really appreciate any suggestions. My Mac preferences are: OS X Yosemite v.10.10.2., 3.19 GHz Intel Pentium i5, 16 GB RAM DD3, NVidia GeForce 7500, 1023 MB. Thank you very much in advance.
-
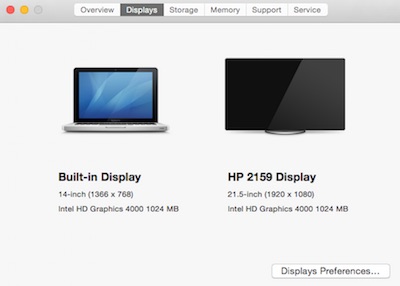
 Hello, I've got Yosemite working allmost perfectly on a notebook Asus N76VZ-V2G-T1006V but I can't use it because it's Intel HD graphics 4000 is not detected. Instead the system considers that my computer has a 3 mb video monitor.... =( Everything is slow and blurry. I can't use it for video editing purpose. Could someone help me to adjust the config.plist to make it work ? Thanks for your help. =) I've attached the "verbose message" displayed by the machine when it boots. And the system info resume image_apercu_systeme - copie.tiff verbose201709262259.txt
 -
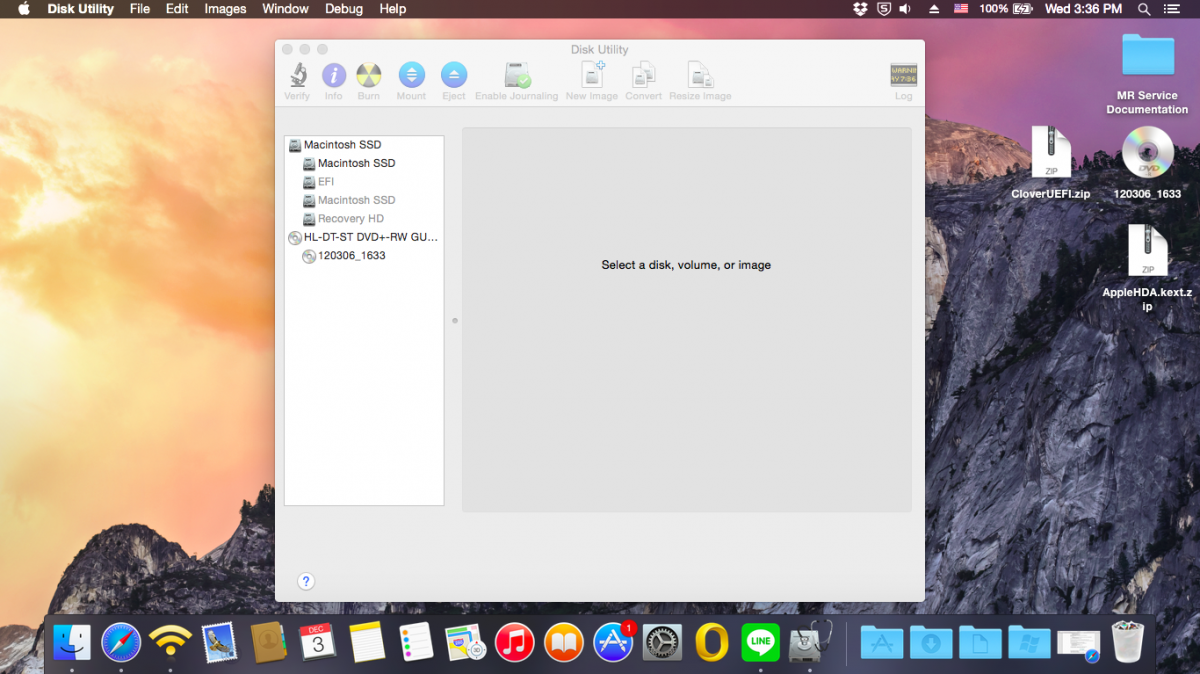
 This is a guide on how to install Yosemite on a Dell Latitude E5440 (2014 version) with Intel HD 4400 Graphics, i5 Processor and Clover UEFI as bootloader. Special thanks to Herve, JakeLo, serotizm, and nguyenmac which provided a very useful guide and which this guide takes a lot of info from: Requirements: - Yosemite App downloaded to /Applications directory on your mac - CloverUEFI.zip files located on attachments below - AppleHDA.kext.zip located on attachments below USB Installer Preparation: 1. Prepare a USB with 8GB or more, format by Disk Utility: - Partition Layout: 2 Partitions - 1st Partition: Name CLOVER, Format: MS-DOS (FAT), Size: >300MB - 2nd Partition: Name MacUSB, Format: Mac OS Extended (Journaled), Size: >7GB - Options: Master Boot Record - Download the CloverUEFI.zip files and copy the whole directory into the CLOVER partition in your USB. 2. Create Yosemite Installer partition (need a Mac), - Download Yosemite Install app from AppStore. - Enable Hidden Files to be shown by opening up a terminal and running the following command: defaults write com.apple.finder AppleShowAllFiles YES - Hold 'alt' on your keyboard, then right click on the Finder icon in the dock and click Relaunch. - Right click to Yosemite Install app > Show Package Contents > Contents > Shared Support and open InstallESD.dmg - Open OS X Install ESD partition, open BaseSystem.dmg (hidden file) - Use Disk Utility to clone OS X Base System to MacUSB partition. - Rename the newly created/restored "OS X Base System" partition in your USB to "Install OS X Yosemite" - Go to System/Installation of "Install OS X Yosemite" and delete the alias “Packagesâ€, then go to “OS X Install ESD†partition, copy the “Packages†folder to System/Installation of "Install OS X Yosemite" - Copy BaseSystem.dmg and BaseSystem.chunklist (hidden files) from "OS X Install ESD" to "Install OS X Yosemite" (on your USB) You can hide the hidden files again in your mac by running the following command from a terminal window and relaunching Finder: defaults write com.apple.finder AppleShowAllFiles NO BIOS Preparation - Enable UEFI Boot Option - Set SATA to AHCI - Disable Legacy Boot Option - Disable "Wake on LAN" - Make sure Data Execution Prevention is enabled - Plug your USB to the laptop Yosemite Installation - Upon turning the laptop on, press F12 to enter the one-time boot up menu - Choose to boot from your USB - Once Clover Boot Menu appears, choose "Boot OS X from Install OS X Yosemite" and press enter. Already the config.plist supplied on the zip file is configured with the boot-arguments that worked for me. - Press spacebar if a nagging screen about Mouse/keyboard appears. Install screen will appear, use Disk Utility to format your drive as GPT, create a Mac OS X Extended (Journaled) partition and install Yosemite to your formatted partition. - Restart once the installation finishes - Boot from your USB again. - Once in the Clover Boot Menu, PRESS F4, and then select to boot from the partition you created and installed OS X on the previous steps. - If all is good and the force is strong with you, it should boot up. Now you can create your account and configure the settings. Post Installation For this part we will install the Clover Bootloader on the hard drive where Yosemite is installed, and since the USB you used worked to boot up, its best to use these same files for the permanent bootloader. - Open a Terminal window a run the following command: diskutil list and then take note of the IDENTIFIER of the EFI partition from the main hard drive where Yosemite is installed, and run the following command: newfs_msdos -v EFI -F 32 /dev/rIDENTIFIER using the IDENTIFIER from your EFI Partition. Don't forget the "r" before your IDENTIFIER - Make sure Disk Utility is closed - Open a Terminal Window and run the following command: defaults write com.apple.DiskUtility DUDebugMenuEnabled 1 - Open Disk Utility - You will now see a "Debug" menu in the top menu option - Enable the "Show every Partition" option - Now on the list of partitions you will see an "EFI" Partition under your main hard drive. Right click on it and choose to mount it. - Go to the EFI partition we just mounted and copy all the contents of your CLOVER partition to the root of the EFI partition. - Remove your USB and reboot. - You should now be able to see the Clover Menu without having the USB on your computer. Before selecting to boot up from your partition, PRESS F4 (only this time is needed...), and select your partition and press ENTER. - Yosemite should boot up now. Hope this helps!! Best Regards, jorgexgb AppleHDA.kext.zip CloverUEFI.zip
-
So I've built my installer as described in this thread (post #41): https://osxlatitude.com/index.php?/topic/2833-install-osx-on-lenovo-thinkpad-x201s-and-maybe-x201/page-5 And I'm installing on a Thinkpad X201 that is successfully running Mavericks, BIOS flashed and using Dell wifi. Here is where my installer stops: Anybody have ideas they can share?
-
So I installed Mac OS X Yosemite and El Capitan on separate drives, and both have glitchy audio. I installed the newest AppleHDA.kext to see it would fix it, but i still get the same issues. It did work perfectly one time, but after that its been horrible. I also tried VoodooHDA to see if that would fix it, it actually made it worse. Any suggestions?
-
hi! i installed Yosemite 10.10.1 with this Jake Lo's method . after installing the kexts and using this DSTD (E6420/E6520 Optimus Disabled = DSDT-NVS.aml ; uncheck Optimus in BIOS) screen goes black. i can only get picture with nv_disable=1. Optimus is disabled. I need help. Intel Core i5 2520M (integrated Intel HD Graphics 3000) 8 Gb RAM NVIDIA NVS 4200M HiRes 1600x900 LCD WIFI - Qualcomm Atheros AR3011 (not working yet, using WIFI stick) bios A22
-
Hello, I have successfully dual installed Yosemite and Windows 10 on latitude E5440. Bluetooth, Key Board, Mouse working fine. Trackpad - Not working. I can live with that. Wifi - Not working (As all Intel wifi are not compatible with OSX). Has anyone tried any of the USB Wifi adapters for E5440? How do they work? Can someone suggest me good USB Wifi adapters for my Hackintosh. Thanks in advance!
-
 After installing OS X Yosemite in my Lenovo Y410p i don't have a great user experience with the trackpad neither with the keyboard, sometimes when i'm writing the cursor jumps to somewhere else, and when i-m using the usb mouse (i have to plug it after the os is loaded if not it is not recognized) and then use the trackpad it gets crazy... i'm using voodoops2.kext by rehabman (the latest version), do someone knows how to fix that? or know about another PS2 kext ?
 -
I've a DELL Latitude E5530 with the specifications below : Processor Intel® Core i5-3340M CPU @ 2.70GHz Video Card Intel® HD Graphics 4000 * Memory 8.1 GB I just need to know if I can install an OSX Yosemite or El Capitan without any problems, also if there's any tutorials about that, I'm new to this forum I wishing to find some help, because I'm getting sick of Windows and I don't have much money to buy a Macbook with the same specifications. Thanks to every one
-
So, im a totall newbie in this hackintosh stuff, i got the installation working but keyboard and mouse doesnt work, also i dont know how to apply DSDT or ssdt and all that stuff, so can someone help me? a step-by-step post installation guide would be great Has Intel Core i7 Ivy or sandy i think, 4gb ram and HD graphics 3000 (i think this one doesnt have nvidia) Thanks
-
Hi, I installed Yosemite following hervé's guide from here https://osxlatitude.com/index.php?/topic/7914-dell-latitude-e6220-with-intel-i5-2520m-hd3000-and-1366x768-lcd-mavericksyosemite/&do=findComment&comment=49907 and everything seems to be working except for one annoying thing: I can only boot from the USB installer stick and then select the OS X hard drive. If I remove the USB stick it doesn't "see" the Chameleon boot loader on the internal hard drive. I first tried r2468, then r2716, then Enoch r2795 but to no avail. Any ideas what might be causing this or what I need to do? The internal HD is a 128gig SanDisk SSD if that should matter. And also one final question: is it safe to install the latest security update 2015-004 that the app store suggests to install? Any special way of going about it? thanks jibe
-
How do I install Yosemite on a DELL Latitude D830 Nivida Graphics card, I have a yosemite.app I try doing a 10.9 Create install USB but whenI choose the Yosemite.app, MyHack says that its not a correct version or something like that. Please help me!
-
Hi, I've been desperately trying in vain, to get Yosemite to install on my Dell E5540. My Specs: Dell E5540 with I5-4310U @2GHz 8GB RAM Intel HD4400 with Nvidia Gforce GT720M Intel Ethernet I218-LM Network Card (I've disabled the un-suported Intel WIFI) AHCI is Enabled for SATA I've followed the below guide to no avail (along with other guides in the forums) https://osxlatitude.com/index.php?/topic/6461-guide-e7440-with-clover/&do=findComment&comment=36589 Not once have I been able to get to the Installation screen. Could someone please enlighten me as to what I'm doing wrong... (With Mavericks I tried the patched Mach_Kernel for 10.9.4 which also resulted in a continuous boot loop) I've attached my EFI Folder along with the modified DSDT.aml file. All Im looking to do, is to get LAN / Sound & Video working on Yosemite. EFI.zip
-
I am unable to boot any version of OS X yosemite(10.10, 10.10.1,...) on my latitude e6410. I have tried both Chameleon and Clover and receive ACPI kernel panics. This is also affecting my El Capitan usb installer too. Here are some steps I have tried to resolve this issue and they have failed: Reset BIOS, Disable VT for Direct IO, Set HDD mode to AHCI. Change Bootloaders from Chameleon to Clover Place AppleACPIPlatform Kext inside Clover kext directory. Have removed AppleACPIPlatform from S/L/E Strangely this does not affect any distro's I have tried from booting into the installerl, but I would like to install using Patel's guide because the end result is much better than a distro. My system specs are: Dell Latitude E6410 i5-560M NVS 3100M 465GB HDD 6GB RAM BIOS A16 Any help would be greatly appreciated, thank you.
-
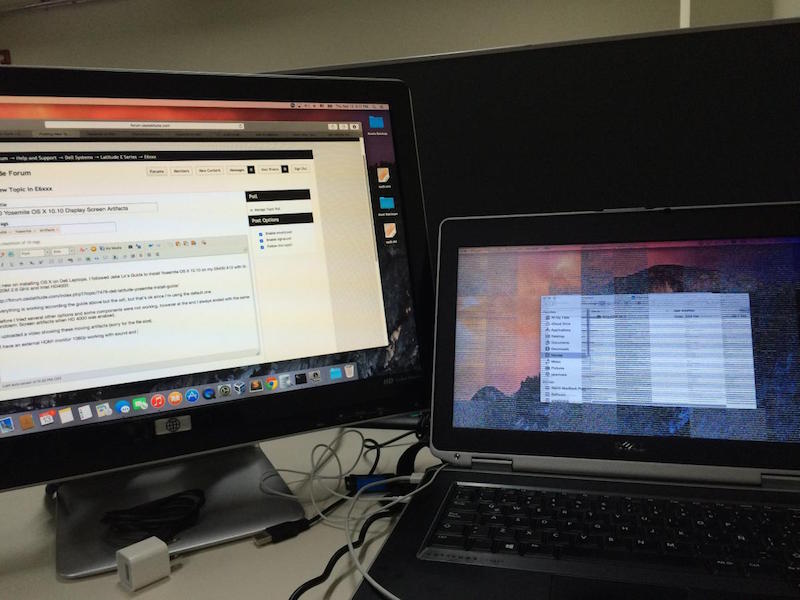
Hi I'm new on installing OS X on Dell Laptops. I followed all Jake Lo's Guide to install Yosemite OS X 10.10 on my E6430 A12 with i5-3320M 2.6 GHz and Intel HD4000 https://osxlatitude.com/index.php?/topic/7478-dell-latitude-yosemite-install-guide/ Everything is working according the guide above but the wifi, but that's ok since I'm using the default one. Before I tried several other options and some components were not working, however at the end I always ended with the same problem: Screen artifacts when HD 4000 was enabled. I uploaded a video showing these moving artifacts (sorry for the file size). I have an external HDMI monitor 1080p working with sound and no artifacts or any problems at all. The built-in display on the laptop is always showing these moving artifacts and lines. I really appreciate any help please. Thanks in advance E6430 A12 i5 3320M 2.6 GHz 8 GB RAM Regards Alex IMG_5568.MOV DSDT_ssdt_boot_smbios.zip
-
Specifications: Processor : Intel® Core™ i3-3110M Processor (3M Cache, 2.40 GHz) Graphics Processor(GPU) : Intel® HD Graphics 4000 & NVIDIA® Optimus™ GeForce® GT 720M (Optional) Chipset : Intel® HM76 Express Chipset Hard disk : HSGT 500GB 5400rpm HDD RAM : 8GB DDR3 1600 MHz SDRAM Wifi : Broadcomm BCM94322HM8L Ethernet : Qualcomm Atheros QCA8172 Audio : Conexant Dolby Audio CX20757 USB 3.0 : Intel Corporation 7 Series/C210 Touchpad : Elan Touchpad v3 Hardware Webcam : Lenovo EasyCamera Card reader : Realtek USB2.0 Card reader (PID: 0x0139) Monitor : LG Philips LP140WH2-TLS1 WXGA 14 16:9 HD1366x768 Optical Drive : Matshita DVD Writer Interface : 1 x Microphone-in & Headphone-out jack 1 x VGA port/Mini D-sub 15-pin for external monitor 1 x USB 3.0 port(s) 2 x USB 2.0 port(s) 1 x RJ45 LAN Jack for LAN insert 1 x HDMI Working: Graphics with QE/CI on Intel HD4000 GPU Audio with AppleHDA WiFi Bluetooth Ethernet USB2.0 and USB3.0 HDMI (With Audio) Webcam Optical Drive Battery Elan Touchpad with Multi touch Sleep, Processor P&C-States with Native power management Fn Hotkeys Not working: Microphone (Internal and External) Nvidia Optimus GT 720M Realtek USB2.0 Card Reader VGA Unknown: None Issues: None For Installation: Follow the steps in the link below, starting with Pre installation, Installation and Post Installation. Use the pack available in the EDP->Bootpacks list. http://www.osxlatitude.com/edp/documentation/ http://www.osxlatitude.com/edp/compatibility/ BIOS - MOD: A modified BIOS available here is necessary to remove the Lenovo white list and unlock advanced options. 2 x unlocked options need to be changed: The graphics value need change 32mb to 64mb for repair the glitch screen. USB XHCI change smart - auto to enabled for repair the webcam.
-
While following https://osxlatitude.com/index.php?/topic/7376-dell-latitude-e6410-yosemite-nvidiaintel/I encountered the following error (see attached). Please let me know how i can fix this
-
 Hi All, Firstly I must thank Jake Lo for his work on getting OSX on the 9020. I am a serious novice OSX user, though I am a tech with 20+ years Windows service (ouch!) so please bear with me. PC is a 9020usff with i7-4770s, 16gb, HD4600. Overall experience is very sweet, though having an issue if I plug my external Lacie USB3 HDD into the SuperSpeed ports it is not recognised. If I plug the same drive into a USB2 port it is recognised as is a USB2 HDD in the SuperSpeed port. I replaced the USB3 kext in Extras with the RehabMan-Generic-USB3-2014-1016 as suggested in another post for the 9010 - as these are vaguely similar machines though same issue arises. Any help, tips, pointers would be very much appreciated. SnookiWooki P.S. Out of curiousity what is the 'Correct' way to copy the kernel over to a freshl OSX install - I took the SSD out and connected it my Mac Mini and copied the files and installed Chameleon on it...
 -
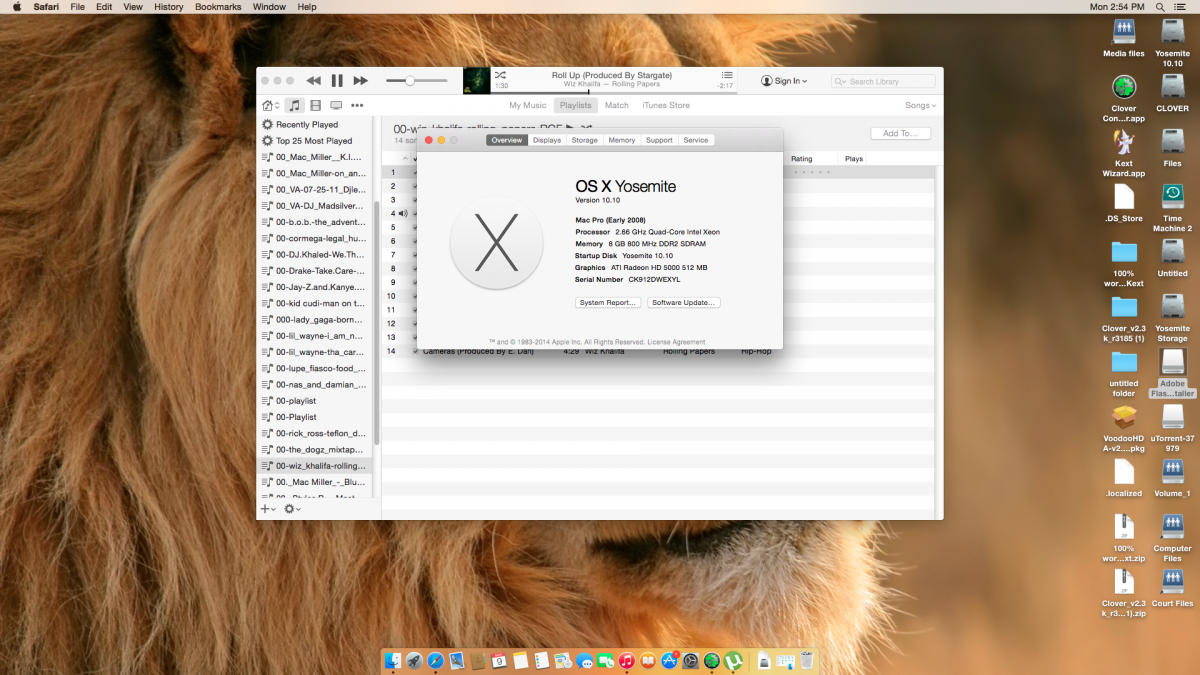
Hey I'm start by saying a lot of the info if not all is already on here scattered... Im just make a write up quick to show u what is needed.. Dell Optiplex 745 q6700 8gb ram hd5450 512mb ssd 120 gb Yo need MACPWN and Yosemite app and a working mac or the same one with a previous version.. Make the USB be PATIENT!!!! it took about 30 minutes to complete and the status didn't move much ... once done u need kext utility and IOATA kext ver 2.5.1 and insert that to S/L/E of usb installer then rebuild permmison now set up ur bios as follows disket usb sata only leave the one with the hdd ur going to us turn off the rest then put it in legacy mode.. now boot off the usb and install OS X yosemite after install use kext uftilitys to put in all the kext from the usb installing in the EFI folder and add in your network kext and sound kext all to S/L/E and rebuild then go to disk utility and resize you partition make a 1gb partition ms dos format now install clover to the 1gb partition u can add themes now and u don't need to check everything off and then you r good just reboot and u will be booting from your hard drive now you can fix ur setup and may sure ur mac is on SATA 0 you should be good to go also u need to add graphic but that easy u can find the hd5450 kext or wtvr one u use and put the kext in S/L/E ad rebuild
- 1 reply
-
- 1
-

-
- Dell Optiplex
- 745
- (and 2 more)
-
Hardware status: [Working] Wireless (swapped to Dell DW1510) [Working] Ethernet [Working] Audio (including Internal Microphone, Line In/Out) [Working] USB2/3 (using native Apple kexts) [Working] Backlight [Working] Battery [Working] HD4000 Graphics (with full acceleration) [Working] VGA port [buggy] [Working] HDMI port (including audio over HDMI) [Working] SDCard Reader [Works OOTB] [Working] Webcam [Works OOTB] [Working] Keyboard/Trackpad (including Fn keys) [Working] Sleep/Wake [Working] Hibernate [Working] Facetime/iMessage This post assumes you've installed Yosemite and are booting with the latest version of Clover. This post assumes a certain level of experience, and is meant more as a collection of solutions than a step-by-step guide. By the end of this post, all your hardware should work flawlessly, and OSX maintenance upgrades (e.g. 10.10.2 > 10.10.3) should install without trashing your system. Since there are different V5-171-* variants, my system specs are as follows: Acer Aspire V5-171-9661 Intel Core i7-3517U HM77 chipset Intel HD4000 graphics, 1366x768 Elantech Touchpad with v4 hardware Anatel Atheros AR5B22 InsydeH20 EFI 3.7 System BIOS Version 2.21 Clover Bootloader r3241 (as of the time of this writing) [booting in EFI mode] OSx 10.10.4 Yosemite (as of the time of this writing) This guide should equally apply to any V5-171-* built in 2012-2013 that has an Ivy Bridge Core i5 or i7 processor. SMBios The 11" MacBookAir5,1 uses an Ivy Brdige Core i7 3***U processor with HD4000 graphics on an Intel HM77 board. This would seem the perfect model to emulate for this laptop. Unfortunately, Clover doesn't provide an option for the 5,1 in its wizard, only for the 13" 5,2. You can either create the SMBios manually, matching the values for a real MacBookAir5,1, or just use 5,2 since it has the same hardware minus the screen size. The Retina MacBookPro10,1 would be another good option. It uses an Ivy Bridge Core i7 3***M processor with HD4000 graphics and the HM77 Chipset. Here's the values for a MacBookAir5,1: <key>SMBIOS</key> <dict> <key>BiosReleaseDate</key> <string>06/08/15</string> <key>BiosVendor</key> <string>Apple Inc.</string> <key>BiosVersion</key> <string>MBA51.88Z.00EF.B03.1506081623</string> <key>Board-ID</key> <string>Mac-66F35F19FE2A0D05</string> <key>BoardManufacturer</key> <string>Apple Inc.</string> <key>BoardType</key> <integer>10</integer> <key>ChassisAssetTag</key> <string>Air-Enclosure</string> <key>ChassisManufacturer</key> <string>Apple Inc.</string> <key>ChassisType</key> <string>10</string> <key>Family</key> <string>MacBook Air</string> <key>Manufacturer</key> <string>Apple Inc.</string> <key>Mobile</key> <true/> <key>ProductName</key> <string>MacBookAir5,1</string> <key>SerialNumber</key> <string>C02XXXXXDRV6</string> <key>Trust</key> <false/> <key>Version</key> <string>1.0</string> </dict> You'll need to generate your own Serial. Additionally, you can find dumps (DSDT, IOReg, etc.) for real Mac hardware at the following link: http://tdev.me/2010/12/apple-hardware-dumps/ Kexts Basic kexts you'll need. Install all kexts to ../Clover/kexts/10.10/ unless otherwise specified: FakeSMC https://bitbucket.org/RehabMan/os-x-fakesmc-kozlek/downloads ElanTouchpad Driver https://osxlatitude.com/index.php?/topic/1948-elan-and-focaltech-smart-touchpad-driver-mac-os-x/ Clover Configuration My clover config is attached to this post, and can likely be used as is (generate your own serial), but in general: Disable all ACPI DSDT edits except for New Way and Fix Regions Use the wizard to generate an smbios of MacBookAir5,1 Nearly everything clover offers should be disabled (graphics, USB, etc.). We'll fix things in other ways. My Bootflags: -v dart=0 nv_disable=1 kext-dev-mode=1 -xcpm Clover Drivers: Drivers present in ../Clover/drivers64UEFI/ FSInject-64.efi HFSPlus.efi - Needed for Clover to read HFS+ formatted partitions. NTFS.efi - Needed for Clover to read NTFS formatted partitions (if you're dual-booting with windows). OsxAptioFix2Drv-64.efi - Needed to enable hibernation when booted in UEFI mode, and to fix the persistence of the hardware NVRam. OsxFatBinaryDrv-64.efi - Needed for Clover to read Fat32 formatted partitions. DSDT Get the stock ACPI tables. I booted into Ubuntu Linux for this. You should now have your stock DSDT and SSDTs. The first step is to correct any errors (Patch at end of section). Mine had a single error: Result is not used. Operator has no effect: line 6114 Original: Method (_L1F, 0, NotSerialized) // _Lxx: Level-Triggered GPE { Not (LPDL, LPDL) If (LEqual (\_SB.PCI0.LPCB.EC0.IOAC, Zero)) { Store (\_SB.PCI0.LPCB.EC0.LIDF, Local0) Not (Local0, Local0) If (LGreaterEqual (OSYS, 0x07D6)) { Add (Local0, 0x02) \_SB.PCI0.GFX0.GLID (Local0) } Notify (\_SB.PCI0.LPCB.LID0, 0x80) } Else { If (LEqual (\_SB.PCI0.LPCB.EC0.LIDF, One)) { \_SB.PCI0.GFX0.GLID (0x03) } } } } Corrected: [deleted bolded line] Method (_L1F, 0, NotSerialized) // _Lxx: Level-Triggered GPE { Not (LPDL, LPDL) If (LEqual (\_SB.PCI0.LPCB.EC0.IOAC, Zero)) { Store (\_SB.PCI0.LPCB.EC0.LIDF, Local0) Not (Local0, Local0) If (LGreaterEqual (OSYS, 0x07D6)) { \_SB.PCI0.GFX0.GLID (Local0) } Notify (\_SB.PCI0.LPCB.LID0, 0x80) } Else { If (LEqual (\_SB.PCI0.LPCB.EC0.LIDF, One)) { \_SB.PCI0.GFX0.GLID (0x03) } } } } I also fixed two warnings: Not all control paths return a value WM00: line 4783 original: Method (WM00, 3, NotSerialized) { Store ("00", CTID) If (LEqual (Arg1, 0x06)) { CSMI (Arg1, Arg2) Return (DI00) } edited: [added the bold] Method (WM00, 3, NotSerialized) { Store ("00", CTID) If (LEqual (Arg1, 0x06)) { CSMI (Arg1, Arg2) Return (DI00) } [B]Return (Buffer (One) { 0x00 })[/B] } Resource tag larger than field 64bit tag, 32bit feild: line 1488 Original: If (LOr (LEqual (MM64, Zero), LLessEqual (OSYS, 0x07D3))) { [B]CreateDWordField (BUF0, \_SB.PCI0._Y0F._LEN, MSLN)[/B] // _LEN: Length Store (Zero, MSLN) } Edited: [changed CreateDWordField to CreateQWordField] If (LOr (LEqual (MM64, Zero), LLessEqual (OSYS, 0x07D3))) { [B]CreateQWordField (BUF0, \_SB.PCI0._Y0F._LEN, MSLN)[/B] // _LEN: Length Store (Zero, MSLN) } I also created a patch that automates the above changes, taking care of the error, and both warnings, and also addresses the vast majority of the remarks: # Fix Error "Result is not used, operator has no effect" Line 5690 into method label _L1F parent_label _GPE code_regex Add\s\(Local0\,\s0x02\) remove_matched; # Fix Warning "ResourceTag larger than Field (Size mismatch, Tag: 64 bits, Field: 32 bits)" Line 1488 into method label _CRS parent_hid PNP0A08 code_regex CreateDWordField\s\(BUF0\,\s\\\_SB\.PCI0\.\_Y0F replace_matched begin CreateQWordField (BUF0, \\_SB.PCI0._Y0F end; # Fix Warning "Not all control paths return a value (WM00)" Line 4783 into method label WM00 parent_hid PNP0C14 insert begin Return (Buffer (One)\n {\n 0x00\n })\n end; # Fix Remark "Use of compiler reserved name (_T_0)" into_all all code_regex _T_([0-9]) replaceall_matched begin T_%1 end; DSDT should now compile without any errors or warnings. Save a virgin copy so you can backtrack if you make any mistakes. Now we begin patching. Nearly all of the patches I used are from RehabMan's laptop patch repo: https://github.com/RehabMan/Laptop-DSDT-Patch Basic Recommended Patches Add MCHC https://github.com/RehabMan/Laptop-DSDT-Patch/blob/master/system/system_MCHC.txt Fix Mutex https://github.com/RehabMan/Laptop-DSDT-Patch/blob/master/system/system_Mutex.txt Masquerade OSX ("Darwin") as Windows 8 ("Windows 2012") https://github.com/RehabMan/Laptop-DSDT-Patch/blob/master/system/system_OSYS_win8.txt SMBus Fix https://github.com/RehabMan/Laptop-DSDT-Patch/blob/master/system/system_SMBUS.txt HD4000 Graphics Apply following patches from the repo to your DSDT: Rename GFX0 to IGPU (apply first) https://github.com/RehabMan/Laptop-DSDT-Patch/blob/master/graphics/graphics_Rename-GFX0.txt Enabled HD4000 & Inject HDMI info https://github.com/RehabMan/Laptop-DSDT-Patch/blob/master/graphics/graphics_HD4K_low.txt You'll also need to set ig-platform-id in clover: <key>Graphics</key> <dict> <key>ig-platform-id</key> <string>0x01660003</string> </dict> Power Management This is accomplished through Clover, or a custom SSDT. I used ssdtprgen.sh to generate a custom SSDT.aml and placed it into ../Clover/ACPI/patched/ to handle my power management. If you go this route, you must also enable Xnu CPU Power Management using bootflag -xcpm and must also set KernelPM to true in your Clover config. USB To get USB fully working, simply apply these two patches: https://github.com/RehabMan/Laptop-DSDT-Patch/blob/master/usb/usb_7-series.txt (apply first) https://github.com/RehabMan/Laptop-DSDT-Patch/blob/master/usb/usb_7-series-multiplex.txt Multiplex patch needs a couple of minor edits to work with this laptop. First, our bios uses Name not Method for USB _PWR. Find the line that reads: Method (_PRW, 0, NotSerialized) { Return (GPRW (0x0D, 0x04)) }\n and edit it to read: Name (_PRW, Package () { 0x0D, 0x03 })\n Also in the multiplex patch, find the line that reads: "AAPL,device-internal", 0x02,\n and edit it to read: "AAPL,device-internal", Zero,\n to match what the MacBookPro10,1 (same chipset) uses. It uses "AAPL,device-internal", 0x02, for ECH1 and ECH2, and 0x00 (Zero) for XHC1. Now, reboot (MAKE SURE YOU UNINSTALL GenericUSBXHCI.kext!), and USB should be fully functional using native Apple kexts. Audio Audio required much fiddling. The V5-171-9661 uses an ALC271x codec. One can find a working kext here: http://www.insanelymac.com/forum/topic/298663-applehda-for-yosemite/ that will give you functioning internal speakers, and headphone jack after applying the following DSDT layout patch: # Maintained by: toleda for: github.com/toleda/audio_alc8xx # File: hdef3-alc8xx_audio-3.txt_v2.0 # Credit: PikeRAlpha # # Add_HDEF, for dsdts with no HDEF, set Audio_ID: 3 # # 1. Enable Audio ID: 3, Add HDEF/layout-id=3 into method label _DSM parent_adr 0x001B0000 remove_entry; into device name_adr 0x001B0000 insert begin Method (_DSM, 4, NotSerialized)\n {\n If (LEqual (Arg2, Zero)) { Return (Buffer() { 0x03 } ) }\n Return (Package()\n {\n "layout-id", Buffer() { 0x03, 0x00, 0x00, 0x00 },\n "PinConfigurations", Buffer(Zero) {},\n "hda-gfx", Buffer() { "onboard-1" },\n })\n }\n end; but to get the internal microphone working, and to make sound survive OSX upgrades, some further work is needed. To make sound update-proof, you need to have Clover patch AppleHDA.kext on the fly, and use an injector kext to supply the stock AppleHDA.kext with information about our codec. Starting with the above kext for ALC271x, I followed this guide: http://www.insanelymac.com/forum/topic/298027-guide-aio-guides-for-hackintosh/page-2?do=findComment&comment=2030060 to create a DummyHDA.kext. If installed to /System/Library/Extensions along side the untouched AppleHDA.kext, and Clover has the following patches applied (an explanation of how to generate your Clover patches with a script is in the thread linked above), the system should now have sound (but no mic). <dict> <key>Comment</key> <string>Expect 2 matches</string> <key>Find</key> <data> hAjsEA== </data> <key>Name</key> <string>AppleHDA</string> <key>Replace</key> <data> AAAAAA== </data> </dict> <dict> <key>Comment</key> <string>Expect 2 matches</string> <key>Find</key> <data> hQjsEA== </data> <key>Name</key> <string>AppleHDA</string> <key>Replace</key> <data> AAAAAA== </data> </dict> <dict> <key>Comment</key> <string>Expect 2 matches</string> <key>Find</key> <data> hBnUEQ== </data> <key>Name</key> <string>AppleHDA</string> <key>Replace</key> <data> aQLsEA== </data> </dict> To fix the internal microphone, you'll need to edit the pathmaps and codec information you added to DummyHDA.kext. My DummyHDA.kext with these edits already made is attached to this post, and can likely be used without modification on another V5-171-9661. Relevant Tutorial Thread: http://www.insanelymac.com/forum/topic/295001-guide-to-patch-applehda-for-your-codec/ The ALC271x kext from which we took the files uses layout 3, and pathmap id 269 (under path 48 in platforms.xml). Structure of pathmaps.xml from downloaded ALC271x kext in PlistEdit Pro: PathMaps | [0-47] | 48-[Contains PathMapID for our codec used by ALC271x pathced kext, 269] | PathMapID: 269 | PathMap | 0-INPUT | | | 0—Line In | | | | | 0 Input NodeID | | | | | 1 Mixer/Selector NodeID | | | | | 2 Pin Complex NodeID | | | 1—Internal Microphone | | | 0 Input NodeID | | | 1 Mixer/Selector NodeID | | | 2 Pin Complex NodeID | 1—OUTPUT | 0—Internal Speakers | | | 0 Pin Complex NodeID | | | 1 Mixer/Selector NodeID | | | 2 Output NodeID | 1—Headphone Jack | 0 Pin Complex NodeID | 1 Mixer/Selector NodeID | 2 Output NodeID NodeIDs for V5-171-9661 Line in Input 9 Selector 34 Complex 18 Microphone Input 8 Mixer 35 Complex 27 Internal Speaker Pin Complex 20 Mixer 13 Output 3 Headphone Pin Complex 33 Mixer 12 Output 2 In the pathmap.xml we took from the ALC271x's kext and placed into DummyHDA.kext, it was only necessary to change the mic’s pin complex from 24 to 27, all the other nodes were correct already. The next step is to edit the codec verbs for the microphone as follows: Original: 01471c10 01471d00 01471e17 01471f90 01b71c20 01b71d00 01b71ea7 01b71f90 01d71c30 01d71d90 01d71e18 01d71f40 02171c40 02171d10 02171e21 02171f00 Corrected: 01471c10 01471d00 01471e17 01471f90 01471c10 01471d00 01471e17 01471f90 01d71c30 01d71d90 01d71e18 01d71f40 02171c40 02171d10 02171e21 02171f00 As you can see I changed the second set of four verbs (bold) from: 01b71c20 01b71d00 01b71ea7 01b71f90 to: 01471c10 01471d00 01471e17 01471f90 as per bcc9’s script. Everything else in this kext matches the verbs provided by the script. If you edit the info.plist file in a text editor, you’ll need to convert the codec verb string from hex to base64. The info.plist edits should look like this: Original: <key>CodecID</key> <integer>283902569</integer> <key>ConfigData</key> <data> AUccEAFHHQABRx4XAUcfkAG3HCABtx0AAbce pwG3H5AB1xwwAdcdkAHXHhgB1x9AAhccQAIX HRACFx4hAhcfAA== </data> Corrected: <key>CodecID</key> <integer>283902569</integer> <key>ConfigData</key> <data> AYccMAGHHRABhx6BAYcfAAGXHEABlx0AAZce oAGXH5ABtxwQAbcdAAG3HhMBtx+QAhccYAIX HRACFx4hAhcfAAG3DAI= </data> Install the edited dummy kext to /System/Library/Extensions, rebuild the kext cache, reboot, and sound should work (make sure you have the stock, untouched AppleHDA.kext in /System/Library/Extensions, not the downloaded ALC271x kext). With these changes, the files taken from the modified ALC271x AppleHDA and placed into DummyHDA will allow the stock AppleHDA.kext to load, provide sound/mic, and sound will survive OSX upgrades. Wireless Not possible. Replace the card with a Dell 1510, or similar OSX compatible card. Note that the DW1510 does not have Bluetooth, and the V5-171-9661's Bluetooth chip is integrated on the stock wireless card. If Bluetooth is important to you, you'll have to use a different card. Ethernet The V5-171-9661 has a Netlink BCM57785. To ensure that ethernet survives OSX upgrades, I used FakePCID and an injector to load the stock Apple network kext. https://github.com/RehabMan/OS-X-Fake-PCI-ID Add FakePCID.kext and FakePCIID_BCM57XX_as_BCM57765.kext to ../Clover/kext/10.10, reboot, and ethernet works. Battery Done with Rehabman's ACPI Battery Driver: https://github.com/RehabMan/OS-X-ACPI-Battery-Driver and a DSDT edit, utilizing this patch from the repo: https://github.com/RehabMan/Laptop-DSDT-Patch/blob/master/battery/battery_Acer-Aspire-E1-571.txt HDMI Audio & VGA Simply apply the following Clover kext patch: <dict> <key>Comment</key> <string>HDMI-audio HD4000 0x01660003, port 0205</string> <key>Find</key> <data> AgUAAAAEAAAHBAAA </data> <key>Name</key> <string>AppleIntelFramebufferCapri</string> <key>Replace</key> <data> AgUAAAAIAAAGAAAA </data> </dict> Brightness Control Apply following patch from the repo to your DSDT: https://github.com/RehabMan/Laptop-DSDT-Patch/blob/master/graphics/graphics_PNLF_ivy_sandy.txt That patch will get rudimentary brightness controls working, but for full control, in conjunction with that patch, you'll either need to install Rehabman's Backlight kext: https://github.com/RehabMan/OS-X-ACPI-Backlight or, as I did, you can use an injector kext to load the default Apple backlight kext. Install the kext in /System/Library/Extensions (doesn't load from ../Clover/kexts/10.10), rebuild the kext cache, reboot and you should have full backlight control. My injector kext with this work done is attached. Brightness Keys Fn+LArrow for brightness down Fn+RArrow for brightness up The V5-171-9661 uses DSDT ec query method _Q11 for brightness down, and _Q12 for brightness up. As of version 4.3 of the Elantech driver, there is native support for ACPI brightness keys, releaving us of the need to use a middleman kext to enable them. With this new version, you only need to apply this simple DSDT patch to get the keys working: #Edit methods _Q11 and _Q12 to interface with KBC0 into method label _Q11 replace_content begin // Brightness Down\n Notify (KBC0, 0x20)\n end; into method label _Q12 replace_content begin // Brightness Up\n Notify (KBC0, 0x10)\n end; Note that by default the driver has FinerBrightnessControl set to true in it's info.plist, breaking brightness control into 64 steps, as opposed to the normal 16 that OS X uses. See this thread for more information on how to configure the Elantech driver: https://osxlatitude.com/index.php?/topic/5969-details-about-the-enhanced-keyboard-for-elan-touchpad-driver/ Hibernation, Hardware NVRam, Facetime & iMessage When booting in UEFI mode, Hibernation can be enabled by including the OsxAptioFix2Drv-64.efi Clover driver when you install. With this driver included, hibernation, set to mode 3 (safe sleep) by default, will work with no other changes. To test this, sleep the laptop with the A/C cable disconnected, and then pull the battery. With the battery reattached, when the laptop is powered on, Clover should say (Hibernated) next to your OSX partition, and when selected, your computer should return to the state it was in when you put it to sleep. Including OsxAptioFix2Drv-64.efi also fixes the hardware NVRam, allowing one to forgo including Clover's NVRam emulator, EmuVariableUefi-64.efi. Without either driver installed, NVRam contents does not persist across reboots. Functional NVRram, whether Clover's emulator, or the hardware NVRam, is required for Facetime & Messages to work. In short, it is necessary to get a unique serial number, to ensure NVRam works, and to call Apple. Optional: Trim Support (for those with SSDs) As of 10.10.4, you only need to issue a terminal command to enable trim support: $ sudo trimforce enable Optional: Rename Devices in DSDT to Match Apple Conventions I created a patch that renames all relevant devices in the DSDT to match what OSX expects. This patch is purely cosmetic; apply at your own risk. Renames: EC0 > EC SAT0 > SATA ACAD > ADP1 BAT1 > SMB0 PXSX@RP02 > ARPT PXSX@RP03 > GIGE CRF1 > SDXC XHC > XHC1 # Rename EC0 to EC (embedded controller) to be more Apple-like into device label EC0 set_label begin EC end; into scope label EC0 set_label begin EC end; into_all all code_regex \.EC0\. replaceall_matched begin \.EC\. end; into_all all code_regex \^EC0\. replaceall_matched begin \^EC\. end; # Rename SAT0 to SATA (serial ata) to be more Apple-like into device label SAT0 set_label begin SATA end; # Rename ACAD (ac adapter) to ADP1 to be more Apple-like into device label ACAD set_label begin ADP1 end; into method label _Q37 parent_hid PNP0C09 code_regex ACAD replaceall_matched begin ADP1 end; into method label _Q38 parent_hid PNP0C09 code_regex ACAD replaceall_matched begin ADP1 end; # Rename BAT1 (battery) to SMB0 to be more Apple-like into device label BAT1 parent_label _SB.PCI0.LPCB set_label begin SMB0 end; into_all all code_regex Notify\s\(BAT1 replaceall_matched begin Notify (SMB0 end; # Rename PXSX at RP02 (wireless) to ARPT to be more Apple-like into device label PXSX parent_adr 0x001C0001 set_label begin ARPT end; into method label HPME parent_adr 0x001C0001 code_regex PXSX replaceall_matched begin ARPT end; # Rename PXSX at RP03 (ethernet) to GIGE to be more Apple-like into device label PXSX parent_adr 0x001C0002 set_label begin GIGE end; into method label HPME parent_adr 0x001C0002 code_regex PXSX replaceall_matched begin GIGE end; # Rename CRF1 at RP03 (sdcard reader) to SDXC to be more Apple-like into device label CRF1 parent_adr 0x001C0002 set_label begin SDXC end; # Rename XHC to XHC1 (usb3.0) to be more Apple-like into device label XHC set_label begin XHC1 end; into_all all code_regex \^XHC\. replaceall_matched begin \^XHC1\. end; Optional: Implement Compiler Recommended DSDT Optimizations I created a patch that addresses the vast majority of the optimizations the compiler suggests. Again, use at your own risk. # Optimization Change \_SB.PCI0._Y0* to ^_Y0* into_all all code_regex \\_SB\.PCI0\._Y0([0-9]) replaceall_matched begin \^_Y0%1 end; into_all all code_regex \\_SB\.PCI0\._Y0([A-F]) replaceall_matched begin \^_Y0%1 end; # Optimization: Change \_SB.PCI0.LPCB.HPET.Y1* to ^_Y1* into_all all code_regex \\_SB\.PCI0\.LPCB\.HPET\._Y1([0-9]) replaceall_matched begin \^_Y1%1 end; # Optimization: Change \_SB.PCI0.PDRC._Y1* to ^_Y1* into_all all code_regex \\_SB\.PCI0\.PDRC\._Y1([0-9]) replaceall_matched begin \^_Y1%1 end; # Optimization: (0x00000000 to Zero into_all all code_regex \(0x00000000 replaceall_matched begin \(Zero end; # Optimization: Package (0x01) to Package (One) into_all all code_regex Package\s\(0x01\) replaceall_matched begin Package (One) end; In the attached zip you'll find my Clover config.plist; my DummyHDA.kext; my AppleBacklightInjector.kext; my native, untouched DSDT; and my patched DSDT. If you can diff my untouched DSDT with yours and have only trivial differences, then you can use my patched DSDT as is. V5-171-9661 Post Install.zip
-
 Hi guys, I followed Jake Lo's installation guide "Dell Latitude E6xxx/E7xxx Yosemite Install Guide". Excellent guide, thank you Jake Lo. USB 2.0 works (mouse and an USB 2.0 HDD) but no USB 3.0. Everithing else specified with the guide works flawlessly. My Configuration: Dell 7440, i7 4600 U, 8 GB Ram, 256 SSD, Yosemite 10.10.4. Help please, Kind Regards, Maitrex
 -
Hi, I have a Dell Latitude E7440 with i4300 (i5 processor with Intel 4400) 1920x1080 display, 256GB SSD. Currently using a USB wifi, and on A15 BIOS. In my search for the best tutorial, I've tried the Clover Method, with the tutorial from here and attempted EDP. With all the tutorials out there, it makes it challenging for a newbie to figure out what is best, or where to start. That being said, I see EDP, MyHack, Clover, Chameleon... What really is the best way? Can someone break down the 4 or 5 methods, and explain why one would choose one over the other? It seems like Clover makes the most sense from what I've tried, but not so sure, as I've had my own issues getting things up and running. I'm currently sort of up using Clover with the tutorial from here, but my Graphics is unaccelerated and some sleep issues with audio.. Running Yosemite 10.10.4. Also it's not so clear, do the boot packs have everything you need for 10.10.4, or do you need to apply patches for each to get up to date (eg. apply 10.10.1, then stuff for 10.10.2, etc.) Thanks!