Search the Community
Showing results for tags 'e6220'.
Found 10 results
-
Hello, I tried installing osx sierra on my E6220 with the following specs Intel Core i3 2330m 4GB ddr3 1333 ram 256GB samsung ssd pny usb 3.0 32gb usb flash drive created by the guide here. also used a clompletly new 32 gb drive created with same guide. Its post with the sierra guide Usb created on an running imac with high sierra with the base installer from the store witch should be version 10.12.6 Used the kernel version 10.12.6 and patched aicpum kext from here the problem is that it hangs at still waiting for root device with booth usb drives Bios has been reset to factory defaults and sata mode is ahci mode. what can i do to fix this. atached all files that the guid refers to. Vanilla_kernel_10.12.6.zip Patched_AICPUPM_10.12.6.zip E6220_i5-2520M_HD3000_Sie-Pack.zip
-
Hi everyone, first of all I wanna thank Hervé for his fantastic guide on how to hackintosh our Latitude E6220. I want to start saying that I'm running Sierra, but I haven't followed the guide entirely, because, after the installation completed and I booted into the main HDD, I installed Clover instead of Enoch. I did this because I basically hate those legacy bootloaders, as they gave me lots of problems when I hackintoshed my other laptop, an Acer Aspire 5750G, so I don't want to use them if it's not mandatory. Also, I don't want to tamper with S/L/E if I can. Right now almost everything is working, but I have a little strange problem. When I first boot up the laptop, the eSata port does not work, and the SD card reader, even though is recognized, doesn't show any card in it. However, if I put the computer to sleep, then I wake it up, both start working without a hitch, I can hotplug the eSata port and the reader mounts without any problem. Is there a way to fix this under Clover? My lappy: Dell Latitude E6220 i5-2520M, HD3000 8GB 1333MHz RAM macOS 10.12.5 Sierra Clover r4077, using Hervé's DSDT and generated SSDT Boot args: darkwake=0 slide=0 I attach my config.plist, I think it could be useful. Thanks in advance config.plist.zip
-
Hello, I'd like to contribute to the forum and I have decided to write a detailed guide how I installed macOS Sierra 10.12.1 on my E6220 with Core-i7 2620m, HD3000, 8GB RAM, 128GB SSD. I have received few personal messages for help, although there’s a perfect Enoch guide by Herve: https://osxlatitude.com/index.php?/topic/7914-dell-latitude-e6220-with-i5-2520m-hd3000-and-1366x768-lcd-mavericksyosemiteel-capitansierra/ and excellent generic El Capitan guide by Jake Lo: https://osxlatitude.com/index.php?/topic/8506-dell-latitude-inspiron-precision-el-capitan-clover-guide/ I will follow Jake’s guide, but I will add more stuff and this guide will be useful for all Sandy bridge E6x20 Many thanks to all OS X latitude forum members, who helped me when I was very new to OS X. Let’s start. You need: 1. E6220 2. 8GB USB or bigger 3. Access to real mac to create install USB or if you have Windows/Linux you can use a virtual machine using virtualbox or vmmare You should update your BIOS to A13 and set it to the following settings : https://osxlatitude.com/index.php?/topic/8281-e6220-bios-settings/ Download macOS Sierra from Apple store. Prepare USB using the following instructions: 1: Prepare Bootable USB Drive This step extracts the OS X Installer contents, then installs Clover bootloader to the USB stick. 1. Insert the USB drive on a running OS X system 2. Open /Applications/Utilities/Disk Utility 3. Highlight the USB drive in left column 4. Click on the Partition tab 5. Click Current and choose 1 Partition 6. Click Options... 7. Choose GUID Partition Table 8. Under Name: type USB (You can rename it later) 9. Under Format: choose Mac OS Extended (Journaled) 10. Click Apply then Partition 11. Go to Applications, right click on “Install macOS Sierraâ€/Show Package Contents/Contents/ SharedSupport 12. Mount InstallESD.dmg 13. Launch ShowHiddenFiles and select “Show Special Files†( app attached at the end of guide) 14. Mount BaseSystem.dmg (hidden) from “OS X Install ESD†15. Use Disk Utility to restore “OS X Base System†to USB (see image below) 16. After restore is complete, USB is now renamed to “OS X Base Systemâ€. Go ahead and rename it to “Install macOS Sierra†17. Go to “Install macOS Sierraâ€/System/Installation and delete the alias “Packagesâ€. 18. Copy “Packages†from root of “OS X Install ESD†to “Install macOS Sierraâ€/System/Installation 19. Copy BaseSystem.dmg and BaseSystem.chunklist (hidden files) from “OS X Install ESD†to root of “Install macOS Sierra†20. Launch ShowHiddenFiles and select “Hide Special Files†21. Download Clover EFI boot loader 22. Open Clover package installer 23. Hit Continue, Continue, Change Install Location... 25. Choose “Install macOS Sierra†26. Hit Continue, then hit Customize. Select these items: • Install Clover in the ESP • Bootloader/Install boot0af in MBR • CloverEFI/CloverEFI 64-bits SATA You can also select a Clover theme. 27. Click Install 28. After installation of Clover, the hidden EFI Partition will appear on the Desktop Now you will need to browse the EFI partition and put the necessary files in the correct locations: DSDT.aml and ssdt.aml should be copied to EFI partition and folders CLOVER->ACPI->patched Important note: if you have different CPU and you use my ssdt.aml - you will get kernel panic. If you have i5-2520M which seems to be the most common - you can get ssdt.aml from the files provided in Herve’s guide - https://osxlatitude.com/index.php?/topic/7914-dell-latitude-e6220-with-i5-2520m-hd3000-and-1366x768-lcd-mavericksyosemiteel-capitansierra/ If you have another CPU - then don’t use ssdt.aml and find NullCPUPowerManagement.kext, which should be added along with the other kexts. As of this writing, I do not know which is the latest such kext working OK with Sierra. If someone is ready to provide it - I can add it to the post. You can use a shell script ssdtPRGen.sh to generate ssdt.aml for your CPU after the install. The script is provided in the Tools zip to this post. You might want to google for a newer version. Kexts should go to EFI/CLOVER/kexts/10.12/ config.plist goes to EFI/CLOVER/ Please use Clover Configurator to generate a new serial. Just start Clover Configurator - File - Open - select config.plist from EFI/CLOVER/ and open it. Then SMBIOS from the left-hand list and click the magic wand and select first laptop picture and from the menu Macbook Pro 8,2 or 8,1 if you have the i5 processor. You can choose year of manufacture and click the buttons ‘shake’ to get different serials generated. When done - click File - Save. Now you can reboot computer and start the installation. You can press F12 before boot and choose USB. If you get kernel panic - one common reason would be if you have empty DIMM A slot, and only 1 RAM stick in DIMM B. Move the RAM to DIMM A and try again. For a new installation of macOS, you MUST erase and format the destination drive according to the following steps before continuing. a. From the menu bar, click Utilities -> Choose Disk Utility b. Highlight your target hard drive for the macOS installation in left column. c. Click Erase tab d. Under Scheme: GUID Partition Map e. Under Name: type Macintosh SSD (You can rename it later) f. Under Format: choose Mac OS Extended (Journaled) g. Click Erase h. Click on Partition Tab to add more partition if you prefer i. Close Disk Utility Click Continue, Continue, Agree Select Macintosh SSD, or name of your existing drive, where you want to install macOS and click Continue Upon completion, system will restart Press the F12 to choose boot device Choose <Your USB Installer device> When Clover boot screen appears, choose Macintosh SSD or name of your existing drive The system will boot into the new drive, and complete the installation… Launch the terminal and enter the following command diskutil list If you something about virtual drive like this: /dev/disk1 (internal, virtual): Please enter the below command if you have only one disk and you are not setting up dual-booting: diskutil cs revert /dev/disk1 Otherwise you have to find out which is the correct ending number from the data you see from “diskutil listâ€. Then create a folder and mount EFI partition: sudo mkdir /Volumes/efi sudo mount -t msdos /dev/disk0s1 /Volumes/efi Now it’s the time to run Clover installer and install on your HDD/SSD in a similar way like when preparing the USB, however please select couple of more options: • Install Clover in the ESP • Bootloader/Install boot0af in MBR • CloverEFI/CloverEFI 64-bits SATA • Install RC scripts on target volume • Install Clover Preference Panel Copy DSDT, SSDT, kexts and config.plist to the EFI partition of your HDD. You can use EFI mounter if for some reason - it is not mounted after Clover install. Now let’s fix the audio: Copy AppleHDA_IDT92HD90.kext to /Library/Extensions Copy AppleHDA.kext to /System/Library/Extensions Repair permission and rebuild cache. Run command from terminal sudo chmod -Rf 755 /L*/E* sudo chown -Rf 0:0 /L*/E* sudo touch -f /L*/E* sudo chmod -Rf 755 /S*/L*/E* sudo chown -Rf 0:0 /S*/L*/E* sudo touch -f /S*/L*/E* sudo kextcache -Boot -U / Make sure to disable hibernation as it's a prerequisite to get sleep & wake to work Ok on a Hackintosh: • sudo pmset hibernatemode 0 • sudo rm -f /var/vm/sleepimage • sudo pmset hibernatefile /dev/null Remove USB and reboot. You system should start fine, but you might notice that if you tap on the touchpad - it does not click. Moreover, Trackpad preference panel may not load. This is easily fixed by deleting: /System/Library/PreferencePanes/Trackpad.prefPane and replacing it with a Trackpad panel from El capitan. Link to download: http://www.megafileupload.com/85j1/Trackpad.prefPane.zip I still had a persisting problem that whatever I set in Trackpad preferences - it’s not saved after reboot, so I used Dr. Hurt's app - Touchpad Settings.app , which I copied to the Applications folder and allowed access from System Preferences - Security & Privacy - Accessibility - Allow the apps below to control your computer and I added Touchpad settings. I really hope that this will be very helpful to people new to hackintoshing and have Sandy Bridge models E6x20. PS. I may have missed something and fix it later. More stuff could be added later, or improve formatting. Feel free to criticize me and point out if I am doing something the wrong way English is not my native language, but I think I have provided clear enough explanations. Tools.zip E6220-i7 2620m.zip
-
Hi guys, i've been browsing and reading the forum for a whole day. I just got myself a lively 6220 and while I'm waiting for El capitan do download again (for some reasons it failed from Apple sigh!) I'm posting this late minute doubt. I'm totally new to Hackintoshes... but willing to give it a try. From what I read El Capitan should work fairly well on the 6220 but I haven't seen any guide regarding Sierra on a 6220, only on a 6230. Am I wrong and since I'm just about to start it's better to go the Sierra way or for some reasons Sierra is a no go on a 6220? Thanks for casting some light on this! And thanks for all the amazing amount of work in this forum.
-
Model: Dell E6220 i7-2620m, 8GB ram, Intel HD 3000 I'm currently following pafkata's guide on running sierra on my e6220 using clover: https://osxlatitude.com/index.php?/topic/9383-dell-e6220-i7-2620m-clover-detailed-guide/ Everything works until the very end of the macOS installer where I get the error "building boot caches on boot helper partition failed". I have tried booting into the SSD anyway but get a boot0af error. Does anyone know how I can resolve this issue? (P.S this is the first time installing Mac on this laptop) Thank you.
-
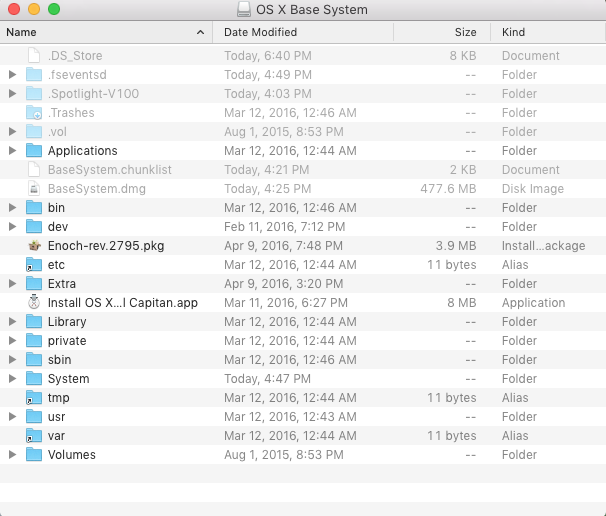
I just got a e6220 shipped with 32bit win7 pro. If you close the lid and reopen it, it crashes by default:) Although a driver and a firmware update solve the problem, I decide to switch to OS X. That's my purchase really for. I followed Herve's instruction (thanks a lot Herve) creating the usb installer for EI Capitan 19.11.4, tried twice but didn't get a bootable usb drive. I didn't alter the bios of my E6220 but my old snow leopard (D430) installer can boot to the boot menu, so I'm not sure if there anything need to change in my bios setting. I copped Enoch-rev.2795.pkg to the root dir of usb but not rename it, don't know if that's matter of not. In my iMac, this pkg cannot be open, says the developer is not recognized... I did a fdisk check, the usb is active. I put the kernel (10.11.4) to /System/Library/Kernels/ I copped Extra dir from E6220_i5-2520M_HD3000_EC-Pack.zip to the root dir of usb. I don't know if the file/dir ownership matters or not..... Don't know what to do/check, ....., Please help Thanks in advance =============== The contant of the USB ========== HMac:OS X Base System elim$ ls -la total 940408 drwxrwxr-t 24 elim staff 884 Apr 11 16:30 . drwxrwxrwt@ 6 root admin 204 Apr 11 16:52 .. -rw-r--r--@ 1 elim staff 8196 Apr 11 18:35 .DS_Store drwx------ 5 elim staff 170 Apr 11 16:03 .Spotlight-V100 d-wx-wx-wt 2 elim staff 68 Mar 12 00:46 .Trashes drwx------ 7 elim staff 238 Apr 11 16:49 .fseventsd drwxr-xr-x 2 elim staff 68 Aug 1 2015 .vol drwxrwxr-x+ 4 elim staff 136 Mar 12 00:44 Applications -rw-r--r--@ 1 elim staff 1948 Apr 11 16:21 BaseSystem.chunklist -rw-r--r--@ 1 elim staff 477579745 Apr 11 16:25 BaseSystem.dmg -rw-r--r--@ 1 elim staff 3620763 Apr 9 19:48 Enoch-rev.2795.pkg drwxr-xr-x@ 11 elim staff 374 Apr 9 15:20 Extra drwxr-xr-x 3 elim staff 102 Mar 11 18:27 Install OS X El Capitan.app drwxr-xr-x+ 11 elim staff 374 Mar 12 00:44 Library drwxr-xr-x+ 5 elim staff 170 Apr 11 16:47 System drwxrwxrwt 2 elim staff 68 Aug 1 2015 Volumes drwxr-xr-x 35 elim staff 1190 Mar 12 00:46 bin dr-xr-xr-x 2 elim staff 68 Feb 11 19:12 dev lrwxr-xr-x 1 elim staff 11 Mar 12 00:44 etc -> private/etc drwxr-xr-x 5 elim staff 170 Mar 12 00:44 private drwxr-xr-x 57 elim staff 1938 Mar 12 00:46 sbin lrwxr-xr-x 1 elim staff 11 Mar 12 00:44 tmp -> private/tmp drwxr-xr-x 8 elim staff 272 Mar 12 00:43 usr lrwxr-xr-x 1 elim staff 11 Mar 12 00:44 var -> private/var

-
Hi, I installed Yosemite following hervé's guide from here https://osxlatitude.com/index.php?/topic/7914-dell-latitude-e6220-with-intel-i5-2520m-hd3000-and-1366x768-lcd-mavericksyosemite/&do=findComment&comment=49907 and everything seems to be working except for one annoying thing: I can only boot from the USB installer stick and then select the OS X hard drive. If I remove the USB stick it doesn't "see" the Chameleon boot loader on the internal hard drive. I first tried r2468, then r2716, then Enoch r2795 but to no avail. Any ideas what might be causing this or what I need to do? The internal HD is a 128gig SanDisk SSD if that should matter. And also one final question: is it safe to install the latest security update 2015-004 that the app store suggests to install? Any special way of going about it? thanks jibe
-
 There is a lot of Graphics Problems with the DELL Latitude E6220. There seems to be a lot of dashes and marks on the screen when you boot up with the Extra Folder from this website. I think there is a problem with the DSDT file.
 -
Hi all, I am running an E6220 with the HD3000 integrated graphics card. I am trying to get an external monitor working. I have tried the HDMI, VGA, and DVI ports with no luck. Using EDP and the E6220 profile, I enabled the VGA/HDMI fix with no lock. Additionally, I've tried a variety of AppleIntelFramebufferCapri.kext and AppleIntelSNBGraphicsFB.kext with no luck. Any suggestions on things to try? Thanks.
-
Hi all, I have a Dell Inspiron E6220 (infact two-I'm only trying to install on one though), which are both: Intel Core i5 2520 2.5GHZ CPU 4GB Ram Seagate Momentus Thin 7200RPM 250GB HDD Intel HD Graphics I have two USBs: a unifail 10.8, and a myHack 10.8, both with the OSX ML from the Mac App Store (on a Mac). When I try to boot up the install, it goes to the Apple screen, the spinning wheel, and then freezes on the spinning wheel and doesn't do anything. This is the same for both USBs (and both laptops). I read somewhere that someone was only able to boot with -f, I tried this on the myHack USB and it still didn't work, but when I tried the unifail, it did work. I was able to get everything ready for installation, and start the installation, until about halfway through the installation the screen just turns full white, with a small grey box. I am pretty sure that the computer completes the installation, and then it reboots back to the unifail USB (I'm not sure about this). Picture of screen: http://puu.sh/4otRE.jpg The computer reboots, and then comes back to the unifail screen on the USB. So now I try to get into the Macintosh HD, and no luck. I try with -f on both USBs and still no luck (it freezes on spinning wheel again). How can I fix this? Some errors near the end I can see: (in -v boot Verbose mode) Bootcachecontrol: Unable to open /var/db/Bootcache.playlist: 2 No such file or directory Bootcachecontrol: Unable to open /var/db/Bootcaches/PreheatedUser/Merged.playlist: 2 No such file or directory Bootcachecontrol: Unable to open /var/db/Bootcaches/PreheatedUser/Login.playlist: 2 No such file or directory Gets stuck on: AppleIntelE1000e: Ethernet address 24:b6:restofaddress Thanks