pafkata
-
Posts
36 -
Joined
-
Last visited
-
Days Won
1
Recent Profile Visitors
2502 profile views


pafkata's Achievements
Advanced Member (5/17)
4
Reputation
-
Dell E7440: Problems with Catalina 10.15.7 clean installation
pafkata replied to dctacsi's topic in The Archive
Get an older Clover version... It changed folder structure around version 5000 Your EFI is probably using the old folder structure and most likely will work with Clover 4976 -
My laptop is connected to a monitor most of the time and I don’t let it sleep most days. So, losing BT after sleep isn’t an issue for me, but I spent some time researching and trying different stuff. Here’s shortly what I am sure: The BT chip must get its firmware injected when powered on. It loses the firmware when powered down during sleep. Clover does it fine with the injector kext. I tried putting the kexts in every ext location and sometimes one kext in Clover and other two in SLE or LE or Apple/Internal/Extensions , but nothing worked. BT only works after boot when injector kext is in Clover. I won’t spend more time on this because I use BT under 5 times per month.
-
I installed fresh Catalina 10.15.2 (19C57) on my E7240 with DW1550 (PCIe connector). It's the same chip as your DW1560 (NGFF/m.2 connector). Bluetooth works fine for me with the suggested kexts, but it can't get online after sleep. As far as I understand, the driver/firmware has to be injected every time when the chip is power on. It seems Clover does it OK, but after waking up - nothing does it again. I will use my system for few more days and complete the setup, so I can clone the SSD. Then, I will play more with this. What is your experience till now ? Here is a list of all my kexts and their versions. They are all in Clover. I have none in /Library/Extensions.

-
I am afraid that I can't do this in the next 2 weeks. I actually bricked my MacOS by trying to solve this and I decided to go back to my Mojave backup. I was surprised to see that my APFS is corrupted in the Mojave SSD image backup, but the system is usable. I consider going with a clean Catalina install in the first week of 2020. I will certainly update this thread with my results.
-
I am unable to get BT working on 10.15.2 . I have E7240 with DW1550, which is essentially the same chip as DW1560. I have the feeling that it's something USB power related as BT device is detected, but unable to connect to anything.
-
I have E7240 (DW1550 for wifi and BT) running Catalina 10.15.1 (19B88) with Clover r.5093 and I don't have any issues. I have attached my bootpack. Please make sure to shuffle the serial number in the config.plist with Clover Configurator. I hope it helps you and anyone else who is trying to install Catalina on E7240 laptops. E7240+DW1550.zip
-
E7240 updated to 10.14.3 (18D109) and System preferences issues
pafkata replied to pafkata's topic in The Archive
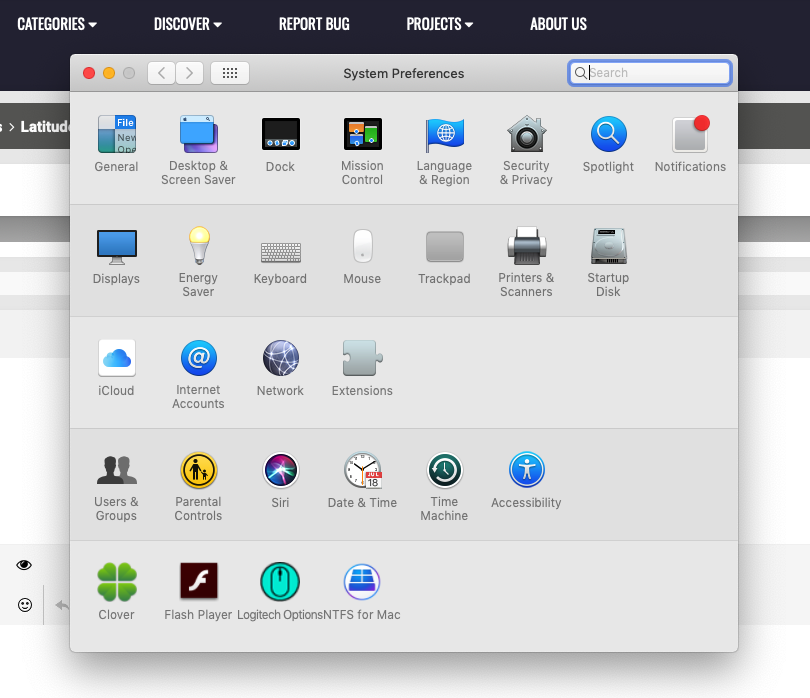
Unfortunately, it does not help. I also found that I have some problem with APFS. My preferences pane issues might be related to the filesystem issue. Most likely, I will do a clean install in the near future. Running First Aid on “paveto” (disk1s1) NOTE: First Aid will temporarily lock the startup volume. Verifying file system. Volume could not be unmounted. Using live mode. Performing fsck_apfs -n -l -x /dev/rdisk1s1 Checking the container superblock. Checking the EFI jumpstart record. Checking the space manager. Checking the space manager free queue trees. Checking the object map. Checking volume. Checking the APFS volume superblock. The volume paveto was formatted by hfs_convert (748.41.3) and last modified by apfs_kext (945.241.4). Checking the object map. error: btn:1: invalid key order (69) oid 644302 / oxid 0 Object map is invalid. The volume /dev/rdisk1s1 could not be verified completely. File system check exit code is 8. Restoring the original state found as mounted. Operation successful. -
Hello Guys, I have updated my E7240 to 10.14.3 (18D109) and it went fine, however I can't click the icon Security & Privacy in System Preferences and the Software update icon is also missing. I have attached screenshots. Does anyone has the same issue ? What could possibly be wrong ?
-
DW5570: how can i use the WWAN under High Sierra?
pafkata replied to wojciech679's topic in Modems/WWAN modules
It turned out that DW5570 can't be used in High Sierra, because there's no easy way to turn the card in online status. It stays by default in low power mode, and the windows driver activates it. Linux guys had the same issue as the one I have in High Sierra, but they made a solution: https://sigquit.wordpress.com/2015/02/09/dell-branded-sierra-wireless-3g4g-modem-not-online/ Basically, I could not google successfully and find a way to send qmi command to the modem with FCC authentication, which will turn it on. I have decided to order Ericsson F5521GW which is known to work fine on High Sierra. I hope that I will never have to use 4G internet, but I must absolutely have this type of alternative link, which costs 5 euro to activate a pre-paid SIM, which will be active for 1 year and has unlimited data transfer at 128Kbps. Yeah, I know it's slow but for some stuff - you don't need speed, just active connectivity -
DW5570: how can i use the WWAN under High Sierra?
pafkata replied to wojciech679's topic in Modems/WWAN modules
@viking1304 - Thanks for the advice. My E7240 is showing the DW5570 as recognized WWAN after switching to 14 and using your kext. Unfortunately, I do not have a SIM card with that particular size, which I can put inside to test if Internet works fine now. -
No issues after update on my E6220 , it has 8GB RAM , so video memory is 512MB and no glitches and no problems with Safari and CPU
-
I do not know what is the issue with the issue mnx's installer. Follow up on the thread if Sierra is possible....Today I updated via App store to 10.12.2 - all good except for sound. I just used the old kext used during installation and rebuilt kernel cache and sound is working now. I do not see any other issues.
-
Yes, I recommend to follow the Herve's Enoch guide. It's definitely much better than mine. I made mine, because for some unknown reason many people want to use Clover and they send me private messages. I am not an expert, but I have a perfectly working system without any issues. I use Clover, because the first guide which I tried was about Clover and I don't really want to try to change the bootloader. I can only guess that you have an awkward partition table or you did something wrong with Clover install options. Never seen this exact same error before.If something wrong with BIOS options or BIOS version - you may have issues with Herve's guide as well.
-
Thanks for the suggestions. I will test and try it. I hope that even if I break something, I have enough experience to recover the OS. I'd update the guide short afterwards once I have personal success setting it that way. Is it allowed to upload TrackpadPrefpane from El Capitan to help people who also have issue with it ? Or it's better to provide an external download link ? UPDATE: I have tried the improvements suggested by Herve and I almost screwed a perfectly working system. Maybe I am a lucky idiot, who is not experience in hackintoshing, but I managed to get a perfectly working system and I will not risk changing the settings again. It turned out that I uploaded messed up config.plist ,so I fixed that and uploaded again UPDATE 2 Appstore update to 10.12.2 - all good except for AppleHDA, which was replaced by the update. I just used the old kext used during installation and rebuild kernel cache and sound is working now. I do not see any other issues.
-
Hello, I'd like to contribute to the forum and I have decided to write a detailed guide how I installed macOS Sierra 10.12.1 on my E6220 with Core-i7 2620m, HD3000, 8GB RAM, 128GB SSD. I have received few personal messages for help, although there’s a perfect Enoch guide by Herve: https://osxlatitude.com/index.php?/topic/7914-dell-latitude-e6220-with-i5-2520m-hd3000-and-1366x768-lcd-mavericksyosemiteel-capitansierra/ and excellent generic El Capitan guide by Jake Lo: https://osxlatitude.com/index.php?/topic/8506-dell-latitude-inspiron-precision-el-capitan-clover-guide/ I will follow Jake’s guide, but I will add more stuff and this guide will be useful for all Sandy bridge E6x20 Many thanks to all OS X latitude forum members, who helped me when I was very new to OS X. Let’s start. You need: 1. E6220 2. 8GB USB or bigger 3. Access to real mac to create install USB or if you have Windows/Linux you can use a virtual machine using virtualbox or vmmare You should update your BIOS to A13 and set it to the following settings : https://osxlatitude.com/index.php?/topic/8281-e6220-bios-settings/ Download macOS Sierra from Apple store. Prepare USB using the following instructions: 1: Prepare Bootable USB Drive This step extracts the OS X Installer contents, then installs Clover bootloader to the USB stick. 1. Insert the USB drive on a running OS X system 2. Open /Applications/Utilities/Disk Utility 3. Highlight the USB drive in left column 4. Click on the Partition tab 5. Click Current and choose 1 Partition 6. Click Options... 7. Choose GUID Partition Table 8. Under Name: type USB (You can rename it later) 9. Under Format: choose Mac OS Extended (Journaled) 10. Click Apply then Partition 11. Go to Applications, right click on “Install macOS Sierraâ€/Show Package Contents/Contents/ SharedSupport 12. Mount InstallESD.dmg 13. Launch ShowHiddenFiles and select “Show Special Files†( app attached at the end of guide) 14. Mount BaseSystem.dmg (hidden) from “OS X Install ESD†15. Use Disk Utility to restore “OS X Base System†to USB (see image below) 16. After restore is complete, USB is now renamed to “OS X Base Systemâ€. Go ahead and rename it to “Install macOS Sierra†17. Go to “Install macOS Sierraâ€/System/Installation and delete the alias “Packagesâ€. 18. Copy “Packages†from root of “OS X Install ESD†to “Install macOS Sierraâ€/System/Installation 19. Copy BaseSystem.dmg and BaseSystem.chunklist (hidden files) from “OS X Install ESD†to root of “Install macOS Sierra†20. Launch ShowHiddenFiles and select “Hide Special Files†21. Download Clover EFI boot loader 22. Open Clover package installer 23. Hit Continue, Continue, Change Install Location... 25. Choose “Install macOS Sierra†26. Hit Continue, then hit Customize. Select these items: • Install Clover in the ESP • Bootloader/Install boot0af in MBR • CloverEFI/CloverEFI 64-bits SATA You can also select a Clover theme. 27. Click Install 28. After installation of Clover, the hidden EFI Partition will appear on the Desktop Now you will need to browse the EFI partition and put the necessary files in the correct locations: DSDT.aml and ssdt.aml should be copied to EFI partition and folders CLOVER->ACPI->patched Important note: if you have different CPU and you use my ssdt.aml - you will get kernel panic. If you have i5-2520M which seems to be the most common - you can get ssdt.aml from the files provided in Herve’s guide - https://osxlatitude.com/index.php?/topic/7914-dell-latitude-e6220-with-i5-2520m-hd3000-and-1366x768-lcd-mavericksyosemiteel-capitansierra/ If you have another CPU - then don’t use ssdt.aml and find NullCPUPowerManagement.kext, which should be added along with the other kexts. As of this writing, I do not know which is the latest such kext working OK with Sierra. If someone is ready to provide it - I can add it to the post. You can use a shell script ssdtPRGen.sh to generate ssdt.aml for your CPU after the install. The script is provided in the Tools zip to this post. You might want to google for a newer version. Kexts should go to EFI/CLOVER/kexts/10.12/ config.plist goes to EFI/CLOVER/ Please use Clover Configurator to generate a new serial. Just start Clover Configurator - File - Open - select config.plist from EFI/CLOVER/ and open it. Then SMBIOS from the left-hand list and click the magic wand and select first laptop picture and from the menu Macbook Pro 8,2 or 8,1 if you have the i5 processor. You can choose year of manufacture and click the buttons ‘shake’ to get different serials generated. When done - click File - Save. Now you can reboot computer and start the installation. You can press F12 before boot and choose USB. If you get kernel panic - one common reason would be if you have empty DIMM A slot, and only 1 RAM stick in DIMM B. Move the RAM to DIMM A and try again. For a new installation of macOS, you MUST erase and format the destination drive according to the following steps before continuing. a. From the menu bar, click Utilities -> Choose Disk Utility b. Highlight your target hard drive for the macOS installation in left column. c. Click Erase tab d. Under Scheme: GUID Partition Map e. Under Name: type Macintosh SSD (You can rename it later) f. Under Format: choose Mac OS Extended (Journaled) g. Click Erase h. Click on Partition Tab to add more partition if you prefer i. Close Disk Utility Click Continue, Continue, Agree Select Macintosh SSD, or name of your existing drive, where you want to install macOS and click Continue Upon completion, system will restart Press the F12 to choose boot device Choose <Your USB Installer device> When Clover boot screen appears, choose Macintosh SSD or name of your existing drive The system will boot into the new drive, and complete the installation… Launch the terminal and enter the following command diskutil list If you something about virtual drive like this: /dev/disk1 (internal, virtual): Please enter the below command if you have only one disk and you are not setting up dual-booting: diskutil cs revert /dev/disk1 Otherwise you have to find out which is the correct ending number from the data you see from “diskutil listâ€. Then create a folder and mount EFI partition: sudo mkdir /Volumes/efi sudo mount -t msdos /dev/disk0s1 /Volumes/efi Now it’s the time to run Clover installer and install on your HDD/SSD in a similar way like when preparing the USB, however please select couple of more options: • Install Clover in the ESP • Bootloader/Install boot0af in MBR • CloverEFI/CloverEFI 64-bits SATA • Install RC scripts on target volume • Install Clover Preference Panel Copy DSDT, SSDT, kexts and config.plist to the EFI partition of your HDD. You can use EFI mounter if for some reason - it is not mounted after Clover install. Now let’s fix the audio: Copy AppleHDA_IDT92HD90.kext to /Library/Extensions Copy AppleHDA.kext to /System/Library/Extensions Repair permission and rebuild cache. Run command from terminal sudo chmod -Rf 755 /L*/E* sudo chown -Rf 0:0 /L*/E* sudo touch -f /L*/E* sudo chmod -Rf 755 /S*/L*/E* sudo chown -Rf 0:0 /S*/L*/E* sudo touch -f /S*/L*/E* sudo kextcache -Boot -U / Make sure to disable hibernation as it's a prerequisite to get sleep & wake to work Ok on a Hackintosh: • sudo pmset hibernatemode 0 • sudo rm -f /var/vm/sleepimage • sudo pmset hibernatefile /dev/null Remove USB and reboot. You system should start fine, but you might notice that if you tap on the touchpad - it does not click. Moreover, Trackpad preference panel may not load. This is easily fixed by deleting: /System/Library/PreferencePanes/Trackpad.prefPane and replacing it with a Trackpad panel from El capitan. Link to download: http://www.megafileupload.com/85j1/Trackpad.prefPane.zip I still had a persisting problem that whatever I set in Trackpad preferences - it’s not saved after reboot, so I used Dr. Hurt's app - Touchpad Settings.app , which I copied to the Applications folder and allowed access from System Preferences - Security & Privacy - Accessibility - Allow the apps below to control your computer and I added Touchpad settings. I really hope that this will be very helpful to people new to hackintoshing and have Sandy Bridge models E6x20. PS. I may have missed something and fix it later. More stuff could be added later, or improve formatting. Feel free to criticize me and point out if I am doing something the wrong way English is not my native language, but I think I have provided clear enough explanations. Tools.zip E6220-i7 2620m.zip