-
Posts
14365 -
Joined
-
Last visited
-
Days Won
871
Content Type
Profiles
Articles, News and Tips
Forums
Everything posted by Jake Lo
-
try this Config config.plist.zip
-

[Short GUIDE] Install High Sierra on Lenovo X201 [i5 520M]
Jake Lo replied to TheOpSys's topic in The Archive
Instead of using 2 usb for installer, I use 1 USB and install Clover with the same settings as the SSD. I don't have an X201 but I do have a T410s with the 1st gen HD Graphics. The FB kext attached by OP doesn't work for it since it has a higher resolution 1440x900 So no QE/CI for now. Can't fix the rest of the issue until this is resolved. -
set BIOS USB settings ->Set XHCI Handoff to Enabled
-

[Solved] E7470 High Sierra (NVMe) fresh install failed
Jake Lo replied to murad3994's topic in The Archive
Your M.2, is it NVMe or Sata SSD? Doesn't matter since HS supports NVMe natively. Reason the drive is not listed is because it only lists bootable drives and your M.2 is not. Not until you have formatted and installed MacOS or Windows. Disable Legacy Option ROMS in the BIOS. Replace the attached file and folders into /EFI/Clover and try again Boot with verbose and debug 0x100 mode murad3994.zip -

Vostro 2520: ALPS touchpad tuning + slow performance
Jake Lo replied to Taskmaste's topic in The Archive
Replace your PS2 kext with this one for Alps -
Not seeing any issue with the files. Are you having issue installing or sleep issue to begin with? Did you set the DVMT with EFI shell?
-

[Solved] E7470 High Sierra (NVMe) fresh install failed
Jake Lo replied to murad3994's topic in The Archive
You should use the alternative bootpack. Replace Config file with this config.plist.zip -
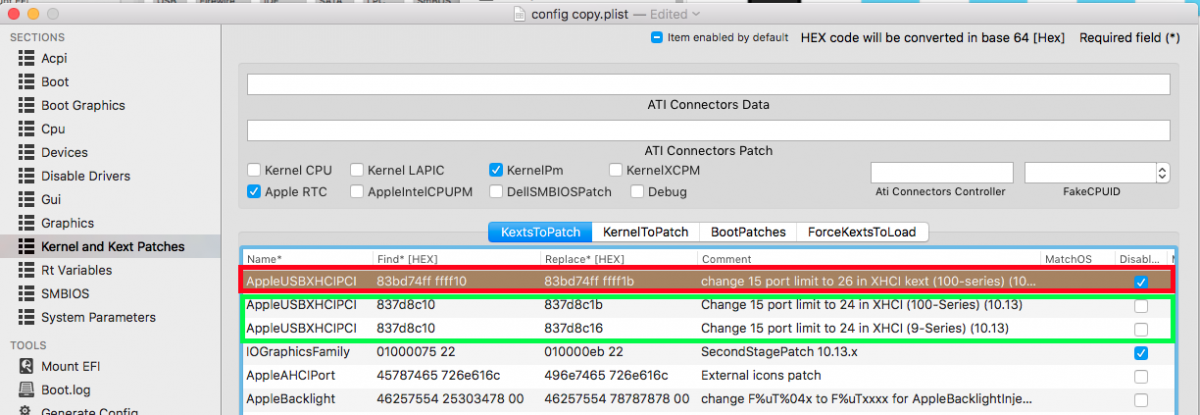
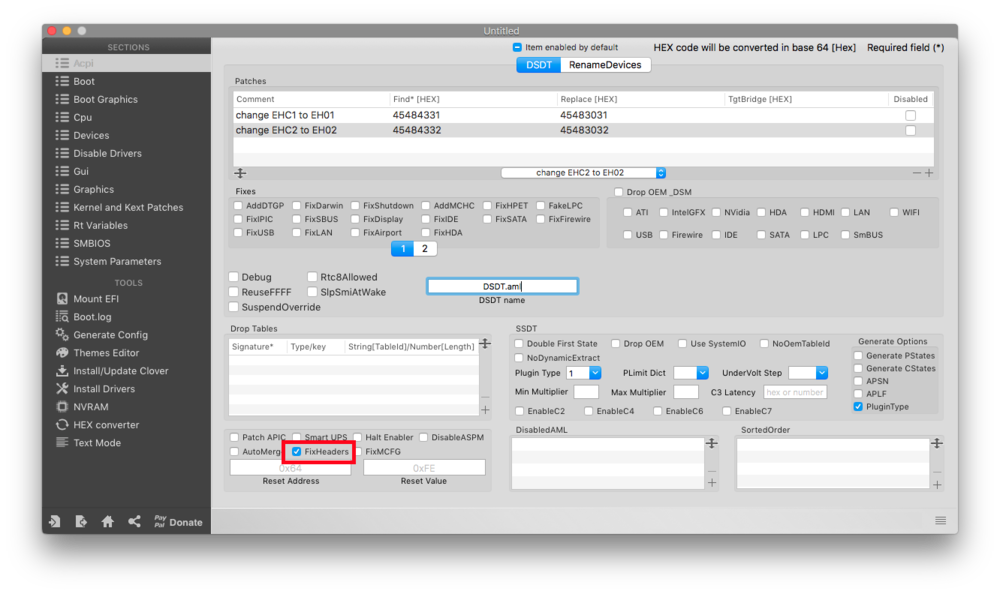
High Sierra Clover Guide Warning: Follow guide at your own risk, I hold no responsibility if you brick your system or destroy all data during the process. If you're creating the installer from a real Mac, make sure you don't accidentally select the real Mac drive when installing Clover loader. It may cause your Mac to not boot again. You've been warned! New Installation Note: By default, upgrading or new Install of HS on an SSD drive, it'll automatically convert to APFS format. If you want to use APFS format, skip step 4 (1) Create the USB installer via Terminal with "createinstallmedia" (a minimum of 16GB UFD is needed or an external USB drive) sudo /Applications/Install\ macOS\ High\ Sierra.app/Contents/Resources/createinstallmedia --volume /Volumes/"target_USB" --applicationpath /Applications/Install\ macOS\ High\ Sierra.app --nointeraction Note: target_USB = name of the USB drive you're writing to (2) Install Clover with following config, add appropriate Sierra bootpacks Only + Generic EFI from post #2 above ( See note1 below for updating bootpack for HS if there isn't one for your model in post #2) UEFI: Install for UEFI booting only Install Clover in the ESP UEFI Drivers\Recommended Drivers ApfsDriverLoader AptioMemoryFix AudioDxe DataHubDxe FSInject HFSPlus SMCHelper (leave off if you have VirtualSMC.kext in bootpack) Additional drivers PartitionDxe Themes (Optional) Install Clover Preference Pane (Optional - only available on installed disk, not installer) Legacy: Install Clover in the ESP Boot Sectors Install boot0af in MBR Clover for BIOS (Legacy) booting CloverEFI 64-bits SATA BIOS Drivers, 64 bit\Recommended Drivers ApfsDriverLoader AudioDxe FSInject HFSPlus SMCHelper XhciDxe Themes (Optional) Install Clover Preference Pane (Optional - only available on installed disk, not installer) (3) Boot with the USB installer, start Disk Utility and initialize your SSD as an APFS drive. Close Disk Utility, select Install MacOS. If you DO NOT want APFS, then select HFS+ format instead. Then Close Disk Utility and follow step 4, otherwise continue to Step 5 (4) Open the terminal (on the menu bar click Utility>Terminal), and launch this command /Volumes/"Image Volume"/"install macOS High Sierra.app"/Contents/Resources/startosinstall --volume /Volumes/"HighSierra" --agreetolicense --converttoapfs NO Note: HighSierra = name of the drive you're targeting (5) System will auto reboot after files has been copied (6) Boot with USB installer, select "Boot macOS Install from HighSierra". Installation will continue installing and reboot (Might have to do this rebooting a couple of times) (7) Boot with USB installer, finish the customization (8) Follow post install steps from Post # 1 NOTE1: Updating the Sierra Bootpack to be use for High Sierra unless there's a High Sierra bootpack already 1) Edit config.plist from Sierra Bootpack (I recommend using Clover Configurator 4.59 or newer) and activate FixHeaders option under Acpi: 2) Update USB port limit for High Sierra where applicable, if current Sierra Bootpack doesn't have it, then you don't need this. Either disable 10.12 (Red) and add 10.13 (Green - 9 or 100 Series) or modify 10.12 to 10.13 port limit Update: New USB port Limit patch for 10.13.4(5) and 10.13.6 credits to PMHeart 3) Under SMBIOS, update the definition so that Firmware Features and Firmware Feature Mask is now populated 4) [Recommended] Update the Sierra kexts under /EFI/CLOVER/kexts/Other/ Common links for new kexts: https://github.com/vit9696/Lilu/releases https://github.com/vit9696/Lilu/blob/master/KnownPlugins.md https://bitbucket.org/RehabMan/ Upgrading to High Sierra and keeping HFS+ format If you want to keep HFS+ format, run this command instead of launching the "Install MacOS High Sierra.app" /Applications/Install\ macOS\ High\ Sierra.app/Contents/Resources/startosinstall --agreetolicense --converttoapfs NO If you want to install or upgrade to a different partition/drive /Applications/Install\ macOS\ High\ Sierra.app/Contents/Resources/startosinstall --volume /Volumes/"targetdrive" --agreetolicense --converttoapfs NO Note: Repair permission and rebuild cache if you lost audio after upgrade. You must upgrade Clover, Config.plist and kexts as noted in NOTE1: Updating the Sierra Bootpack to be use for High Sierra When posting for HELP, please include full system specs and attach debug files. If you're not able to start the installer, then attach the Clover folder and include screenshot(s) of the error / KP by booting with verbose + debug 0x100 mode
- 6 replies
-
- 10
-

-

-
If you're on 10.11.4 and newer, make sure the info file has the dependency added (highlighted) com.apple.iokit.IOACPIFamily 1.2.0a1 com.apple.iokit.IOAudioFamily 1.8.6fc11 com.apple.iokit.IOGraphicsFamily 2.0 com.apple.iokit.IOHDAFamily 1.0.0d1 com.apple.iokit.IONDRVSupport 2.0 com.apple.iokit.IOPCIFamily 1.1
-
@alfalus ALC3236 aka ALC233 is available in AppleALC.kext + Lilu.kext Layout-id = 4, 5, 28, 29 Give that a try
-

[Solved] E7470 High Sierra (NVMe) fresh install failed
Jake Lo replied to murad3994's topic in The Archive
What version of BIOS are you on? Boot to Clover, hit F4. Then compress and attach the Clover folder here for review -
Ok, here give this a try. Replace the file and folders into /EFI/Clover Make sure you have HFSPlus.efi in /EFI/Clover/drivers64UEFI B250M-D3H.zip
-

Dell Inspiron 3542 Screen Turns off while loading installation files
Jake Lo replied to Mojonater's topic in The Archive
Try replacing your boot files with mine here, under Inspiron / Sierra 3542_A12. Just replace the file/folder to /EFI/Clover -

Vostro 2520: ALPS touchpad tuning + slow performance
Jake Lo replied to Taskmaste's topic in The Archive
Better you start from scratch with source build from the Appstore and not a Distro. Since you have a semi working hack, you could download 10.12.6 from Appstore and build a clean installer. -
See post #2 and 3
-

Vostro 2520: ALPS touchpad tuning + slow performance
Jake Lo replied to Taskmaste's topic in The Archive
Go into /System/Library/Extensions and remove NullCPUPowermanagement.kext ApplePS2Controller.kext ApplePS2Keyboard.kext AppleACPIPS2Nub.kext Restore these original kext from 10.12.6 to /S/L/E AppleIntelHD3000Graphics.kext AppleIntelSNBGraphicsFB.kext AppleIntelCPUPowermanagement.kext Repair permission and rebuild cache -

Vostro 2520: ALPS touchpad tuning + slow performance
Jake Lo replied to Taskmaste's topic in The Archive
Holy Moly, that's a lot of kexts. Probably most are not needed, and some are duplicate doing the same thing. Launch this DPCIManager https://sourceforge.net/projects/dpcimanager/ Post screenshot of Status and PCI List also launch this and save file IOReg IORegistryExplorer_v2.1.zip Post them here. Did you patch your own DSDT? -

Vostro 2520: ALPS touchpad tuning + slow performance
Jake Lo replied to Taskmaste's topic in The Archive
just these and post result sudo touch -f /L*/E* sudo touch -f /S*/L*/E* sudo kextcache -Boot -U / -

Vostro 2520: ALPS touchpad tuning + slow performance
Jake Lo replied to Taskmaste's topic in The Archive
Problem with distros is that you don't know what mods were done to the system. Please post the result from the commands above -
I have them in /Clover/kexts/Other
-

Vostro 2520: ALPS touchpad tuning + slow performance
Jake Lo replied to Taskmaste's topic in The Archive
Post #1 said you're on 10.12.6. So you upgraded to 10.12.3 and now 10.12.6? Run this in terminal, it'll split out any modded or customized kexts in the output sudo chmod -Rf 755 /L*/E* sudo chown -Rf 0:0 /L*/E* sudo touch -f /L*/E* sudo chmod -Rf 755 /S*/L*/E* sudo chown -Rf 0:0 /S*/L*/E* sudo touch -f /S*/L*/E* sudo kextcache -Boot -U / You don't have any kext in Clover/kexts directory, so don't know what you have until you post the result after you ran the commands -

Vostro 2520: ALPS touchpad tuning + slow performance
Jake Lo replied to Taskmaste's topic in The Archive
From your last post in another thread, you mentioned not having patched DSDT, full graphics acceleration and other issue. Had you resolved those? Post your new Clover folder for review -

Latitude 5480 (+ Geforce 930MX) need help for DSDT patch
Jake Lo replied to sdarktemplar's topic in The Archive
When applying Rehabman's patch usb_prw_0x6d_xhc_skl, I left out the removal of the _DSM Method so to keep the native- 18 replies


