Hervé
-
Posts
10069 -
Joined
-
Last visited
-
Days Won
569
Content Type
Profiles
Articles, News and Tips
Forums
Everything posted by Hervé
-
 First of all, no double post on the forum please! Did I forget or remove the USBPorts or USBInjectAll from the booptack? If so my mistake and my apologies, I'll add it later once I'm back on my E6230 Hackintosh. Meantime what you can do is download Rehabman's USBInjectAll and install it in /L/E. Repair permissions, rebuild your cache and reboot. You'll then be able to generate the USBPorts kext from Hackintool app. Regarding what you call "stock Bluetooth", I guess you mean the optional internal DW380 module, right? If you look in the earlier guides like El Capitan or Sierra, you'll see how these can be fully enabled, knowing that it is not BT 4.x but older. Mine is disabled in BIOS because I run with an Apple BCM4360CD in a mini-PCIe adapter in the WWAN slot. DW380 will work with the good old Bluetooth Transport patch + Rehabman's firmware patching kexts. I used to include the transport patch in FakeSMC (it's a little and simple injection) and you'd have to adjust it to Mojave since Apple were in the habit of changing those transport kexts every time a new OS X/macOS version came out.
 -
EDID cannot be injected "elsewhere"; it's either properly injected or not at all. But given that your wake issues also affect mouse, wireless networking and the Finder, I very much doubt that it's all EDID related.
-
And beta #6 is a complete doddle!

-
Those BIOS settings would indeed NOT influence anything. This being said, I wrote the BIOS parameters thread when running BIOS 1.8.0; I now run with BIOS 1.11.0 and those parameters are still present, at least on my 7490... At this point of time, 1.11.0 is the lastest version posted by Dell for this model. I slightly modified the bootpack late yesterday. Install Clover as per the guide and then, afterwards, transfer the files and folder of the bootpack to the EFI/CLOVER folder of your mounted EFI partition.
-
'bit of old news but as identified here by @Sherlocks back in March, the above AppleRTC patch is no longer applicable to Mojave from version10.14.4. The code has changed even if the kext's version remained set to v2.0. The new patch to be used from 10.14.4 is: Find: 75 33 0F B7 Replace by: EB 33 0F B7 This was included to Clover's AppleRTC patch from version r4911. Patched_AppleRTC_10.14.6.kext.zip
-
The guide clearly illustrates the card's properties injection. Obviously, injecting the card's own id is useless and totally voids the desired effect which is to bypass AirPortBrcmNIC kext to load AirPortBrcm4360 instead. Can't say if your other diversions from my guide are the cause of your issue. There are many posts in the previous 14pages of this thread relating to other id reference re: compatibility and/or pin masking. Please refer to those. So many people have reported issues with those DW1820A cards by now, I feel sorry I ever recommended the model and tried to work things out.
-
dell latitude 7490 [Solved] Dell Latitude 7490 under Mojave: no webcam
Hervé replied to Eiskalt71's topic in The Archive
Well that explains a few things! -
Sure but that's not what any follower of my guide should do. In fact I was careful to be very specific on that matter: "open this EFI partition and transfer the files & folders from the Latitude 7490 Mojave Clover pack below to the EFI/Clover folder" Granted there could be confusion so I've just modified it so that there should no longer be any. All the files and folders included in the pack go to EFI/Clover folder as stated in the guide.
-
Oh that's correct, I removed it since I can not assume everyone will use a DW1820A or have one already fitted. It could be useless and, worse, conflict with a different card fitted into the slot. As such, I indeed removed the properties injection from pack #6's Clover config. I never include the CLOVERX64.efi file since it's normally installed by the Clover installation package once it's run and it may differ from one Clover version to another...
-
Can you please post your zipped copy of pack #5? I've deleted it here... I'll try and compare them in order to find out the mistake I may have made in pack #6. Thanks.
-
Hmm... I think I remember experiencing this before... from memory under Mojave... The USBPorts injector may not have been generated under the correct running conditions. Get rid of it (rebuild your cache if you installed it in /L/E or /S/L/E) and replace it byRehabman's USBInjectAll and reboot. Then try and re-generate USBPorts again. Your Clover setup and/or kexts arrangement could be incorrect too. You know the drill by now...
-
Try and re-generate a USBPorts kext with Hackintool app.
-
New bootpack with revised DSDT to include support for keyboard brightness keys Fn-UP/Fn-DOWN.
-
Tried without this HibernationFixup and/or without the CPUFriend kexts?
-
Firmware v4689, right? How does Bluetooth work after Sleep & Wake?
-
dell latitude 7490 [Solved] Dell Latitude 7490 under Mojave: no webcam
Hervé replied to Eiskalt71's topic in The Archive
Then I suggest you generate your own USBPorts kext with Hackintool app. You can Google for it and download it. -
dell latitude 7490 [Solved] Dell Latitude 7490 under Mojave: no webcam
Hervé replied to Eiskalt71's topic in The Archive
I guess it's time to verify the config I posted in my Clover pack... I certainly have that option enabled on my 7490 and the model name is indeed not truncated. -
dell latitude 7490 [Solved] Dell Latitude 7490 under Mojave: no webcam
Hervé replied to Eiskalt71's topic in The Archive
Try the 7490 on its own, without being connected to the Dock. -
dell latitude 7490 [Solved] Dell Latitude 7490 under Mojave: no webcam
Hervé replied to Eiskalt71's topic in The Archive
On your HDD (or SSD), what's in /Library/Extensions folder ? -
dell latitude 7490 [Solved] Dell Latitude 7490 under Mojave: no webcam
Hervé replied to Eiskalt71's topic in The Archive
Explain in details what you did with kexts. Are you injecting them through Clover or caching them from /L/E? If you're caching them from /L/E, you obviously have to repair permissions and rebuilt your kext cache... -
[SOLVED] Need Help on Dell Inspiron i5570-7987SLV-PUS
Hervé replied to razor7's topic in The Archive
No, not since Mojave. Conversion is automatic. Only APFS is officially supported for macOS installation. If you want to install on an MBR partitioned disk or on an HFS+ partition, you have to use special tricks/special installation method and that's a little complex unless you're an advanced Hackintosher. So, it's best that newbies avoid this...- 26 replies
-
- 1
-

-
- i5570
- i5570-7987slv-pus
- (and 2 more)
-
dell latitude 7490 [Solved] Dell Latitude 7490 under Mojave: no webcam
Hervé replied to Eiskalt71's topic in The Archive
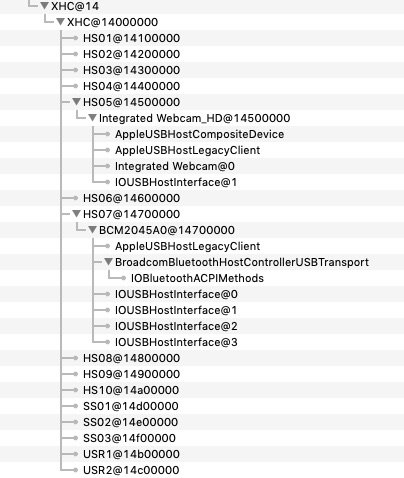
Re: SysProfiler info, you posted a screenshot of no use... So, please, open up System Information and do "File->Save As". That's what a saved output is. This being said, I'm not seeing your Webcam in IOReg which is not normal if it's enabled in BIOS. Hanging off RP05@1C,4 PCIe root device, I see the Realtek USB audio + Gigabit Ethernet of the Dock you're connected to but, hanging off built-in USB3 root device XHC@14, I only some of your USB devices: a USB dongle, presumably for a wireless mouse the BT module of your DW1820A card the Broadcom security chip This is probably due to the fact that your USB ports are not all properly injected/detected as reflected in IOPReg. For instance, there's no HS01 port and no USRx port. This problem can only result from an incorrect USB port injector. Looking at my original Clover pack, I realise I had posted it with good old Rehabman's USBInjectAll kext. Remove it and replace it by the attached USBPorts kext (generated through Hackintool app) which fully injects the definitions required for all the 7490 USB ports. You should then see this in IOReg and your webcam should be listed in System Information->Hardware->USB: Please confirm behaviour after replacing USBInjectAll by the attached USBPorts kext so that I may update the pack I posted in my 7490 guide. 7490_USBPorts.kext.zip
-
Firmware also get reloaded on wake. And systematically so. For instance if your DW1820A runs on, say, firmware v4689 in Windows but you use Rehabman's latest kexts without any mod, you'd retain v4689 registered in macOS on a warm reboot from Windows but you'd get v5799 on waking the Hackintosh from sleep. Ideally, whatever firmware is used under Windows should also be used by Rehabman's firmware patching kexts. Now, the trick is to find out which firmware version works best under macOS...
-
[SOLVED] E6330 - A21 - Mojave - boot to black screen
Hervé replied to anhgiang's topic in The Archive
Whereas device PNLF is included inside my E6230's patched DSDT. -
E5540 - Mojave - video, microphone and AppStore issues
Hervé replied to Alcyone's topic in The Archive
Check if you have the BIOS option for BIOS downgrade; if you do, you'd need to allow downgrades.