Hervé
-
Posts
10077 -
Joined
-
Last visited
-
Days Won
569
Content Type
Profiles
Articles, News and Tips
Forums
Everything posted by Hervé
-
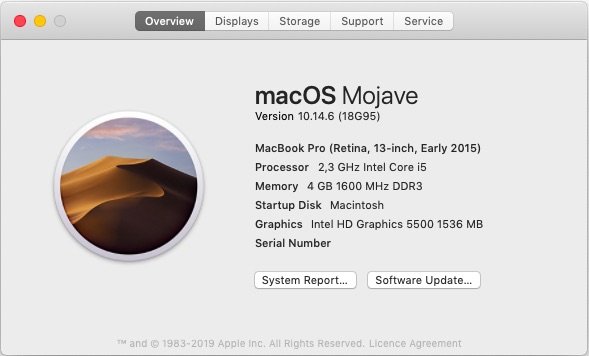
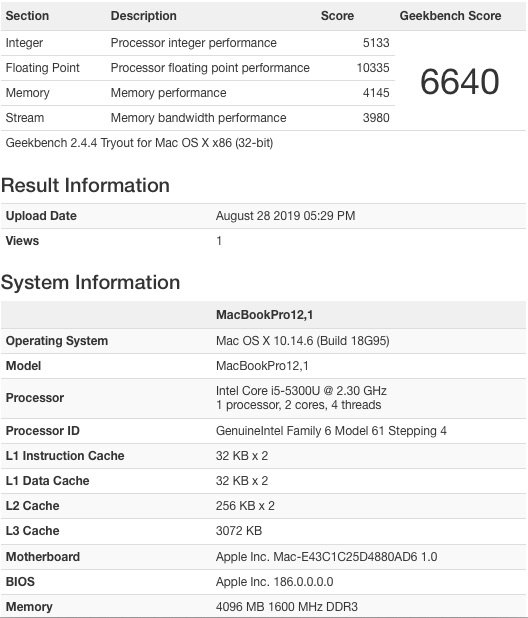
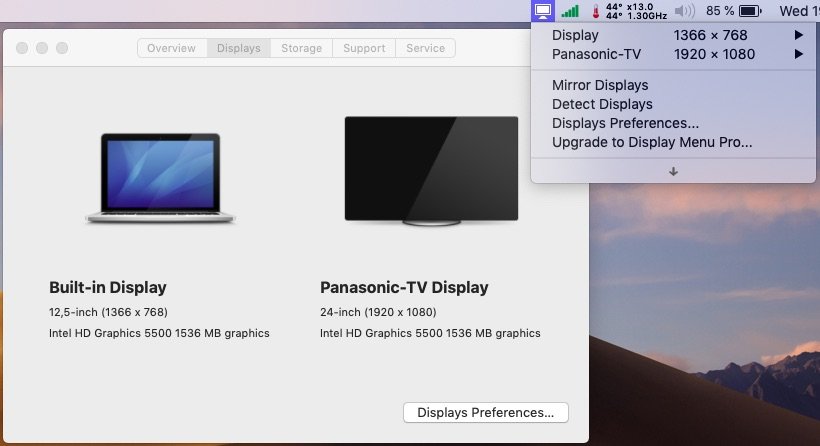
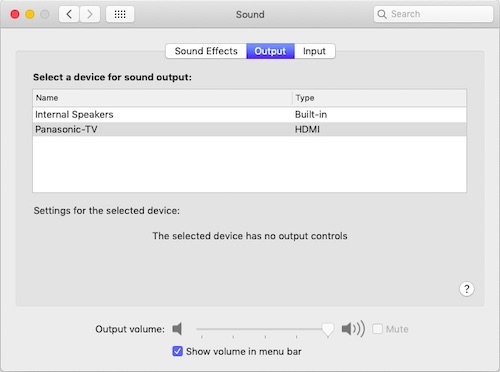
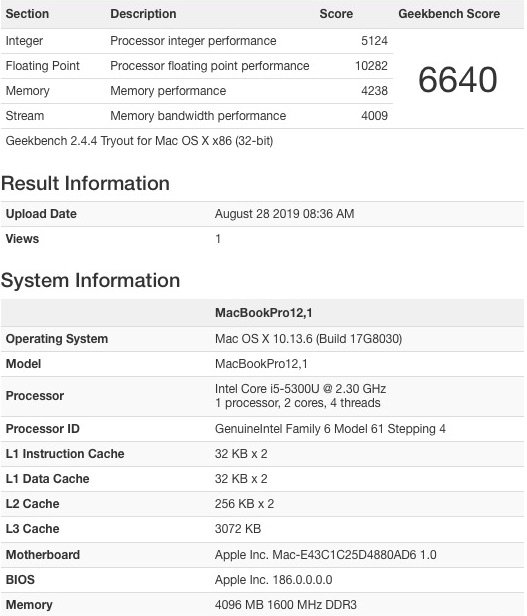
Target macOS release: Mojave 10.14.x This is a Clover-based installation using the well-known/well documented vanilla method detailed below: Working: full graphics acceleration on Intel HD5500 graphics (with Lilu + WEG) multi-display with DP and HDMI OOB audio, including jack microphone input and headset output (with AppleALC & layout-id 11 + CodecCommander) HDMI audio (with BDW Framebuffer patch) built-in GigEthernet LAN connection (with IntelMausiEthernet kext) wireless and bluetooth with any compatible card/USB dongle integrated webcam (OOB) full CPU power management, including Turbo boost to 2.9GHz (with CPU-specific generated SSDT) sleep (Lid, Energy Saver settings, Apple menu, Fn-F1, PWR button) & wake (Lid, PWR button) battery management (with ACPIBatteryManager ) SD card reader (with DSDT patch for compatibility with Apple's default Broadcom device 14e4:16bc) keyboard (with Dr Hurt's VoodooPS2Controller R6 + DSDT patch for brightness control) keyboard backlight OOB (for backlit models) touchpad including tap-to-click (with Dr Hurt's VoodooPS2Controller R6) USB3.0 ports (with Rehabman's USBInjectAll + FakePCIID kexts for multiplexing) Not working: N/A Not tested: SmartCard reader fingerprint scanner GeekBench v2.4.4 (32bit) gives a 6600+ rating: 1) 10.14 USB installer creation Using a USB key of 8GB minimum, create a Mojave USB installer through the following Terminal command: sudo <path>/Install\ macOS\ Mojave.app/Contents/Resources/createinstallmedia --volume /Volumes/<USB key> where: <path> = location of Mojave installation package (eg: /Applications if freshly downloaded) <USB key> = name of formatted USB volume (eg: USB_8GB) The process will take several minutes. Once completed: Setup your BIOS for UEFI mode install Clover bootloader on the USB installer with the following customised settings: Clover for UEFI booting only Install Clover in the ESP UEFI Drivers -> Recommended drivers ApfsDriverLoader / AptioMemoryFix / DataHubDxe / FSInject / HFSPlus / SMCHelper UEFI Drivers -> Human Interface Devices (optional only) PS2MouseDxe / UsbMouseDxe Themes (optional only) Install Clover PrefPane (optional only) you may use Clover version r5035 attached in above in High Sierra guide once Clover is installed, run Clover Configurator app (available in above High Sierra guide) and mount the freshly created EFI partition of the USB installer open this EFI partition and transfer the files & folders from the Latitude E7250 Mojave Clover pack below to the EFI/Clover folder of the EFI partition: Clover_Pack_E7250_Moj.zip Clover_Pack_E7250_Moj_#2.zip 2) 10.14 installation boot the Mojave USB installer at the Clover main menu, select the "Install macOS Mojave" partition (but don't press [ENTER]) press [SPACE], select -v verbose option in the menu, then choose to boot with the selected options proceed with installation, creating & formatting the target Mojave installation through Disk Utility as/if required on 1st reboot, boot off the USB installer and select the freshly created "macOS install from <target Mojave partition>" repeat this until this partition is no longer offered and only the target Mojave partition is left to boot Reboot the target Mojave partition via your USB installer 3) Post-installation tuning Once the target Mojave partition has booted, complete the 1st boot configuration tuning Once at the desktop, install Clover bootloader on the Mojave partition/disk with the customised settings listed above Once Clover is installed, launch Clover Configurator app and mount the freshly created EFI partition of the Mojave partition/disk Open this EFI partition and transfer the files & folders from the above Latitude E7250 Mojave Clover pack to the EFI/Clover folder of the EFI partition You may then reboot and verify that Mojave boots off your disk through Clover After that reboot, finalise post-installation tuning actions such as disabling hibernation, allowing all apps download from anywhere, changing all serial numbers, etc. Please note that: Mojave runs with the same settings as those used for High Sierra. Again, generate your own CPU-specific SSDT using Pike R Alpha's well-known generator script of you have a different CPU than the i5-5300U fitted to my E7250.

-
Target macOS release: High Sierra 10.13.x This is a Clover-based installation using the well-known/well-documented vanilla manual method detailed below: Working: full QE/CI with HD5500 graphics OOB DP + HDMI output OOB full audio, including jack microphone input and headset output (with AppleALC kext & layout-id 11 + CodecCommander) HDMI audio (with AppleIntelBDWGraphicsFB kext patch) built-in Gigabit Ethernet (with IntelMausiEthernet kext) full CPU power management, including Turbo boost to 2.9GHz (with CPU-specific generated SSDT) system sleeps Ok through lid closure, power button, Fn-F1, Apple menu->Sleep and energy savings settings with hibernation mode set to 0 (sleep to RAM) and /var/vm/sleepimage file deleted. Wakes Ok through lid opening and power button wireless & bluetooth with any compatible card/USB dongle battery management and monitoring (with ACPIBatteryManager kext) SD card reader (with DSDT patch for compatibility with Apple's default Broadcom device 14e4:16bc) integrated webcam OOB keyboard backlight control OOB (for backlit models) USB3.0 ports (with Rehabman's USBInjectAll + FakePCIID kexts for USB2/USB3 multiplexing) Not Working: N/A Not tested: SmartCard reader Fingerprint scanner GeekBench v2.4.4 (32bit) gives a 6600+ rating: 1) 10.13 USB installer creation Using a USB key of 8GB minimum, create a High Sierra USB installer through the following Terminal command: sudo <path>/Install\ macOS\ High\ Sierra.app/Contents/Resources/createinstallmedia --volume /Volumes/<USB key> where: <path> = location of High Sierra installation package (eg: /Applications if freshly downloaded) <USB key> = name of formatted USB volume (eg: USB_8GB) The process will take several minutes. Once completed: install Clover bootloader on the USB installer with the following customised settings: Clover for UEFI booting only Install Clover in the ESP UEFI Drivers -> Recommended drivers ApfsDriverLoader / AptioMemoryFix / DataHubDxe / FSInject / HFSPlus / SMCHelper UEFI Drivers -> Human Interface Devices (optional only) PS2MouseDxe / UsbMouseDxe Themes (optional only) Install Clover PrefPane (optional only) you may use version r5035 attached below or any subsequent version available at Dids' Github repo Clover_v2.5k_r5035.pkg.zip once Clover is installed, launch Clover Configurator app and mount the freshly created EFI partition of the USB installer Clover Configurator.zip open this EFI partition and transfer the files & folders from the E7250 High Sierra Clover pack below to the EFI/Clover folder of the EFI partition Clover_Pack_E7250_HiSie.zip Clover_Pack_E7250_HiSie_#2.zip 2) 10.13 installation boot the High Sierra USB installer at the Clover main menu, select the "Install macOS High Sierra" partition (but don't press [ENTER]) press [SPACE], select -v verbose option in the menu, then choose to boot with the selected options proceed with installation, creating & formatting the target High Sierra installation through Disk Utility as/if required on 1st reboot, boot off the USB installer and select the freshly created "macOS install from <target High Sierra partition>" repeat this until this partition is no longer offered and only the target High Sierra partition is left to boot 3) Post-Installation tuning Once the target High Sierra partition has booted, complete the 1st boot configuration finalisation Once at the desktop, install Clover bootloader on the High Sierra partition/disk with the customised settings listed above Once Clover is installed, launch Clover Configurator app and mount the freshly created EFI partition of the High Sierra partition/disk Open this EFI partition and transfer the files & folders from the above E7250 High Sierra Clover pack to the EFI/Clover folder of the EFI partition You may then reboot and verify that High Sierra boots off your disk through Clover After that reboot, finalise post-installation tuning actions such as disabling hibernation, allowing all apps download from anywhere, changing all serial numbers, etc. Please note that: Clover config of the pack contains HDMI-audio BDW framebuffer patch. Caching add-on kexts from /L/E is faster than injecting them from E/C/k/O. After any kexts modification, whether to /S/L/E or to /L/E, repair permissions and rebuild cache. E7250 can use SMBIOS MBA7,1 or MBP12,1. Above Clover pack provided with MBP12,1 settings. CPU power management SSDT used (with dropping of SSDTs CpuPm + CpuOIst) in preference to simple "PluginType" in order to get Fn-F1 working to put laptop to sleep. Otherwise, Fn-F1 powers off the laptop. The trick in the SSDT is to return 0x05 in the _DSM method (0x03 by default). Generate your own CPU-specific SSDT using Pike R Alpha's well-known generator script of you have a different CPU than the i5-5300U fitted to my E7250. Patched A21 DSDT only contains the following patches to support Fn-F11/Fn-F12 brightness control, the rest is full vanilla: Method (_INI, 0, Serialized) // _INI: Initialize { [...] If (CondRefOf (\_OSI, Local0)) { If (Lor (_OSI ("Darwin"), _OSI ("Windows 2009"))) // Sets OSYS for "Darwin" for Fn-F11/Fn-F12 brightness ctrl { Store (0x07D9, OSYS) } [...] } [...] } Method (OSID, 0, NotSerialized) { If (LEqual (ACOS, Zero)) { [...] If (CondRefOf (\_OSI, Local0)) { [...] If (LOr (_OSI ("Darwin"), _OSI (WIN7))) // "Darwin" check - for Fn-F11/Fn-F12 brightness ctrl { Store (0x80, ACOS) } [...] } } Return (ACOS) } Method (BRT6, 2, NotSerialized) { If (LEqual (Arg0, One)) { Notify (LCD, 0x86) Notify (^^LPCB.PS2K, 0x366) // Fn-F12 brightness ctrl (up) } If (And (Arg0, 0x02)) { Notify (LCD, 0x87) Notify (^^LPCB.PS2K, 0x365) // Fn-F11 brightness ctrl (down) } }
-

Help with ACPI for battery not charging Inspiron 5558
Hervé replied to Koolio's topic in The Archive
You simply Google for "Rehabman ACPIBatteryManager" and download the latest. But that's not going to help your battery charge... Or then, it was only the battery monitoring, contrary to your previous statement. -
Help with ACPI for battery not charging Inspiron 5558
Hervé replied to Koolio's topic in The Archive
Battery not charging is normally unrelated to macOS; it must be goosed. Did you check its status in BIOS? -
Help with ACPI for battery not charging Inspiron 5558
Hervé replied to Koolio's topic in The Archive
Do you mean that the battery will not charge at all or that the battery monitoring icon is not showing that the battery is on charge (mains connected)? Not quite the same... -
I was asked about the patch for the DW380 Bluetooth module. It's the same (principle) as before: patch consists of adding an entry for the DW380 module in the Bluetooth Transport kext, based on the copy of an existing module entry/definition. Under Mojave, the target for the patch is the BroadcomBluetoothHostControllerUSBTransport plugin kext of IOBluetoothFamily. In order to avoid patching the vanilla kext to inject the module's info, it's best to simply inject this through FakeSMC (i.e. the patch added as is to the Info.plist file, right above the <key>FakeSMC</key> key entry). This has the additional advantage of being sustainable to macOS updates. Mojave patch will be: <key>DW380 Bluetooth module: PID 0x413c/16700, VID 0x8197/33175</key> <dict> <key>CFBundleIdentifier</key> <string>com.apple.iokit.BroadcomBluetoothHostControllerUSBTransport</string> <key>IOClass</key> <string>BroadcomBluetoothHostControllerUSBTransport</string> <key>IOProviderClass</key> <string>IOUSBHostDevice</string> <key>LMPLoggingEnabled</key> <true/> <key>idProduct</key> <integer>33175</integer> <key>idVendor</key> <integer>16700</integer> </dict> Example for Mojave: FakeSMC_with_DW380_injection.kext.zip NB: DW380 obviously requires Rehabman's firmware patching kexts to run properly (BrcmFirmwareRepo + BrcmPatchRAM2).
-
Choice is extremely limited as far as M.2 cards are concerned: DW1560 (BCM4352) -> patch required DW1830 (BCM4360) -> works OOB DW1820A (BCM4350) and related -> patch required but probably best avoided given the amount of headache & trouble it's given to users; no guarantee it'll work... I know of no other M.2 cards that are fully supported. There are Atheros cards of course but Mojave dropped support for those even though Atheros cards that worked up to High Sierra can be re-used under 10.14 once the Atheros40 kext from previous macOS release is re-installed. This being said, M.2 cards based on AR946x/AR9565/AR9485 chips are not supported to the full and only operate at limited rate. They require a re-written Atheros40 kext.
-
DW1830 is a 3 x antenna cards when most M.2 cards are 2 x antennas only. If you only connect 2 x antennas to the DW1830, it'll not run at full speed.
-
Tried Karabiner app ?
-
Bad slot maybe. There are 3 x mini-PCIe slots, try the other 2...
-
Optiplex 3046: trouble booting the USB installer (High Sierra / Mojave)
Hervé replied to Trunyce's topic in The Archive
There is a full Clover pack/instructions, stated as "fully working", available in post #2 of this Optiplex 3046 thread. Since you may not be using the same version of Clover, I would suggest you 1st install Clover on your UZB installer (whatever version) and then grab the ACPI folder + Config file + kexts folder from that thread and insert them in your own EFI folder. -
It's not a train I wanted to jump on but I've now experienced the issues reported by so many people; on a Latitude E7250 that I'm working on. None of my BCM4350 cards will work in it. I've tried: 2 x DW1820A 0VW3T3 (1028:0021) models that actually work 100% Ok in my Latitude 7490 1 x DW1820A 096JNT (1028:00xx) 1 x Foxconn T77H649.00 (17aa:075a) I believe I've tried everything that had been mentionned in this thread, including the pin masking (3 @front, 2 @rear); on all 4 cards; to no avail. Given that the 2 x 0VW3T3 run perfectly in the 7490, I suspect it's not just a matter of cards but, also or instead, an issue of M.2 slot and/or ACPI definition. I'm supposed to handover the E7250 to its owner by September 1st so I don't know if I'll have sussed out the issue by then. We'll see...
-
Make sure you've got your ACPI patches, Clover config and add-on kexts all right. You may refer to my E6230 guide: Naturally, all will work with a vanilla installation; no such guarantee with a distro...
-
I don't think you need to place the had-verbs in /usr/bin; 'never done it myself on any of my Hacks and they all run with AppleALC these days. You repaired permissions and rebuilt your cache after installing CodecCommander in /L/E, right?
-
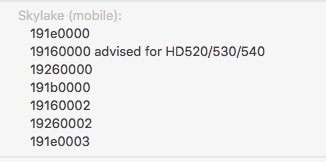
It's of course framebuffer related: your graphics are not initialising. Looking at Clover's listed layout-ids for mobile SKL, you'll see the following list: As such, I have doubts about your injected layout-id 19260000. I would have expected that a setup where you fake HD530 id 8086:191b and inject layout-id 19160000 would get you there. You need to use the correct SMBIOS profile of course.
-
How did you use it? It has to go to /L/E to be cached, not injected from E/C/k/O...
-
I believe I had explained in may guide that combining compatibility with 14e4:4353 injection + boot parameter brcmfx-driver=1 caused issues to me. Try without the boot parameter. What's interesting though -and that's probably key- is that your system runs Ok if you restrict the card to 40MHz. But is that on the 5GHz or, presumably, the 2.4GHz network band?
-
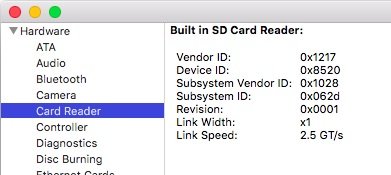
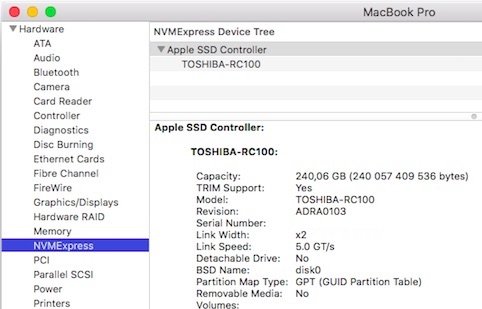
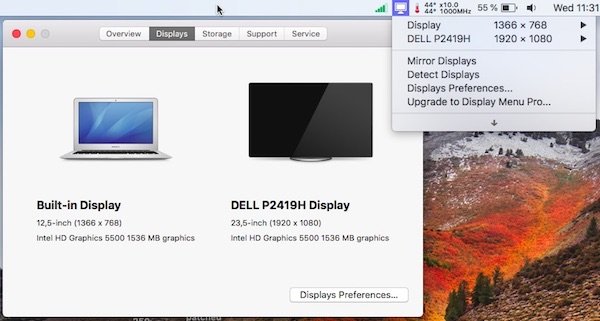
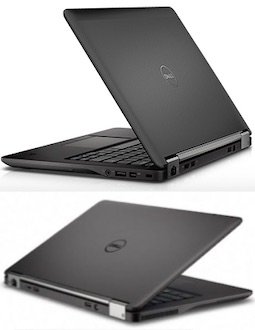
Last update: 29 Aug 2019 Specifications: BIOS A21 with HDD set to AHCI mode Intel Wildcat Point LP Series 9 chipset Intel dual-core Broadwell i5-5300U 2.30GHz CPU (Turbo boost to 2.7GHz (2 cores) or 2.9GHz (1 core)) Integrated Intel HD5500 graphics (300MHz/900MHz) (PCI ven id 0x8086, dev id 0x1616) 12.5" 1366x768 HD non-touch LCD 4GB DDR3L-1600 RAM Intel I218LM Gigabit Ethernet (PCI ven id 0x8086, dev id 0x15a2) Realtek ALC293 High Def audio (PCI ven id 0x10ec, dev id 0x0293) O2 Micro SD card reader (PCI ven id 0x1217, dev id 0x8520) Internal-USB Surplus Innovation Technology webcam (PCI ven id 0x1bcf, dev id 0x28ae) 3 x USB 3.0 ports (1 x with power share) 1 x mini DisplayPort 1 x HDMI v1.4 1 x 35mm combo headset/microphone jack 1 x SmartCard reader 1 x optional NFC/fingerprint reader 1 x internal mSATA slot for SSD 1 x internal M.2 2230 WLAN slot (key A/E) 1 x internal M.2 3042 WWAN slot (key B), supports M.2 NVME SSD (eg: PCIe Gen3 x2 Toshiba RC100) but not directly bootable E7250:~ admin$ lspci -nn 00:00.0 Host bridge [0600]: Intel Corporation Broadwell-U Host Bridge -OPI [8086:1604] (rev 09) 00:02.0 VGA compatible controller [0300]: Intel Corporation HD Graphics 5500 [8086:1616] (rev 09) 00:03.0 Audio device [0403]: Intel Corporation Broadwell-U Audio Controller [8086:160c] (rev 09) 00:04.0 Signal processing controller [1180]: Intel Corporation Broadwell-U Processor Thermal Subsystem [8086:1603] (rev 09) 00:14.0 USB controller [0c03]: Intel Corporation Wildcat Point-LP USB xHCI Controller [8086:9cb1] (rev 03) 00:16.0 Communication controller [0780]: Intel Corporation Wildcat Point-LP MEI Controller #1 [8086:9cba] (rev 03) 00:19.0 Ethernet controller [0200]: Intel Corporation Ethernet Connection (3) I218-LM [8086:15a2] (rev 03) 00:1b.0 Audio device [0403]: Intel Corporation Wildcat Point-LP High Definition Audio Controller [8086:9ca0] (rev 03) 00:1c.0 PCI bridge [0604]: Intel Corporation Wildcat Point-LP PCI Express Root Port #1 [8086:9c90] (rev e3) 00:1d.0 USB controller [0c03]: Intel Corporation Wildcat Point-LP USB EHCI Controller [8086:9ca6] (rev 03) 00:1f.0 ISA bridge [0601]: Intel Corporation Wildcat Point-LP LPC Controller [8086:9cc3] (rev 03) 00:1f.2 SATA controller [0106]: Intel Corporation Wildcat Point-LP SATA Controller [AHCI Mode] [8086:9c83] (rev 03) 00:1f.3 SMBus [0c05]: Intel Corporation Wildcat Point-LP SMBus Controller [8086:9ca2] (rev 03) 01:00.0 SD Host controller [0805]: O2 Micro, Inc. SD/MMC Card Reader Controller [1217:8520] (rev 01) E7250:~ admin$ For recommended BIOS settings, see here.
-
New pack #3 posted with the missing kext added. Sorry about that.
-
For P530, did you try faking the iGPU id of a regular HD530 instead? I have not looked but there's a chance P530's id is not included for cover by the SKL framebuffer...
-
First of all, no double post on the forum please! Did I forget or remove the USBPorts or USBInjectAll from the booptack? If so my mistake and my apologies, I'll add it later once I'm back on my E6230 Hackintosh. Meantime what you can do is download Rehabman's USBInjectAll and install it in /L/E. Repair permissions, rebuild your cache and reboot. You'll then be able to generate the USBPorts kext from Hackintool app. Regarding what you call "stock Bluetooth", I guess you mean the optional internal DW380 module, right? If you look in the earlier guides like El Capitan or Sierra, you'll see how these can be fully enabled, knowing that it is not BT 4.x but older. Mine is disabled in BIOS because I run with an Apple BCM4360CD in a mini-PCIe adapter in the WWAN slot. DW380 will work with the good old Bluetooth Transport patch + Rehabman's firmware patching kexts. I used to include the transport patch in FakeSMC (it's a little and simple injection) and you'd have to adjust it to Mojave since Apple were in the habit of changing those transport kexts every time a new OS X/macOS version came out.
-
EDID cannot be injected "elsewhere"; it's either properly injected or not at all. But given that your wake issues also affect mouse, wireless networking and the Finder, I very much doubt that it's all EDID related.
-
And beta #6 is a complete doddle!
-
Those BIOS settings would indeed NOT influence anything. This being said, I wrote the BIOS parameters thread when running BIOS 1.8.0; I now run with BIOS 1.11.0 and those parameters are still present, at least on my 7490... At this point of time, 1.11.0 is the lastest version posted by Dell for this model. I slightly modified the bootpack late yesterday. Install Clover as per the guide and then, afterwards, transfer the files and folder of the bootpack to the EFI/CLOVER folder of your mounted EFI partition.
-
'bit of old news but as identified here by @Sherlocks back in March, the above AppleRTC patch is no longer applicable to Mojave from version10.14.4. The code has changed even if the kext's version remained set to v2.0. The new patch to be used from 10.14.4 is: Find: 75 33 0F B7 Replace by: EB 33 0F B7 This was included to Clover's AppleRTC patch from version r4911. Patched_AppleRTC_10.14.6.kext.zip